 The second part of the series covered the basics of the PowerShell programming language, but now it’s worthwhile to figure out how to use the code written on it for administrative tasks. The most obvious way to do this is to run the script. In addition to it, it is possible to create your own cmdlets.
Table of contents:
Positional parametersParam () blockAdditional parameter attributesPassing parameters through the pipelineFunction body structureAttribute [CmdletBinding ()] and advanced functionsScripting modules and creating cmdletsPositional parameters
In scripts and functions, you can pass positional parameters (arguments) whose values are written to the $ args built-in variable. This one-dimensional array does not require prior declaration, and its scope is limited to a script or function. For example, run the simplest script:Write-Host " :" $args.count
Write-Host ":" $args
 In functions, positional parameters are used in the same way:
function Print-Args {
    Write-Host " :" $args.count
    Write-Host " 0:" $args[0]
    Write-Host " 1:" $args[1]
}
Print-Args “Zero” “One”Please note that when calling Print-Args we do not put a comma between the parameters: it is not an array that is passed to the function, but individual values that are written to the one-dimensional array $ args - its scope is limited by the body of the function.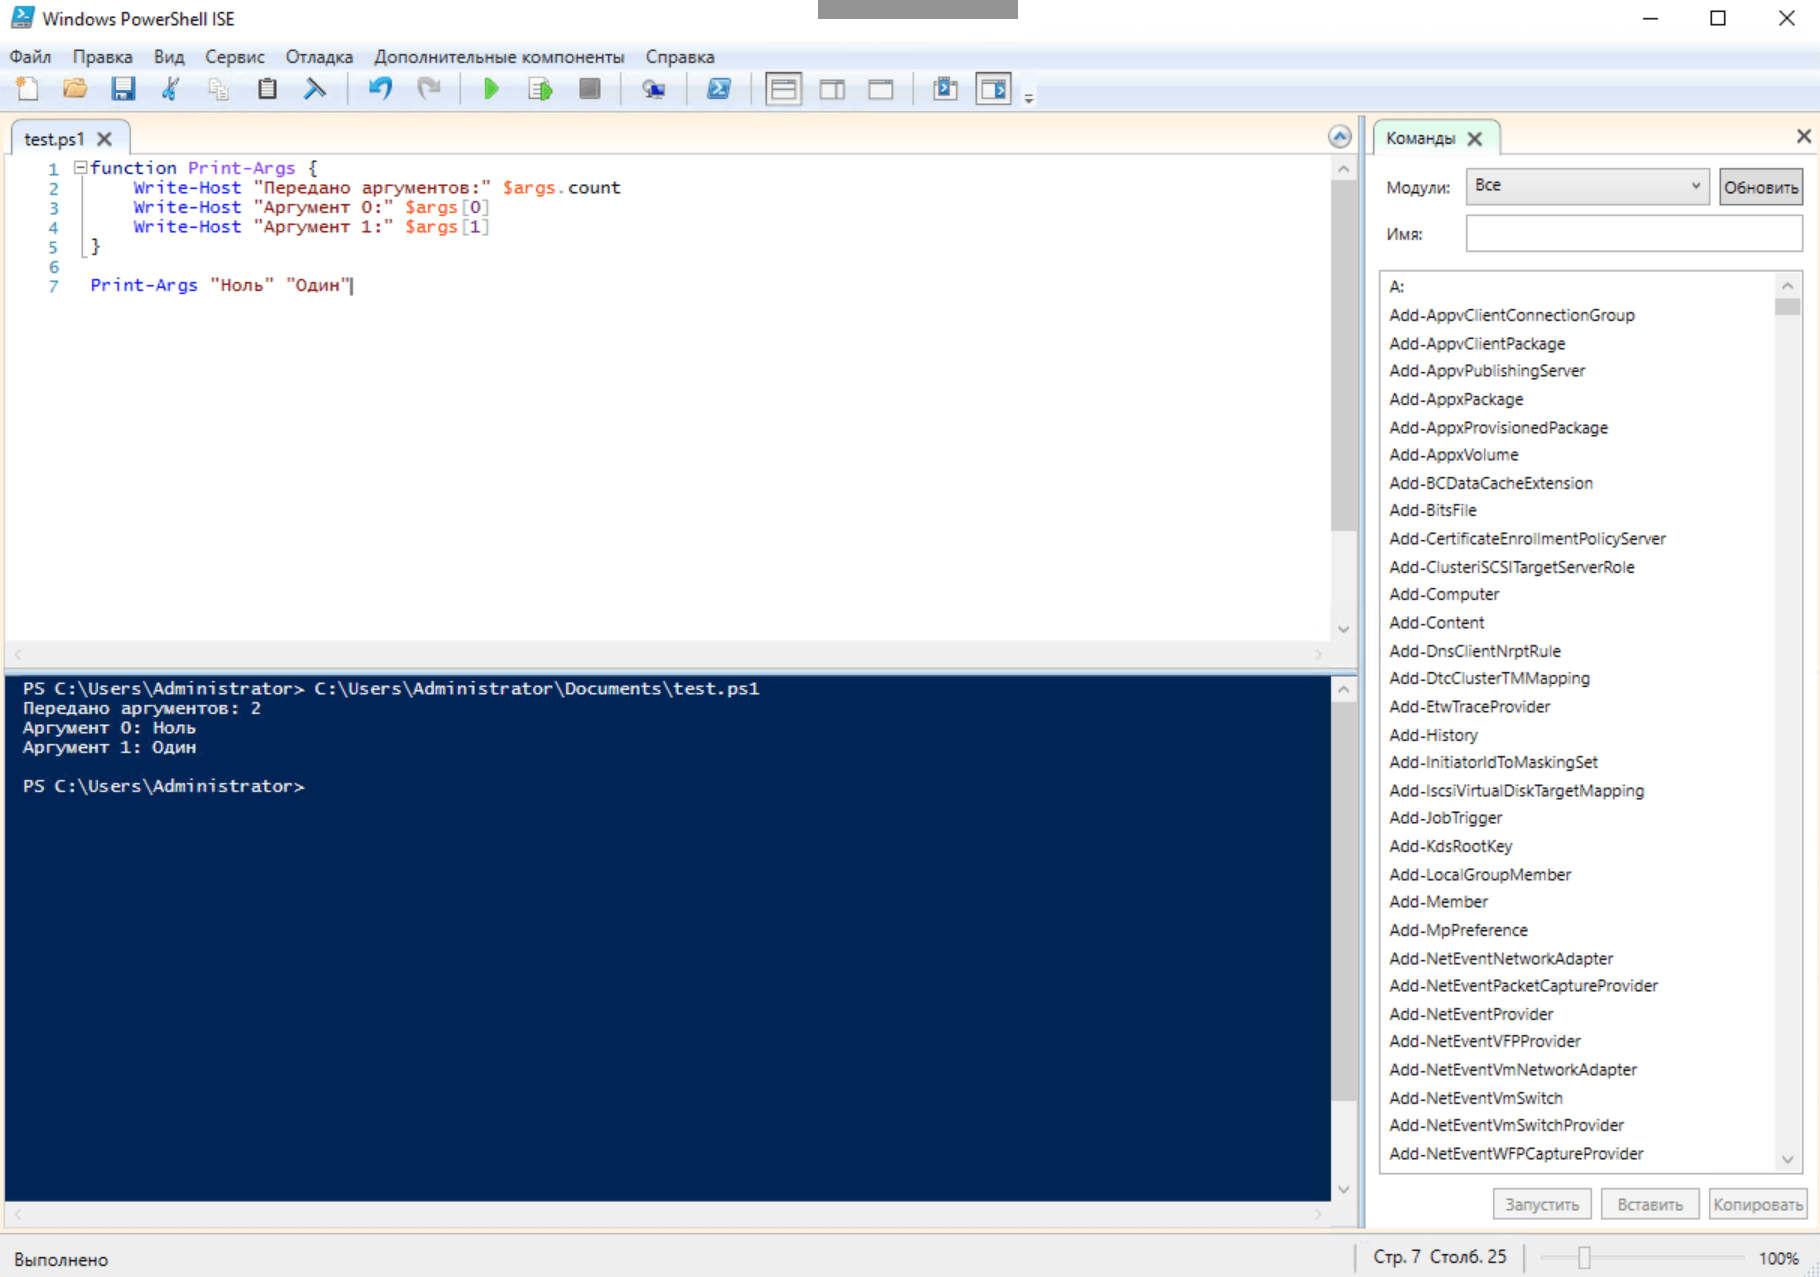 The method described above allows you to pass any number of parameters to a script or function, but when calling you must follow the order of their sequence, and you can access them only by the index of the array - this is not always convenient.
Param block ()
In scripts and functions, it is much more convenient to use named parameters. In a previous article, we talked about one way to describe them:function test ($arg0, ..., $argN)
{
}
A similar syntax is familiar to developers, but when a function is called, the parameters (if any) are separated by spaces, and are not enclosed in parentheses - a certain dissonance arises. This is the specificity of shell languages: for working with the shell in interactive mode, spaces between values are much more convenient. The test ($ value0) call is also correct, but the parameter in this case is the entire expression in parentheses, i.e. ($ value0) instead of $ value0 . Passing in this way several parameters will not work. As a result of calling test ($ value0, $ value1), the function will receive only one - an array of two elements with values $ value0 and $ value1 .Microsoft Corporation recommends using the Param () block - this syntax is more universal and allows you to specify not only function arguments, but also script parameters:param (
$arg0, $arg1
)
Write-Host $arg0 $arg1
 In the body of the function, it looks like this:
function test {
     param (
           $arg0, $arg1
     )
}
If the argument list of the function is small, the Param () block will only clutter the design, but in many cases it makes the code more readable and is, among other things, an element of a good programming style.Additional parameter attributes
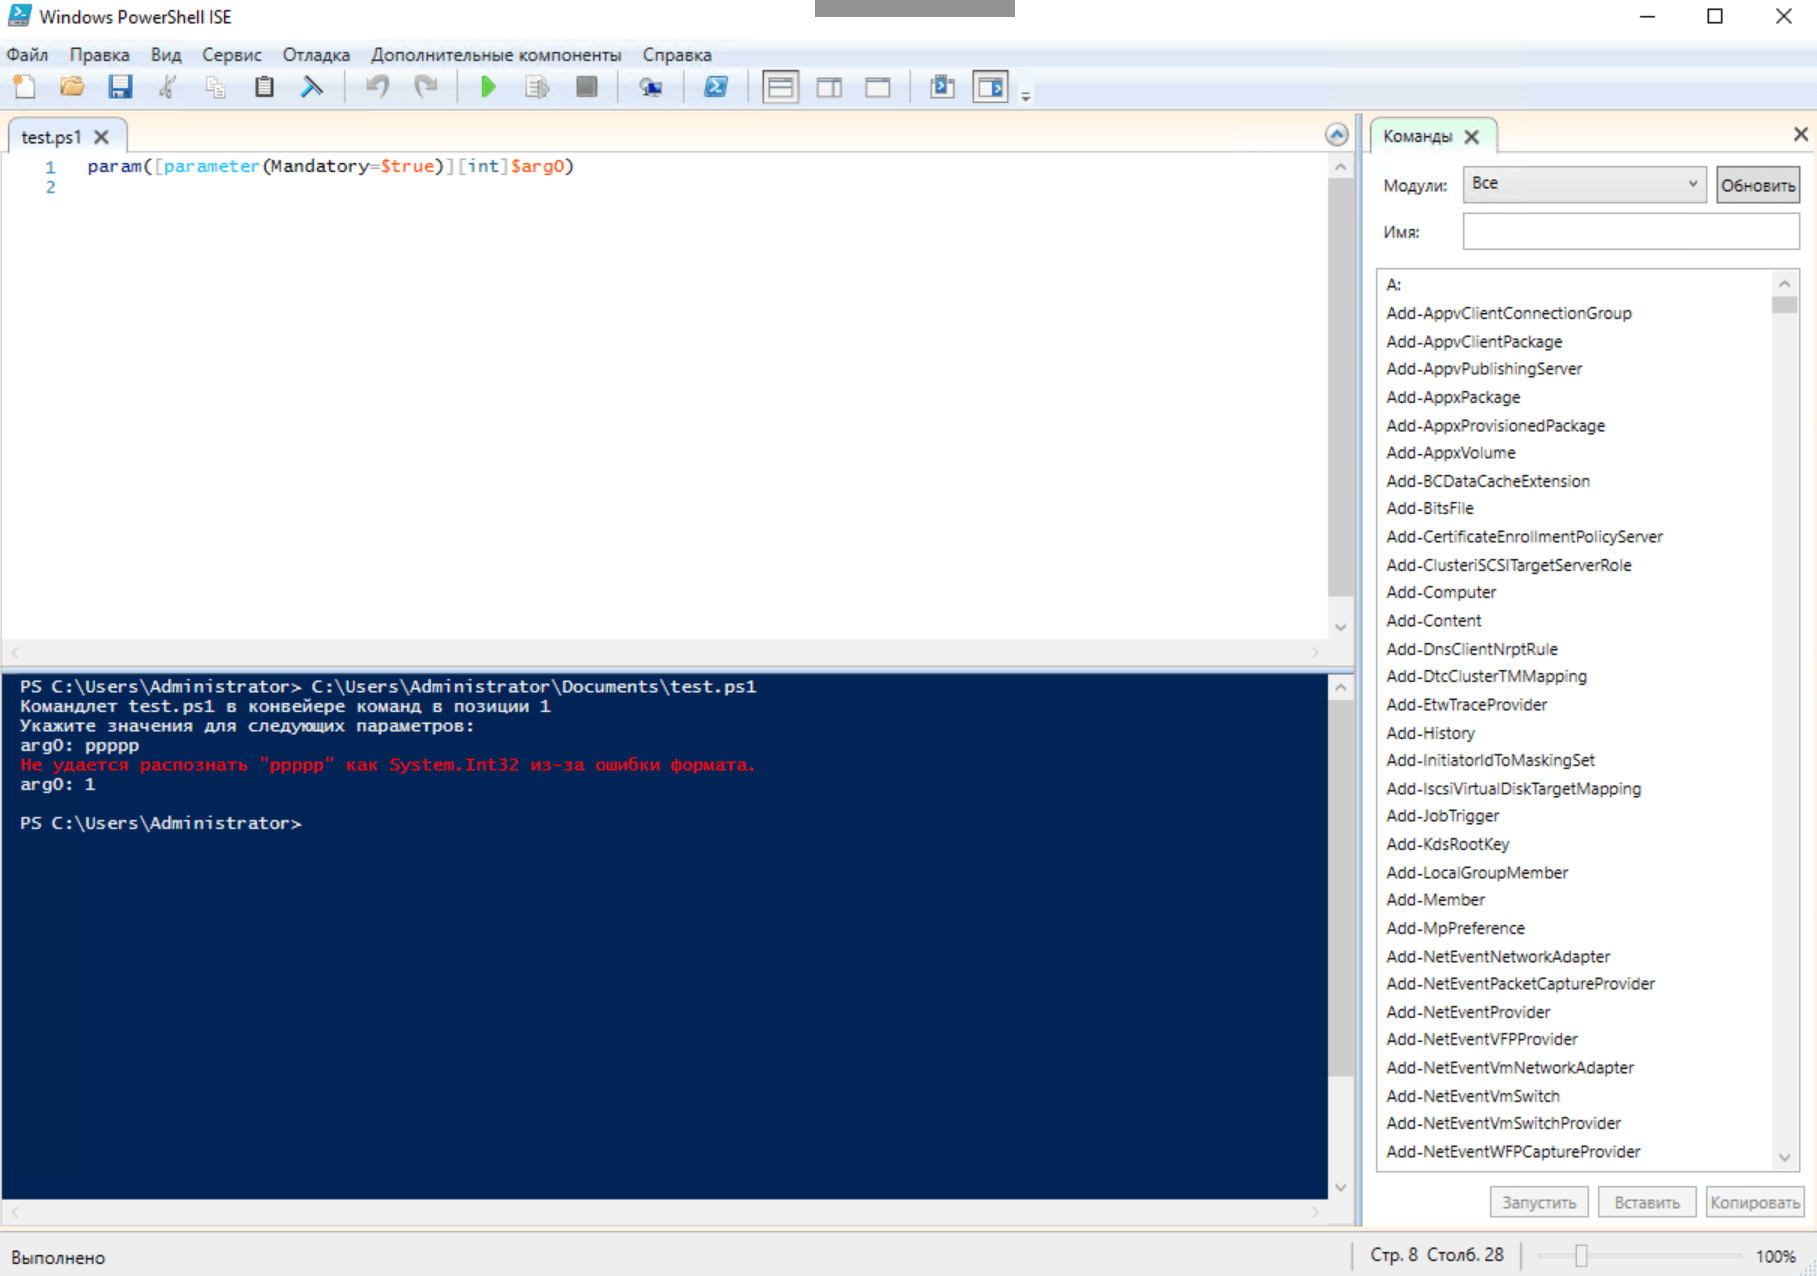
When describing function arguments or script parameters, their additional attributes can be set. The simplest example is a forced installation of the type:param([int]$arg0)
orfunction test ([int]$arg0) {
}
In addition to type casting, you can use the [parameter ()] attribute:param(
[parameter(Argument1=value1, Argument2=value2)]
$ParameterName
)
With its help it is easy to make the parameter mandatory. Pay attention to the simultaneous use of several attributes - in this case they follow each other:param([parameter(Mandatory=$true)][int]$arg0)
orfunction test ([parameter(Mandatory=$true)][int]$arg0) {
}
orfunction test {
parameter([parameter(Mandatory=$true)][int]$arg0)
}
 Position allows you to specify the order of the parameter (by default, it corresponds to the order of the declaration):
param(
                    [parameter(Mandatory=$true, Position=0)]
                    [int]
                    $arg0,

                    [parameter(Position=1)]
                    [string]
                    $arg1,

                    [parameter(Position=2)]
                    [array]
                    $arg2
)
The [Parameter ()] attribute has other arguments, a complete list of which is available on the Microsoft website . Other attributes are described there, with the help of which you can validate the passed values, check them using regular expressions, etc. Here are a few:[Alias ()] sets an alias for the parameter:param(
[parameter(Mandatory=$true)]
[alias("ARG","ArgumentName")]
[string[]]
$arg0
)
The cast operator [string []] means that the parameter value is a string array.[AllowNull ()] allows $ null as a required parameter:param(
[parameter(Mandatory=$true)]
[AllowNull()]
[string]
$arg0
)
[AllowEmptyString ()] allows an empty string as a required parameter:param(
[parameter(Mandatory=$true)]
[AllowEmptyString()]
[string]
$arg0
)
[AllowEmptyCollection ()] allows an empty array as a required parameter:param(
[parameter(Mandatory=$true)]
[AllowEmptyCollection()]
[string[]]
$arg0
)
[ValidatePattern ()] validation using a regular expression:param(
[parameter(Mandatory=$true)]
[ValidatePattern("[0-9][0-9][0-9][0-9]")]
[string[]]
$arg0
)
[ValidateLength ()] checks the length of a string parameter:param(
[parameter(Mandatory=$true)]
[ValidateLength(1,10)]
[string]
$arg0
)
Passing parameters through the pipeline
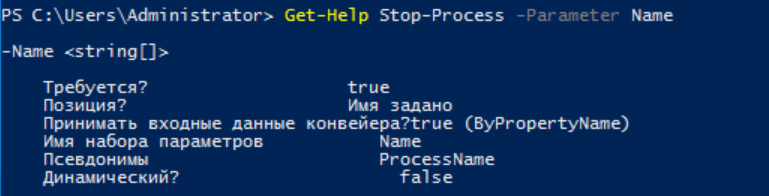
In the first article in the series, we talked about the possibility of transferring data to cmdlets through a pipeline. In PowerShell, cmdlets and functions return objects or arrays of objects (results of statements), and also receive them at the input. To see this, we prepare one of the cmdlets using Get-Help:Get-Help Stop-Process -Parameter Name
 Through the pipeline, you can accept parameter values for which the corresponding attributes are set (ByValue and / or ByPropertyName). In the first case, the parameter will be matched with an object received via the pipeline, provided that its type corresponds to the expected one. In the second parameter value will be the property of the incoming object whose name corresponds to the name or alias of this parameter. To set the attributes, use [parameter ()] with the boolean arguments ValueFromPipeline and ValueFromPipelineByPropertyName, whose default value is $ false:
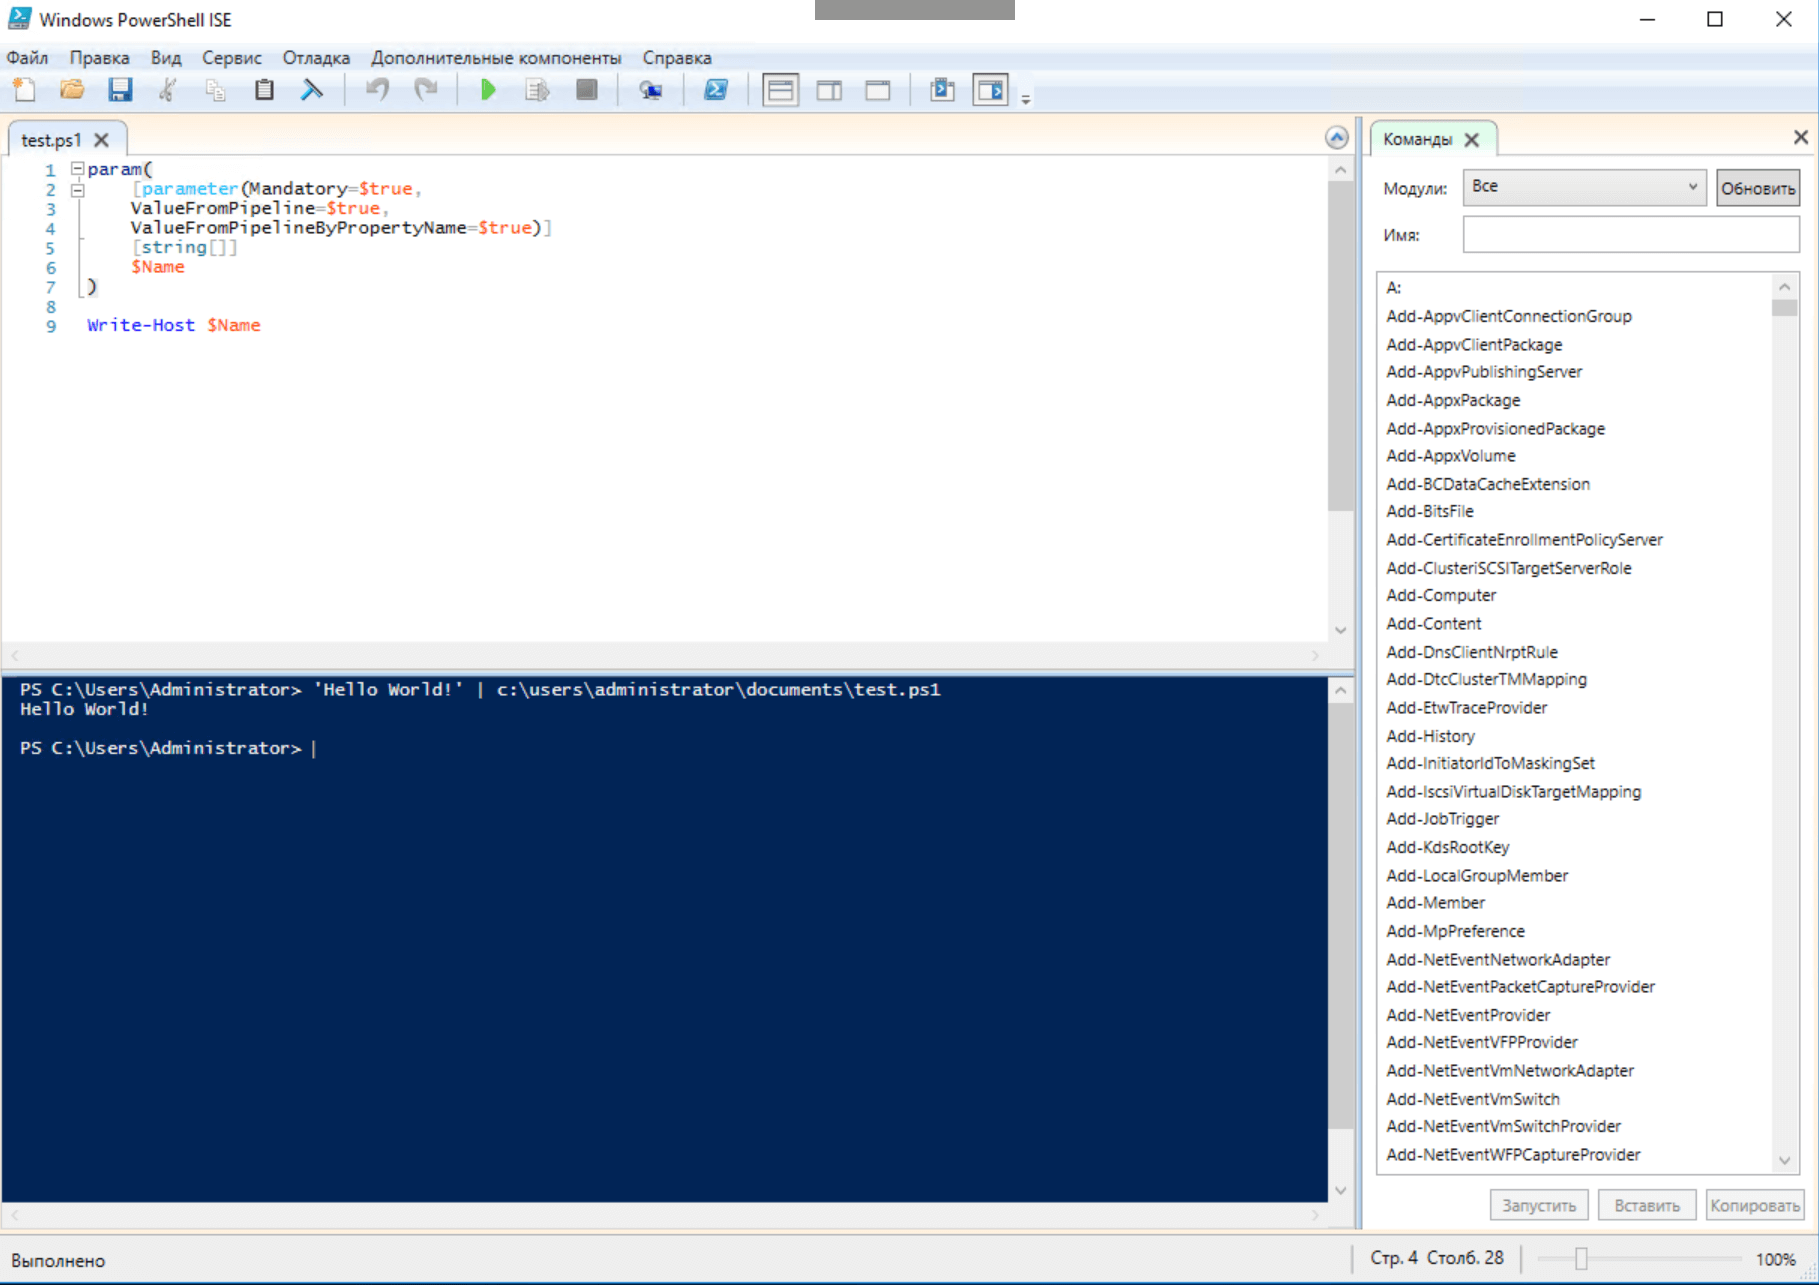
param(
    [parameter(Mandatory=$true,
    ValueFromPipeline=$true)]
    [string[]]
    $Name
)
orparam(
[parameter(Mandatory=$true,
ValueFromPipelineByPropertyName=$true)]
[string[]]
$Name
)
ValueFromPipelineByPropertyName is usually used if necessary to pass several parameters so that there is no confusion, and the argument can be used simultaneously with ValueFromPipeline:param(
[parameter(Mandatory=$true,
ValueFromPipeline=$true,
ValueFromPipelineByPropertyName=$true)]
[string[]]
$Name
)
Write-Host $Name
 As you can see, scripts can also receive parameters through the pipeline, but nevertheless, the practical application of the attributes described above is more likely for advanced functions , which will be discussed below.
Function body structure
In PowerShell, a function can include three optional blocks of code enclosed in statement brackets - Begin, Process, and End. It looks something like this:function test
{
param()
begin {}
process {}
end {}
}
The Begin block is the first to be executed once, and if the parameters are passed to the function through the pipeline, the code will run before the first object arrives for processing. The $ _ and $ PSItem variables in the Begin block in this case will not contain values. If the function is called using explicitly specified parameters, they will be available in the Begin block, since there is no need to wait for objects to be received from the pipeline. Next, the Process block is executed: if the parameters are passed through the pipeline, it will be launched one by one for each object. In the case of explicitly specified parameters, the Process block starts only once. The function ends by executing the End block once. Obviously, the use of these constructions is justified only if the function can receive objects from the pipeline:function test
{
param(
[Parameter(ValueFromPipeline)]
[string[]]
$Param1,
[string]$Param2
)
begin
{
Write-Host " Begin"
Write-Host " ( pipeline):" $Param1
Write-Host " ( ):" $Param2
}
process {
Write-Host " Process"
Write-Host " ( pipeline):" $Param1
Write-Host " ( ):" $Param2
}
end
{
Write-Host " End"
Write-Host " ( pipeline):" $Param1
Write-Host " ( ):" $Param2
}
}
'one', 'two', 'three' | test -Param2 'four'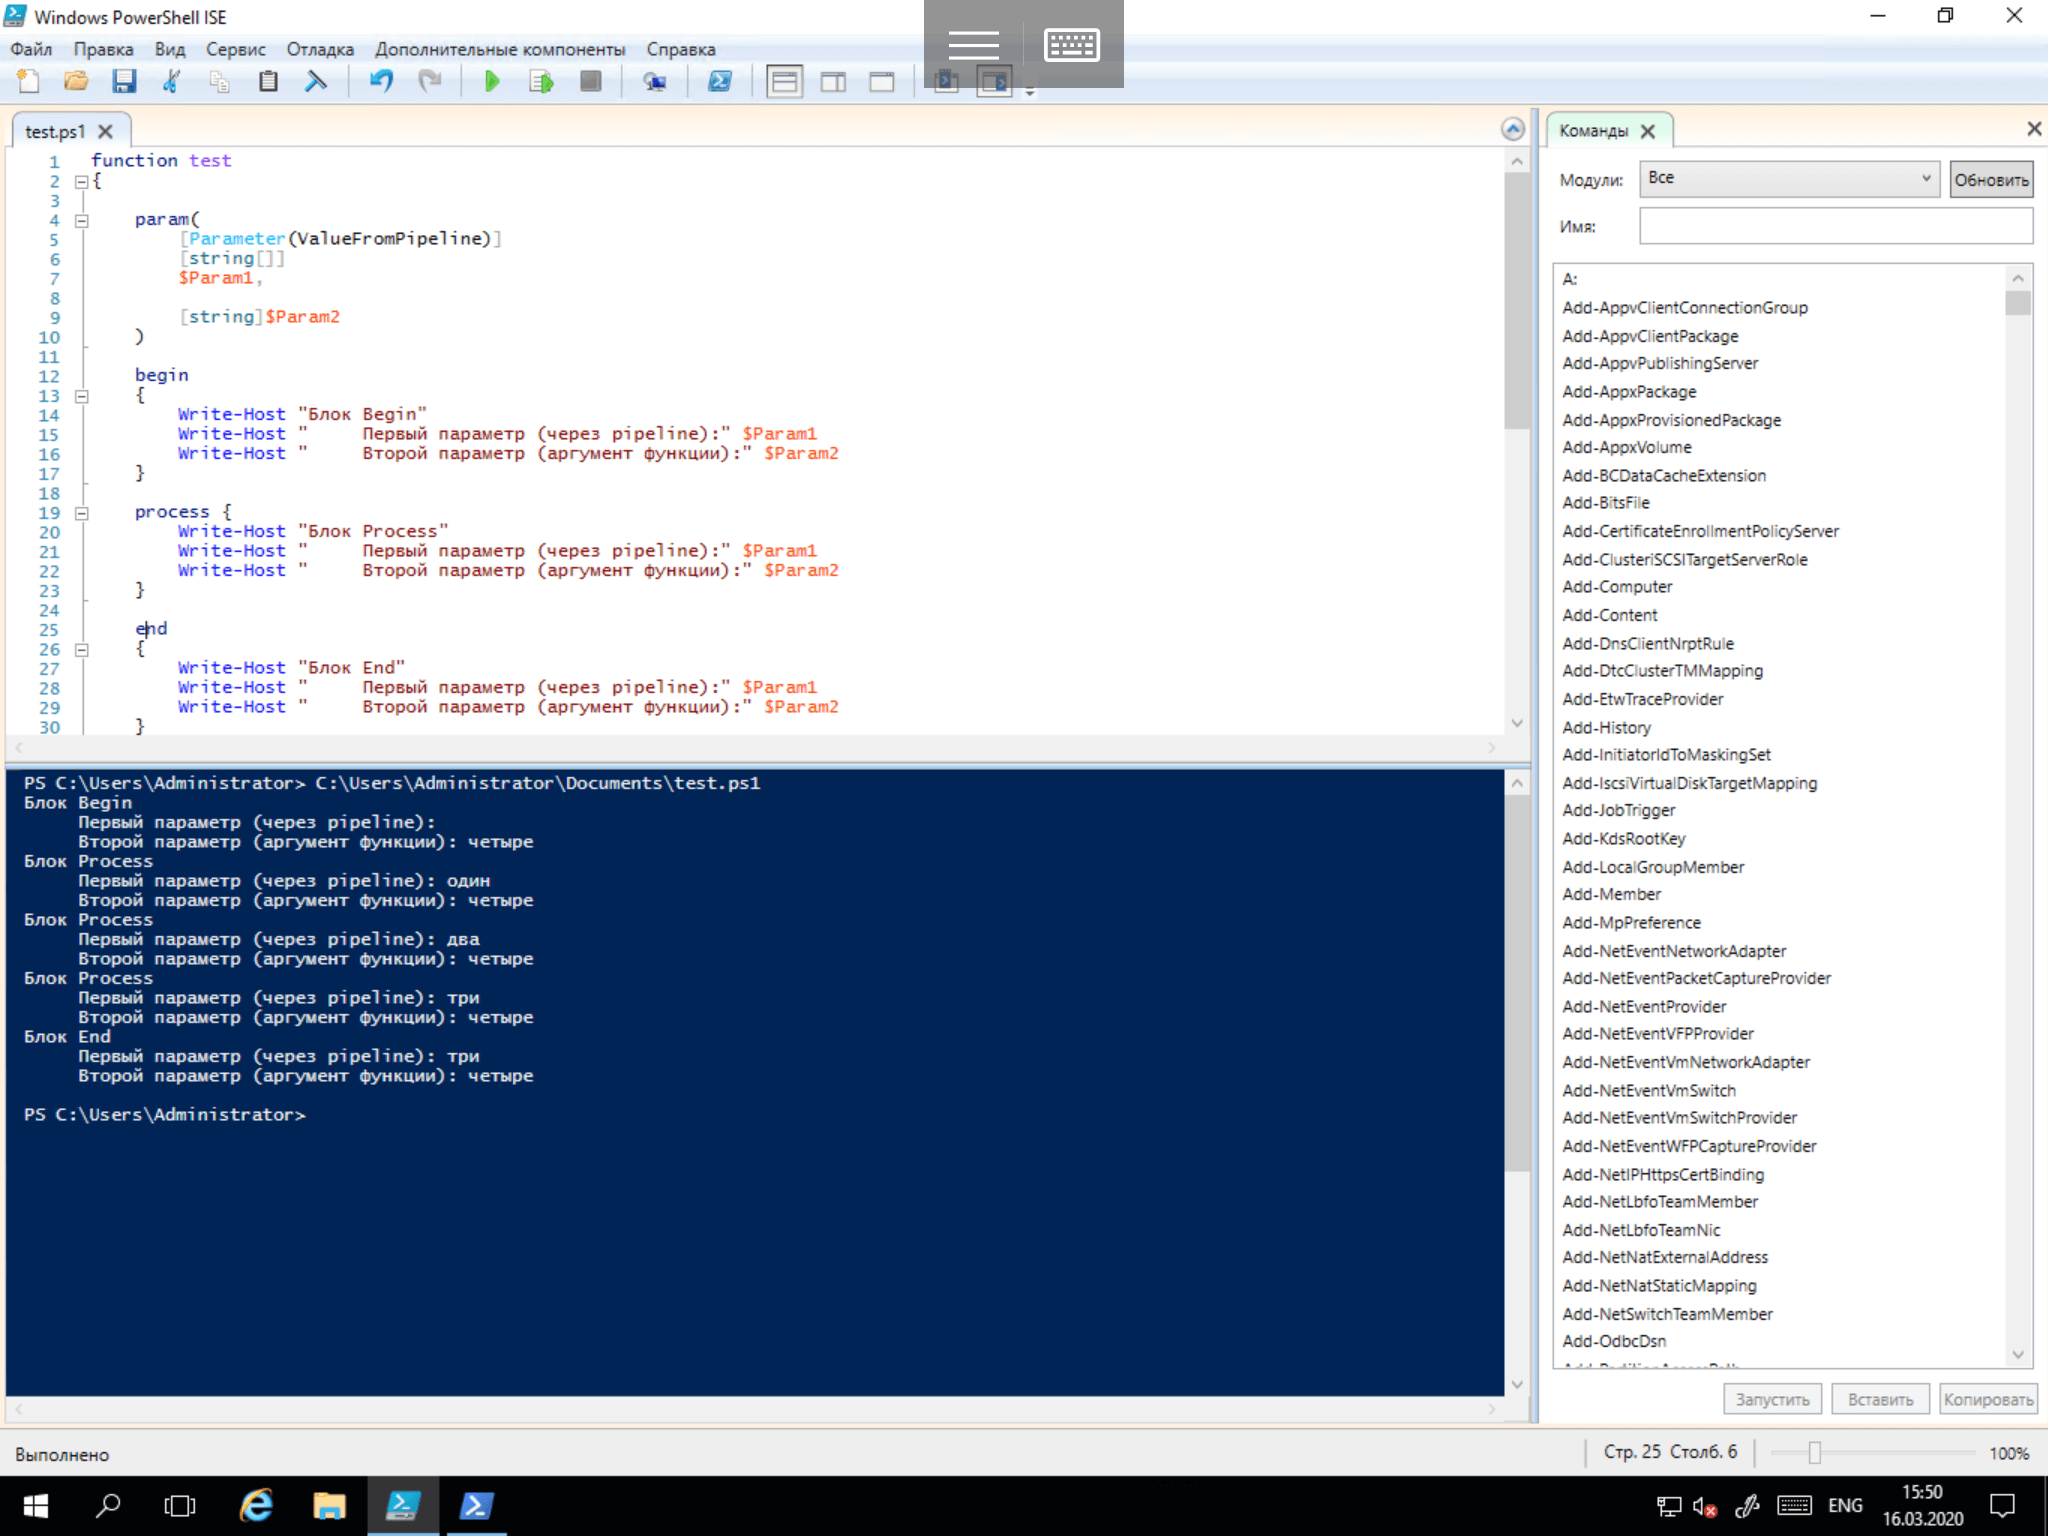
[CmdletBinding ()] Attribute and Advanced Functions
To create “advanced” functions (and scripts strictly speaking), you can use the [ CmdletBinding () ] attribute . In particular, it allows you to define advanced functions with the capabilities of binary cmdlets compiled in Visual Studio, which are classes of .NET Core classes. Since this attribute is used mainly in functions, we will stop on them:function <Name>
{
[CmdletBinding(ConfirmImpact=<String>,
DefaultParameterSetName=<String>,
HelpURI=<URI>,
SupportsPaging=<Boolean>,
SupportsShouldProcess=<Boolean>,
PositionalBinding=<Boolean>)]
Param ()
Begin{}
Process{}
End{}
}
In fact, [CmdletBinding ()] initializes a new instance of the CmdletBindingAttribute class by calling the constructor, to which optional arguments can be passed. Their detailed description is on the Microsoft website . The CmdletBinding attribute allows you to control additional features of the advanced function: adding support for -Confirm and -WhatIf (via SupportsShouldProcess), -Force, -Verbose and -Debug, as well as disabling positional parameter binding, etc. Further we will analyze the use of special parameters.The -Force parameter is used to suppress requests for various operations;-WhatIfneeded to emulate the launch and display information about the consequences of executing a function (command) without this parameter. Commonly used if a function can perform destructive actions.Remove-Item C: \ Windows \ notepad.exe -WhatIf -Confirm requires confirmation and is also used if the function can perform destructive actions.
function Delete-File {
[CmdletBinding(
    ConfirmImpact = 'High',
    SupportsShouldProcess = $true
)]
    param(
        [string]$File,
        [switch]$Force
    )
    if ($Force -or $PSCmdlet.ShouldProcess($File,"Delete file")) {
        Remove-Item $File
    }
}
 To process -WhatIf and / or -Confirm, the ShouldProcess method (SupportsShouldProcess = $ true) is called, which either prompts or emulates the execution of the command. To implement -Force processing, we put it first in the IF condition. First, the expression to the left of the -or operator is checked, and if it is true, the test stops - the ShouldProcess method will not be called. Also, in the [CmdletBinding ()] attribute, we specified the ConfirmImpact argument, which determines the level of influence of the code on the system and includes the -Confirm parameter handler. This argument can take the following values:None or not specified - confirmation messages will not be displayed, even if the -Confirm parameter is passed.Low - the function slightly affects the system and does not create significant risks of data loss.Medium - medium exposure with little risk of data loss as a result of destructive actions.High - the code creates a high risk of data loss as a result of destructive actions.By default, for a PowerShell session, the exposure level is considered High. The current value is stored in the $ ConfirmPreference variable, and if the code has the same or higher level of impact on the system, a confirmation request will always be displayed.Options -Verbose and -Debugneeded to display debugging information. Their use is considered a good programming style (forget about Write-Host, this is not necessary in advanced functions). The first parameter displays information about the progress, and the second - detailed debugging information. It also makes it possible to switch to step-by-step code execution. The behavior of -Verbose and -Debug is defined like this:
function Get-Something {
[CmdletBinding()]
    param()
    if ($PSBoundParameters.Verbose) {$VerbosePreference = "Continue"}
    if ($PSBoundParameters.Debug) {$DebugPreference = "Continue"}
    Write-Verbose "Type some verbose information"
    Write-Debug "Type some debug information"
}
To work with special parameters, we used the $ PSBoundParameters variable. By default, the values of $ VerbosePreference and $ DebugPreference are equal to 'SilentlyContinue', therefore, even if the corresponding parameters are specified, debugging information will not be displayed - they must be transferred to the 'Continue' state.Script Modules and Cmdlet Creation
Let's start creating our own cmdlets. In fact, these are advanced functions that are described in the so-called script modules - text files with the extension .psm1. They are stored in directories defined in the environment variable PSModulePath. You can view the paths to them using the following command:Get-ChildItem Env: \ PSModulePath | Format-Table -AutoSizeThe standard set looks something like this:C: \ Users \% UserName% \ Documents \ WindowsPowerShell \ ModulesC: \ Program Files \ WindowsPowerShell \ ModulesC: \ Windows \ System32 \ WindowsPowerShell \ v1.0 \ ModulesAfter creating the ModuleName.psm1 file with the extended Delete-File function from the previous section, you need to save it, for example, in] C: \ Users \% UserName% \ Documents \ WindowsPowerShell \ Modules \ ModuleName. Please note that the script module must be stored in a separate subdirectory, the name of which coincides with the base name (without extension) of the .psm1 file. After running the Import-Module ModuleName command , the Delete-File function will become available to the user, and since it is advanced, from the practical point of view it is the same cmdlet. In this article, we have examined in sufficient detail the passing of parameters to functions and scripts. The next part of the series will focus on object-oriented programming.Part 1: Windows PowerShell Essentials2: Windows PowerShell4: ,
