Recently, as a hobby, I’m filming lectures of a familiar psychologist on video. I mount and publish the footage on my website. A month ago, I got the idea to organize a round-the-clock broadcast of these lectures on YouTube 24/7. A sort of thematic “channel” dedicated to personal growth.How to make a normal broadcast, I know. But how to make it a broadcast of video files? That she walked 24/7, was flexible, as autonomous as possible, and at the same time did not depend on my home computer. This was what I had to find out. It took several days to find a solution. I studied a lot of forums and various manuals without which my broadcast would simply not have turned out. And now, when the prank is a success, I feel the need to share my decision. So this article appeared.In short, the final solution was as follows: VPS + ffmeg + bash script . Under the cut, I describe the steps taken and talk about the "pitfalls" that were discovered during the broadcast.
Step 1 - where will the broadcast go from?
At the very beginning, it was necessary to determine where the broadcast will be conducted, where its source will be. The very first thing that came to mind was from a home computer . Collect videos into a playlist and play them in any video player. Then capture the screen image and broadcast it to YouTube. But I almost immediately dismissed this option. to implement it, you need to keep your home computer constantly on, and this is the noise from the coolers even at night and increased energy consumption (+ 100-150 kWh every month). And it turns out that you will not be able to use your home computer for the duration of the broadcast. any movement of the mouse will be visible in the broadcast.Then I began to look towards cloud services. I was looking for a ready-made service where you could upload your videos or, for example, insert links to videos from YouTube and it would all be packed into one non-stop broadcast. But I did not find anything suitable. Perhaps I was looking badly. The only thing ± suitable for the functionality is restream.io, a service that helps broadcast simultaneously on multiple platforms. They seem to be able to upload their videos. But this service was created for completely different purposes and they expect that the broadcast will last only a couple of hours. I think that if through this service it would have been possible to organize a round-the-clock broadcast, then this would have shot at tens, or even hundreds of dollars a month. But I still wanted to organize the broadcast either for free or with minimal financial investment.It became clear that you need to broadcasta separate device or even a separate computer. Thinking toward something like the Raspberri Pi. And what? He has no cooler. I recorded the video on a USB flash drive, stuck an Ethernet cable and let it lie somewhere in a secluded place, it’s broadcasting. Option. But I had neither the board itself nor the experience with it, so I also refused this option.In the end, I came across a discussion where they discussed creating your own serverbroadcasts. This was not exactly what I was looking for, but I caught the main idea - you can use the server! In that discussion, they suggested using a bunch of VPS + nginx + OBS. It became clear that this bunch could suit me. The only thing that confused me was that I never administered the server and it seemed to me that my dedicated server was confused and expensive. I decided to find out how much it would cost to rent a server in the minimum configuration and was pleasantly surprised. Prices are in Belarusian rubles and they are just crumbs. For understanding, 8 Belarusian rubles is somewhere around 3.5 dollars or 240 Russian rubles. For a month using a full-fledged computer that is turned on 24/7 and has fast Internet access. For some reason, this discovery was very joyful for me, and for several days I walked terribly pleased like a child who discovered space rockets :)By the way, I took advantage of the offer of the very first site that Google gave me on request “VPS rental”. Perhaps there are even more budget solutions, but this price suited me and I did not look further.When creating a server, you can select the operating system under which it will operate. On any of the listed systems, you can organize the broadcast and make a choice based on your preferences and financial capabilities (they ask for an additional fee for a server with Windows). I chose CentOS. Just because I used to have a little experience with her.
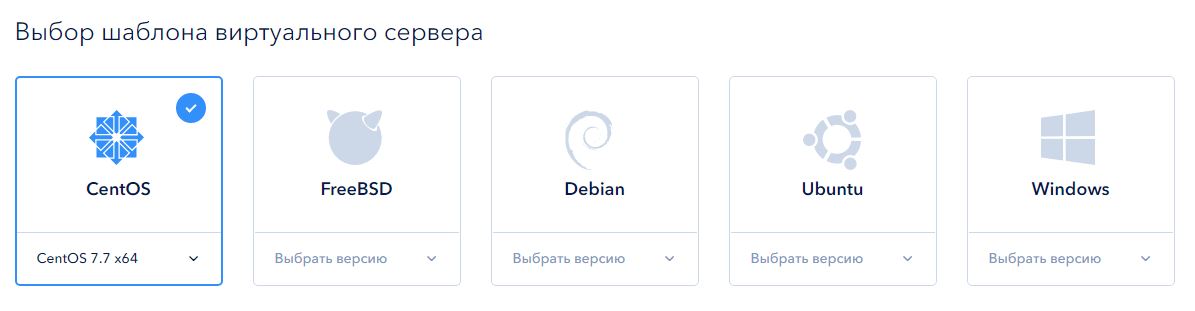
Step 2 - server setup
The first thing you need after creating the server is to connect to it via SSH. At first I used PuTTy, but then I started using the Secure Shell App, which runs on Google Chrome. So it turned out to be more convenient for me.Then I changed the host name, set up time synchronization on the server, updated the system, messed around with iptables ... and did a bunch of things, but not because it was necessary. It was just interesting for me to set up the server and it worked for me. I love when it turns out :)But those steps that need to be done:- Connect the EPEL repository.
- Raise FTP server (I chose vsftp).
- Install ffmpeg.
I will not give details of the team, this instruction is rather conceptual in order to convey a general plan of action. If you have any difficulties with any of the steps, they are quickly resolved by a query in a search engine like “CentOS connect EPEL” or “CentOS FTP server installation”. And at the first links you can find detailed step-by-step instructions.So, as I wrote earlier, I needed a bunch of VPS + nginx + OBS. VPS - ready. But here on the remaining points questions began to arise. OBS is a broadcast program, Open Broadcaster Software. And it only works with threads i.e. for example, it takes an image from a webcam and broadcasts it. Or screen recording. Or an already ongoing broadcast redirects to another site. And I do not have a stream, I only have a set of video files that I need to make a stream.He began to dig in this direction and came across ffmpeg. FFmpeg is a set of free open source libraries that allow you to record, convert and transfer digital audio and video recordings in various formats.And I was very surprised how much ffmpeg can do. If you want, it will pull the sound out of the video. If you want, it will cut out a fragment of the video without transcoding. If you want, it will convert from one format to another. And much, much more. Up to the point that you can specify a file for him, he will convert it to a stream and transfer it to YouTube himself. Everything, the chain is assembled. It remains only to refine the nuances.Step 3 - broadcast setup
We create a broadcast on YouTube. At this stage, we only need a link and a translation key. In the screenshot below, they are highlighted in red.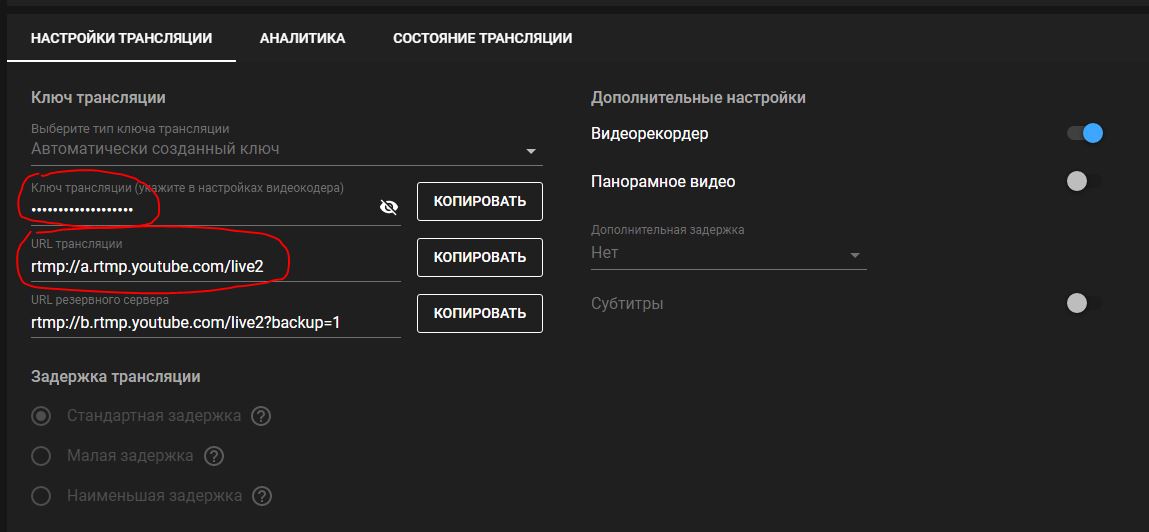 Next, upload the video files to the server that we plan to broadcast. Actually, FTP is only needed for this stage. If you have another convenient way to upload files to the server, then the FTP server can be left out.We stream to YouTube. To start broadcasting, you must run ffmpeg with several attributes. Here is the shortest command that I got:
ffmpeg -re -i lecture1.mp4 -f flv rtmp://a.rtmp.youtube.com/live2/%_%
Attribute Decryption-re – , .
-i – , . , , -. , /usr/media/lecture1.mp4.
-f – . , ffmpeg « » mp4 flv.
, YouTube .. , , , .
If you did everything correctly, then after running this command, YouTube will see the transmitted stream. To start the broadcast, you just have to click the “Start Broadcast” button in YouTube itself.Step 4 - add autonomy
Congratulations! Now you know how to start broadcasting from a video file. But this is not enough for round-the-clock broadcasting. It is important that after the first video has finished playing, the next one will start immediately, and when all the videos are shown, playback starts all over again.I came up with the following option: create a .sh file in which I registered a command for each video file and at the very end indicated a command to restart the same script. It turned out a kind of recursion: 1... ( lecture1.mp4)
2... ( lecture2.mp4)
3... ( lecture3.mp4)
bash start.sh
And yes, it worked. I, pleased with myself, started a test broadcast and went to sleep.An unpleasant surprise awaited me in the morning. It turned out that the broadcast went on just a couple of minutes and ended almost immediately as I turned off my computer. The investigation showed that the commands launched in this way are executed while the user is authorized on the server. As soon as I disconnected, the execution of the commands I started was interrupted. To prevent this from happening, it’s enough to bashadd the team before the team nohup. This will allow the running process to run regardless of your presence.The final minimum version of the script looks like this:ffmpeg -re -i lecture1.mp4 -f flv rtmp://a.rtmp.youtube.com/live2/%_%
ffmpeg -re -i lecture2.mp4 -f flv rtmp://a.rtmp.youtube.com/live2/%_%
ffmpeg -re -i lecture3.mp4 -f flv rtmp://a.rtmp.youtube.com/live2/%_%
nohup bash start.sh $
Where start.sh is the file in which this script is written. And this file should be located in the same directory as the video files.Adding a dollar sign at the end allows you to start the process in the background so that you can continue to use the console without interrupting broadcasting.From bonuses the following buns turned out:- You can manually switch the playback of files. To do this, you need to "kill" the currently running ffmpeg process. After that, playback of the next file from the list will automatically start.
- New videos can be added to the broadcast without stopping the broadcast. Just upload the video to the server, add the command to run this file in the script, save it. And that’s it. In the next round of playback, the new file will already be broadcast along with the old files.
Step 5 - configure ffmpeg
On this, in principle, one could stop. But I wanted to make the broadcast a little more friendly for the audience.Suppose a person went to the broadcast, started watching, he liked it and wanted to watch this lecture from the beginning, and the broadcast does not include rewinding. To view a lecture from the beginning, a person will need to go to my website and get a record of the lecture of interest. And how to understand what lecture interests him? The site has 16 lectures and every week there are only more. I think that even I, who shot and edited all these lectures, will not be able to determine which lecture it is from a random fragment. Therefore, it is necessary that each lecture be somehow designated.The option to add captions to the source video files in the editing program did not suit me. It was necessary to make sure that the original files were used. To support broadcast required from me as little body movements as possible.It turned out that ffmpeg can help me with this as well. It has a special attribute -vfthat allows you to put text on top of the video. To add text to the video, you need to add the following fragment to the command:-vf drawtext="fontfile=OpenSans.ttf:text=' 13\: . ?':fontsize=26:fontcolor=white:borderw=1:bordercolor=black:x=40:y=670"
Decoding of parametersfontfile= – . . . .
text= – , , .
fontsize= – .
fontcolor= – .
borderw= – ( 1 ).
bordercolor= – .
x= y= – . 0;0 . , 1280720 .
It looks like this: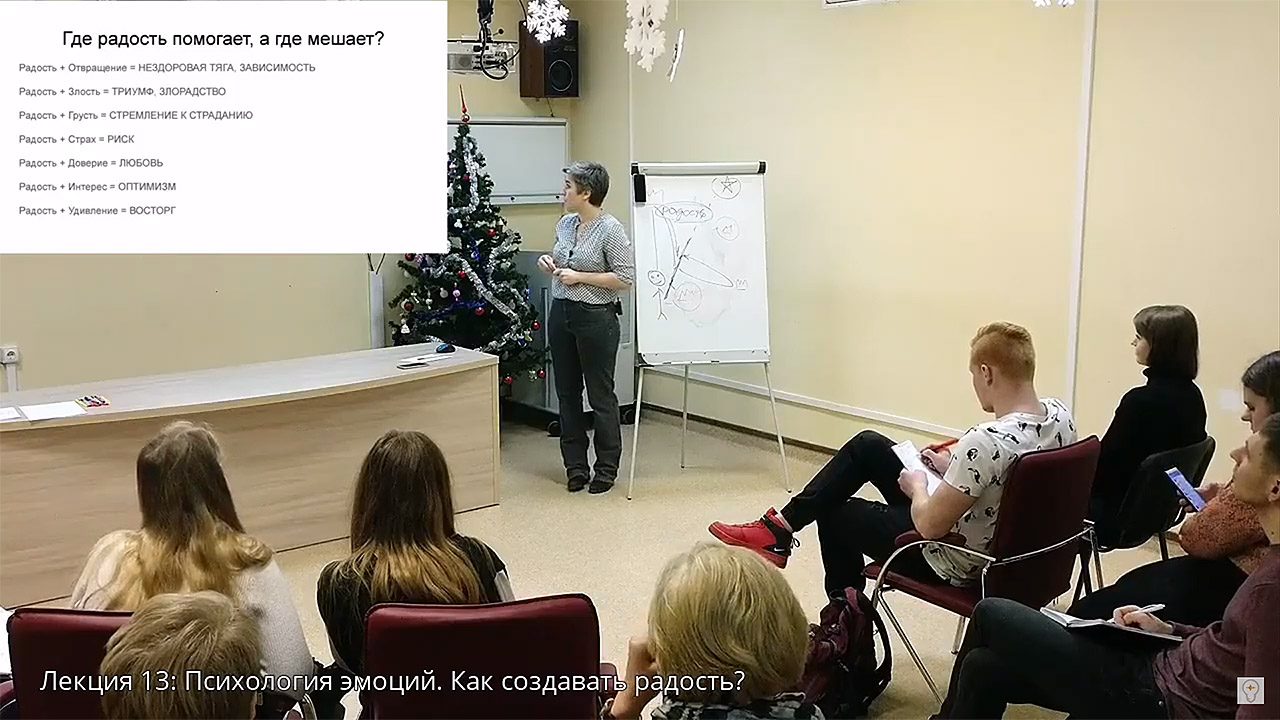
Step 6 - determine the broadcast quality
Everything, the broadcast is ready. FFmpeg broadcasts, files play, my presence is not needed for broadcast. Even every lecture is signed. Look like that's it.But another nuance surfaced - I chose the minimum server configuration and it did not pull the broadcast. Server configuration: 1 core (like 2.2 GHz), 1 gigabyte of RAM, 25 GB SSD. There was enough RAM, but the processor almost completely went into loading 100% (and sometimes even at 102-103% :) This led to the fact that the broadcast freezes once every few seconds. Ugly.You could just take a more expensive configuration with two cores, the benefit is that with cloud technologies, the server configuration is changed by pressing a couple of buttons. But I wanted to fit in the power of the minimum configuration. I began to study the ffmpeg documentation and yes, there are also settings there that allow you to adjust the load on the system.High image quality can be achieved in two ways: either a high processor load, or a large outgoing traffic. It turns out that the more the processor can take on the load, the less bandwidth the channel will need. Or you can not heavily load the processor, but then you will need a wide channel with a large margin of traffic. If there are restrictions both on the processor and on the size of the outgoing channel / traffic, then you will have to reduce the picture quality so that the broadcast goes smoothly.My server has a 10 Mbps channel. This width is straight with a margin. But there is a traffic limit - 1 TB per month. Therefore, in order to meet the traffic restrictions, my outgoing stream should not exceed ~ 300 Kb per second i.e. the bitrate of the outgoing stream should be no more than 2.5 Mbps. YouTube, by the way, just recommends broadcasting in such a bitrate.Ffmpeg uses different approaches to regulate the load on the system. Well written about it here . I ended up using two attributes: -crfand -preset.Constant Rate Factor (CRF)- this is a coefficient due to which you can adjust the picture quality. CRF can range from 0 to 51, where 0 is the quality of the source file, 51 is the worst quality possible. It is recommended to use values from 17 to 28, the default is 23. With a ratio of 17, the video will visually be identical to the original, but technically it will not. The documentation also states that the size of the final video, depending on the specified CRF, changes exponentially i.e. increasing the coefficient by 6 points will double the bitrate of the outgoing video.If using CRF you can choose the "weight" of the outgoing picture, then using presets (-preset) you can determine how much the processor will be loaded. The parameters for this attribute have the following:ultrafastsuperfastveryfastfasterfastmedium - default valueslowslowerveryslow
The “faster” the parameter is specified, the higher the load on the processor.I first picked up the preset, which was basically “tough” to my processor, and then more finely tuned the load using CRF. In my case, the preset came up fast, and for crf I settled on a value of 24.Conclusion
That's all. The final command to start the broadcast I got this:ffmpeg -re -i lecture1.mp4 -vf drawtext="fontfile=OpenSans.ttf:text=' 1\: ':fontsize=26:fontcolor=white:borderw=1:bordercolor=black:x=40:y=670" -c:v libx264 -preset fast -crf 24 -g 3 -f flv rtmp://a.rtmp.youtube.com/live2/%_%
Here there are only two undescribed moments:1) -c:v libx264- an indication of a specific codec for working with the source file.2) -g 3- an explicit indication of the number of key frames. In this case, it is indicated that every third frame should be key. The standard value is either 5 or 8, but YouTube swears, asks at least 3.What quality of the broadcast turned out can be seen here .The server load was as follows: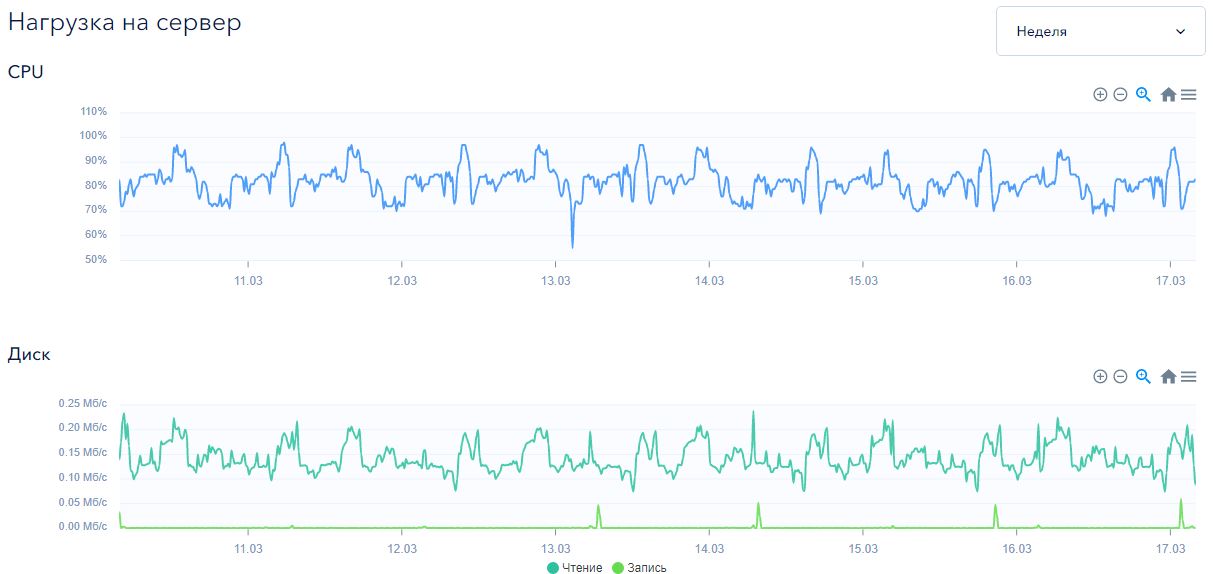
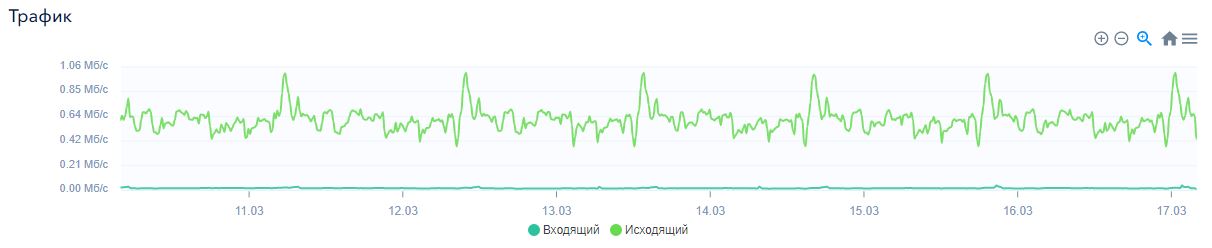 Based on the monitoring data, it is clear that the processor load varies from 70% to 95% and the broadcast has never reached 100% in a week. So, with these settings, the processor is enough.When loading a disk, I can say that it is almost not loaded and a regular HDD should be enough for broadcasting.But the amount of outgoing traffic bothers me. It turns out that my outgoing stream ranges from 450 to 650 KB per second. For a month it will be about 1.8 terabytes. You may have to buy traffic or still switch to a dual-core configuration because I would not like to reduce the quality of the picture.***As a result, I’ll say that setting up such a broadcast from scratch takes about 1-2 hours. Moreover, most of the time it will take to upload the video to the server.As a marketing tool, the launch of such a broadcast did not pay off. Perhaps if you wind up the views so that YouTube's algorithms pick up this broadcast and actively show it in the recommendations, then something would work out. In my case, for 16 days of continuous broadcasting, it was watched 58 times.That is OK. Broadcast harmoniously fit on the main page of my site. It turned out a kind of opportunity to quickly make up your mind about the lecturer and the lectures themselves.And one moment. It is important that the broadcast does not violate anyone else’s copyright, otherwise it will be blocked. I’m calm for my broadcast. I specially selected musical inserts with free use, and the author of the content sits at a neighboring computer and is not at all against me using its content :)But if you have a radio playing in the background somewhere in the background, or you used your favorite track during editing, or you took a video from a popular music video, series or movie, then your broadcast is at risk. It is also important that the broadcast carries at least minimal semantic load, otherwise it may be blocked as spam.***That's all for me. I hope this manual will serve someone well. Well, if you have something to add - write, I will gladly read additions and clarifications to the article.