 In the last article, we made a blank with you, so to speak, the basis on which our universe will be created, visualization using the console may look good, but text characters are boring and not very beautiful, in this article we will focus on visualizing our tiles using Phaser.jsIn the last article, our project looked like this:
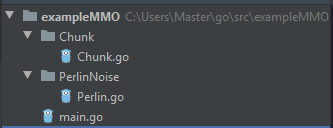 Now we will use other tools for web development, I hope you have Node.js and npm installed, if not, urgently install it. And so we open the terminal and starts:
$ npm install phaser@3.22.0
Upon successful completion of the team, we should see the following:+ phaser@3.22.0
added 15 packages from 48 contributors and audited 20 packages in 4.38s
 So fine, modules appeared, now we will create a directory for our client
 In Content we will store game resources, i.e. our sprites. We will also create two files game.js and MainScene.js, in the root directory (where the main.go file is located) create index.htmlgame.js - stores the main settings for the gameMainScene.js - it will contain the class of the main game sceneindex.html - the page where the scene will be renderedImmediately connect our scripts to index.html and we will not return to this file anymore:
 <script src="node_modules/phaser/dist/phaser.js" type="module"></script>
<script src="Client/game.js" type="module"></script>
In MainScene.js we will make a small class template for our future scene:export {MainScene}
class MainScene extends Phaser.Scene{
constructor() {
super({key: 'MainScene'})
}
preload() {
}
create() {
}
update() {
}
}
In game.js add typical settings to your liking, here are mine:import {MainScene} from "./MainScene.js";
let config = {
type: Phaser.AUTO,
width: 800,
height: 600,
disableContextMenu: true,
background: 'black',
physics: {
default: 'arcade',
arcadePhysics: {
overlapBias: 1
}
},
scene:[MainScene],
pixelArt: true,
roundPixels: true,
antialias: true
}
let game = new Phaser.Game(config);
Now we need an HTTP server, on th this is done in a few lines. Go to main.go and create a server:package main
import (
"fmt"
"html/template"
"net/http"
)
func main() {
http.HandleFunc("/", indexHandler)
http.Handle("/node_modules/phaser/dist/", http.StripPrefix("/node_modules/phaser/dist/", http.FileServer(http.Dir("./node_modules/phaser/dist/"))))
http.Handle("/Client/", http.StripPrefix("/Client/", http.FileServer(http.Dir("./Client/"))))
http.Handle("/Client/Content/", http.StripPrefix("/Client/Content/", http.FileServer(http.Dir("./Client/Content/"))))
err := http.ListenAndServe(":8080", nil)
if err != nil {
fmt.Println(err.Error())
}
}
func indexHandler(w http.ResponseWriter, r *http.Request) {
fmt.Println("indexAction")
t, _ := template.ParseFiles("index.html")
err := t.Execute(w, "index")
if err != nil {
fmt.Println(err.Error())
}
}
Well, we have our own web server and client! Let's get it started! Open the console:$ go run main.go
We open the browser and try to connect to our server, in my case it’slocalhost: 8080
 If you saw a black screen, then you did everything right.And so, let's create another handler by which we will receive our chunk in json format. Create a separate directory and call it GameController, here we will have all the handlers working with the game data, create the file Map_Controller.goAlso we need an improved
Chunk.gopackage Chunk
import (
"exampleMMO/PerlinNoise"
"fmt"
)
var TILE_SIZE = 16
var CHUNK_SIZE = 16 * 16
var PERLIN_SEED float32 = 160
type Chunk struct {
ChunkID [2]int `json:"chunkID"`
Map map[Coordinate]Tile `json:"map"`
}
type Tile struct {
Key string `json:"key"`
X int `json:"x"`
Y int `json:"y"`
}
type Coordinate struct {
X int `json:"x"`
Y int `json:"y"`
}
func NewChunk(idChunk Coordinate) Chunk {
fmt.Println("New Chank", idChunk)
chunk := Chunk{ChunkID: [2]int{idChunk.X, idChunk.Y}}
var chunkXMax, chunkYMax int
var chunkMap map[Coordinate]Tile
chunkMap = make(map[Coordinate]Tile)
chunkXMax = idChunk.X * CHUNK_SIZE
chunkYMax = idChunk.Y * CHUNK_SIZE
switch {
case chunkXMax < 0 && chunkYMax < 0:
{
for x := chunkXMax + CHUNK_SIZE; x > chunkXMax; x -= TILE_SIZE {
for y := chunkYMax + CHUNK_SIZE; y > chunkYMax; y -= TILE_SIZE {
posX := float32(x - (TILE_SIZE / 2))
posY := float32(y + (TILE_SIZE / 2))
tile := Tile{}
tile.X = int(posX)
tile.Y = int(posY)
perlinValue := PerlinNoise.Noise(posX/PERLIN_SEED, posY/PERLIN_SEED)
switch {
case perlinValue < -0.01:
tile.Key = "Water"
case perlinValue >= -0.01 && perlinValue < 0:
tile.Key = "Sand"
case perlinValue >= 0 && perlinValue <= 0.5:
tile.Key = "Ground"
case perlinValue > 0.5:
tile.Key = "Mount"
}
chunkMap[Coordinate{X: tile.X, Y: tile.Y}] = tile
}
}
}
case chunkXMax < 0:
{
for x := chunkXMax + CHUNK_SIZE; x > chunkXMax; x -= TILE_SIZE {
for y := chunkYMax - CHUNK_SIZE; y < chunkYMax; y += TILE_SIZE {
posX := float32(x - (TILE_SIZE / 2))
posY := float32(y + (TILE_SIZE / 2))
tile := Tile{}
tile.X = int(posX)
tile.Y = int(posY)
perlinValue := PerlinNoise.Noise(posX/PERLIN_SEED, posY/PERLIN_SEED)
switch {
case perlinValue < -0.12:
tile.Key = "Water"
case perlinValue >= -0.12 && perlinValue <= 0.5:
tile.Key = "Ground"
case perlinValue > 0.5:
tile.Key = "Mount"
}
chunkMap[Coordinate{X: tile.X, Y: tile.Y}] = tile
}
}
}
case chunkYMax < 0:
{
for x := chunkXMax - CHUNK_SIZE; x < chunkXMax; x += TILE_SIZE {
for y := chunkYMax + CHUNK_SIZE; y > chunkYMax; y -= TILE_SIZE {
posX := float32(x + (TILE_SIZE / 2))
posY := float32(y - (TILE_SIZE / 2))
tile := Tile{}
tile.X = int(posX)
tile.Y = int(posY)
perlinValue := PerlinNoise.Noise(posX/PERLIN_SEED, posY/PERLIN_SEED)
switch {
case perlinValue < -0.12:
tile.Key = "Water"
case perlinValue >= -0.12 && perlinValue <= 0.5:
tile.Key = "Ground"
case perlinValue > 0.5:
tile.Key = "Mount"
}
chunkMap[Coordinate{X: tile.X, Y: tile.Y}] = tile
}
}
}
default:
{
for x := chunkXMax - CHUNK_SIZE; x < chunkXMax; x += TILE_SIZE {
for y := chunkYMax - CHUNK_SIZE; y < chunkYMax; y += TILE_SIZE {
posX := float32(x + (TILE_SIZE / 2))
posY := float32(y + (TILE_SIZE / 2))
tile := Tile{}
tile.X = int(posX)
tile.Y = int(posY)
perlinValue := PerlinNoise.Noise(posX/PERLIN_SEED, posY/PERLIN_SEED)
switch {
case perlinValue < -0.12:
tile.Key = "Water"
case perlinValue >= -0.12 && perlinValue <= 0.5:
tile.Key = "Ground"
case perlinValue > 0.5:
tile.Key = "Mount"
}
chunkMap[Coordinate{X: tile.X, Y: tile.Y}] = tile
}
}
}
}
chunk.Map = chunkMap
return chunk
}
We just added json keys to our structures and improved chunk creation a bit. Wereturn to Map_Controller,package GameController
import (
"encoding/json"
"exampleMMO/Chunk"
"fmt"
"net/http"
)
func Map_Handler(w http.ResponseWriter, r *http.Request) {
c:= Chunk.NewChunk(Chunk.Coordinate{1,1})
js, e :=json.Marshal(c)
if e!= nil {
fmt.Println(e.Error())
}
fmt.Println(string(js))
}
and add a line to main.go http.HandleFunc("/map", GameController.Map_Handler)
Let's try to start the server and go to localhost: 8080 / map.Output in the terminal:New Chank {1 1}
json: unsupported type: map[Chunk.Coordinate]Chunk.Tile
Yes, we forgot that in Golang, when serialized, the map keys must be a string. For serialization, Go checks if the type matches the TextMarshaler interface, and calls its MarshalText () method, we just need to create the MarshalText () method for our Coordinate type. Wereturn to Chunk.go and add the following code:func (t Coordinate) MarshalText() ([]byte, error) {
return []byte("[" + strconv.Itoa(t.X) + "," + strconv.Itoa(t.Y) + "]"), nil
}
You can write your implementation, the most important thing is that this method returns a unique string. We will use this key to manage chunks on the client, let's now check how our controller works, start the server again and see the output to the console.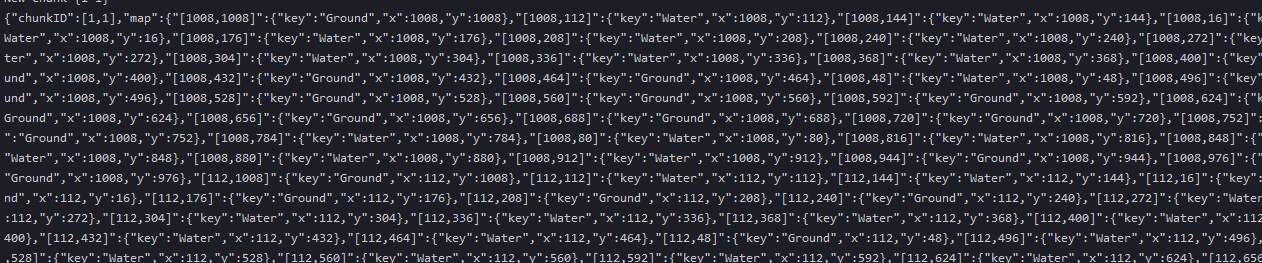 Yes, everything is fine, let's now make a conclusion to the stream, add two lines at the end of our controller:
	w.Header().Set("Content-Type", "application/json")
	w.Write(js)
For now, finish with Golang and get back to the client. we will need three titles, although in fact we have 4 of them, but for now we have three, or even two.

 Add our tiles to the Content directory and start working with MainScene.js, for the first results we need a few functions:
class MainScene extends Phaser.Scene{
constructor() {
super({key: 'MainScene'})
}
preload() {
this.load.image("Ground", "Client/Content/sprGrass.png")
this.load.image("Water", "Client/Content/sprWater1.png")
this.load.image("Sand", "Client/Content/sprGrass.png")
}
create() {
this.getGameMap()
}
update() {
}
async getGameMap() {
let res = await fetch("/map")
let result = await res.json()
this.drawChunk(result.map)
}
drawChunk(map) {
for (let chunkKey in map) {
this.add.image(map[chunkKey].x,map[chunkKey].y, map[chunkKey].key)
}
}
}
The server returns our chunk to us in the form of a json object, you can see its structure in the browser console: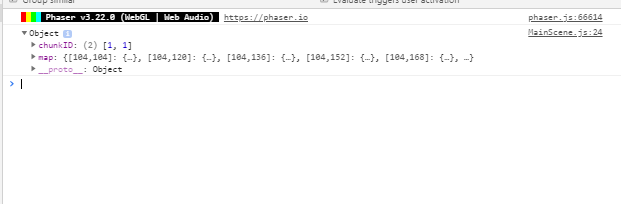 And so Phaser rendered it in the browser:
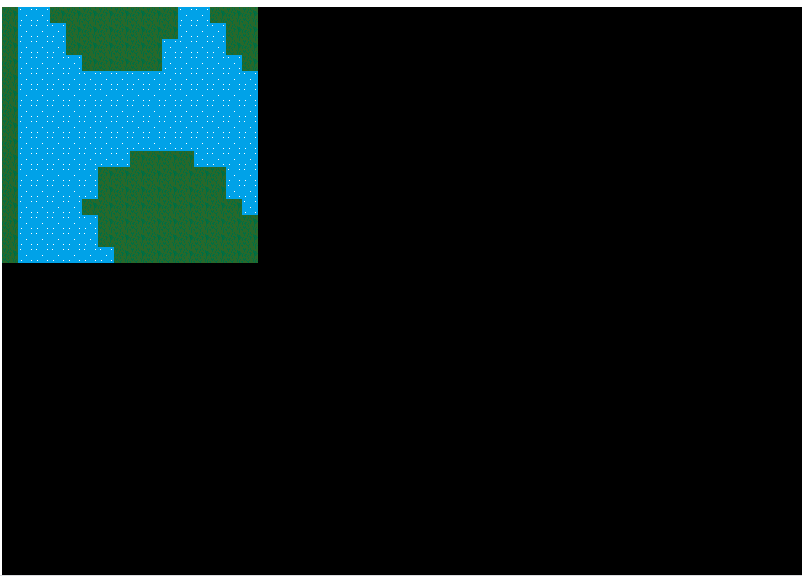 We examined the simplest work between the server and the client, in the next article we will immediately draw 9 chunks and navigate to the world. See all code and resources from the article here .