Hello, Habr! My name is Alexander Khakimov, I am an android developer at FINCH.Did it happen that your design was for iOS, and you have to adapt it for android? If so, do your designers often use widgets? Unfortunately, a widget is a rare case for many developers, because rarely does anyone work with it.In the article I will tell you in detail how to create a widget, which is worth paying attention to and will share my case.Widget creation
To create a widget you need to know:- Features of widget components.
- Features of displaying the widget in the screen grid.
- Features widget updates.
We will analyze each item separately.Features of widget components
Any developer who has worked with RemoteViews at least once is familiar with this item. If you are one of these, feel free to move on to the next point.RemoteViews is designed to describe and manage Views hierarchies that belong to a process in another application. Using hierarchy management, you can change properties or call methods that belong to the View, which is part of another application. RemoteViews includes a limited set of components from the standard android.widget component library.View inside widgets works in a separate process (usually this is the home screen), therefore, to change the widget's UI, use the BroadcastReceiver extension - AppWidgetProvider, which works in our application.Features of displaying the widget in the "grid" of the screen
In fact, this point is not so complicated, if you look at the official guidelines :Each widget must define a minWidth and minHeight, indicating the minimum amount of space it should consume by default. When users add a widget to their Home screen, it will generally occupy more than the minimum width and height you specify. Android Home screens offer users a grid of available spaces into which they can place widgets and icons. This grid can vary by a device; for example, many handsets offer a 4x4 grid, and tablets can offer a larger, 8x7 grid.
Translating into Russian: each widget must set its own minimum width and height to indicate the minimum space that it will occupy by default.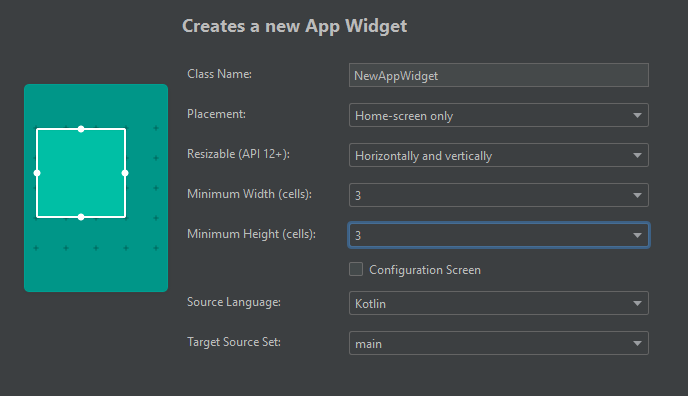 Example of widget settings when creating in Android Studio Awidget that was added to the Home screen will usually take up more space than the minimum width and height of the screen that you set. Android Home screens provides users with a grid of available spaces in which widgets and icons can be located. This grid may vary by device; for example, many phones offer 4x4 grids, and tablets can offer large 8x4 grids.From this it becomes clear that the device’s grid can be anything, and the cell size may vary, depending on the size of the grid. Accordingly, the content of the widget should be designed with these features in mind.The minimum width and height of the widget for a given number of columns and rows can be calculated using the formula:minSideSizeDp = 70 × n - 30, where n is the number of rows or columns.At the moment, the maximum minimum grid you can set is 4x4. This ensures that your widget will be displayed on all devices.
Features widget updates
Since AppWidgetProvider is essentially an extension of BroadcastReceiver, you can do the same with it as with a regular BroadcastReceiver. AppWidgetProvider simply parses the corresponding fields from the Intent received in onReceive and calls the interception methods with the received extras.The difficulty arose with the frequency of updating the content - the whole point is the difference in the internal operation of widgets on iOS and Android. The fact is that data on iOS widgets is updated when the widget becomes visible to the user. In Android, such an event does not exist. We cannot find out when the user sees the widget.For widgets on Android, the recommended update method is a timer update. The timer settings are set by the widget parameter updatePeriodMillis. Unfortunately, this setting does not allow updating the widget more than once every 30 minutes. Below I will talk about this in more detail.Widget case
Further we will talk about the case that we had at FINCH in a large lottery application with the Stoloto application for participation in state lotteries.The task of the application is to simplify and make transparent for the user the choice of a lottery and the purchase of a ticket. Therefore, the required functionality of the widget is quite simple: show the user recommended games for purchase and tap to go to the corresponding one. The list of games is determined on the server and updated regularly.In our case, the widget design included two states:- For authorized user
- For an unauthorized user
An authorized user needs to show his profile data: the status of the internal wallet, the number of tickets awaiting the draw and the amount of lost wins. For each of these elements, a transition to the screen inside the application is provided, different from the others.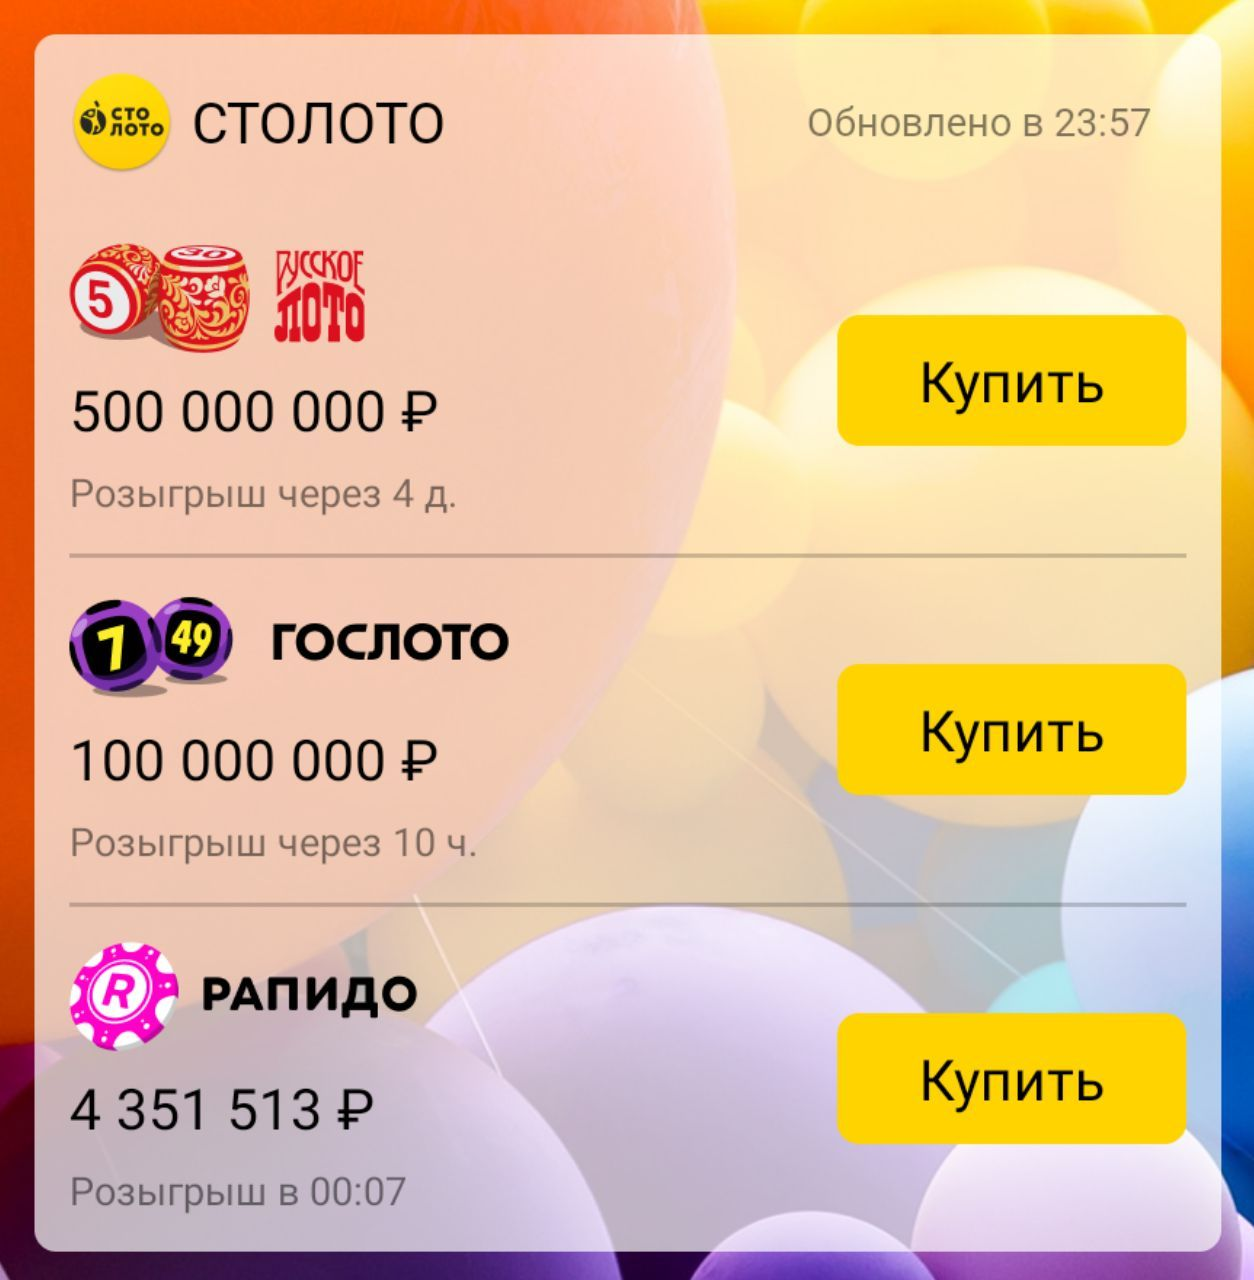
 As you may have noticed, another feature for an authorized user is the “refresh” button, but more on that later.To implement the display of two states, taking into account the design, I used the RemoteAdapter as an implementation of RemoteViewsService to generate content cards.And now a little code and how everything works inside. If you already had experience with the widget, then you know that any update of widget data starts with the onUpdate method:
override fun onUpdate(
context: Context,
appWidgetManager: AppWidgetManager,
appWidgetIds: IntArray
) {
injector.openScope(this, *arrayOf(this))
appWidgetIds
.forEach {
updateWidget(context, appWidgetManager, it)
}
}
We are writing an update for each instance of our widget.private fun updateWidget(
context: Context,
appWidgetManager: AppWidgetManager,
appWidgetId: Int
) {
val remoteViews = RemoteViews(
context.packageName,
R.layout.app_widget_layout
...
...
updateRemoteAdapter(context, remoteViews, appWidgetId)
appWidgetManager.updateAppWidget(appWidgetId, remoteViews)
appWidgetManager.notifyAppWidgetViewDataChanged(
appWidgetId,
R.id.lvWidgetItems
)
}
Updating the adapter.private fun updateRemoteAdapter(context: Context, remoteViews: RemoteViews, appWidgetId: Int) {
val adapterIntent = Intent(context, StolotoAppWidgetRemoteViewsService::class.java).apply {
putExtra(AppWidgetManager.EXTRA_APPWIDGET_ID, appWidgetId)
}
remoteViews.setRemoteAdapter(R.id.lvWidgetItems, adapterIntent)
// actionIntent pendingIntent
val actionIntent = Intent(context, StolotoAppWidgetProvider::class.java).apply {
action = WIDGET_CLICK_ACTION
putExtra(AppWidgetManager.EXTRA_APPWIDGET_ID, appWidgetId)
}
val pendingIntent = PendingIntent.getBroadcast(
context, 0, actionIntent,
PendingIntent.FLAG_UPDATE_CURRENT
)
remoteViews.setPendingIntentTemplate(R.id.lvWidgetItems, pendingIntent)
}
We are writing the implementation of our service. In it, it’s important for us to indicate which implementation of the RemoteViewsService.RemoteViewsFactory interface to use to generate content.class StolotoAppWidgetRemoteViewsService : RemoteViewsService() {
override fun onGetViewFactory(intent: Intent): RemoteViewsFactory =
StolotoAppWidgetRemoteViewsFactory(
this.applicationContext,
intent
)
}
This is actually a thin wrapper over the Adapter. Thanks to him, we can associate our data with remote collection view. RemoteViewsFactory provides methods for generating RemoteViews for each item in the dataset. The constructor has no requirements - all I do is pass the context in it.Next, a few words about the main methods:- onCreate - creating an adapter.
- getLoadingView - the method suggests returning the View, which the system will display instead of the list items while they are being created. If you do not create anything here, then the system uses some default View.
- getViewAt - the method suggests creating list items. Here comes the standard use of RemoteViews.
- onDataSetChanged is called when a request is received to update the data in the list. Those. In this method, we prepare the data for the list. The method is sharpened by the execution of heavy, long code.
- onDestroy is called when the last list that the adapter used is deleted (one adapter can be used by several lists).
- RemoteViewsFactory lives while all instances of the list are alive, so we can store current data in it, for example, a list of current items.
Define a list of data that we will show:private val widgetItems = ArrayList<WidgetItem>()
When creating the adapter, we begin to load the data. Here you can safely perform any difficult tasks, including walking quietly into the network blocking the flow.override fun onCreate() {
updateDataSync()
}
When calling the command to update data, we also call updateDataSync () override fun onDataSetChanged() {
updateDataSync()
}
Inside updateDataSync, everything is simple too. We clear the current list of items. Download profile and game data. private fun updateDataSync() {
widgetItems.clear()
updateProfileSync()
updateGamesSync()
}
It’s more interesting hereprivate fun updateProfileSync() {
Since it is important for us to show the profile only to an authorized user, we need to download the profile information only in this case:val isUserFullAuth = isUserFullAuthInteractor
.execute()
.blockingGet()
if (isUserFullAuth) {
val profile = getWidgetProfileInteractor
.execute()
.onErrorReturn {
WidgetProfile()
}
.blockingGet()
The WidgetProfile model is assembled from different sources, so the logic of their receipt and its default values are arranged in such a way that a negative wallet value indicates incorrect data or problems with their receipt.For business logic, the lack of wallet data is critical, therefore, in the case of an incorrect wallet, a profile model will not be created and added to the list of items. if (profile.walletAmount >= 0L) {
widgetItems.add(
WidgetItem.Profile(
wallet = profile.walletAmount.toMoneyFormat(),
waitingTickets = if (profile.waitingTicketsCount >= 0) profile.waitingTicketsCount.toString() else "",
unpaidPrizeAmount = if (profile.unpaidPrizeAmount >= 0) profile.unpaidPrizeAmoount.toMoneyFormat() else ""
)
)
}
}
}
The updateGamesSync () method uses getWidgetGamesInteractor and adds a set of games relevant to the widget to the widgetItems list.Before proceeding to the generation of cards, consider the WidgetItem model in more detail. It is implemented through the kotlin sealed class, which makes the model more flexible, and working with it is more convenient.sealed class WidgetItem {
data class Profile(
val wallet: String,
val waitingTickets: String,
val unpaidPrizeAmount: String
) : WidgetItem()
data class Game(
val id: String,
val iconId: Int,
val prizeValue: String,
val date: String
) : WidgetItem()
}
Create RemoteViews and determine their response through FillInIntentoverride fun getViewAt(position: Int): RemoteViews {
return when (val item = widgetItems[position]) {
is WidgetItem.Profile -> {
RemoteViews(
context.packageName,
R.layout.item_widget_user_profile
).apply {
setTextViewText(R.id.tvWidgetWalletMoney, item.wallet)
setTextViewText(R.id.tvWidgetUnpaidCount, item.unpaidPrizeAmount)
setTextViewText(R.id.tvWidgetWaitingCount, item.waitingTickets)
setOnClickFillInIntent(
R.id.llWidgetProfileWallet, Intent().putExtra(
StolotoAppWidgetProvider.KEY_PROFILE_OPTIONS,
StolotoAppWidgetProvider.VALUE_USER_WALLET
)
)
setOnClickFillInIntent(
R.id.llWidgetProfileUnpaid, Intent().putExtra(
StolotoAppWidgetProvider.KEY_PROFILE_OPTIONS,
StolotoAppWidgetProvider.VALUE_UNPAID_PRIZE
)
)
setOnClickFillInIntent(
R.id.llWidgetProfileWaiting, Intent().putExtra(
StolotoAppWidgetProvider.KEY_PROFILE_OPTIONS,
StolotoAppWidgetProvider.VALUE_WAITING_TICKETS
)
)
}
is WidgetItem.Game -> {
RemoteViews(
context.packageName,
R.layout.item_widget_game
).apply {
setImageViewResource(R.id.ivWidgetGame, item.iconId)
setTextViewText(R.id.tvWidgetGamePrize, item.prizeValue)
setTextViewText(R.id.tvWidgetGameDate, item.date)
setOnClickFillInIntent(
R.id.llWidgetGame, Intent().putExtra(
StolotoAppWidgetProvider.KEY_GAME_CLICK, item.id
)
)
}
}
}
}
The setOnClickFillInIntent method assigns the specified viewId intent, which will be combined with the parent PendingIntent to determine the behavior when clicking on the view with this viewId. This way we can respond to user clicks in our WidgetProvider.Manual widget update
An update time of half an hour was set for our widget. You can update it more often, for example, through dancing with WorkManager, but why load your network and battery? Such behavior in the early stages of development seemed adequate.Everything changed when the “business” noticed that when the user looks at the widget, the irrelevant data is displayed on it: “Here on my iPhone, I open the widget and there is the MOST fresh data of my profile.”The situation is commonplace: iOS generates new cards for EVERY widget display, because for this they have a special screen, and Android does not have such events for the widget in principle. I had to take into account that some lotteries are held once every 15 minutes, so the widget should give up-to-date information - you want to participate in some kind of draw, but it has already passed.In order to get out of this unpleasant situation and somehow solve the problem with updating data, I proposed and implemented a time-tested solution - the “update” button.Add this button to the layout layout with the list and initialize its behavior when updateWidget is called....
val intentUpdate = Intent(context, StolotoAppWidgetProvider::class.java)
intentUpdate.action = AppWidgetManager.ACTION_APPWIDGET_UPDATE
//
val ids = AppWidgetManager.getInstance(context)
.getAppWidgetIds(ComponentName(context, StolotoAppWidgetProvider::class.java))
intentUpdate.putExtra(AppWidgetManager.EXTRA_APPWIDGET_IDS, ids)
// intent PendingIntent, PendingIntent.getBroadcast()
val pendingUpdate = PendingIntent.getBroadcast(
context,
appWidgetId,
intentUpdate,
PendingIntent.FLAG_UPDATE_CURRENT
)
// pendingIntent ‘’
remoteViews.setOnClickPendingIntent(R.id.ivWidgetRefresh, pendingUpdate)
…
The first developments showed a sad picture: from pressing the "update" button to the actual update, several seconds could pass. Although the widget is generated by our application, it is actually under the control of the system and communicates with our application through broadcasts.Those. when you click on the "update" button of our widget, the chain starts:- Get the Intent in the onReceive provider 'action'.
- AppWidgetManager.ACTION_APPWIDGET_UPDATE.
- Call onUpdate for all widgetsIds specified in intent-e.
- Go online for new data.
- Refresh local data and display new list cards.
As a result, updating the widget did not look very nice, because by clicking on the button we looked at the same widget for a couple of seconds. It was unclear whether the data was updated. How to solve the problem of visual response?Firstly, I added the isWidgetLoading flag with global access through the interactor. The role of this parameter is quite simple - do not show the refresh button while the widget data is loading.Secondly, I divided the data loading process in the factory into three stages:enum class LoadingStep {
START,
MIDDLE,
END
}
START - start of download. At this stage, the state of all adapter views and the global download flag changes to “loading”.MIDDLE - the stage of the main data loading. After they are downloaded, the global download flag is put in the “loaded” state, and the downloaded data is displayed in the adapter.END - end of download. The adapter does not need to change adapter data in this step. This step is needed to correctly process the update stage of the views in WidgetProvider.Let's see in more detail what the button update looks like in the provider:if (isFullAuthorized && !widgetLoadingStateInteractor.isWidgetLoading) {
remoteViews.setViewVisibility(R.id.ivWidgetRefresh, View.VISIBLE)
...
...
} else {
remoteViews.setViewVisibility(
R.id.ivWidgetRefresh,
if (isFullAuthorized) View.INVISIBLE else View.GONE
)
}
Now let's look at what happens in the adapter:private fun updateDataSync() {
when (loadingStep) {
START -> {
widgetItems.forEach { it.isLoading = true }
widgetLoadingStateInteractor.isWidgetLoading = true
loadingStep = MIDDLE
widgetManager.updateWidgets()
}
MIDDLE -> {
widgetItems.clear()
updateProfileSync()
updateGamesSync()
widgetLoadingStateInteractor.isWidgetLoading = false
loadingStep = END
widgetManager.updateWidgets()
}
END -> {
loadingStep = START
}
}
}
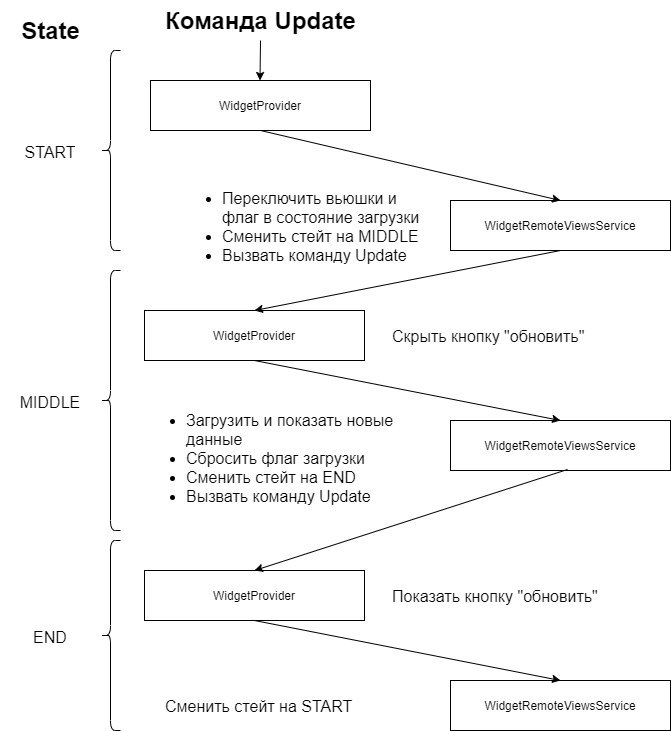 Logic of work:
- At the end of the START and MIDDLE steps, I call the updateWidgets method to update the view state managed by the provider.
- START «» , MIDDLE.
- MIDDLE, «».
- MIDDLE, END.
- , END, «». , END loadingStep START.
With the help of such an implementation, I reached a compromise between the requirement of the "business" to see relevant data on the widget and the need to "pull" the update too often.I hope the article was useful to you. If you had experience creating widgets for Android, then tell us about it in the comments.Good luck