Entonces, en la segunda parte comenzamos la implementación. Primero, decidamos sobre la tecnología. Elijo componentes web. El enfoque de componentes, la API nativa, es fácil de reutilizar y depurar.Paso 1 - Describe las posiciones finales
La etiqueta de nuestra ventana virtual se llamará ventana personalizada. Entonces, primero describimos las propiedades generales de la ventana gráfica:custom-viewport {
min-height: 50vh;
max-height: 100vh;
width: 100%;
position: absolute;
bottom: 0;
overflow: hidden;
transform-origin: 50% 100% 0;
}
Posición iniciada:custom-viewport[data-mode = "inited"] {
transform: translateY(calc(100% - 50vh));
transition: transform 1s;
}
Puesto abierto:custom-viewport[data-mode = "opened"] {
transform: translateY(0);
transition: transform 1s;
overflow-y: scroll;
}
Posición eliminada:custom-viewport[data-mode = "deleted"] {
transform: translateY(100%);
transition: transform 1s;
}
Paso 2 - comienza a escribir el componente de vista personalizada
class CustomViewport extends HTMLElement {
 constructor() {
  super();
 }
}
Implementamos eventos dragUp / dragDownclass CustomViewport extends HTMLElement {
constructor() {
super();
}
connectedCallback() {
this.addEventListener("touchstart", ev => {
this.firstTouch = ev.touches[0];
});
this.addEventListener("touchmove", ev => {
this.deltaY = ev.touches[0].clientY - this.firstTouch.clientY;
return this.deltaY > 0 ? this.dragDown(ev) : this.dragUp(ev);
});
}
dragUp(ev) {}
dragDown(ev) {}
}
Esquemáticamente, el código anterior se puede describir de la siguiente manera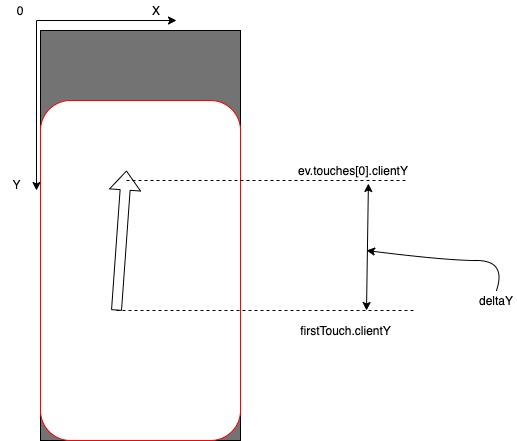 , por lo que ahora podemos distinguir entre los eventos dragUp / dragDown. La siguiente utilidad es el cálculo de la reserva de energía.
class CustomViewport extends HTMLElement {
constructor() {
super();
this.VIEWPORT_HEIGHT = window.innerHeight;
}
connectedCallback() {
this.addEventListener("touchstart", ev => {
this.firstTouch = ev.touches[0];
const rect = this.getBoundingClientRect();
const { height, top } = rect;
this.bottomOffsetBeforeDragging = (height + top) - this.VIEWPORT_HEIGHT;
});
this.addEventListener("touchmove", ev => {
this.deltaY = ev.touches[0].clientY - this.firstTouch.clientY;
return this.deltaY > 0 ? this.dragDown() : this.dragUp();
});
}
dragUp() {}
dragDown() {}
isBottomOffset() {
return (this.bottomOffsetBeforeDragging + this.deltaY) > 0;
}
}
Aquí primero recordamos cuánta reserva de energía teníamos en el momento en que comenzó el movimiento, y luego simplemente agregamos deltaY a este valor y vemos si podemos subir o no.En realidad, la lógica de arrastre:...
dragUp() {
if(this.isBottomOffset()) {
return;
}
this.style.transform = 'translateY(0)';
}
...
Escribimos un método que moverá la ventana gráfica:class CustomViewport extends HTMLElement {
constructor() {
super();
this.VIEWPORT_HEIGHT = window.innerHeight;
}
connectedCallback() {
this.addEventListener("touchstart", ev => {
this.firstTouch = ev.touches[0];
const rect = this.getBoundingClientRect();
const { height, top } = rect;
this.bottomOffsetBeforeDragging = (height + top) - this.VIEWPORT_HEIGHT;
this.lastPosY = this.bottomOffsetBeforeDragging - this.scrollTop;
});
...
}
translateY() {
const pixels = this.deltaY + this.lastPosY;
this.style.transform = `translateY(${pixels}px)`;
this.style.transition = 'none';
}
...
}
Examinemos con más detalle qué es this.lastPosY y cómo se calcula. Si en css escribimos transform: translateY (calc (100% - 50vh)); donde 100% es la altura de la ventana virtual en sí, y 50vh es la mitad de la altura de la ventana real, y esto encaja bien para una descripción estática de la posición, entonces es más conveniente operar con valores absolutos para calcular el movimiento en la dinámica, estamos haciendo estas transformaciones aquí.Entonces this.lastPosY es la cantidad de movimiento de la ventana virtual en píxeles al comienzo del movimiento, es a él a quien agregamos this.deltaY y obtenemos una nueva posición de ventana gráfica.Como definimos las propiedades:bottom: 0;
transform-origin: 50% 100% 0;
entonces nuestro sistema de coordenadas para contar el movimiento de la ventana gráfica tomará la forma Describimos dragDown:
...
dragDown() {
 if(this.lastPosY < 0) {
  return;
 }
 this.translateY();
}
...
Evento dragEnd en realidad:class CustomViewport extends HTMLElement {
constructor() {
super();
this.VIEWPORT_HEIGHT = window.innerHeight;
}
connectedCallback() {
this.addEventListener("touchend", ev => {
const { mode: currentMode } = this.dataset;
this.style = null;
if (Math.abs(deltaY) < 10) {
this.dataset.mode = currentMode;
return;
}
if (deltaY > 0) {
if (currentMode === "inited") {
this.dataset.mode = "deleted";
return;
}
this.dataset.mode = "inited";
return;
}
this.dataset.mode = "opened";
});
...
En la línea if (Math.abs (deltaY) <10) indicamos que si se ha movido menos de 10 píxeles, abandone la posición actual.Como resultado, deberíamos obtener un componente como
class CustomViewport extends HTMLElement {
 constructor() {
  super();
  this.VIEWPORT_HEIGHT = window.innerHeight;
 }
 connectedCallback() {
  this.addEventListener("touchstart", ev => {
   this.firstTouch = ev.touches[0];
   const rect = this.getBoundingClientRect();
   const { height, top } = rect;
   this.bottomOffsetBeforeDragging = (height + top) - this.VIEWPORT_HEIGHT;
   this.lastPosY = this.bottomOffsetBeforeDragging - this.scrollTop;
  });
  this.addEventListener("touchmove", ev => {
   this.deltaY = ev.touches[0].clientY - this.firstTouch.clientY;
   return this.deltaY > 0 ? this.dragDown() : this.dragUp();
  });
  this.addEventListener("touchend", ev => {
   const { mode: currentMode } = this.dataset;
   this.style = null;
   if (Math.abs(this.deltaY) < 10) {
    this.dataset.mode = currentMode;
    return;
   }
    if (this.deltaY > 0) {
     if (currentMode === "inited") {
       this.dataset.mode = "deleted";
       return;
      }
      this.dataset.mode = "inited";
      return;
    }
    this.dataset.mode = "opened";
  });
 }
 dragUp() {
  if(this.isBottomOffset()) {
   this.translateY();
   return;
  }
  this.style.transform = 'translateY(0)';
}
 dragDown() {
   if(this.lastPosY < 0) {
   return;
  }
  this.translateY();
}
translateY() {
  const pixels = this.deltaY + this.lastPosY;
  this.style.transform = `translateY(${pixels}px)`;
  this.style.transition = 'none';
 }
 isBottomOffset() {
   return (this.bottomOffsetBeforeDragging + this.deltaY) > 0;
 }
}

customElements.define('custom-viewport', CustomViewport);
Este código no es una implementación completa, sino solo un prototipo. Un estudio más detallado del desplazamiento, rebotes, cualquier otra optimización, touchcancel - se deja al lector.