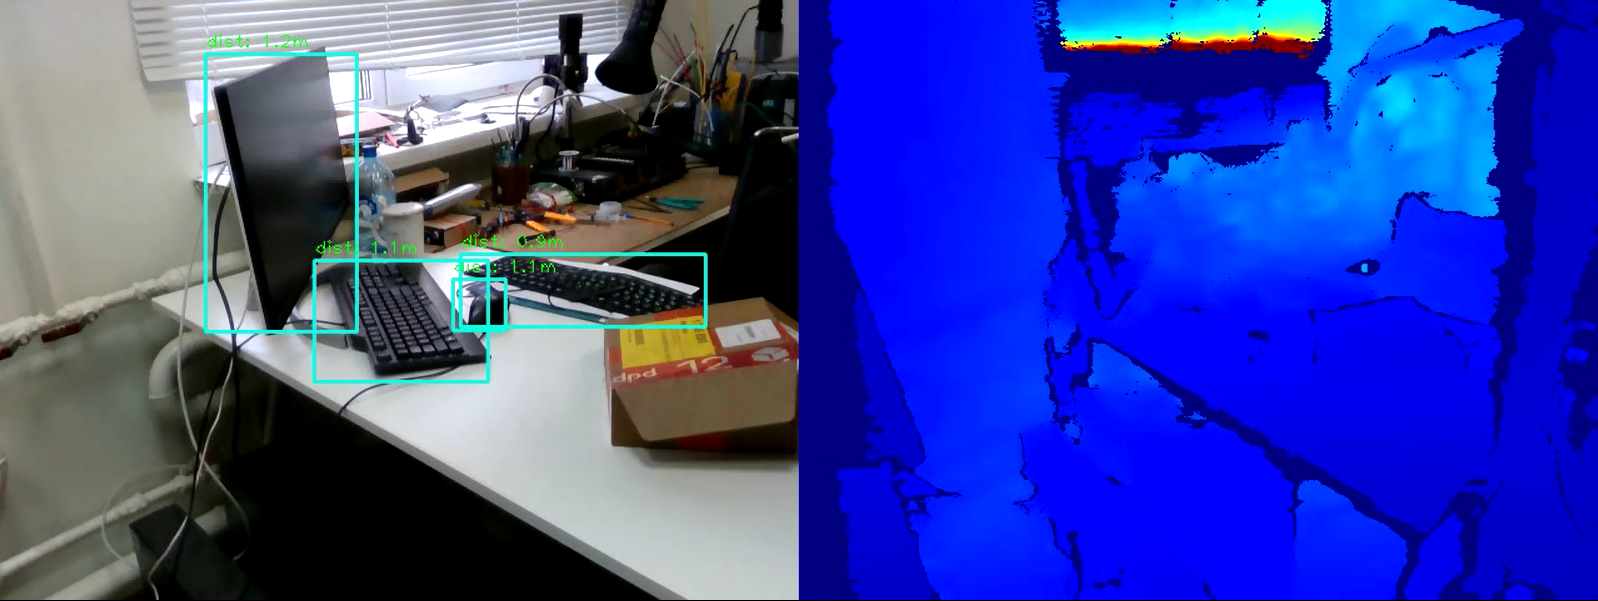
إن مهمة الكشف عن الأشياء في الصورة اليوم هي إحدى المهام الرائدة في مجال رؤية الماكينة. جوهرها ليس فقط لتصنيف الكائن في الصورة ، ولكن أيضًا للإشارة إلى موقعه بالضبط.يمكن استكمال نتائج الكشف عن الكائن بمعلومات عن مدى وجود هذا الكائن. يمكن حل مشكلة قياس المسافة باستخدام كاميرا Intel RealSense D435 Depth ، التي تقيس العمق عند كل نقطة.في هذه المقالة ، سنحل مشكلة قياس المسافة إلى كائن في الوقت الفعلي باستخدام مكتبة OpenCV وتقنية RealSense.
المتطلبات
كاميرا RealSenseلقياس المسافة ، نحتاج إلى كاميرا عمق RealSense D435 . في هذا المثال ، ليست هناك حاجة لتثبيت RealSense SDK .مكتبة Pyrealsense2جميع التعليمات البرمجية ، لسهولة العرض ، سنكتب في Python 3.7 ، لذلك نحن بحاجة إلى حزمة pyrealsense2 .pip install pyrealsense2
مكتبة OpenCVأيضًا ، نحتاج إلى مكتبة OpenCV (أي إصدار يبدأ من 3.4 مناسب). يمكن الاطلاع على دليل تثبيت المكتبة على موقع OpenCV الرسمي .جنبا إلى جنب مع OpenCV ، سيتم تثبيت مكتبة أخرى ضرورية - numpy .كشف الكائن
الخطوة الأولى هي تحديد الكائنات في الفيديو. لاكتشاف الأجسام في الوقت الفعلي ، فإن ما يسمى بالنماذج أحادية المرحلة (على سبيل المثال ، Retina Net ، SSD ، YOLO ) ، التي تفوز بسرعة التشغيل ، مثالية .من أجل بساطة التجربة ، سنأخذ النموذج المدرب SSDLite Mobilenet v2 . بدلاً من ذلك ، يمكن استخدام أي نموذج آخر يقوم بإرجاع إحداثيات الكائن بشكل أو بآخر.يمكنك تنزيل الأرشيف مع ملفات النموذج في مستودع TensorFlow الرسمي .يحتوي الأرشيف على رسم بياني حسابي مجمّد بتنسيق ثنائي .pb، وكذلك التكوينات المختلفة. ولكن لاستخدام النموذج في OpenCV ، يجب أن يكون لديك أيضًا رسم بياني للحسابات بتنسيق النص .pbtxt . إنه غير موجود في الأرشيف ، لذا يجب إنشاؤه يدويًا.انسخ نصين من مستودع OpenCV :- github.com/opencv/opencv/blob/master/samples/dnn/tf_text_graph_ssd.py
- github.com/opencv/opencv/blob/master/samples/dnn/tf_text_graph_common.py
بعد ذلك ، قم بتنفيذ الأمر التالي ، مع تحديد المسارات اللازمة:python tf_text_graph_ssd.py --input /path/to/model.pb --config /path/to/example.config --output /path/to/graph.pbtxt
الإخراج هو ملف بياني . pbtxt .نضع ملفات النموذج الموجودة في مجلد المشروع. في حالتي ، هذا هو النماذج / المجلد .تطوير
الآن كل شيء جاهز للتطوير. لنبدأ في كتابة التعليمات البرمجية.نقوم باستيراد المكتبات اللازمة ونقوم بعمل كعب على طريقة draw_predictions () التي سنحتاجها لاحقًا:import pyrealsense2 as rs
import numpy as np
import cv2 as cv
def draw_predictions(pred_img, color_img, depth_image):
pass
إنشاء الكائنات الرئيسية:pipeline = rs.pipeline()
config = rs.config()
colorizer = rs.colorizer()
spatial = rs.spatial_filter()
spatial.set_option(rs.option.holes_fill, 3)
نقوم بتهيئة نموذج SSD . هنا ، ملف .pbtxt الذي أنشأناه أعلاه مفيد لنا :
model = cv.dnn.readNetFromTensorflow(
"models/ssdlite_mobilenet_v2_coco_2018_05_09/frozen_inference_graph.pb",
"models/ssdlite_mobilenet_v2_coco_2018_05_09/graph.pbtxt"
)
نبدأ تدفقات الكاميرا:
config.enable_stream(rs.stream.color, 640, 480, rs.format.bgr8, 30)
config.enable_stream(rs.stream.depth, 640, 480, rs.format.z16, 30)
profile = pipeline.start(config)
لاحظ أننا نلتقط دفق الألوان بتنسيق BGR ، نظرًا لأن هذا هو التنسيق الذي يستخدم OpenCV افتراضيًا.نبدأ دورة يتم من خلالها التقاط الإطارات ومعالجتها بالتتابع:cv.namedWindow("RealSense object detection", cv.WINDOW_AUTOSIZE)
try:
while True:
frames = pipeline.wait_for_frames()
depth_frame = frames.get_depth_frame()
color_frame = frames.get_color_frame()
if not depth_frame or not color_frame:
continue
لمزيد من معالجة الإطارات ، فإننا نمثلها في شكل صفائف numpy :
depth_image = np.asanyarray(depth_frame.get_data())
color_image = np.asanyarray(color_frame.get_data())
نستخدم نموذج SSD للكشف عن:
model.setInput(cv.dnn.blobFromImage(color_image, size=(300, 300), swapRB=True, crop=False))
pred = model.forward()
draw_predictions(pred, color_image, depth_image)
نرسم النتيجة في النافذة:
colorized_depth = cv.applyColorMap(cv.convertScaleAbs(depth_image, alpha=0.03), cv.COLORMAP_JET)
images = np.hstack((color_image, colorized_depth))
cv.imshow("RealSense object detection", images)
نكتب شرط الخروج من الحلقة:
key = cv.waitKey(1) & 0xFF
if (key == 27) or (key == ord('q')):
cv.destroyWindow("RealSense object detection")
break
أغلق الدفق:finally:
pipeline.stop()
وآخر واحد. نحن نملأ طريقة تقديم draw_predictions () التي أنشأناها في البداية. في ذلك ، سننظر في المسافة إلى الأشياء. قررت حساب المسافة على النحو التالي: خذ متوسط جميع نقاط المسافة في إطار الكائن الذي تم العثور عليه:def draw_predictions(pred_img, color_img, depth_image):
for detection in pred_img[0,0,:,:]:
score = float(detection[2])
if score > 0.5:
left = detection[3] * color_img.shape[1]
top = detection[4] * color_img.shape[0]
right = detection[5] * color_img.shape[1]
bottom = detection[6] * color_img.shape[0]
cv.rectangle(color_img, (int(left), int(top)), (int(right), int(bottom)), (210, 230, 23), 2)
depth = depth_image[int(left):int(right), int(top):int(bottom)].astype(float)
depth_scale = profile.get_device().first_depth_sensor().get_depth_scale()
depth = depth * depth_scale
dist,_,_,_ = cv.mean(depth)
dist = round(dist, 1)
cv.putText(color_img, "dist: "+str(dist)+"m", (int(left), int(top)-5), cv.FONT_HERSHEY_PLAIN, 1, (0, 255, 0), 1)

كود كاملimport pyrealsense2 as rs
import numpy as np
import cv2 as cv
def draw_predictions(pred_img, color_img, depth_image):
for detection in pred_img[0,0,:,:]:
score = float(detection[2])
if score > 0.5:
left = detection[3] * color_img.shape[1]
top = detection[4] * color_img.shape[0]
right = detection[5] * color_img.shape[1]
bottom = detection[6] * color_img.shape[0]
cv.rectangle(color_img, (int(left), int(top)), (int(right), int(bottom)), (210, 230, 23), 2)
depth = depth_image[int(left):int(right), int(top):int(bottom)].astype(float)
depth_scale = profile.get_device().first_depth_sensor().get_depth_scale()
depth = depth * depth_scale
dist,_,_,_ = cv.mean(depth)
dist = round(dist, 1)
cv.putText(color_img, "dist: "+str(dist)+"m", (int(left), int(top)-5), cv.FONT_HERSHEY_PLAIN, 1, (0, 255, 0), 1)
pipeline = rs.pipeline()
config = rs.config()
colorizer = rs.colorizer()
model = cv.dnn.readNetFromTensorflow(
"models/ssdlite_mobilenet_v2_coco_2018_05_09/frozen_inference_graph.pb",
"models/ssdlite_mobilenet_v2_coco_2018_05_09/graph.pbtxt"
)
config.enable_stream(rs.stream.color, 640, 480, rs.format.bgr8, 30)
config.enable_stream(rs.stream.depth, 640, 480, rs.format.z16, 30)
profile = pipeline.start(config)
cv.namedWindow("RealSense object detection", cv.WINDOW_AUTOSIZE)
try:
while True:
frames = pipeline.wait_for_frames()
depth_frame = frames.get_depth_frame()
color_frame = frames.get_color_frame()
if not depth_frame or not color_frame:
continue
depth_image = np.asanyarray(depth_frame.get_data())
color_image = np.asanyarray(color_frame.get_data())
model.setInput(cv.dnn.blobFromImage(color_image, size=(300, 300), swapRB=True, crop=False))
pred = model.forward()
draw_predictions(pred, color_image, depth_image)
colorized_depth = cv.applyColorMap(cv.convertScaleAbs(depth_image, alpha=0.03), cv.COLORMAP_JET)
images = np.hstack((color_image, colorized_depth))
cv.imshow("RealSense object detection", images)
key = cv.waitKey(1) & 0xFF
if (key == 27) or (key == ord('q')):
cv.destroyWindow("RealSense object detection")
break
finally:
    pipeline.stop()
استنتاج
وبالتالي ، لدينا برنامج نصي بسيط لتقدير المسافة إلى الكائن المحدد. قد ترتكب الخوارزمية خطأ حوالي 50 سم ، ولكن بشكل عام تعمل بشكل جيد في غضون أربعة أمتار. لزيادة دقة القياس ، يمكنك تطبيق مرشحات إضافية مضمنة في pyrealsense2 على خريطة العمق لزيادة جودة الصورة ، أو تعديل خوارزمية حساب العمق نفسه (على سبيل المثال ، حساب متوسط مرجح أو قياس المسافة في منطقة مركزية واحدة). كما ترون ، المهمة ليست صعبة ، ولكنها مثيرة للاهتمام.