大家好!在本文中,我想谈谈如何在服务器和数据中心环境的Atlassian插件中使用React和Atlaskit。介绍
当前,如果您正在为服务器和数据中心的Atlassian产品开发插件,则可以使用vm,soy,requirejs,jquery,骨干来从框中开发用户界面。在这里,您可以阅读有关如何使用即用型库的文章。该技术堆栈已过时,希望使用更新的技术。我选择打字稿,并作为堆栈进行反应。另外,为了使将服务器插件轻松转移到云中,我选择了用户界面元素库atlaskit。在本文中,我将讨论Atlassian Jira,但是其他Atlassian服务器和数据中心产品也可以使用相同的方法。为了重现本文中的示例,您必须安装git和Atlassian SDK。所以,让我们开始吧!安装Maven原型并创建一个新项目。
我做了Maven原型,以使其更容易创建一个新项目,该项目已经包含使用React和Atlaskit创建插件的所有必要设置。如果不想使用原型,则可以从该原型中获取已经创建的插件,然后转到“我们组装并启动项目”部分。从我的Bitbucket存储库中克隆原型:git clone https://alex1mmm@bitbucket.org/alex1mmm/jira-react-atlaskit-archetype.git --branch v1 --single-branch
转到jira-react-atlaskit-archetype文件夹文件夹,并将此原型安装在本地Maven存储库中:cd jira-react-atlaskit-archetype
atlas-mvn install
之后,转到更高一级的文件夹并基于该原型创建一个新项目:cd ..
atlas-mvn archetype:generate -DarchetypeCatalog=local
将询问一个问题,以选择必要的原型。这是我在本地存储库中的原型:1: local -> com.cprime.jira.sil.extension:sil-extension-archetype (This is the com.cprime.jira.sil.extension:sil-extension plugin for Atlassian JIRA.)
2: local -> ru.matveev.alexey.sil.extension:sil-extension-archetype (This is the ru.matveev.alexey.sil.extension:sil-extension plugin for Atlassian JIRA.)
3: local -> ru.matveev.alexey.atlas.jira:jira-react-atlaskit-archetype-archetype (jira-react-atlaskit-archetype-archetype)
我需要选择ru.matveev.alexey.atlas.jira:jira-react-atlaskit-archetype-archetype,因此我将数字3表示为答案。然后,您需要为新项目指定groupid和artifactid:Define value for property 'groupId': react.atlaskit.tutorial
Define value for property 'artifactId': my-tutorial
Define value for property 'version' 1.0-SNAPSHOT: :
Define value for property 'package' react.atlaskit.tutorial: :
Confirm properties configuration:
groupId: react.atlaskit.tutorial
artifactId: my-tutorial
version: 1.0-SNAPSHOT
package: react.atlaskit.tutorial
Y: : Y
我们组装并安装项目
就我而言,新项目位于my-tutorial文件夹中。让我们转到此文件夹并构建项目:cd my-tutorial
atlas-mvn package
组装完项目后,转到后端文件夹并运行Atlassian Jira:cd backend
atlas-run
测试插件
Atlassian Jira启动后,请转到以下地址的浏览器:http://localhost:2990/jira
您需要以admin身份登录:admin and go gear->管理应用程序。 您会从我们的插件中看到一个菜单。但是在开始我们的Atlaskit元素之前,请转到系统->日志记录和性能分析,并为react.atlaskit.tutorial.servlet包设置INFO日志记录级别。
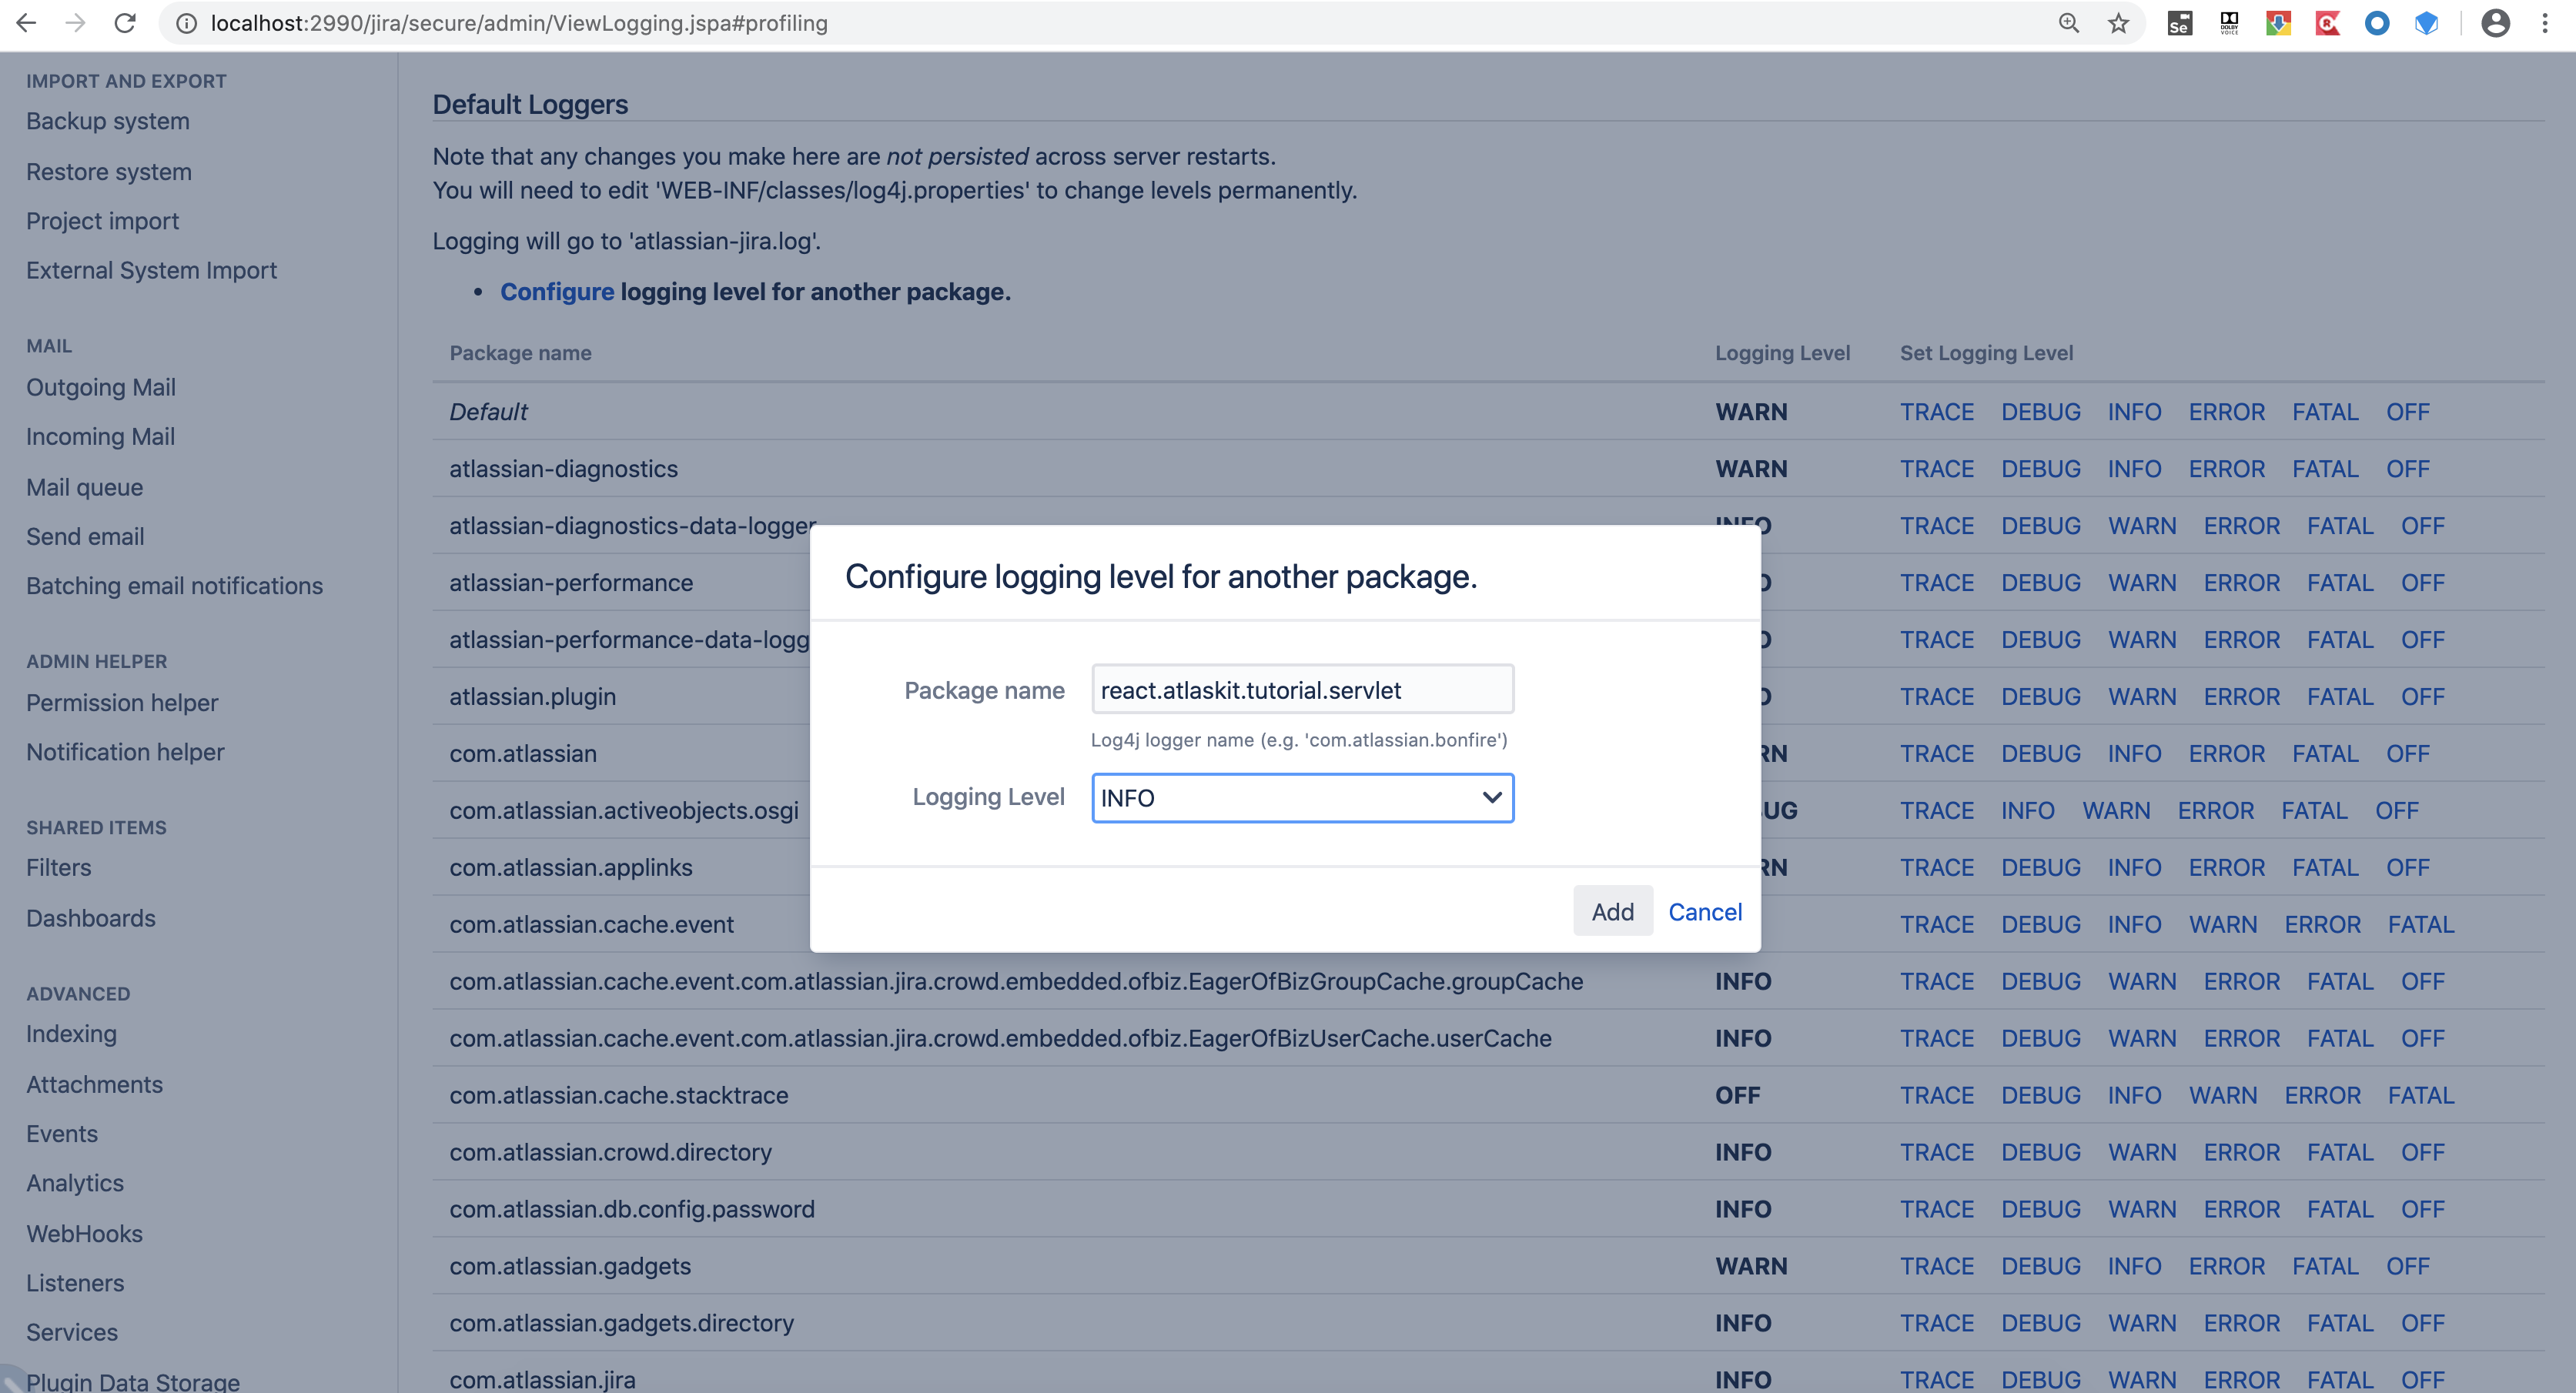 现在返回到“管理应用程序”,然后单击“表单”菜单。我们将看到使用Atlaskit Form元素显示的数据输入表单:
 填写所有文本字段,然后单击Submit按钮:
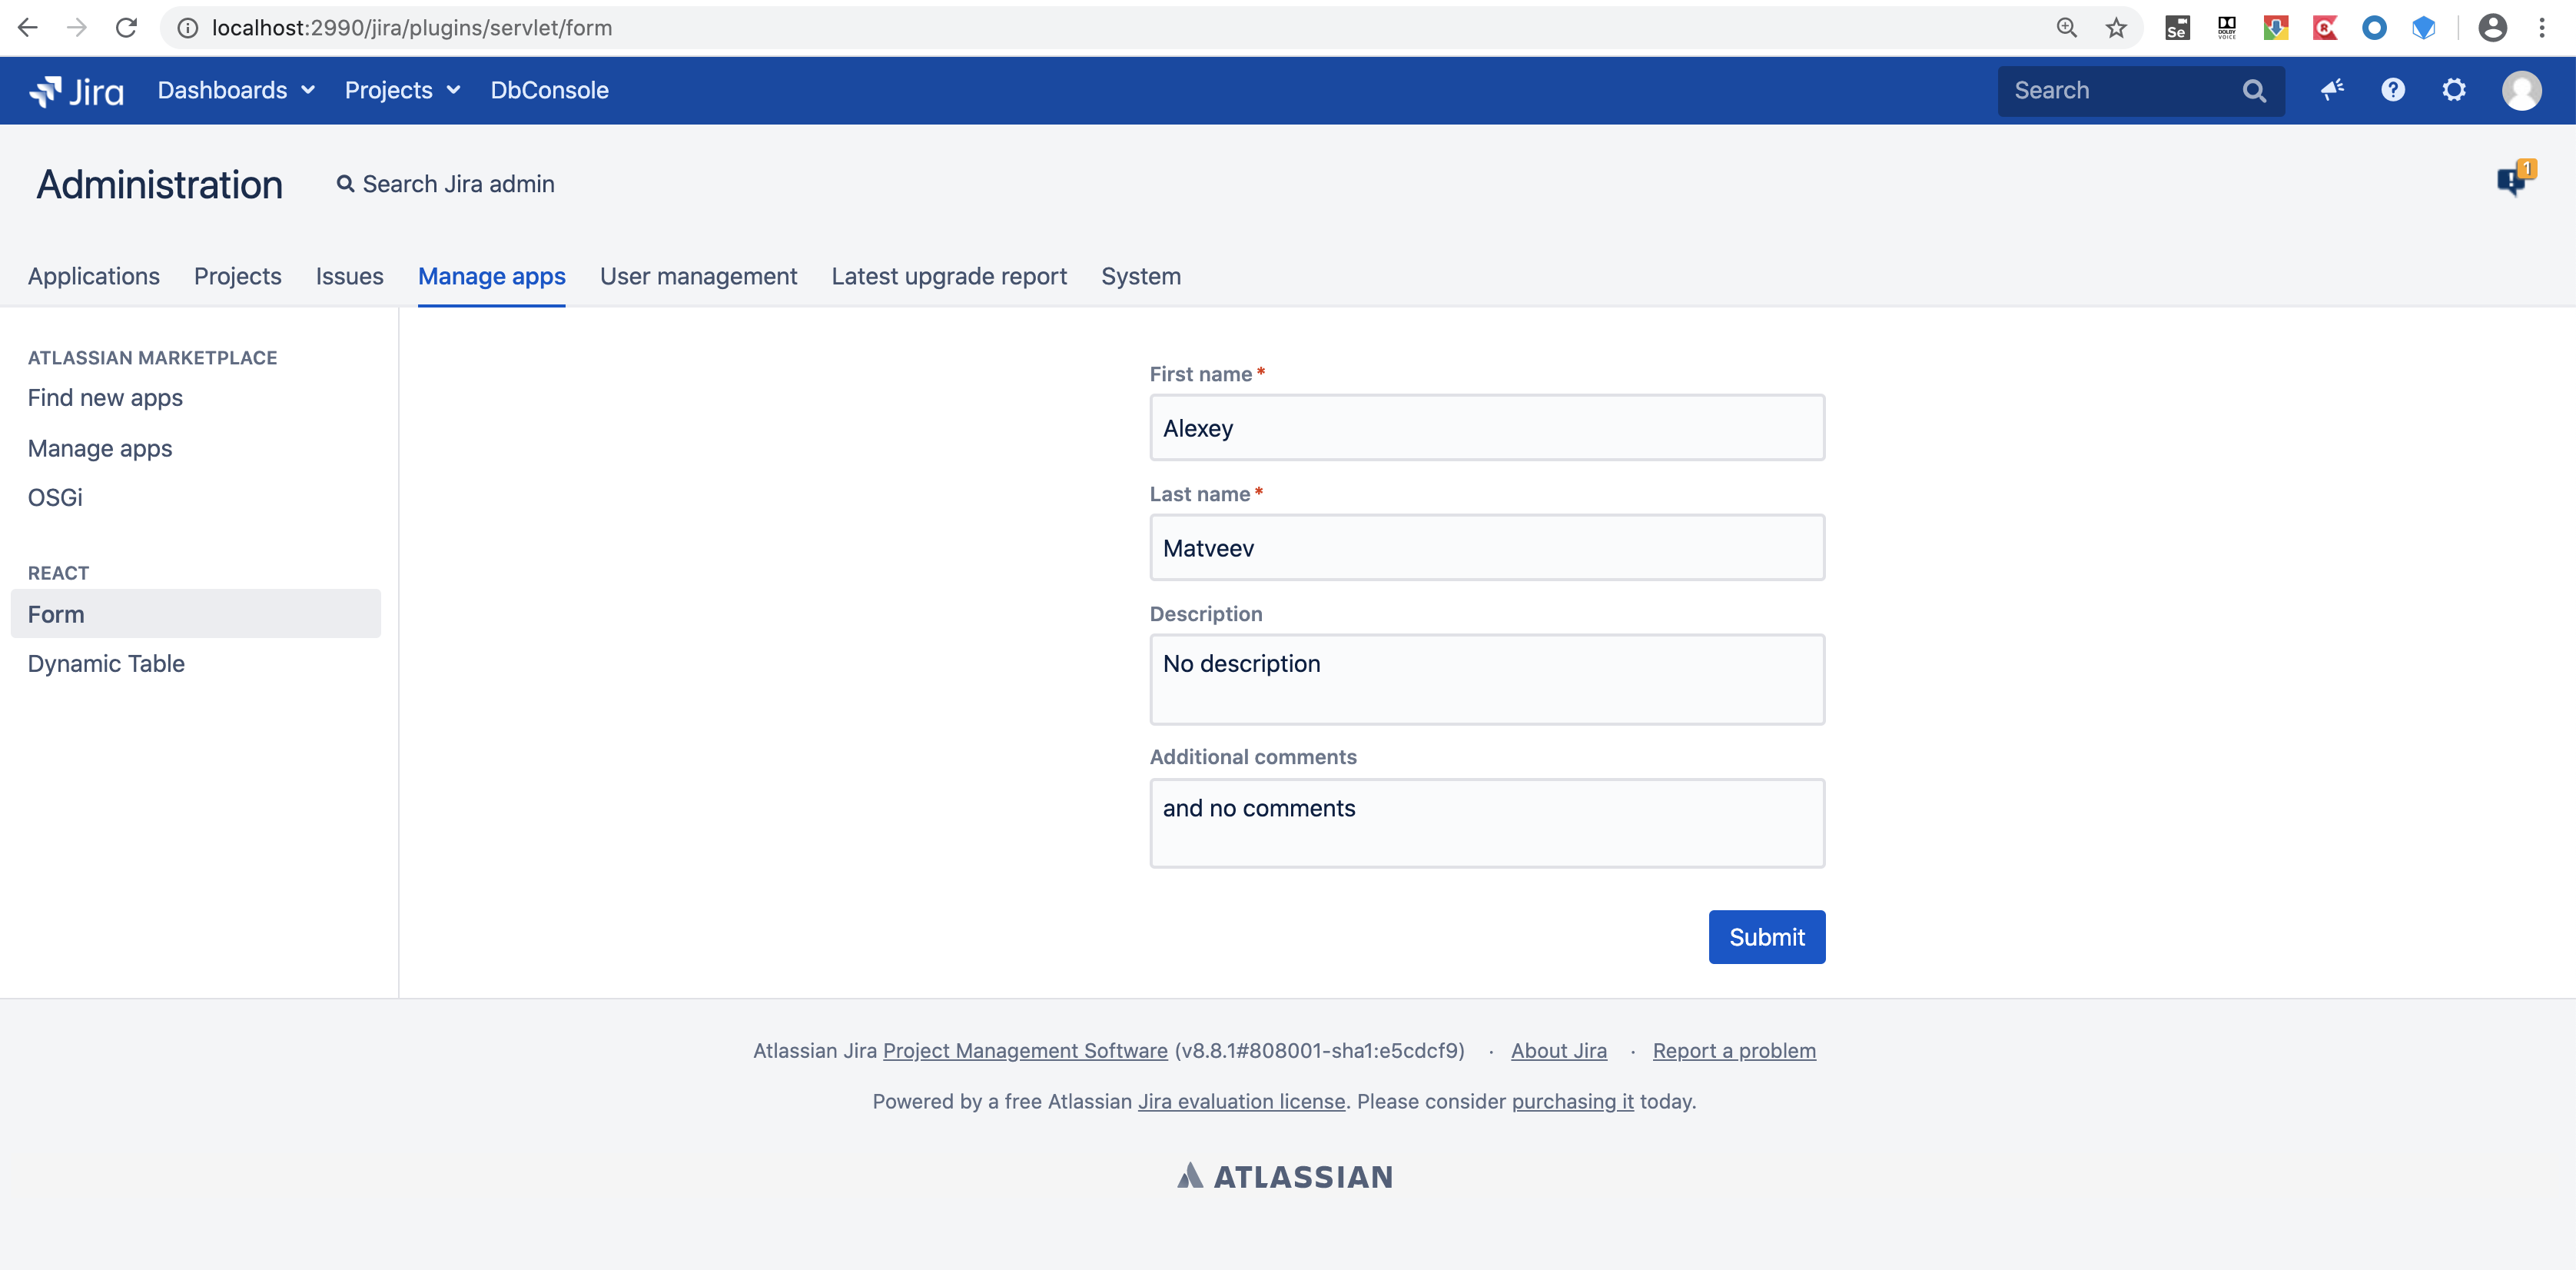 现在,如果打开atlassian-jira.log文件,您将看到类似以下内容:
2020-05-10 08:44:29,701+0300 http-nio-2990-exec-4 INFO admin 524x12509x1 15awhw2 0:0:0:0:0:0:0:1 /plugins/servlet/form [r.a.tutorial.servlet.FormServlet] Post Data: {"firstname":"Alexey","lastname":"Matveev","description":"No description","comments":"and no comments"}
这意味着,通过单击Submit按钮,我们的数据已成功传输到服务于此表单的servlet,并且该servlet在日志文件中显示了输入的数据。现在,选择“动态表”菜单。您将看到Atlaskit 动态表格元素: 这就是我们插件的全部工作。现在,让我们看看它是如何工作的!
内部插件
这是我们插件的结构: 后端包含使用Atlassian SDK创建的Atlassian Jira插件。前端包含将由我们的插件使用的UI元素。pom.xml pom文件,其中定义了两个模块:
 <modules>
<module>frontend</module>
<module>backend</module>
</modules>
现在让我们看一下前面的文件夹。前端
前端文件夹包含以下文件:我将 描述主要文件。package.json是npm的配置文件,其中包含以下信息:我们将使用诸如打字稿,地图集,babel之类的软件包。.babel.rc- Babel的配置文件。Babel用于将ECMAScript 2015+代码转换为JavaScript代码。我们将编写我们的Typescript代码,因此我们需要将其转换为JavaScript代码,以便Jira插件可以使用它。webpack.config.js -为配置文件的WebPack。Webpack处理我们的应用程序,构建依赖关系图,并生成一个包含所有必要JavaScript的捆绑包,以使我们的应用程序正常工作。为了使Jira插件能够与我们的JavaScript一起使用,我们需要为每个入口点使用一个Javascript文件。在我们的例子中,入口点是菜单项“表单”和“动态表”。这是webpack.config.js文件的内容:
const WrmPlugin = require('atlassian-webresource-webpack-plugin');
var path = require('path');module.exports = {
    module: {
        rules: [
          {
            test: /\.(js|jsx)$/,
            exclude: /node_modules/,
            use: {
                loader: "babel-loader"
            }
          }
        ]
    },
    entry: {
            'form': './src/form.js',
            'dynamictable': './src/dynamictable.js'
    },

    plugins: [
        new WrmPlugin({
            pluginKey: 'ru.matveev.alexey.atlas.jira.jira-react-atlaskit',
            locationPrefix: 'frontend/',
            xmlDescriptors: path.resolve('../backend/src/main/resources', 'META-INF', 'plugin-descriptors', 'wr-defs.xml')
        }),
    ],
    output: {
        filename: 'bundled.[name].js',
        path: path.resolve("./dist")
    }
};
如您所见,我们使用atlassian-webresource-webpack-plugin。需要这样做,以便在webpack创建JavaScript文件之后,该文件将自动添加为Web资源:plugins: [
new WrmPlugin({
pluginKey: 'ru.matveev.alexey.atlas.jira.jira-react-atlaskit',
locationPrefix: 'frontend/',
xmlDescriptors: path.resolve('../backend/src/main/resources', 'META-INF', 'plugin-descriptors', 'wr-defs.xml')
}),
],
作为此配置的结果,在组装了前端模块之后,将在后端/ src / resources / META-INF / plugin-descriptors文件夹中创建wr-defs.xml文件。locationPrefix参数允许我们指定Jira插件中JavaScript文件的位置。在本例中,我们指示文件将位于backend / src / resources / frontend文件夹中。我们稍后将在后端模块中将JavaScript文件放入此文件夹中,但是现在此参数允许我们在文件wr-defs.xml中获得这样一行:<resource type =“ download” name =“ bundled.dynamictable.js” location =“ frontend / bundled.dynamictable.js» />。这是在项目的构建过程中创建的wr-defs.xml文件的内容:<bundles>
<web-resource key="entrypoint-form">
<transformation extension="js">
<transformer key="jsI18n"/>
</transformation>
<context>form</context>
<dependency>com.atlassian.plugins.atlassian-plugins-webresource-plugin:context-path</dependency>
<resource type="download" name="bundled.form.js" location="frontend/bundled.form.js"/>
</web-resource>
<web-resource key="entrypoint-dynamictable">
<transformation extension="js">
<transformer key="jsI18n"/>
</transformation>
<context>dynamictable</context>
<dependency>com.atlassian.plugins.atlassian-plugins-webresource-plugin:context-path</dependency>
<resource type="download" name="bundled.dynamictable.js" location="frontend/bundled.dynamictable.js"/>
</web-resource>
<web-resource key="assets-632cdd38-e80f-4a5a-ba4c-07ba7cb36e60">
<transformation extension="js">
<transformer key="jsI18n"/>
</transformation>
<transformation extension="soy">
<transformer key="soyTransformer"/>
<transformer key="jsI18n"/>
</transformation>
<transformation extension="less">
<transformer key="lessTransformer"/>
</transformation>
</web-resource>
</bundles>
如您所见,我们还有Web资源的其他部分,其中定义了webpack创建的JavaScript文件。剩下的就是告诉Jira,在安装插件时,我们还将使用后端/ src / resources / META-INF / plugin-descriptor文件夹中的Web资源。为此,我们对backend / pom.xml文件进行了以下更改:<plugin>
<groupId>com.atlassian.maven.plugins</groupId>
<artifactId>jira-maven-plugin</artifactId>
<version>${amps.version}</version>
<extensions>true</extensions>
<configuration>
<productVersion>${jira.version}</productVersion>
<productDataVersion>${jira.version}</productDataVersion>
<compressResources>false</compressResources>
<enableQuickReload>true</enableQuickReload>
<instructions>
<Atlassian-Plugin-Key>${atlassian.plugin.key}</Atlassian-Plugin-Key>
<Export-Package></Export-Package>
<Import-Package>org.springframework.osgi.*;resolution:="optional", org.eclipse.gemini.blueprint.*;resolution:="optional", *</Import-Package>
<Spring-Context>*</Spring-Context>
<Atlassian-Scan-Folders>META-INF/plugin-descriptors</Atlassian-Scan-Folders>
</instructions>
</configuration>
</plugin>
我们添加了<Atlassian-Scan-Folders> META-INF /插件描述符</ Atlassian-Scan-Folders>。该参数将告诉Jira,有必要在META-INF / plugin-descriptors文件夹中搜索其他Web资源。我们还添加了<compressResources> false </ compressResources>,以禁用我们的JavaScript文件的最小化。他们已经被缩小。我们还在webpack.config.js文件中为应用程序定义了两个入口点: entry: {
'form': './src/form.js',
'dynamictable': './src/dynamictable.js'
},
这意味着webpack将扫描./src/form.js和./src/dynamictable.js文件,并创建两个JavaScript文件,每个文件都是其中一个入口点的文件。这些文件将在frontend / dist文件夹中创建。./src/form.js和./src/dynamictable.js不包含任何特殊内容。我从Atlaskit中的示例中获取了大部分代码。这是form.js文件的内容:import Form from "./js/components/Form";
这只是从文件./js/components/Form.js导入类的一行。这是./js/components/Form.js文件的内容:import React, { Component } from 'react';
import ReactDOM from "react-dom";
import Button from '@atlaskit/button';
import TextArea from '@atlaskit/textarea';
import TextField from '@atlaskit/textfield';
import axios from 'axios';
import Form, { Field, FormFooter } from '@atlaskit/form';
export default class MyForm extends Component {
render() {
return (
<div
style={{
display: 'flex',
width: '400px',
margin: '0 auto',
flexDirection: 'column',
}}
>
<Form onSubmit={data => axios.post(document.getElementById("contextPath").value + "/plugins/servlet/form", data)}>
{({ formProps }) => (
<form {...formProps} name="text-fields">
<Field name="firstname" defaultValue="" label="First name" isRequired>
{({ fieldProps }) => <TextField {...fieldProps} />}
</Field>
<Field name="lastname" defaultValue="" label="Last name" isRequired>
{({ fieldProps: { isRequired, isDisabled, ...others } }) => (
<TextField
disabled={isDisabled}
required={isRequired}
{...others}
/>
)}
</Field>
<Field
name="description"
defaultValue=""
label="Description"
>
{({ fieldProps }) => <TextArea {...fieldProps} />}
</Field>
<Field
name="comments"
defaultValue=""
label="Additional comments"
>
{({ fieldProps }) => <TextArea {...fieldProps} />}
</Field>
<FormFooter>
<Button type="submit" appearance="primary">
Submit
</Button>
</FormFooter>
</form>
)}
</Form>
</div>
);
}
}
window.addEventListener('load', function() {
const wrapper = document.getElementById("container");
wrapper ? ReactDOM.render(<MyForm />, wrapper) : false;
});</code></pre>
<!-- /wp:code --> :<!-- wp:code -->
<pre class="wp-block-code"><code>window.addEventListener('load', function() {
const wrapper = document.getElementById("container");
wrapper ? ReactDOM.render(<MyForm />, wrapper) : false;
});
在这里,我在div容器中显示MyForm组件。该容器将在大豆Jira插件模板中定义。还请注意以下这一行:onSubmit={data => axios.post(document.getElementById("contextPath").value + "/plugins/servlet/form", data)}
document.getElementById(“ contextPath”)。value获取ID为contextPath的字段的值。我在Jira插件的大豆模板中定义了该字段。此字段中的值来自“表单”菜单项绑定到的servlet。在我的情况下,contextPath包含值/ jira,因为从Atlassian SDK启动Jira时,会设置此上下文路径。一切都与前端有关。组装frontend模块的结果是,我们在frontend / dist和xml文件夹中获得了两个JavaScript文件,在backend / src / resources / META-INF / plugin-descriptors文件夹中获得了其他Web资源。现在,让我们继续到后端。后端
我将这些插件添加到了后端/ pom.xml文件中:<plugin>
<groupId>org.codehaus.mojo</groupId>
<artifactId>properties-maven-plugin</artifactId>
<version>1.0.0</version>
<executions>
<execution>
<phase>generate-resources</phase>
<goals>
<goal>write-project-properties</goal>
</goals>
<configuration>
<outputFile>${project.build.outputDirectory}/maven.properties</outputFile>
</configuration>
</execution>
</executions>
</plugin>
<plugin>
<artifactId>maven-resources-plugin</artifactId>
<version>3.1.0</version>
<executions>
<execution>
<id>copy frontend files to resources</id>
<phase>generate-resources</phase>
<goals>
<goal>copy-resources</goal>
</goals>
<configuration>
<outputDirectory>src/main/resources/frontend</outputDirectory>
<overwrite>true</overwrite>
<resources>
<resource>
<directory>../frontend/dist</directory>
<includes>
<include>*.*</include>
</includes>
</resource>
</resources>
</configuration>
</execution>
</executions>
</plugin>
properties-maven-plugin创建一个包含所有Maven属性的maven.properties文件。我需要atlassian.plugin.key属性,以便从绑定到插件菜单项的servlet调用Web资源。maven-resources-plugin从frontend / dist文件夹中提取JavaScript文件,并将它们复制到backend / resources / frontend文件夹。然后,我创建了菜单项,并从这些菜单项中调用了servlet。以下是atlassian-plugin.xml文件中的行:<servlet name="Form Servlet" i18n-name-key="form-servlet.name" key="form-servlet" class="react.atlaskit.tutorial.servlet.FormServlet">
<description key="form-servlet.description">The Form Servlet Plugin</description>
<url-pattern>/form</url-pattern>
</servlet>
<servlet name="Dynamic Table Servlet" i18n-name-key="dynamic-table-servlet.name" key="dynamic-table-servlet" class="react.atlaskit.tutorial.servlet.DynamicTableServlet">
<description key="dynamic-table-servlet.description">The Dynamic Table Servlet Plugin</description>
<url-pattern>/dynamictable</url-pattern>
</servlet>
<web-section name="React Plugin" i18n-name-key="react.name" key="react" location="admin_plugins_menu" weight="1000">
<description key="react.description">React Plugin</description>
<label key="react.label"/>
</web-section>
<web-item name="from web item" i18n-name-key="form.name" key="form" section="admin_plugins_menu/react" weight="1000">
<description key="form.description">Form</description>
<label key="form.label"/>
<link linkId="configuration-link">/plugins/servlet/form</link>
</web-item>
<web-item name="dynamic table web item" i18n-name-key="dynamictable.name" key="dynamictable" section="admin_plugins_menu/react" weight="1000">
<description key="dynamictable.description">Dynamic Table</description>
<label key="dynamictable.label"/>
<link linkId="configuration-link">/plugins/servlet/dynamictable</link>
</web-item>
因此,我们有从这些菜单项中调用的菜单和servlet。现在让我们看一下Servlet:FormServlet.java:public class FormServlet extends HttpServlet{
private static final Logger log = LoggerFactory.getLogger(FormServlet.class);
private final ResourceService resourceService;
private final SoyTemplateRenderer soyTemplateRenderer;
public FormServlet(@ComponentImport SoyTemplateRenderer soyTemplateRenderer, ResourceService resourceService) {
this.resourceService = resourceService;
this.soyTemplateRenderer = soyTemplateRenderer;
}
@Override
protected void doGet(HttpServletRequest req, HttpServletResponse resp) throws ServletException, IOException
{
String pluginKey = this.resourceService.getProperty("atlassian.plugin.key");
Map<String, Object> map = new HashMap<>();
map.put("contextPath", req.getContextPath());
String html = soyTemplateRenderer.render(pluginKey + ":jira-react-atlaskit-resources", "servlet.ui.form", map);
resp.setContentType("text/html");
resp.getWriter().write(html);
resp.getWriter().close(); }
@Override
protected void doPost(HttpServletRequest req, HttpServletResponse resp) throws ServletException, IOException {
StringBuffer jb = new StringBuffer();
String line = null;
try {
BufferedReader reader = req.getReader();
while ((line = reader.readLine()) != null)
jb.append(line);
} catch (Exception e) { }
log.info(String.format("Post Data: %s", jb.toString()));
String pluginKey = this.resourceService.getProperty("atlassian.plugin.key");
Map<String, Object> map = new HashMap<>();
map.put("contextPath", req.getContextPath());
String html = soyTemplateRenderer.render(pluginKey + ":jira-react-atlaskit-resources", "servlet.ui.form", map);
resp.setContentType("text/html");
resp.getWriter().write(html);
resp.getWriter().close();
}}
我定义两个变量resourceService和soyTemplateRenderer并在类构造函数中初始化这些变量。resourceService-一个从maven.properties文件读取属性的Bean。soyTemplateRenderer-可以调用大豆模板的Jira bean。在doGet方法中,我获得atlassian.plugin.key属性的值和上下文路径。然后,我将上下文路径作为参数传递给大豆模板,并以servlet.ui.form的名称调用大豆模板。以下是大豆文件的内容:{namespace servlet.ui}
/**
* This template is needed to draw the form page.
*/
{template .form}
{@param contextPath: string}
{webResourceManager_requireResourcesForContext('form')}
<html>
<head>
<meta charset="utf-8"/>
<meta name="decorator" content="atl.admin">
<meta name="admin.active.section" content="admin_plugins_menu/react">
<title>Form Page</title>
</head>
<body>
<div class="field-group hidden">
<input class="text" type="text" id="contextPath" name="contextPath" value="{$contextPath}">
</div>
<div id="maincontainer">
<div id="container">
</div>
</div>
</body>
</html>
{/template}
/**
* This template is needed to draw the dynamic table page.
*/
{template .dynamictable}
{webResourceManager_requireResourcesForContext('dynamictable')}
<html>
<head>
<meta charset="utf-8"/>
<meta name="decorator" content="atl.admin">
<meta name="admin.active.section" content="admin_plugins_menu/react">
<title>Dynamic Table Page</title>
</head>
<body>
<div id="maincontainer">
<div id="container">
</div>
</div>
</body>
</html>
{/template}
模板的代码非常简单。我将Web资源称为菜单项,并创建一个容器div,供React使用。我在atlassian-plugin.xml中注册了大豆文件本身:<web-resource key="jira-react-atlaskit-resources" name="jira-react-atlaskit Web Resources">
...
<resource type="soy" name="soyui" location="/templates/servlets.soy"/>
...
<context>jira-react-atlaskit</context>
</web-resource>
这就是在Atlassian服务器和数据中心插件中使用React和Atlaskit所需要做的一切。