介绍
在上一篇文章中我们已经与您一起探讨了将Webix框架集成到Electron并基于这些框架创建简单的GUI应用程序的问题。本文的目的是进一步发展集成到使用Electron和Webix其他JavaScript框架构建的GUI界面的问题。 “ Webix”中实现的所有GUI元素均以“ view”参数为特征。根据此参数的值,将显示一个或另一个GUI元素。在实现界面时,允许您创建“ Webix”的“视图”元素的类型数量重叠了大约90%的任务。剩下的10%只是在需要集成Webix中未明确支持的先前编写的代码或框架(库)的情况下。为了实现与第三方框架(库)的集成,我们将与您一起创建“视图” Webix元素。问题的提法
创建一个GUI应用程序“ Electron + Webix”,该应用程序将构建形式为“ y = a * sin(b)+ c”的函数图,并具有通过动态重绘该图来更改函数“ a,b和c”的参数的功能。小预订
立即预订“ Webix”中存在用于处理图表的标准非常强大的工具。我的目标不是补充这些工具,而是向您展示如何将其他框架或库集成到Electron + Webix捆绑包中。碰巧的是,我使用“ D3.js”为该图准备了现成的代码,因此决定将其集成到应用程序中。工具类
- Visual Studio代码编辑器code.visualstudio.com。
- Node.JS-从此处下载nodejs.org/en
- 电子-安装“ npm install --save-dev电子”。
- Webix – ru.webix.com.
- JQuery – «npm jquery»
- D3.js – d3js.org
- (https://github.com/kapakym/electron_webix) , .
1.因为我很懒惰,所以我不想第二次从头开始编写所有代码。因此,我们从上一篇文章中获取代码,并将其填充到所需的文件夹中。有两种选择。第一种是从站点下载归档文件(图1),如果安装了Git客户端,则将其克隆(图2)。 图。 1 -从站点下载源代码
 图。 2-克隆存储库2.为了将来不致混淆,请重命名文件夹(这是可选的),例如“ electron_webix_2”,然后在Visual Studio Code中打开它(图3)。
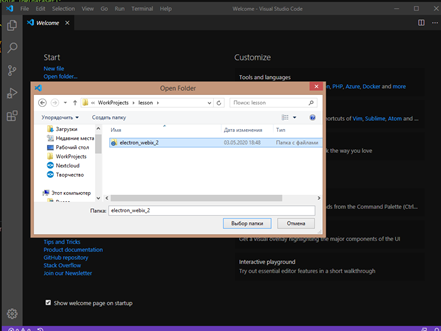 图。 3-打开项目3.安装必要的元件。您需要做的第一件事是从“ Node.JS”上方的工具中提供的链接下载并安装它。没有“ Node.JS”,您将无能为力。接下来,在Visual Studio Code中打开“ Ctr +`”控制台,并一个接一个地输入以下命令(图4):
- “ Npm安装--save-dev电子”;
- “ Npm安装jquery”。
 图。4-安装Node.JS和JQuery4.接下来,您和我仍然需要“ D3.js”框架,我们还使用工具中的链接(“ d3.zip”文件)下载了该框架。从下载的存档文件“ d3.zip”中,我们提取文件“ d3.js”,并将其放在“ libs”文件夹中(图5)。
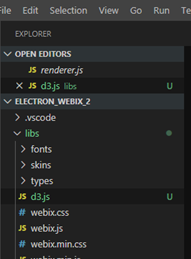 图。5-添加D3.js库在此工作站上,我们已经准备好了。
打字界面
现在已经准备好工作场所,让我们直接开始创建应用程序。它将由以下“视图”元素组成:- -工具栏,一个标准的Webix元素。该元素将放置在窗口的顶部,并将包含窗口控制按钮和应用程序的名称。我们已经在上一篇文章的材料中创建了这个界面元素,在这里我们将不做任何更改;
- -myview,您和我只需创建一个定制的“视图”即可。这将是使用“ D3.js”框架构建函数图的区域。除其他外,将教导该区域以适应我们应用程序窗口的大小。将其放置在应用程序窗口的中间;
- -滑块,“ Webix”的标准元素。该元素允许您使用所谓的“滑块”来更改其值。我们将创建3个此类元素,每个元素都将负责更改函数“ a,b或c”的某个参数。将它们放在应用程序窗口的底部。
让我们开始吧。打开文件“ renderer.js”并进行编辑,即 我们从上一篇文章中删除了不需要的元素,并将其替换为上述元素。“ renderer.js”文件如下所示:
const { remote } = require('electron')
let WIN = remote.getCurrentWindow()
const webix = require('./libs/webix.min.js')
$ = require('jquery')
webix.ui(
{
"id": 1587908357897,
"rows": [
{
"css": "webix_dark",
"view": "toolbar",
"height": 0,
"cols": [
{ "view": "label", "label": "Elcetron +Webix its cool!", css:"head_win" },
{ "label": "-", "view": "button", "height": 38, "width": 40, id:"min-bt" },
{ "label": "+", "view": "button", "height": 38, "width": 40, id:"max-bt" },
{ "label": "x", "view": "button", "height": 38, "width": 40, id:"close-bt" }
]
},
{
"width": 0,
"height": 0,
"cols": [
{ "url": "demo->5ea58f0e73f4cf00126e3769", "view": "sidebar", "width": 177 },
{
"width": 0,
"height": 0,
"rows": [
{ "template": "Hello WORLD! ", "view": "template" },
{
"url": "demo->5ea58f0e73f4cf00126e376d",
"type": "bar",
"xAxis": "#value#",
"yAxis": {},
"view": "chart"
}
]
}
]
}
]
}
)
$$("close-bt").attachEvent("onItemClick", () => {
const window = remote.getCurrentWindow();
window.close();
})
$$("min-bt").attachEvent("onItemClick", () => {
const window = remote.getCurrentWindow();
window.minimize();
})
$$("max-bt").attachEvent("onItemClick", () => {
const window = remote.getCurrentWindow();
if (!window.isMaximized()) {
window.maximize();
} else {
window.unmaximize();
}
})
它将变成这样:
const { remote } = require('electron')
let WIN = remote.getCurrentWindow()
const webix = require('./libs/webix.min.js')
$ = require('jquery')
webix.ui(
{
"id": 1587908357897,
"rows": [
{
"css": "webix_dark",
"view": "toolbar",
"height": 0,
"cols": [
{ "view": "label", "label": "Electron + Webix + D3.js", css:"head_win" },
{ "label": "-", "view": "button", "height": 38, "width": 40, id:"min-bt" },
{ "label": "+", "view": "button", "height": 38, "width": 40, id:"max-bt" },
{ "label": "x", "view": "button", "height": 38, "width": 40, id:"close-bt" }
]
},
{ "view": "myview", id: "d3_chart" },
{
"cols": [
{
"label": "Amplitude", "title": "#value#", "value": 50, "view": "slider", id: "slider_amplitude",
},
{
"label": "Bias", "title": "#value#", "value": 0, "view": "slider", "height": 38, id: "slider_scope", min:-50, max:50, step:1,
},
{
"label": "Frequency", "title": "#value#", "value": 0.005, "view": "slider", "height": 38, id: "slider_freq", min:0, max:0.1, step:0.001,
}
]
}
]
}
)
$$("close-bt").attachEvent("onItemClick", () => {
const window = remote.getCurrentWindow();
window.close();
})
$$("min-bt").attachEvent("onItemClick", () => {
const window = remote.getCurrentWindow();
window.minimize();
})
$$("max-bt").attachEvent("onItemClick", () => {
const window = remote.getCurrentWindow();
if (!window.isMaximized()) {
window.maximize();
} else {
window.unmaximize();
}
})
让我们更详细地考虑哪些参数包括“ {” view“:” myview“,id:” d3_chart“}”:-视图:myview-输入“ view”,虽然它不存在,但我们还没有创建它;-id:d3_chart-“ Webix” ID,我们将使用它来引用我们的元素。为了完整性,我还将解释“ slider”元素的参数:-视图:滑块-键入“视图”,滑块;-标签:“文本”-将在滑块上显示的标签;-标题:“#value”-滑块的当前显示值;-值:“值”-默认滑块值;-min:“值”-滑块的最小值;-max:“值”-滑块的最大值“;-step:” value“-更改滑块的值的步骤。您可以在docs.webix.com/desktop__components.html上了解有关Webix元素所有参数的更多信息。创建“ myview”
现在创建一个文件“ view_chart.js”,在其中定义新类型“ myview”并在“ VSC”中将其打开。 图。6-开始编辑view_chart.js
,向其中添加以下代码:webix.protoUI({
name: "myview",
$init: function () {
},
redraw: function (a, b, c) {
},
}, webix.ui.view);
webix.protoUI函数旨在基于标准元素创建自定义Webix元素。请考虑传递给此函数的参数:- 名称-创建的项目的名称;
- $ init是在创建元素时将启动的函数。换句话说,它是一个构造函数。
- 重绘-我们与您一起使用的函数,它将负责重绘该函数的图形。我们将传递变量``a,b和c''的参数值
- webix.ui.view是我们元素的父级。
您可以在此处阅读有关webix.protoUI的更多信息,因此,当“视图”的框架就绪时,我们将编写一些函数来绘制正弦图。用于计算sin函数值的函数如下所示:function calcsin(a, b, c) {
dataset = [];
for (var i = 1; i < 360; i++) {
dataset.push({ "x": i, "y": a * Math.sin(b * i) + c });
};
};
这里的一切都非常简单,我们将参数值代入数学函数sin中并将结果保存在数组中。将其添加到文件“ view_chart.js”的末尾。接下来,在文件“ view_chart.js”的末尾添加一个函数,该函数将使用D3.js框架绘制图形,如下所示:function drawSin() {
$(document).ready(function () {
width = $("#mycontent").width() - margin.left - margin.right
height = $("#mycontent").height() - margin.top - margin.bottom;
var xScale = d3.scaleLinear()
.domain([0, 360])
.range([0, width]);
var yScale = d3.scaleLinear()
.domain([-100, 100])
.range([height, 0]);
var line = d3.line()
.x(function (d, i) { return xScale(d.x); })
.y(function (d) { return yScale(d.y); })
.curve(d3.curveMonotoneX)
var svg = d3.select("#mycontent").append("svg")
.attr("float", "center")
.attr("class", "webix_chart")
.attr("width", width + margin.left + margin.right)
.attr("height", height + margin.top + margin.bottom)
.append("g")
.attr("transform", "translate(" + margin.left + "," + margin.top + ")")
svg.append("g")
.attr("class", "x axis")
.attr("transform", "translate(0," + height/2 + ")")
.call(d3.axisBottom(xScale));
svg.append("g")
.attr("class", "y axis")
.call(d3.axisLeft(yScale))
svg.append("path")
.datum(dataset)
.attr("class", "line")
.attr("d", line);
})
}
给定函数的顺序如下:-计算相对于div元素的图的大小,将div元素打包为该图的“宽度”和“高度”;-我们通过``X''和``Y''缩放图表的值;-创建一个“ html”元素“ svg”,在其中绘制“ X”轴,“ Y”轴和图形本身;现在,用于计算和呈现图表的函数已经准备就绪,我们将连接几个库,并在“ view_chart.js”文件的开头声明几个变量:
const d3 = require("./libs/d3")
$ = require('jquery')
var dataset = [];
var margin = { top: 50, right: 50, bottom: 50, left: 50 }
, width = $("#mycontent").width() - margin.left - margin.right
, height = $("#mycontent").height() - margin.top - margin.bottom;
考虑到缩进,变量“ width”和“ height”将存储图表的宽度和高度。接下来,返回功能“ webix.protoUI”并编写其功能:webix.protoUI({
name: "myview",
$init: function () {
this.$view.innerHTML = "<div id='mycontent'></div>"
calcsin(60, 0.05, 0)
drawSin()
},
redraw: function (a, b, c) {
$("#mycontent").html("")
calcsin(a, b, c)
drawSin()
},
}, webix.ui.view);
内容填充两个功能。创建“视图”时,第一个“ init”仅执行一次。当我们需要重绘图表时,将调用第二个。现在,文件“ view_chart.js”的全部内容将如下所示:
const d3 = require("./libs/d3")
$ = require('jquery')
var dataset = [];
var margin = { top: 50, right: 50, bottom: 50, left: 50 }
, width = $("#mycontent").width() - margin.left - margin.right
, height = $("#mycontent").height() - margin.top - margin.bottom;
webix.protoUI({
name: "myview",
$init: function () {
this.$view.innerHTML = "<div id='mycontent'></div>"
calcsin(60, 0.05, 0)
drawSin()
},
redraw: function (a, b, c) {
$("#mycontent").html("")
calcsin(a, b, c)
drawSin()
},
}, webix.ui.view);
function drawSin() {
$(document).ready(function () {
width = $("#mycontent").width() - margin.left - margin.right
height = $("#mycontent").height() - margin.top - margin.bottom;
var xScale = d3.scaleLinear()
.domain([0, 360])
.range([0, width]);
var yScale = d3.scaleLinear()
.domain([-100, 100])
.range([height, 0]);
var line = d3.line()
.x(function (d, i) { return xScale(d.x); })
.y(function (d) { return yScale(d.y); })
.curve(d3.curveMonotoneX)
var svg = d3.select("#mycontent").append("svg")
.attr("float", "center")
.attr("class", "webix_chart")
.attr("width", width + margin.left + margin.right)
.attr("height", height + margin.top + margin.bottom)
.append("g")
.attr("transform", "translate(" + margin.left + "," + margin.top + ")")
svg.append("g")
.attr("class", "x axis")
.attr("transform", "translate(0," + height/2 + ")")
.call(d3.axisBottom(xScale));
svg.append("g")
.attr("class", "y axis")
.call(d3.axisLeft(yScale))
svg.append("path")
.datum(dataset)
.attr("class", "line")
.attr("d", line);
})
}
function calcsin(a, b, c) {
    dataset = [];
    for (var i = 1; i < 360; i++) {
        dataset.push({ "x": i, "y": a * Math.sin(b * i) + c });
    };
};
接下来,您需要在文件“ renderer.js”中连接文件“ view_chart.js”的内容。我们为什么需要在renderer.js文件的顶部添加“ require(../ view_chart.js“)行,如下所示:
const { remote } = require('electron')
let WIN = remote.getCurrentWindow()
const webix = require('./libs/webix.min.js')
$ = require('jquery')
require("./view_chart.js")
现在,您需要向“ styles.css”文件中添加几个样式,将其打开并添加“ svg path”和“ #mycontent”样式,如下所示:.head_win {
-webkit-app-region: drag;
}
svg path{
stroke: #666;
fill: none;
stroke-width: 1;
}
#mycontent {
text-align: center;
overflow: none;
border: 1px solid black;
background-color: antiquewhite;
height: calc(100% - 2px);
}
完成样式后,您可以尝试运行我们的应用程序,看看发生了什么。因此,按“ F5”,然后在屏幕上将出现一个窗口,如图7 所示。7-我们的应用程序窗口我们看到了什么?上部是标准的Webix工具栏。中间部分是我们在myview中创建的图表。下部是三个滑块,我们必须教他们更改函数参数的值。
让滑块工作
现在让我们继续进行步骤,根据``振幅'',``偏差''和``频率''滑块的值在应用程序的中间重新绘制图形。我们为什么将“ onChange”事件处理程序添加到滑块,如下所示:
{
"label": "Amplitude", "title": "#value#", "value": 50, "view": "slider", id: "slider_amplitude",
on: {
onChange: function () {
$$("d3_chart").redraw($$("slider_amplitude").getValue(), $$("slider_freq").getValue(), $$("slider_scope").getValue());
}
}
},
{
"label": "Bias", "title": "#value#", "value": 0, "view": "slider", "height": 38, id: "slider_scope", min:-50, max:50, step:1,
on: {
onChange: function () {
$$("d3_chart").redraw($$("slider_amplitude").getValue(), $$("slider_freq").getValue(), $$("slider_scope").getValue());
}
}
},
{
"label": "Frequency", "title": "#value#", "value": 0.005, "view": "slider", "height": 38, id: "slider_freq", min:0, max:0.1, step:0.001,
on: {
onChange: function () {
$$("d3_chart").redraw($$("slider_amplitude").getValue(), $$("slider_freq").getValue(), $$("slider_scope").getValue());
}
}
}
在此处理程序中,我们将通过其元素``id''访问元素并调用我们之前创建的``redraw''函数来重绘图表,并向其传递滑块的当前值。单击“ F5”,运行我们的应用程序并尝试更改值(图8)。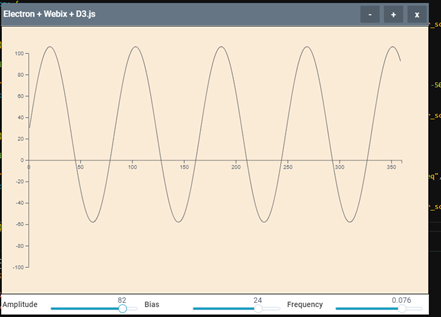 图。8-检查滑条的功能
在窗口后拉动图形
最后,我们添加了一个函数,该函数可以在图表更改时使图表适应窗口的大小。为什么我们在编辑器中打开文件“ view_chart.js”,并在其末尾添加一个处理程序来捕获窗口更改,如下所示:window.onresize = function ( e ) {
$("#mycontent").html("")
drawSin()
}
调整窗口大小时,此功能有效。其功能归结为清除“ mycontent”块的内容并重绘图形(调用“ drawSin()”函数)。每次调用drawSin()函数时,都会为width和height变量分配有关mycontent块大小(高度和宽度)的当前信息,此后图形将更改比例以适合块尺寸。结论
就这样。希望这些信息对您有用。谢谢!可以在这里下载资源。