因此,在第二部分中,我们开始执行。首先,让我们决定技术。我选择Web组件。组件方法(本机api)易于重用和调试。步骤1-说明结束位置
我们的虚拟视口的标签称为自定义视口。因此,首先我们描述视口的常规属性:custom-viewport {
min-height: 50vh;
max-height: 100vh;
width: 100%;
position: absolute;
bottom: 0;
overflow: hidden;
transform-origin: 50% 100% 0;
}
初始职位:custom-viewport[data-mode = "inited"] {
transform: translateY(calc(100% - 50vh));
transition: transform 1s;
}
职位空缺:custom-viewport[data-mode = "opened"] {
transform: translateY(0);
transition: transform 1s;
overflow-y: scroll;
}
删除的职位:custom-viewport[data-mode = "deleted"] {
transform: translateY(100%);
transition: transform 1s;
}
第2步-开始编写自定义视口组件
class CustomViewport extends HTMLElement {
 constructor() {
  super();
 }
}
我们实现dragUp / dragDown事件class CustomViewport extends HTMLElement {
constructor() {
super();
}
connectedCallback() {
this.addEventListener("touchstart", ev => {
this.firstTouch = ev.touches[0];
});
this.addEventListener("touchmove", ev => {
this.deltaY = ev.touches[0].clientY - this.firstTouch.clientY;
return this.deltaY > 0 ? this.dragDown(ev) : this.dragUp(ev);
});
}
dragUp(ev) {}
dragDown(ev) {}
}
从原理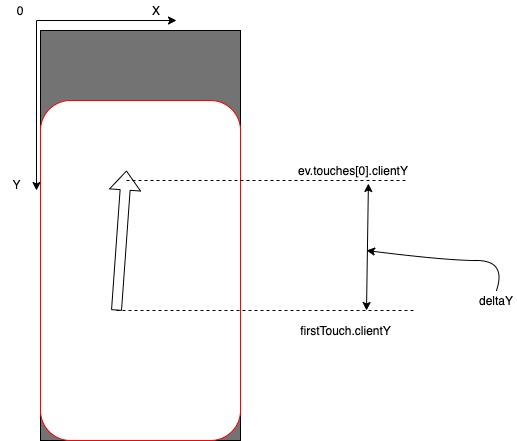 上讲,上面的代码可以描述如下,因此,现在我们可以区分一下dragUp / dragDown事件。下一个实用程序是功率储备的计算。
class CustomViewport extends HTMLElement {
constructor() {
super();
this.VIEWPORT_HEIGHT = window.innerHeight;
}
connectedCallback() {
this.addEventListener("touchstart", ev => {
this.firstTouch = ev.touches[0];
const rect = this.getBoundingClientRect();
const { height, top } = rect;
this.bottomOffsetBeforeDragging = (height + top) - this.VIEWPORT_HEIGHT;
});
this.addEventListener("touchmove", ev => {
this.deltaY = ev.touches[0].clientY - this.firstTouch.clientY;
return this.deltaY > 0 ? this.dragDown() : this.dragUp();
});
}
dragUp() {}
dragDown() {}
isBottomOffset() {
return (this.bottomOffsetBeforeDragging + this.deltaY) > 0;
}
}
在这里,我们首先记住运动开始时我们有多少动力储备,然后我们简单地将deltaY添加到该值,看看是否可以向上运动。实际上是逻辑拖动:...
dragUp() {
if(this.isBottomOffset()) {
return;
}
this.style.transform = 'translateY(0)';
}
...
我们编写了一种将视口移动的方法:class CustomViewport extends HTMLElement {
constructor() {
super();
this.VIEWPORT_HEIGHT = window.innerHeight;
}
connectedCallback() {
this.addEventListener("touchstart", ev => {
this.firstTouch = ev.touches[0];
const rect = this.getBoundingClientRect();
const { height, top } = rect;
this.bottomOffsetBeforeDragging = (height + top) - this.VIEWPORT_HEIGHT;
this.lastPosY = this.bottomOffsetBeforeDragging - this.scrollTop;
});
...
}
translateY() {
const pixels = this.deltaY + this.lastPosY;
this.style.transform = `translateY(${pixels}px)`;
this.style.transition = 'none';
}
...
}
让我们更详细地检查this.lastPosY是什么以及如何计算。如果在CSS中,我们编写了transform:translateY(calc(100%-50vh)); 其中100%是虚拟视口本身的高度,而50vh是真实视口的高度的一半,这非常适合位置的静态描述,那么使用绝对值进行操作以计算动力学中的运动更加方便,我们在这里进行这些转换。因此this.lastPosY是虚拟视口在移动开始时的移动量,以像素为单位,我们将this.deltaY添加到其中,并获得新的视口位置。由于我们定义了属性:bottom: 0;
transform-origin: 50% 100% 0;
然后,用于计算视口运动的坐标系统将采用以下形式: 我们描述dragDown:
...
dragDown() {
 if(this.lastPosY < 0) {
  return;
 }
 this.translateY();
}
...
实际上是dragEnd事件:class CustomViewport extends HTMLElement {
constructor() {
super();
this.VIEWPORT_HEIGHT = window.innerHeight;
}
connectedCallback() {
this.addEventListener("touchend", ev => {
const { mode: currentMode } = this.dataset;
this.style = null;
if (Math.abs(deltaY) < 10) {
this.dataset.mode = currentMode;
return;
}
if (deltaY > 0) {
if (currentMode === "inited") {
this.dataset.mode = "deleted";
return;
}
this.dataset.mode = "inited";
return;
}
this.dataset.mode = "opened";
});
...
在如果(Math.abs(deltaY)<10)的行中,我们指示如果移动的像素少于10个,则保留当前位置。结果,我们应该得到一个像
class CustomViewport extends HTMLElement {
 constructor() {
  super();
  this.VIEWPORT_HEIGHT = window.innerHeight;
 }
 connectedCallback() {
  this.addEventListener("touchstart", ev => {
   this.firstTouch = ev.touches[0];
   const rect = this.getBoundingClientRect();
   const { height, top } = rect;
   this.bottomOffsetBeforeDragging = (height + top) - this.VIEWPORT_HEIGHT;
   this.lastPosY = this.bottomOffsetBeforeDragging - this.scrollTop;
  });
  this.addEventListener("touchmove", ev => {
   this.deltaY = ev.touches[0].clientY - this.firstTouch.clientY;
   return this.deltaY > 0 ? this.dragDown() : this.dragUp();
  });
  this.addEventListener("touchend", ev => {
   const { mode: currentMode } = this.dataset;
   this.style = null;
   if (Math.abs(this.deltaY) < 10) {
    this.dataset.mode = currentMode;
    return;
   }
    if (this.deltaY > 0) {
     if (currentMode === "inited") {
       this.dataset.mode = "deleted";
       return;
      }
      this.dataset.mode = "inited";
      return;
    }
    this.dataset.mode = "opened";
  });
 }
 dragUp() {
  if(this.isBottomOffset()) {
   this.translateY();
   return;
  }
  this.style.transform = 'translateY(0)';
}
 dragDown() {
   if(this.lastPosY < 0) {
   return;
  }
  this.translateY();
}
translateY() {
  const pixels = this.deltaY + this.lastPosY;
  this.style.transform = `translateY(${pixels}px)`;
  this.style.transition = 'none';
 }
 isBottomOffset() {
   return (this.bottomOffsetBeforeDragging + this.deltaY) > 0;
 }
}

customElements.define('custom-viewport', CustomViewport);
该代码不是完整的实现,而只是一个原型。滚动的更详细的研究,去抖,任何其他优化,触摸取消-留给读者。