 下午好,亲爱的读者们。在本文中,我们将讨论Web开发中的软件体系结构。很长时间以来,我和我的同事使用了“清洁架构”的一种变体在其Frontend项目中构建架构。最初,我在过渡到TypeScript时将其投入使用,因为我在React的开发世界中没有找到其他合适的通用架构方法(而且我来自Android开发,很久以前,在Kotlin之前,我对Fernando Cejas的一篇文章大惊小怪,我有时仍然会提到)。在本文中,我想向您介绍我们在使用TypeScript的React应用程序中使用Clean Architecture的经验。我为什么要告诉这个?-有时我必须向尚不熟悉这种方法的开发人员澄清并证明其用法。因此,在这里我将进行详细的分析,并附有直观的解释,以后我可以参考。内容
- 介绍
- 理论部分
- 建筑的目的是什么?
- 清洁建筑的原始定义
- 前端的干净架构
- 实践部分
- 结论
- 资源和来源
1.简介首先,架构是全球性的事物。在特定的编程语言的上下文中,不需要理解它。您通常需要了解关键思想,这意味着可以实现使用一种或另一种体系结构的好处。其原理与设计模式或SOLID相同-它们不是为特定的语言而是为整个编程方法(例如OOP)而发明的。看到整个图景时,最容易理解体系结构。因此,在本文中,我不仅会讨论“理论上”应该如何做,还将提供该项目的具体示例。首先,我们将在前端处理使用Clean Architecture的理论部分,然后考虑一个带有UML图和每个类的描述的Web应用程序。重要说明:清洁体系结构并没有为组织应用程序建立严格的规则,仅给出建议。每种平台和语言都有其细微差别。本文介绍了我已经与同事一起使用并且现在正在使用的方法-它不是万能药。我还想指出,对于小型项目,使用这种架构方法可能是多余的。任何体系结构的主要目标都是使代码易于理解,支持和测试。但是,如果您的应用程序在没有体系结构,测试和其他条件的情况下使用JS编写的速度更快,这是很正常的。不要在不需要的地方进行过度设计。 请记住,架构/测试的主要优势是在具有多个开发人员的大型项目中获得的,您需要在其中理解和更改其他人的代码。UPD_0UPD_0: . , —
, , . - , . , , .
, , :
— ( ) .
— , «Computer Programming as an Art» (1974)
, « — ». - , ( , ).
2.理论部分2.1。建筑的目的是什么?答:架构对于节省开发过程中的时间,在较长的开发周期内保持系统的可测试性和可扩展性是必不可少的。如果您不为大型应用程序构建体系结构会发生什么情况,您可以更详细地阅读,例如,在Bob Martin撰写的《 The Clean Architecture》一书中。为了简要说明,我将提供本书的以下图表: 在该图表上,我们看到每个新版本(假设它们定期发布)会向系统中添加越来越少的行,并且增加了一行的成本。这是由于系统的复杂性,并且进行更改开始需要不合理的大量工作。在“干净的体系结构”中,此图是不良体系结构的一个示例。这种方法迟早会导致这样一个事实,即扩展系统的成本要比系统本身的收益高。
再次关于开发时间的比例( ):
« 90 10 , . 10 90 »
— , Bell Labs
: , , .
现在,我们(开发人员,项目经理,客户)希望在我们的项目中看到我的“理想”选项: 该图清楚地表明,行数的增长率不会因版本而变化。一行代码的成本(取决于版本)会增加,但考虑到我们正在谈论数百万行的代码,这并不会显着增加。不幸的是,如果我们谈论的是大型企业系统,那么这种选择是不可能的,因为随着产品的扩展,系统的复杂性增加,开发人员的变化,因此开发成本将不可避免地增加。但是,我也可以请您-我们正在谈论前端应用程序!让我们面对现实-通常,此类应用程序不会增长到数百万行,否则浏览器会讨厌下载此类应用程序。在极端情况下,它们会分为不同的产品,并且主要逻辑位于后端。因此,在某种程度上,我们可以努力争取上述增加代码成本的趋势(根据应用程序的大小,成功的方法不同)。如果我们的项目维护成本比没有好的体系结构便宜50%,这已经节省了开发人员的时间和客户资金。最初构建了良好且清晰的架构之后,我们获得了以下优势:我认为问题“为什么这是必要的?!”我回答。接下来,我们进入问题的技术部分。2.2。最初的定义我将不对“干净的体系结构”进行详细描述,因为该主题已在许多文章中进行了披露,而只是简要地阐述了问题的实质。在2012年Bob Martin的原始文章中,显示了下图:该图的
 关键思想是将应用程序划分为几层(可以有任意数量的层)。内层不知道外层,依赖关系变成中心。该层离中心越远,它对应用程序的“非加权”细节(例如,使用哪种框架以及屏幕上有多少个按钮)的了解就越多。
- Entities. Entities (). - . Entities - . , Cart () — , .. , React, , — .
, React\Angular\Express\Nest.js\DI .. , , , Web- React’e — NodeJS . - Use cases. Use Cases ( — , — Interactors). , . , , — , (. ).
- Gateways, Presenters, etc. (Gateways = Repositories, Presenters = View Models) — , - . , , API , View Model React- -.
: Use Cases Repositories, , , frontend API. - 外部接口。平台相关层。这是对API,React组件等的直接调用。这层是最难测试和抽象的(React'e中的一个按钮-有一个React'e按钮)。
2.3。在前端环境中进行定义现在,让我们进入前端区域。在Frontend的上下文中,上图可以这样表示: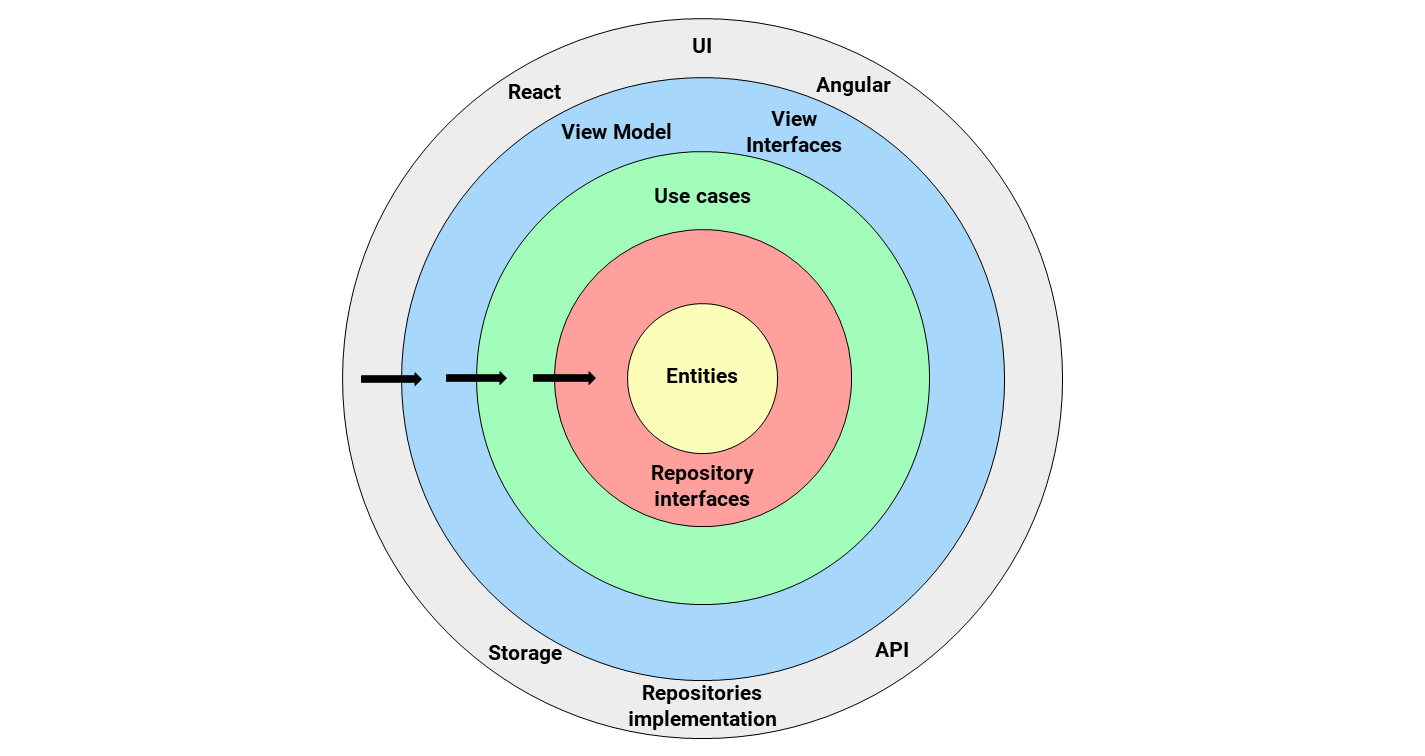
- 实体。业务实体与原始体系结构中的相同。请注意,实体可以存储状态,并且通常用于此目的。例如,实体“购物篮”可以存储当前会话的订单,以便提供用于处理它们的方法(获取总价,商品总量等)。
- Repository interfaces. API, , . . , “” . , , . , . SOLID’a ( , ). (, , API ).
- Use Cases. . , - (. . , — , , , ).
- View Models View Interfaces.
ViewModel — Presenters . MVVP MVP\MVC\MV*. , MVP : Presenter View , ViewModel View, . View “” View Model. MVVP (View → ViewModel), MVP — (View ︎ Presenter). — .
View Interfaces — , View, View Model View . onViewModelChanged(): void. . - 5. External interfaces. , . — React’a API. (AngularJS, React Native) (IndexDB, local storage ..). The Clean Architecutre , , - .
如果以三层应用程序的形式显示上面的图,则它采用以下形式: 红色箭头显示数据流(但不显示依赖关系,依赖关系图显示在上面的饼图中)。矩形图形式的图像使您可以更好地了解数据流如何在应用程序内部移动。我在这篇文章中以这种图表的形式看到了描述的想法。请记住,在更复杂的应用程序中,层结构可能会发生变化。例如,当每个层都高于域时,这是一种常见的做法-它可以具有自己的映射器以进行数据转换。3.示例应用程序3.1。 Web授权申请说明为了使体系结构的应用程序更直观和易于理解,我创建了一个基于其构建的Web应用程序。您可以在GitHub存储库中查看应用程序的源代码。该应用程序如下所示:该
 应用程序是一个简单的登录窗口。为了使应用程序本身复杂化(以便使体系结构适用),我们进行以下介绍:
- 字段不能为空(验证)。
- 输入的邮件必须具有正确的格式(验证)。
- 访问数据必须在服务器上验证(API存根)并接收验证密钥。
- 为了进行授权,API方法需要提供验证数据和验证密钥。
- 授权后,访问密钥必须保存在应用程序(实体层)中。
- 退出后,必须从内存中删除授权密钥。
3.2。源代码结构在我们的示例中,src文件夹的结构如下:
- 数据 -包含用于处理数据的类。该目录是饼图中的最后一个圆圈,因为它包含用于实现存储库接口的类。因此,这些类知道API和特定于平台的内容(本地存储,cookie等)。
- domain — . Entities, Use Cases Repository Interfaces. entities : models structures. , models — , structures — ( POJO Java). , models , () , structures — , JSON- (json2ts, «») .
- presentation — View Models, View Interfaces View ( ), util — , ..
当然,结构可能因项目而异。例如,在我的一个项目中,表示的根本是用于监视侧栏状态的类和用于在页面之间导航的类。3.3。URM项目图 不断增加的源-GitHub。矩形清楚地显示了按层划分类。请注意,依赖关系直接指向域层(根据示意图)。3.4。代码实体层的分析在本节中,我们将遍历所有类并描述其工作逻辑。让我们从最远的圆-实体开始,因为其余的类都基于它。AuthListener.tsx
export default interface AuthListener {
onAuthChanged(): void;
}
AuthHolder.tsximport AuthListener from './AuthListener';
export default class AuthHolder {
private authListeners: AuthListener[];
private isAuthorized: boolean;
private authToken: string;
public constructor() {
this.isAuthorized = false;
this.authListeners = [];
this.authToken = '';
}
public onSignedIn(authToken: string): void {
this.isAuthorized = true;
this.authToken = authToken;
this.notifyListeners();
}
public onSignedOut(): void {
this.isAuthorized = false;
this.authToken = '';
this.notifyListeners();
}
public isUserAuthorized(): boolean {
return this.isAuthorized;
}
public getAuthToken(): string {
if (!this.isAuthorized) {
throw new Error('User is not authorized');
}
return this.authToken;
}
public addAuthListener(authListener: AuthListener): void {
this.authListeners.push(authListener);
}
public removeAuthListener(authListener: AuthListener): void {
this.authListeners.splice(this.authListeners.indexOf(authListener), 1);
}
private notifyListeners(): void {
this.authListeners.forEach((listener) => listener.onAuthChanged());
}
}
AuthorizationResult.tsx
export default interface AuthorizationResult {
authorizationToken: string;
}
ValidationResult.tsx
export default interface ValidationResult {
validationKey: string;
}
这样就结束了实体层。请注意,该层专门处理业务逻辑(状态存储),并用于在应用程序的其余部分中传输数据。通常,状态不需要存储在业务逻辑类中。为此,具有使用场景(用于数据转换)的存储库包非常适合。存储库接口AuthRepository.tsximport ValidationResult from '../../entity/auth/stuctures/ValidationResult';
import AuthorizationResult from '../../entity/auth/stuctures/AuthorizationResult';
export default interface AuthRepository {
validateCredentials(email: string, password: string): Promise<ValidationResult>;
login(email: string, password: string, validationKey: string): Promise<AuthorizationResult>;
}
用例LoginUseCase.tsximport AuthRepository from '../../repository/auth/AuthRepository';
import AuthHolder from '../../entity/auth/models/AuthHolder';
export default class LoginUseCase {
private authRepository: AuthRepository;
private authHolder: AuthHolder;
public constructor(authRepository: AuthRepository, authHolder: AuthHolder) {
this.authRepository = authRepository;
this.authHolder = authHolder;
}
public async loginUser(email: string, password: string): Promise<void> {
const validationResult = await this.authRepository.validateCredentials(email, password);
const authResult = await this.authRepository.login(
email,
password,
validationResult.validationKey,
);
this.authHolder.onSignedIn(authResult.authorizationToken);
}
}
在这种情况下,用例只有一种方法。通常,用例只有一个公共方法,该方法为一项操作实现复杂的逻辑。在这种情况下,您必须首先进行验证,然后将验证数据发送到授权API方法。但是,如果将具有共同逻辑的多个场景组合到一个场景中,通常会使用一种方法。仔细确保用例不包含必须存在于实体中的逻辑。用例中过多的方法或存储状态通常用作指示代码应在另一层中的指示。存储库实现AuthFakeApi.tsximport AuthRepository from '../../domain/repository/auth/AuthRepository';
import ValidationResult from '../../domain/entity/auth/stuctures/ValidationResult';
import AuthorizationResult from '../../domain/entity/auth/stuctures/AuthorizationResult';
export default class AuthFakeApi implements AuthRepository {
validateCredentials(email: string, password: string): Promise<ValidationResult> {
return new Promise((resolve, reject) => {
if (password.length < 5) {
reject(new Error('Password length should be more than 5 characters'));
return;
}
resolve({
validationKey: 'A34dZ7',
});
});
}
login(email: string, password: string, validationKey: string): Promise<AuthorizationResult> {
return new Promise((resolve, reject) => {
if (validationKey === 'A34dZ7') {
if (email === 'user@email.com' && password === 'password') {
resolve({
authorizationToken: 'Bearer ASKJdsfjdijosd93wiesf93isef',
});
}
} else {
reject(new Error('Validation key is not correct. Please try later'));
return;
}
reject(new Error('Email or password is not correct'));
});
}
}
在此类中,我们模拟了对API的访问。我们将返回一个Promise,它将返回一个实际的获取请求。如果我们想用真实的API替换实现,只需在App.tsx文件或依赖项注入工具(如果使用)中将AuthFakeApi类更改为AuthApi。请注意,我们注释了错误描述方法,以便其他程序员理解错误处理的必要性。不幸的是,TypeScript当前没有有关Java中引发类型的指令,因此我们使用一个简单的注释。util(表示层)在此目录中,我们放置了实现“预防性”数据验证逻辑的类,以及用于UI层的其他类。FormValidator.tsxexport default class FormValidator {
static isValidEmail(email: string): boolean {
const emailRegex = /^\S+@\S+\.\S+$/;
return emailRegex.test(email);
}
}
View接口BaseView.tsx一个类,允许View模型将更改通知给View。由所有View组件实现。export default interface BaseView {
onViewModelChanged(): void;
}
视图模型BaseViewModel.tsx一个类,提供用于链接视图模型和视图的基本方法。由所有视图模型实现。import BaseView from '../view/BaseView';
export default interface BaseViewModel {
attachView(baseView: BaseView): void;
detachView(): void;
}
AuthViewModel.tsximport BaseViewModel from '../BaseViewModel';
export default interface AuthViewModel extends BaseViewModel {
emailQuery: string;
passwordQuery: string;
isSignInButtonVisible: boolean;
isSignOutButtonVisible: boolean;
isShowError: boolean;
errorMessage: string;
authStatus: string;
isAuthStatusPositive: boolean;
onEmailQueryChanged(loginQuery: string): void;
onPasswordQueryChanged(passwordQuery: string): void;
onClickSignIn(): void;
onClickSignOut(): void;
}
AuthViewModelImpl.tsx
import AuthViewModel from './AuthViewModel';
import BaseView from '../../view/BaseView';
import LoginUseCase from '../../../domain/interactors/auth/LoginUseCase';
import AuthHolder from '../../../domain/entity/auth/models/AuthHolder';
import AuthListener from '../../../domain/entity/auth/models/AuthListener';
import FormValidator from '../../util/FormValidator';
export default class AuthViewModelImpl implements AuthViewModel, AuthListener {
public emailQuery: string;
public passwordQuery: string;
public isSignInButtonVisible: boolean;
public isSignOutButtonVisible: boolean;
public isShowError: boolean;
public errorMessage: string;
public authStatus: string;
public isAuthStatusPositive: boolean;
private baseView?: BaseView;
private loginUseCase: LoginUseCase;
private authHolder: AuthHolder;
public constructor(loginUseCase: LoginUseCase, authHolder: AuthHolder) {
this.emailQuery = '';
this.passwordQuery = '';
this.isSignInButtonVisible = true;
this.isSignOutButtonVisible = false;
this.isShowError = false;
this.errorMessage = '';
this.authStatus = 'is not authorized';
this.isAuthStatusPositive = false;
this.loginUseCase = loginUseCase;
this.authHolder = authHolder;
this.authHolder.addAuthListener(this);
}
public attachView = (baseView: BaseView): void => {
this.baseView = baseView;
};
public detachView = (): void => {
this.baseView = undefined;
};
public onAuthChanged = (): void => {
if (this.authHolder.isUserAuthorized()) {
this.isSignInButtonVisible = false;
this.isSignOutButtonVisible = true;
this.authStatus = 'authorized';
this.isAuthStatusPositive = true;
} else {
this.isSignInButtonVisible = true;
this.isSignOutButtonVisible = false;
this.authStatus = 'is not autorized';
this.isAuthStatusPositive = false;
}
this.notifyViewAboutChanges();
};
public onEmailQueryChanged = (loginQuery: string): void => {
this.emailQuery = loginQuery;
this.notifyViewAboutChanges();
};
public onPasswordQueryChanged = (passwordQuery: string): void => {
this.passwordQuery = passwordQuery;
this.notifyViewAboutChanges();
};
public onClickSignIn = async (): Promise<void> => {
if (!this.validateLoginForm()) {
this.notifyViewAboutChanges();
return;
}
try {
await this.loginUseCase.loginUser(this.emailQuery, this.passwordQuery);
this.isShowError = false;
this.errorMessage = '';
} catch (e) {
this.errorMessage = e.message;
this.isShowError = true;
}
this.notifyViewAboutChanges();
};
public onClickSignOut = (): void => {
this.authHolder.onSignedOut();
};
private validateLoginForm = (): boolean => {
if (!this.emailQuery) {
this.isShowError = true;
this.errorMessage = 'Email cannot be empty';
return false;
}
if (this.errorMessage === 'Email cannot be empty') {
this.isShowError = false;
this.errorMessage = '';
}
if (!FormValidator.isValidEmail(this.emailQuery)) {
this.isShowError = true;
this.errorMessage = 'Email format is not valid';
return false;
}
if (this.errorMessage === 'Email format is not valid') {
this.isShowError = false;
this.errorMessage = '';
}
if (!this.passwordQuery) {
this.isShowError = true;
this.errorMessage = 'Password cannot be empty';
return false;
}
if (this.errorMessage === 'Password cannot be empty') {
this.isShowError = false;
this.errorMessage = '';
}
return true;
}
private notifyViewAboutChanges = (): void => {
if (this.baseView) {
this.baseView.onViewModelChanged();
}
};
}
注意方法onClickSignOut-在其中我们直接引用AuthHolder类。这是其中使用场景形式的中介是多余的情况之一,因为该方法的逻辑非常琐碎。同样,您可以直接访问存储库界面。但是,如果代码很复杂,则为了退出,有必要将其放在单独的用例中。用户界面(视图)AuthComponent.tsx
import React from 'react';
import './auth-component.css';
import BaseView from '../BaseView';
import AuthViewModel from '../../view-model/auth/AuthViewModel';
export interface AuthComponentProps {
authViewModel: AuthViewModel;
}
export interface AuthComponentState {
emailQuery: string;
passwordQuery: string;
isSignInButtonVisible: boolean;
isSignOutButtonVisible: boolean;
isShowError: boolean;
errorMessage: string;
authStatus: string;
isAuthStatusPositive: boolean;
}
export default class AuthComponent
extends React.Component<AuthComponentProps, AuthComponentState>
implements BaseView {
private authViewModel: AuthViewModel;
public constructor(props: AuthComponentProps) {
super(props);
const { authViewModel } = this.props;
this.authViewModel = authViewModel;
this.state = {
emailQuery: authViewModel.emailQuery,
passwordQuery: authViewModel.passwordQuery,
isSignInButtonVisible: authViewModel.isSignInButtonVisible,
isSignOutButtonVisible: authViewModel.isSignOutButtonVisible,
isShowError: authViewModel.isShowError,
errorMessage: authViewModel.errorMessage,
authStatus: authViewModel.authStatus,
isAuthStatusPositive: authViewModel.isAuthStatusPositive,
};
}
public componentDidMount(): void {
this.authViewModel.attachView(this);
}
public componentWillUnmount(): void {
this.authViewModel.detachView();
}
public onViewModelChanged(): void {
this.setState({
emailQuery: this.authViewModel.emailQuery,
passwordQuery: this.authViewModel.passwordQuery,
isSignInButtonVisible: this.authViewModel.isSignInButtonVisible,
isSignOutButtonVisible: this.authViewModel.isSignOutButtonVisible,
isShowError: this.authViewModel.isShowError,
errorMessage: this.authViewModel.errorMessage,
authStatus: this.authViewModel.authStatus,
isAuthStatusPositive: this.authViewModel.isAuthStatusPositive,
});
}
public render(): JSX.Element {
const {
emailQuery,
passwordQuery,
isSignInButtonVisible,
isSignOutButtonVisible,
isShowError,
errorMessage,
authStatus,
isAuthStatusPositive,
} = this.state;
return (
<div className="row flex-grow-1 d-flex justify-content-center align-items-center">
<div className="auth-container col bg-white border rounded-lg py-4 px-5">
<div className="row mt-2 mb-4">
Status:
<span className={`${isAuthStatusPositive ? 'text-success' : 'text-danger'}`}>
{authStatus}
</span>
</div>
<div className="row mt-2">
<input
type="text"
placeholder="user@email.com"
onChange={(e: React.FormEvent<HTMLInputElement>): void => {
this.authViewModel.onEmailQueryChanged(e.currentTarget.value);
}}
value={emailQuery}
className="form-control"
/>
</div>
<div className="row mt-2">
<input
type="password"
placeholder="password"
onChange={(e: React.FormEvent<HTMLInputElement>): void => {
this.authViewModel.onPasswordQueryChanged(e.currentTarget.value);
}}
value={passwordQuery}
className="form-control"
/>
</div>
{isShowError && (
<div className="row my-3 text-danger justify-content-center">{errorMessage}</div>
)}
{isSignInButtonVisible && (
<div className="row mt-4">
<button
type="button"
className="col btn btn-primary"
onClick={(): void => this.authViewModel.onClickSignIn()}
>
Sign in
</button>
</div>
)}
{isSignOutButtonVisible && (
  <div className="row mt-4">
    <button
      type="button"
      className="col btn btn-primary"
      onClick={(): void => this.authViewModel.onClickSignOut()}
    >
      Sign out
    </button>
  </div>
)}
</div>
</div>
);
}
}
该组件取决于框架,因此位于图的最极端。安装()时,AuthComponent会componentDidMount附加到AuthViewModel上,而当(componentWillUnmount)消失时,AuthComponent会分离。每次ViewModel更改时,AuthComponent都会更新其状态以进一步更新标记。根据状态注意条件渲染:
{isSignOutButtonVisible && (
<div className="row mt-4">
<button
type="button"
className="col btn btn-primary"
onClick={(): void => this.authViewModel.onClickSignOut()}
>
Sign out
</button>
</div>
)}
以及调用ViewModel方法以传递值:onClick={(): void => this.authViewModel.onClickSignOut()}
入口点要进入应用程序,我们使用index.tsx和App.tsx文件。index.tsx
import React from 'react';
import ReactDOM from 'react-dom';
import 'bootstrap/dist/css/bootstrap.css';

import App from './App';
import * as serviceWorker from './serviceWorker';

ReactDOM.render(
  <React.StrictMode>
    <App />
  </React.StrictMode>,
  document.getElementById('root'),
);

serviceWorker.unregister();
App.tsx
import React from 'react';
import './app.css';
import AuthComponent from './presentation/view/auth/AuthComponent';
import AuthViewModelImpl from './presentation/view-model/auth/AuthViewModelImpl';
import AuthFakeApi from './data/auth/AuthFakeApi';
import LoginUseCase from './domain/interactors/auth/LoginUseCase';
import AuthHolder from './domain/entity/auth/models/AuthHolder';
function App(): JSX.Element {
const authRepository = new AuthFakeApi();
const authHolder = new AuthHolder();
const loginUseCase = new LoginUseCase(authRepository, authHolder);
const authViewModel = new AuthViewModelImpl(loginUseCase, authHolder);
return (
<div className="app-container d-flex container-fluid">
<AuthComponent authViewModel={authViewModel} />
</div>
);
}
export default App;
初始化App.tsx
文件中的所有依赖项。在此应用程序中,我们不会使用依赖注入工具,以免不必要地使代码复杂化。如果需要更改某些依赖关系,我们将在此文件中替换它。例如,代替以下行:const authRepository = new AuthFakeApi();
写:const authRepository = new AuthApi();
还要注意,我们仅使用接口,而不使用特定的实现(一切都基于抽象)。声明变量时,我们的意思是:const authRepository: AuthRepository = new AuthFakeApi();
这使您可以隐藏实现细节(以便以后在不更改界面的情况下进行替换)。4.结论我希望阅读本文时,您能了解如何将Clean Architecture应用于React(不仅是项目),并且我们的经验将有助于使您的应用程序更好。本文介绍了在前端项目中使用The Clean Architecture的理论和实践基础。如前所述,“干净的体系结构”仅提供有关如何构建体系结构的建议。上面是使用此体系结构的简单应用程序的示例。请记住,随着应用程序的增长,体系结构可能会发生变化,因此上面的代码不是万能的(如开头所述),本文只是我们经验的一部分。5.资源源代码UML图