让我们熟悉一下神经网络中的一种攻击,这种攻击导致分类错误且外部影响最小。想象一下,神经网络就是您。此刻,您在喝一杯香浓咖啡的同时,对猫的图像进行分类的准确率高达90%以上,甚至没有怀疑“单像素攻击”会将您所有的“猫”变成卡车。现在我们将暂停,将咖啡移到一边,导入我们需要的所有库,并分析这种像素攻击的工作方式。这种攻击的目的是使算法(神经网络)给出错误的答案。下面我们将通过几种不同的卷积神经网络模型来看到这一点。使用多维数学优化的方法之一-微分进化,我们找到了可以改变图像的特殊像素,从而使神经网络开始错误地对该图像进行分类(尽管事实是该算法较早地正确且高精度地“识别”了同一图像)。导入库:
%matplotlib inline
import pickle
import numpy as np
import pandas as pd
import matplotlib
from keras.datasets import cifar10
from keras import backend as K
from networks.lenet import LeNet
from networks.pure_cnn import PureCnn
from networks.network_in_network import NetworkInNetwork
from networks.resnet import ResNet
from networks.densenet import DenseNet
from networks.wide_resnet import WideResNet
from networks.capsnet import CapsNet
from differential_evolution import differential_evolution
import helper
matplotlib.style.use('ggplot')
对于我们的实验,我们将加载CIFAR-10数据集,其中包含分为10类的真实世界图像。(x_train, y_train), (x_test, y_test) = cifar10.load_data()
class_names = ['airplane', 'automobile', 'bird', 'cat', 'deer', 'dog', 'frog', 'horse', 'ship', 'truck']
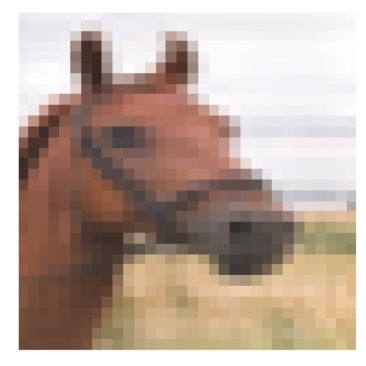
让我们通过索引查看任何图像。例如,这匹马。image_id = 99
helper.plot_image(x_test[image_id])
 我们将不得不寻找可以改变神经网络响应的非常强大的像素,这意味着是时候编写一个函数来更改图像的一个或多个像素了。
def perturb_image(xs, img):
if xs.ndim < 2:
xs = np.array([xs])
tile = [len(xs)] + [1]*(xs.ndim+1)
imgs = np.tile(img, tile)
xs = xs.astype(int)
for x,img in zip(xs, imgs):
pixels = np.split(x, len(x) // 5)
for pixel in pixels:
x_pos, y_pos, *rgb = pixel
img[x_pos, y_pos] = rgb
return imgs
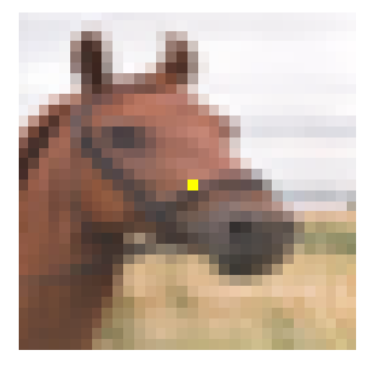
一探究竟 ?!将我们坐标为(16,16)的马匹的一个像素更改为黄色。image_id = 99
pixel = np.array([16, 16, 255, 255, 0])
image_perturbed = perturb_image(pixel, x_test[image_id])[0]
helper.plot_image(image_perturbed)
 为了演示攻击,您需要在我们的CIFAR-10数据集上下载神经网络的预训练模型。我们将使用lenet和resnet这两个模型,但是您可以通过取消注释相应的代码行来使用其他模型进行实验。
lenet = LeNet()
resnet = ResNet()

models = [lenet, resnet]
加载模型后,有必要评估每个模型的测试图像,以确保我们仅攻击正确分类的图像。下面的代码显示每个模型的精度和参数数量。network_stats, correct_imgs = helper.evaluate_models(models, x_test, y_test)
correct_imgs = pd.DataFrame(correct_imgs, columns=['name', 'img', 'label', 'confidence', 'pred'])
network_stats = pd.DataFrame(network_stats, columns=['name', 'accuracy', 'param_count'])
network_stats
Evaluating lenet
Evaluating resnet
Out[11]:
name accuracy param_count
0 lenet 0.748 62006
1 resnet 0.9231 470218
所有这些攻击可以分为两类:WhiteBox和BlackBox。它们之间的区别在于,在第一种情况下,我们都可靠地了解了所要处理的算法和模型。对于BlackBox,我们需要的只是输入(图像)和输出(被分配给一个类的概率)。一像素攻击指的是BlackBox。在本文中,我们考虑攻击单个像素的两种方法:无针对性和针对性。在第一种情况下,我们猫的神经网络属于哪一类绝对不重要,最重要的是,不属于猫的类。当我们希望我们的猫成为卡车而只有卡车时,可以应用有针对性的攻击。但是,如何找到其像素变化会导致图像类别变化的像素呢?如何通过更改可能成功的一个像素来找到像素?让我们尝试将这个问题表述为优化问题,但是只能用非常简单的话来表述:对于非目标攻击,我们必须使对所需类的信任最小化,而对于目标类,应使对目标类的信任最大化。进行此类攻击时,很难使用梯度优化功能。必须使用不依赖于函数平滑度的优化算法。回想一下,对于我们的实验,我们使用CIFAR-10数据集,其中包含大小为32 x 32像素的真实世界图像,分为10类。这意味着我们具有从0到31的整数离散值和从0到255的颜色强度,并且该函数不会很平滑,而是参差不齐,如下所示: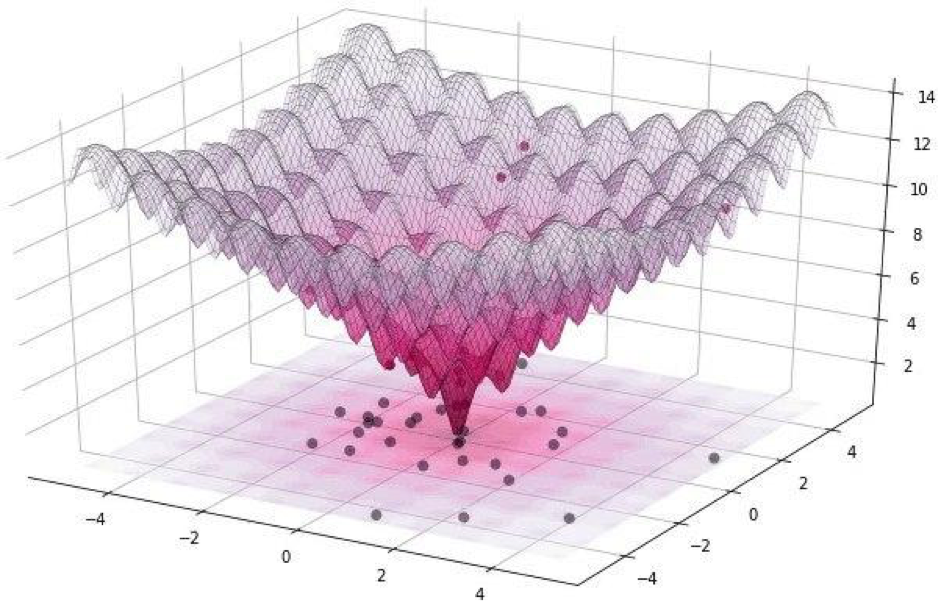 这就是为什么我们使用差分进化算法。但是回到代码并编写一个函数,该函数返回模型可靠性的概率。如果目标类是正确的,那么我们要最小化此函数,以便模型可以确定另一个类(这是不正确的)。
def predict_classes(xs, img, target_class, model, minimize=True):
imgs_perturbed = perturb_image(xs, img)
predictions = model.predict(imgs_perturbed)[:,target_class]
return predictions if minimize else 1 - predictions
image_id = 384
pixel = np.array([16, 13, 25, 48, 156])
model = resnet
true_class = y_test[image_id, 0]
prior_confidence = model.predict_one(x_test[image_id])[true_class]
confidence = predict_classes(pixel, x_test[image_id], true_class, model)[0]
print('Confidence in true class', class_names[true_class], 'is', confidence)
print('Prior confidence was', prior_confidence)
helper.plot_image(perturb_image(pixel, x_test[image_id])[0])
Confidence in true class bird is 0.00018887444
Prior confidence was 0.70661753
 我们将需要下一个函数来确认攻击成功的标准,当更改足以欺骗模型时,它将返回True。
def attack_success(x, img, target_class, model, targeted_attack=False, verbose=False):
attack_image = perturb_image(x, img)
confidence = model.predict(attack_image)[0]
predicted_class = np.argmax(confidence)
if verbose:
print('Confidence:', confidence[target_class])
if ((targeted_attack and predicted_class == target_class) or
(not targeted_attack and predicted_class != target_class)):
return True
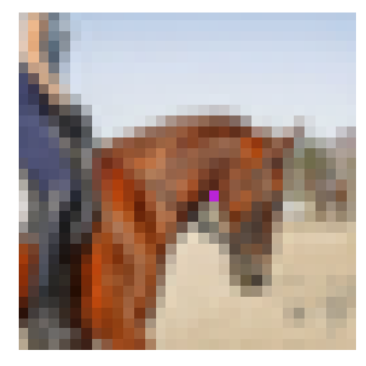
让我们看一下成功标准函数的工作。为了演示,我们假设是非目标攻击。image_id = 541
pixel = np.array([17, 18, 185, 36, 215])
model = resnet
true_class = y_test[image_id, 0]
prior_confidence = model.predict_one(x_test[image_id])[true_class]
success = attack_success(pixel, x_test[image_id], true_class, model, verbose=True)
print('Prior confidence', prior_confidence)
print('Attack success:', success == True)
helper.plot_image(perturb_image(pixel, x_test[image_id])[0])
Confidence: 0.07460087
Prior confidence 0.50054216
Attack success: True
 现在是时候将所有谜题收集到一张图片中了。我们将对Scipy中的差分进化的实现进行少量修改。
def attack(img_id, model, target=None, pixel_count=1,
maxiter=75, popsize=400, verbose=False):
targeted_attack = target is not None
target_class = target if targeted_attack else y_test[img_id, 0]
bounds = [(0,32), (0,32), (0,256), (0,256), (0,256)] * pixel_count
popmul = max(1, popsize // len(bounds))
def predict_fn(xs):
return predict_classes(xs, x_test[img_id], target_class,
model, target is None)
def callback_fn(x, convergence):
return attack_success(x, x_test[img_id], target_class,
model, targeted_attack, verbose)
attack_result = differential_evolution(
predict_fn, bounds, maxiter=maxiter, popsize=popmul,
recombination=1, atol=-1, callback=callback_fn, polish=False)
attack_image = perturb_image(attack_result.x, x_test[img_id])[0]
prior_probs = model.predict_one(x_test[img_id])
predicted_probs = model.predict_one(attack_image)
predicted_class = np.argmax(predicted_probs)
actual_class = y_test[img_id, 0]
success = predicted_class != actual_class
cdiff = prior_probs[actual_class] - predicted_probs[actual_class]
helper.plot_image(attack_image, actual_class, class_names, predicted_class)
return [model.name, pixel_count, img_id, actual_class, predicted_class, success, cdiff, prior_probs, predicted_probs, attack_result.x]
现在该分享研究(攻击)的结果,看看仅改变一个像素如何将青蛙变成狗,将猫变成青蛙,将汽车变成飞机。但是,允许更改的图像点越多,成功攻击任何图像的可能性就越高。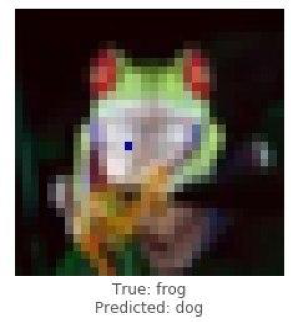
 使用resnet模型演示对青蛙图像的成功攻击。经过几次迭代,我们应该对班级的真正减少充满信心。
image_id = 102
pixels = 1
model = resnet
_ = attack(image_id, model, pixel_count=pixels, verbose=True)
Confidence: 0.9938618
Confidence: 0.77454716
Confidence: 0.77454716
Confidence: 0.77454716
Confidence: 0.77454716
Confidence: 0.77454716
Confidence: 0.53226393
Confidence: 0.53226393
Confidence: 0.53226393
Confidence: 0.53226393
Confidence: 0.4211318
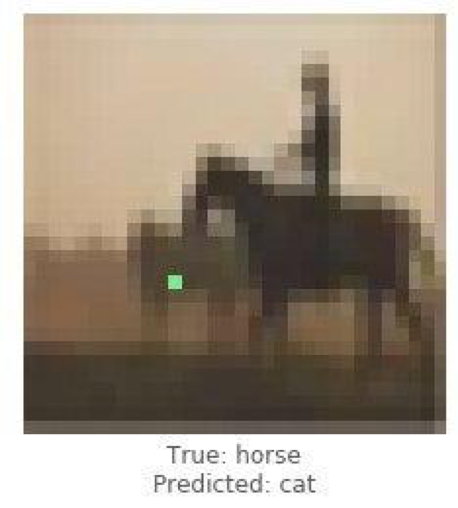
 这些是非针对性攻击的示例,现在我们将进行针对性攻击,并选择我们希望模型对图像进行分类的类别。该任务比上一个任务要复杂得多,因为我们将使神经网络将船的图像分类为汽车,将马的图像分类为猫。
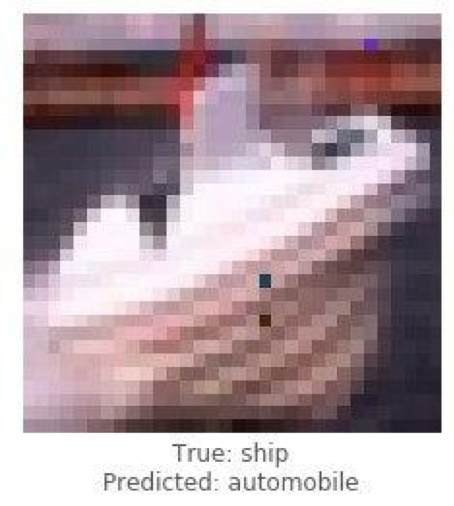
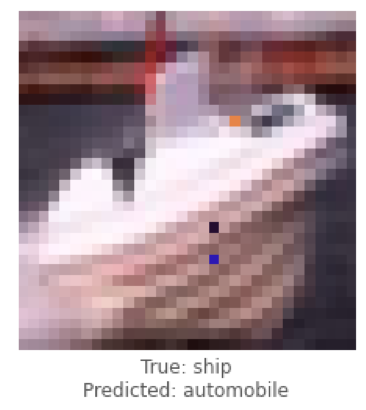
 下面我们将尝试让lenet将船的图像分类为汽车。
image_id = 108
target_class = 1
pixels = 3
model = lenet
print('Attacking with target', class_names[target_class])
_ = attack(image_id, model, target_class, pixel_count=pixels, verbose=True)
Attacking with target automobile
Confidence: 0.044409167
Confidence: 0.044409167
Confidence: 0.044409167
Confidence: 0.054611664
Confidence: 0.054611664
Confidence: 0.054611664
Confidence: 0.054611664
Confidence: 0.054611664
Confidence: 0.054611664
Confidence: 0.054611664
Confidence: 0.054611664
Confidence: 0.054611664
Confidence: 0.054611664
Confidence: 0.054611664
Confidence: 0.054611664
Confidence: 0.081972085
Confidence: 0.081972085
Confidence: 0.081972085
Confidence: 0.081972085
Confidence: 0.1537778
Confidence: 0.1537778
Confidence: 0.1537778
Confidence: 0.22246778
Confidence: 0.23916133
Confidence: 0.25238588
Confidence: 0.25238588
Confidence: 0.25238588
Confidence: 0.44560355
Confidence: 0.44560355
Confidence: 0.44560355
Confidence: 0.5711696
 处理了单个攻击案例后,我们将使用卷积神经网络ResNet的体系结构收集统计信息,遍历每个模型,更改每个图像的1、3或5个像素。在本文中,我们展示了最终结论,而不会打扰读者熟悉每次迭代,因为这需要大量时间和计算资源。
def attack_all(models, samples=500, pixels=(1,3,5), targeted=False,
               maxiter=75, popsize=400, verbose=False):
    results = []
    for model in models:
        model_results = []
        valid_imgs = correct_imgs[correct_imgs.name == model.name].img
        img_samples = np.random.choice(valid_imgs, samples, replace=False)

        for pixel_count in pixels:
            for i, img_id in enumerate(img_samples):
                print('\n', model.name, '- image', img_id, '-', i+1, '/', len(img_samples))
                targets = [None] if not targeted else range(10)

                for target in targets:
                    if targeted:
                        print('Attacking with target', class_names[target])
                        if target == y_test[img, 0]:
                            continue
                    result = attack(img_id, model, target, pixel_count,
                                    maxiter=maxiter, popsize=popsize,
                                    verbose=verbose)
                    model_results.append(result)

        results += model_results
        helper.checkpoint(results, targeted)
    return results

untargeted = attack_all(models, samples=100, targeted=False)

targeted = attack_all(models, samples=10, targeted=False)
为了测试网络信誉的可能性,开发了一种算法,并测量了其对模式识别解决方案的预测质量的影响。让我们看看最终结果。untargeted, targeted = helper.load_results()
columns = ['model', 'pixels', 'image', 'true', 'predicted', 'success', 'cdiff', 'prior_probs', 'predicted_probs', 'perturbation']
untargeted_results = pd.DataFrame(untargeted, columns=columns)
targeted_results = pd.DataFrame(targeted, columns=columns)
下表显示,使用精度为0.9231的ResNet神经网络,更改图像的几个像素,我们获得了很好的成功攻击图像百分比(attack_success_rate)。helper.attack_stats(targeted_results, models, network_stats)
Out[26]:
model accuracy pixels attack_success_rate
0 resnet 0.9231 1 0.144444
1 resnet 0.9231 3 0.211111
2 resnet 0.9231 5 0.222222
helper.attack_stats(untargeted_results, models, network_stats)
Out[27]:
model accuracy pixels attack_success_rate
0 resnet 0.9231 1 0.34
1 resnet 0.9231 3 0.79
2 resnet 0.9231 5 0.79
在实验中,您可以自由使用人工神经网络的其他体系结构,因为目前有很多体系结构。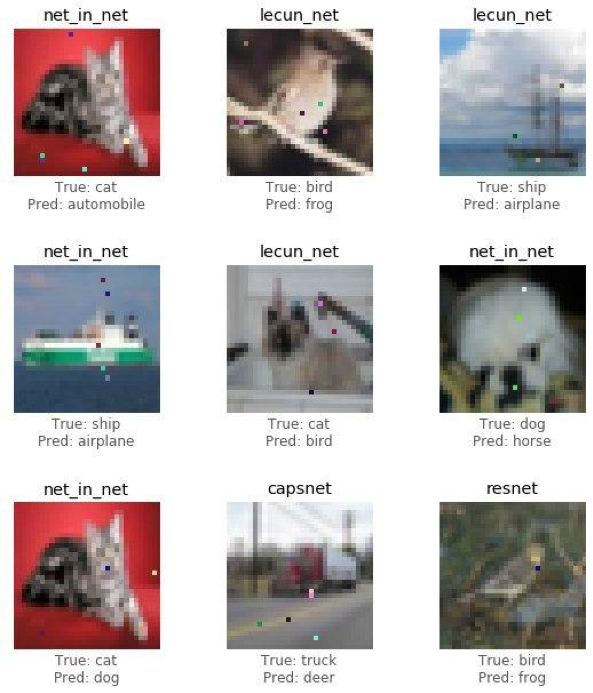 神经网络用无形的线程包围了现代世界。长期以来,人们已经发明了服务,在这些服务中,用户可以使用AI(人工智能)来接收经过处理的照片,这些照片在风格上与伟大艺术家的作品相似,而如今,算法本身可以绘制图片,创作音乐杰作,编写书籍甚至电影脚本。诸如计算机视觉,面部识别,无人驾驶车辆,疾病诊断等领域-做出重要决策且无权犯错,干扰算法的操作将导致灾难性后果。一像素攻击是欺骗攻击的一种方法。为了测试网络信誉的可能性,开发了一种算法,并测量了其对模式识别解决方案的预测质量的影响。结果表明,所应用的神经网络卷积结构易受专门训练的“一像素攻击”算法的影响,该算法会替换一个像素,从而使识别算法失去信誉。本文由Alexander Andronic和Adrey Cherny-Tkach作为Data4实习的一部分编写。