 在上一篇文章中,我们与您形成了一片空白,可以这么说,将是创建宇宙的基础,使用控制台进行可视化可能看起来不错,但是文本字符很无聊且不是很漂亮,在本文中,我们将重点介绍使用Phaser.js在上一篇文章中,我们的项目如下所示:
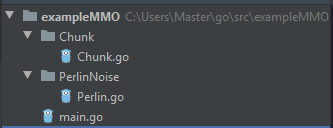 现在我们将使用其他工具进行Web开发,我希望您已经安装了Node.js和npm,如果没有,请紧急安装。因此,我们打开终端并开始:
$ npm install phaser@3.22.0
成功完成团队工作后,我们将看到以下内容:+ phaser@3.22.0
added 15 packages from 48 contributors and audited 20 packages in 4.38s
 很好,模块出现了,现在我们将为客户端创建目录。
 在Content中,我们将存储游戏资源,即 我们的精灵。我们还将在根目录(位于main.go文件所在的位置)中创建两个文件game.js和MainScene.js。create index.htmlgame.js-存储游戏MainScene.js 的主要设置-将包含主游戏场景的类index.html -将渲染场景的页面立即将我们的脚本连接到index.html,我们将不再返回该文件:
 <script src="node_modules/phaser/dist/phaser.js" type="module"></script>
<script src="Client/game.js" type="module"></script>
在MainScene.js中,我们将为将来的场景制作一个小类模板:export {MainScene}
class MainScene extends Phaser.Scene{
constructor() {
super({key: 'MainScene'})
}
preload() {
}
create() {
}
update() {
}
}
在game.js中,根据自己的喜好添加典型设置,这是我的:import {MainScene} from "./MainScene.js";
let config = {
type: Phaser.AUTO,
width: 800,
height: 600,
disableContextMenu: true,
background: 'black',
physics: {
default: 'arcade',
arcadePhysics: {
overlapBias: 1
}
},
scene:[MainScene],
pixelArt: true,
roundPixels: true,
antialias: true
}
let game = new Phaser.Game(config);
现在我们需要一个HTTP服务器,此过程只需几行即可完成。转到main.go并创建服务器:package main
import (
"fmt"
"html/template"
"net/http"
)
func main() {
http.HandleFunc("/", indexHandler)
http.Handle("/node_modules/phaser/dist/", http.StripPrefix("/node_modules/phaser/dist/", http.FileServer(http.Dir("./node_modules/phaser/dist/"))))
http.Handle("/Client/", http.StripPrefix("/Client/", http.FileServer(http.Dir("./Client/"))))
http.Handle("/Client/Content/", http.StripPrefix("/Client/Content/", http.FileServer(http.Dir("./Client/Content/"))))
err := http.ListenAndServe(":8080", nil)
if err != nil {
fmt.Println(err.Error())
}
}
func indexHandler(w http.ResponseWriter, r *http.Request) {
fmt.Println("indexAction")
t, _ := template.ParseFiles("index.html")
err := t.Execute(w, "index")
if err != nil {
fmt.Println(err.Error())
}
}
好吧,我们有自己的Web服务器和客户端!让我们开始吧!打开控制台:$ go run main.go
我们打开浏览器并尝试连接到我们的服务器,在我的情况下本地主机:8080
 如果看到黑屏,则说明您所做的一切正确。因此,让我们创建另一个处理程序,通过该处理程序我们将接收json格式的块。创建一个单独的目录,并将其命名为GameController,在这里我们将所有的游戏数据工作处理程序,创建文件Map_Controller.go我们还需要改进
块package Chunk
import (
"exampleMMO/PerlinNoise"
"fmt"
)
var TILE_SIZE = 16
var CHUNK_SIZE = 16 * 16
var PERLIN_SEED float32 = 160
type Chunk struct {
ChunkID [2]int `json:"chunkID"`
Map map[Coordinate]Tile `json:"map"`
}
type Tile struct {
Key string `json:"key"`
X int `json:"x"`
Y int `json:"y"`
}
type Coordinate struct {
X int `json:"x"`
Y int `json:"y"`
}
func NewChunk(idChunk Coordinate) Chunk {
fmt.Println("New Chank", idChunk)
chunk := Chunk{ChunkID: [2]int{idChunk.X, idChunk.Y}}
var chunkXMax, chunkYMax int
var chunkMap map[Coordinate]Tile
chunkMap = make(map[Coordinate]Tile)
chunkXMax = idChunk.X * CHUNK_SIZE
chunkYMax = idChunk.Y * CHUNK_SIZE
switch {
case chunkXMax < 0 && chunkYMax < 0:
{
for x := chunkXMax + CHUNK_SIZE; x > chunkXMax; x -= TILE_SIZE {
for y := chunkYMax + CHUNK_SIZE; y > chunkYMax; y -= TILE_SIZE {
posX := float32(x - (TILE_SIZE / 2))
posY := float32(y + (TILE_SIZE / 2))
tile := Tile{}
tile.X = int(posX)
tile.Y = int(posY)
perlinValue := PerlinNoise.Noise(posX/PERLIN_SEED, posY/PERLIN_SEED)
switch {
case perlinValue < -0.01:
tile.Key = "Water"
case perlinValue >= -0.01 && perlinValue < 0:
tile.Key = "Sand"
case perlinValue >= 0 && perlinValue <= 0.5:
tile.Key = "Ground"
case perlinValue > 0.5:
tile.Key = "Mount"
}
chunkMap[Coordinate{X: tile.X, Y: tile.Y}] = tile
}
}
}
case chunkXMax < 0:
{
for x := chunkXMax + CHUNK_SIZE; x > chunkXMax; x -= TILE_SIZE {
for y := chunkYMax - CHUNK_SIZE; y < chunkYMax; y += TILE_SIZE {
posX := float32(x - (TILE_SIZE / 2))
posY := float32(y + (TILE_SIZE / 2))
tile := Tile{}
tile.X = int(posX)
tile.Y = int(posY)
perlinValue := PerlinNoise.Noise(posX/PERLIN_SEED, posY/PERLIN_SEED)
switch {
case perlinValue < -0.12:
tile.Key = "Water"
case perlinValue >= -0.12 && perlinValue <= 0.5:
tile.Key = "Ground"
case perlinValue > 0.5:
tile.Key = "Mount"
}
chunkMap[Coordinate{X: tile.X, Y: tile.Y}] = tile
}
}
}
case chunkYMax < 0:
{
for x := chunkXMax - CHUNK_SIZE; x < chunkXMax; x += TILE_SIZE {
for y := chunkYMax + CHUNK_SIZE; y > chunkYMax; y -= TILE_SIZE {
posX := float32(x + (TILE_SIZE / 2))
posY := float32(y - (TILE_SIZE / 2))
tile := Tile{}
tile.X = int(posX)
tile.Y = int(posY)
perlinValue := PerlinNoise.Noise(posX/PERLIN_SEED, posY/PERLIN_SEED)
switch {
case perlinValue < -0.12:
tile.Key = "Water"
case perlinValue >= -0.12 && perlinValue <= 0.5:
tile.Key = "Ground"
case perlinValue > 0.5:
tile.Key = "Mount"
}
chunkMap[Coordinate{X: tile.X, Y: tile.Y}] = tile
}
}
}
default:
{
for x := chunkXMax - CHUNK_SIZE; x < chunkXMax; x += TILE_SIZE {
for y := chunkYMax - CHUNK_SIZE; y < chunkYMax; y += TILE_SIZE {
posX := float32(x + (TILE_SIZE / 2))
posY := float32(y + (TILE_SIZE / 2))
tile := Tile{}
tile.X = int(posX)
tile.Y = int(posY)
perlinValue := PerlinNoise.Noise(posX/PERLIN_SEED, posY/PERLIN_SEED)
switch {
case perlinValue < -0.12:
tile.Key = "Water"
case perlinValue >= -0.12 && perlinValue <= 0.5:
tile.Key = "Ground"
case perlinValue > 0.5:
tile.Key = "Mount"
}
chunkMap[Coordinate{X: tile.X, Y: tile.Y}] = tile
}
}
}
}
chunk.Map = chunkMap
return chunk
}
我们只是在结构中添加了json键,并稍微改进了块的创建。我们回到Map_Controller,package GameController
import (
"encoding/json"
"exampleMMO/Chunk"
"fmt"
"net/http"
)
func Map_Handler(w http.ResponseWriter, r *http.Request) {
c:= Chunk.NewChunk(Chunk.Coordinate{1,1})
js, e :=json.Marshal(c)
if e!= nil {
fmt.Println(e.Error())
}
fmt.Println(string(js))
}
并在main.go中添加一行 http.HandleFunc("/map", GameController.Map_Handler)
让我们尝试启动服务器并转到localhost:8080 / map。在终端中输出:New Chank {1 1}
json: unsupported type: map[Chunk.Coordinate]Chunk.Tile
是的,我们忘记了在Golang中进行序列化时,映射键必须是字符串。对于序列化,Go检查类型是否与TextMarshaler接口匹配,并调用其MarshalText()方法,我们只需要为我们的Coordinate类型创建MarshalText()方法,我们返回Chunk.go并添加以下代码:func (t Coordinate) MarshalText() ([]byte, error) {
return []byte("[" + strconv.Itoa(t.X) + "," + strconv.Itoa(t.Y) + "]"), nil
}
您可以编写实现,最重要的是此方法返回唯一的字符串。我们将使用此密钥来管理客户端上的块,让我们检查控制器的工作方式,再次启动服务器并查看控制台的输出。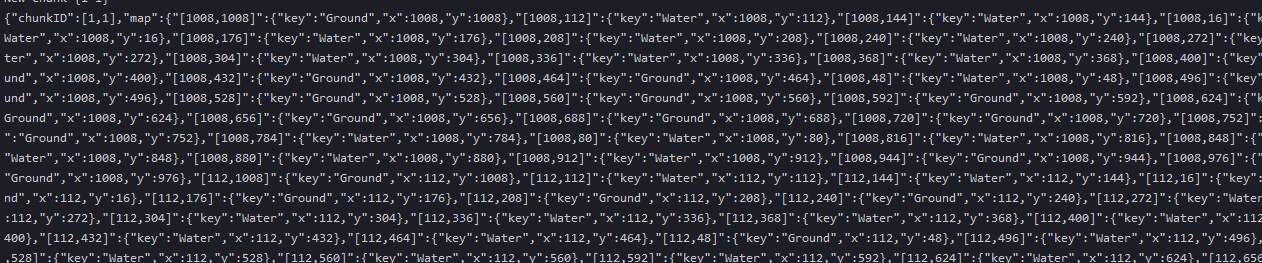 是的,一切都很好,让我们对流进行总结,在控制器的末尾添加两行:
	w.Header().Set("Content-Type", "application/json")
	w.Write(js)
现在,完成Golang并返回到客户端。我们将需要三个标题,尽管实际上我们有四个标题,但目前我们只有三个甚至两个。

 将图块添加到Content目录,并开始使用MainScene.js,对于第一个结果,我们需要一些功能:
class MainScene extends Phaser.Scene{
constructor() {
super({key: 'MainScene'})
}
preload() {
this.load.image("Ground", "Client/Content/sprGrass.png")
this.load.image("Water", "Client/Content/sprWater1.png")
this.load.image("Sand", "Client/Content/sprGrass.png")
}
create() {
this.getGameMap()
}
update() {
}
async getGameMap() {
let res = await fetch("/map")
let result = await res.json()
this.drawChunk(result.map)
}
drawChunk(map) {
for (let chunkKey in map) {
this.add.image(map[chunkKey].x,map[chunkKey].y, map[chunkKey].key)
}
}
}
服务器以json对象的形式将块返回给我们,您可以在浏览器控制台中查看其结构: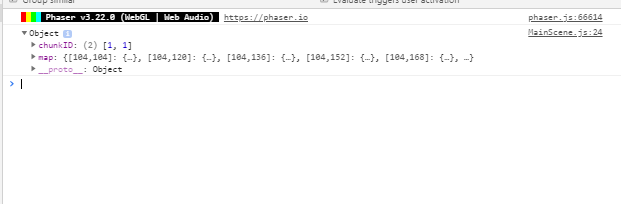 移相器在浏览器中呈现它:
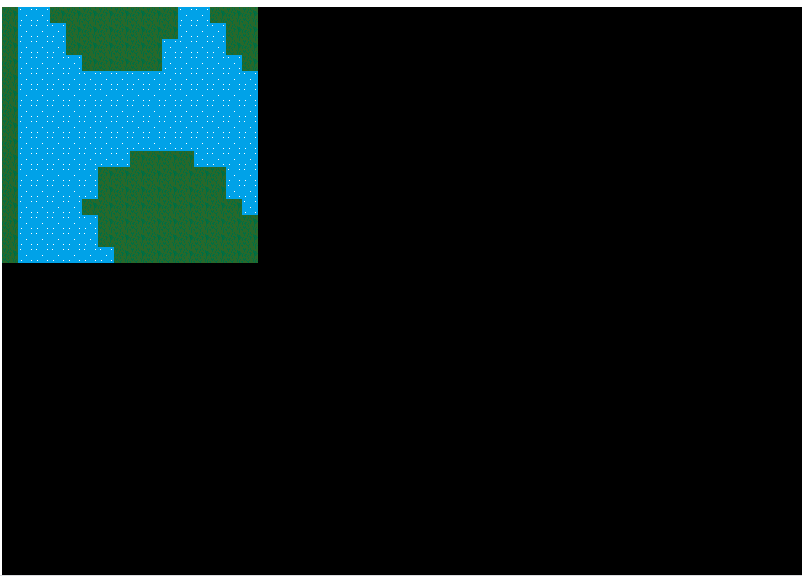 我们研究了服务器和客户端之间最简单的工作,在下一篇文章中,我们将立即绘制9个块并进行导航致全世界。在此处查看文章中的所有代码和资源。