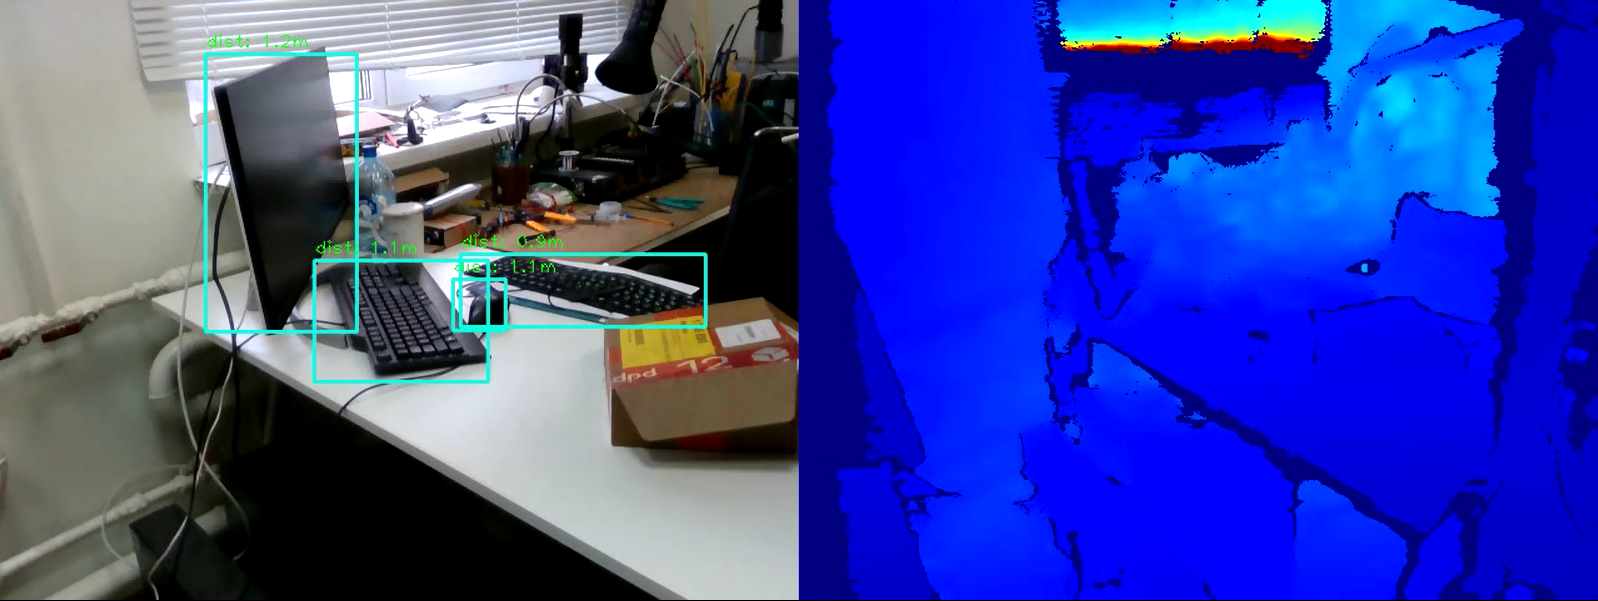
如今,检测图像中的对象的任务是机器视觉领域的领先者之一。它的本质不仅是对图片中的对象进行分类,而且还指示其确切位置。对象检测的结果可以补充有关此对象位于多远的信息。可以使用Intel RealSense D435深度摄像头解决距离测量问题,该摄像头可以测量每个点的深度。在本文中,我们将解决使用OpenCV库和RealSense技术实时测量到对象的距离的问题。
要求
实感摄像头要测量距离,我们需要一个实感D435深度摄像头。对于此示例,无需安装RealSense SDK。Pyrealsense2库所有代码,为了便于演示,我们将使用Python 3.7编写,因此我们需要pyrealsense2包。pip install pyrealsense2
OpenCV库另外,我们需要OpenCV库(从3.4开始的任何版本都是合适的)。可以在OpenCV官方网站上查看库安装手册。与OpenCV一起,将安装另一个必要的库-numpy。物体检测
第一步是选择视频中的对象。为了实时检测物体,所谓的一级模型(例如Retina Net,SSD和YOLO)在操作速度上很胜一筹。为了简化实验,我们将使用经过训练的模型SSDLite Mobilenet v2。相反,可以使用任何其他以一种或另一种形式返回对象坐标的模型。您可以在官方TensorFlow信息库中下载包含模型文件的存档。归档文件包含二进制.pb格式的冻结计算图,以及各种配置。但是要在OpenCV中使用该模型,您还必须具有.pbtxt文本格式的计算图。它不在存档中,因此必须手动生成。从OpenCV储存库复制两个脚本:- github.com/opencv/opencv/blob/master/samples/dnn/tf_text_graph_ssd.py
- github.com/opencv/opencv/blob/master/samples/dnn/tf_text_graph_common.py
然后,执行以下命令,指定必要的路径:python tf_text_graph_ssd.py --input /path/to/model.pb --config /path/to/example.config --output /path/to/graph.pbtxt
输出是graph.pbtxt文件。我们将现有的模型文件放在项目文件夹中。就我而言,这是models /文件夹。发展历程
现在一切都准备好进行开发了。让我们开始编写代码。我们导入必要的库,并在draw_predictions()方法上创建一个存根,稍后将需要它:import pyrealsense2 as rs
import numpy as np
import cv2 as cv
def draw_predictions(pred_img, color_img, depth_image):
pass
创建主要对象:pipeline = rs.pipeline()
config = rs.config()
colorizer = rs.colorizer()
spatial = rs.spatial_filter()
spatial.set_option(rs.option.holes_fill, 3)
我们初始化ssd模型。在这里,我们上面生成的.pbtxt文件对我们有用:
model = cv.dnn.readNetFromTensorflow(
"models/ssdlite_mobilenet_v2_coco_2018_05_09/frozen_inference_graph.pb",
"models/ssdlite_mobilenet_v2_coco_2018_05_09/graph.pbtxt"
)
我们开始摄像头流:
config.enable_stream(rs.stream.color, 640, 480, rs.format.bgr8, 30)
config.enable_stream(rs.stream.depth, 640, 480, rs.format.z16, 30)
profile = pipeline.start(config)
请注意,我们以BGR格式捕获颜色流,因为默认情况下这是使用OpenCV的格式。我们开始一个周期,在该周期中,我们将依次捕获和处理帧:cv.namedWindow("RealSense object detection", cv.WINDOW_AUTOSIZE)
try:
while True:
frames = pipeline.wait_for_frames()
depth_frame = frames.get_depth_frame()
color_frame = frames.get_color_frame()
if not depth_frame or not color_frame:
continue
为了进一步处理帧,我们以numpy数组的形式表示它们:
depth_image = np.asanyarray(depth_frame.get_data())
color_image = np.asanyarray(color_frame.get_data())
我们使用ssd模型来检测:
model.setInput(cv.dnn.blobFromImage(color_image, size=(300, 300), swapRB=True, crop=False))
pred = model.forward()
draw_predictions(pred, color_image, depth_image)
我们在窗口中绘制结果:
colorized_depth = cv.applyColorMap(cv.convertScaleAbs(depth_image, alpha=0.03), cv.COLORMAP_JET)
images = np.hstack((color_image, colorized_depth))
cv.imshow("RealSense object detection", images)
我们编写退出循环的条件:
key = cv.waitKey(1) & 0xFF
if (key == 27) or (key == ord('q')):
cv.destroyWindow("RealSense object detection")
break
关闭流:finally:
pipeline.stop()
还有最后一个。我们填写一开始创建的draw_predictions()渲染方法。在其中,我们将考虑到物体的距离。我决定按以下方式计算距离:取所发现对象框架中所有距离点的平均值:def draw_predictions(pred_img, color_img, depth_image):
for detection in pred_img[0,0,:,:]:
score = float(detection[2])
if score > 0.5:
left = detection[3] * color_img.shape[1]
top = detection[4] * color_img.shape[0]
right = detection[5] * color_img.shape[1]
bottom = detection[6] * color_img.shape[0]
cv.rectangle(color_img, (int(left), int(top)), (int(right), int(bottom)), (210, 230, 23), 2)
depth = depth_image[int(left):int(right), int(top):int(bottom)].astype(float)
depth_scale = profile.get_device().first_depth_sensor().get_depth_scale()
depth = depth * depth_scale
dist,_,_,_ = cv.mean(depth)
dist = round(dist, 1)
cv.putText(color_img, "dist: "+str(dist)+"m", (int(left), int(top)-5), cv.FONT_HERSHEY_PLAIN, 1, (0, 255, 0), 1)

完整代码import pyrealsense2 as rs
import numpy as np
import cv2 as cv
def draw_predictions(pred_img, color_img, depth_image):
for detection in pred_img[0,0,:,:]:
score = float(detection[2])
if score > 0.5:
left = detection[3] * color_img.shape[1]
top = detection[4] * color_img.shape[0]
right = detection[5] * color_img.shape[1]
bottom = detection[6] * color_img.shape[0]
cv.rectangle(color_img, (int(left), int(top)), (int(right), int(bottom)), (210, 230, 23), 2)
depth = depth_image[int(left):int(right), int(top):int(bottom)].astype(float)
depth_scale = profile.get_device().first_depth_sensor().get_depth_scale()
depth = depth * depth_scale
dist,_,_,_ = cv.mean(depth)
dist = round(dist, 1)
cv.putText(color_img, "dist: "+str(dist)+"m", (int(left), int(top)-5), cv.FONT_HERSHEY_PLAIN, 1, (0, 255, 0), 1)
pipeline = rs.pipeline()
config = rs.config()
colorizer = rs.colorizer()
model = cv.dnn.readNetFromTensorflow(
"models/ssdlite_mobilenet_v2_coco_2018_05_09/frozen_inference_graph.pb",
"models/ssdlite_mobilenet_v2_coco_2018_05_09/graph.pbtxt"
)
config.enable_stream(rs.stream.color, 640, 480, rs.format.bgr8, 30)
config.enable_stream(rs.stream.depth, 640, 480, rs.format.z16, 30)
profile = pipeline.start(config)
cv.namedWindow("RealSense object detection", cv.WINDOW_AUTOSIZE)
try:
while True:
frames = pipeline.wait_for_frames()
depth_frame = frames.get_depth_frame()
color_frame = frames.get_color_frame()
if not depth_frame or not color_frame:
continue
depth_image = np.asanyarray(depth_frame.get_data())
color_image = np.asanyarray(color_frame.get_data())
model.setInput(cv.dnn.blobFromImage(color_image, size=(300, 300), swapRB=True, crop=False))
pred = model.forward()
draw_predictions(pred, color_image, depth_image)
colorized_depth = cv.applyColorMap(cv.convertScaleAbs(depth_image, alpha=0.03), cv.COLORMAP_JET)
images = np.hstack((color_image, colorized_depth))
cv.imshow("RealSense object detection", images)
key = cv.waitKey(1) & 0xFF
if (key == 27) or (key == ord('q')):
cv.destroyWindow("RealSense object detection")
break
finally:
    pipeline.stop()
结论
因此,我们有一个简单的脚本来估计到选定对象的距离。该算法可能会犯约50厘米的错误,但总体上在四米之内效果很好。为了提高测量精度,您可以将pyrealsense2中嵌入的其他滤镜应用于深度图以提高图像质量,或者修改深度计算算法本身(例如,计算加权平均值或在一个中心区域中测量距离)。如您所见,任务并不困难,但很有趣。