Halo! Hari ini kita akan bertemu dengan yang namanya M5 UI. Berkat M5 UI, Anda dapat menghubungkan semua jenis bidang, tombol, bilah geser dan sakelar dengan beberapa baris kode, membuat lapisan bersyarat. Terlepas dari kenyataan bahwa proses menghubungkan elemen UI sangat sederhana, Anda juga dapat menggunakan alat visual M5 UI Designer untuk Arduino IDE.

Gambar 1
M5 UI , M5 UI Designer.
, . / , , , , . 2.

2.
, ( ) Fn TAB
Inputbox 50 px. , 32 px. (: Enter user name), , ':'. , . — . .
Textbox . , . . . .
Waitingbar 50 px. , 12 px. (: Connection to Wi-Fi), , ':'. , . .
Progressbar 50 px. , 12 px. (: Times of the check), , ':'. , ( 10% — , 30% — , 80% — , 100% — ). .
Selectbox 50 px. , 44 px. (: Mode), , ':'. , . Fn, K / M / .
Checkbox (true/false) 32 px. , 44 px. ( , true, — false). (: Remember password). SPACE.
Button ( void (String*)) 32 px. , 22 px. (: Launch). (. 3). SPACE.

3. 24 x 24 px
, 51 px.
Rangebox 50 px. , 32 px. (: Speed), , ':'. . Fn, N / $ / .
- PC/MAC;
- M5STACK;
- FACES;
- FACES Keyboard;
- USB-C ;
- ( -);
- 5 7 ;
- 40 60 ;
- ;
- ;
- ;
- 36 (1 .);
- 160 (1 .);
- 74HC595N (1 .);
- 220 (1 .);
- : , , , (4 .);
- BC337 (1 .);
- 100 (1 .);
- (1 .).
!
1. M5 UI
M5 UI for Arduino IDE Downloads ( ) GitHub (. 3.1).
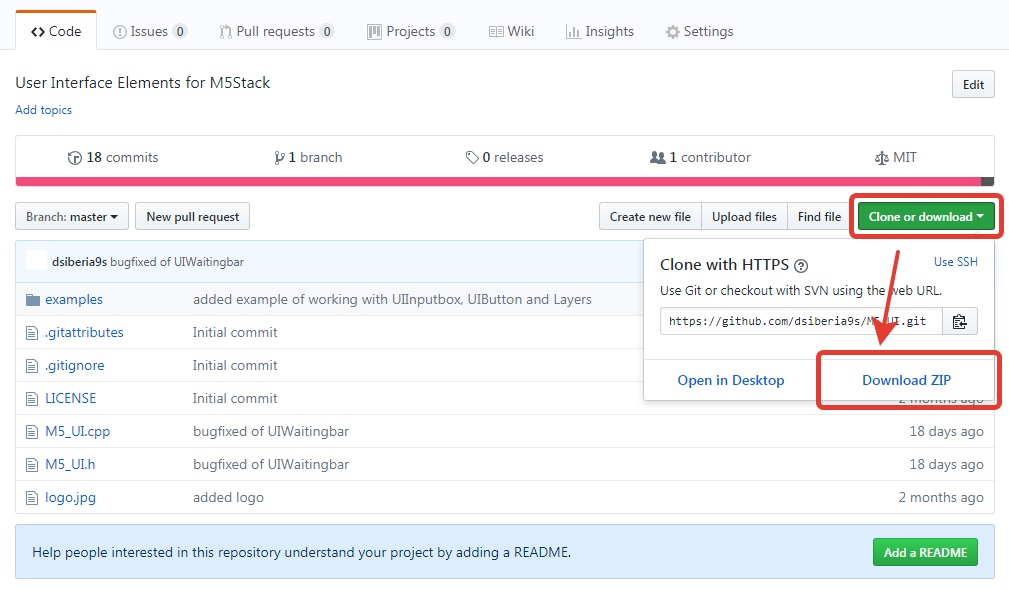
3.1. Clone or download, Download ZIP
Arduino IDE (. 3.2).

3.2. Sketch, Include Library, Add .ZIP Library...
. .
2. M5 UI Designer
M5 UI Designer for Arduino IDE Downloads ( ) GitHub , index.html (beta- Chrome) (. 3.4)

3.4
(. 3.5).

3.5. — M5 UI Designer
3. Enter — (⊙_⊙)
— Inputbox , : -. M5 ? — Enter ( ).
Enter, — void (String*).
void userFunction1(String* rootVar) {
    // reaction after pressing the Enter key
}

...
UIEnter = userFunction1;
4. , Inputbox Textbox (^_^♪)
— Inputbox. Enter (. 4).
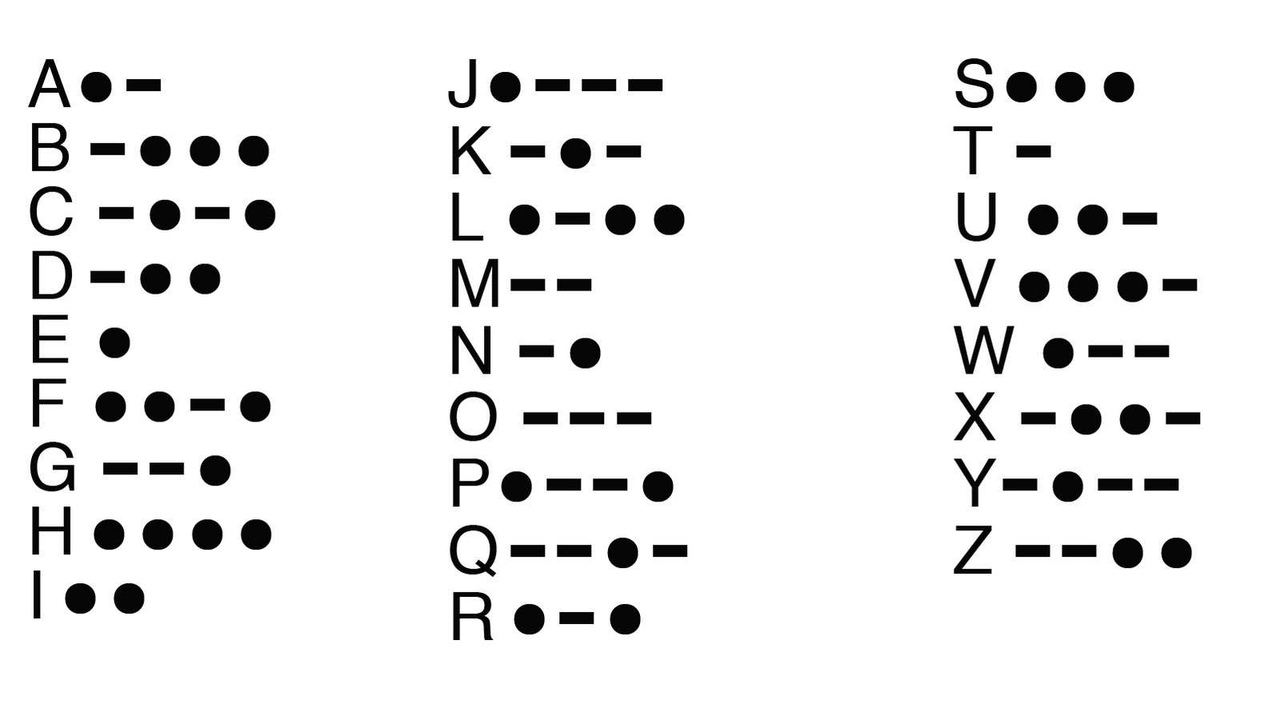
4.
M5 UI Designer, Inputbox Textbox, . Tools > User Functions " " Morse. Properties > Enter key Morse (. 4.1).

4.1.
Source Arduino IDE.
/* User functions: */
void Morse(String* rootVar) {
 int MorseCodes[] =
 {
  0,1,-1,-1, // A
  1,0,0,0, // B
  1,0,1,0, // C
  1,0,0,-1, // D
  0,-1,-1,-1, // E
  0,0,1,0,  //F
  1,1,0,-1, // G
  0,0,0,0,  // H
  0,0,-1,-1,  // I
  0,1,1,1, // J
  1,0,1,-1, // K
  0,1,0,0, // L
  1,1,-1,-1, // M
  1,0,-1,-1,  // N
  1,1,1,-1, // O
  0,1,1,0,  // P
  1,1,0,1,  // Q
  0,1,0,-1, // R
  0,0,0,-1, // S
  1,-1,-1,-1, // T
  0,0,1,-1, // U
  0,0,0,1,  // V
  0,1,1,-1, // W
  1,0,0,1,  // X
  1,0,1,1, // Y
  1,1,0,0 // Z
 };
 for (int i = 0; i < UIInputbox_v05700a.length(); i++) {
  char chr = UIInputbox_v05700a[i];
  if (chr == ' ')
  {
    M5.Speaker.mute();
    delay(350);
  }
  else
  {
    int chrNum = (chr - 'a') * 4;
    for (int j = chrNum; j < (chrNum + 4); j++)
    {
      M5.Speaker.tone(440);
      if (MorseCodes[j] == 0)
        delay(50);
      else if (MorseCodes[j] == 1)
        delay(200);
      M5.Speaker.mute();
      delay(150);
    }
  }
 }
}
— M5 UI Designer . , — Morse. :) (. 4.2).

4.2
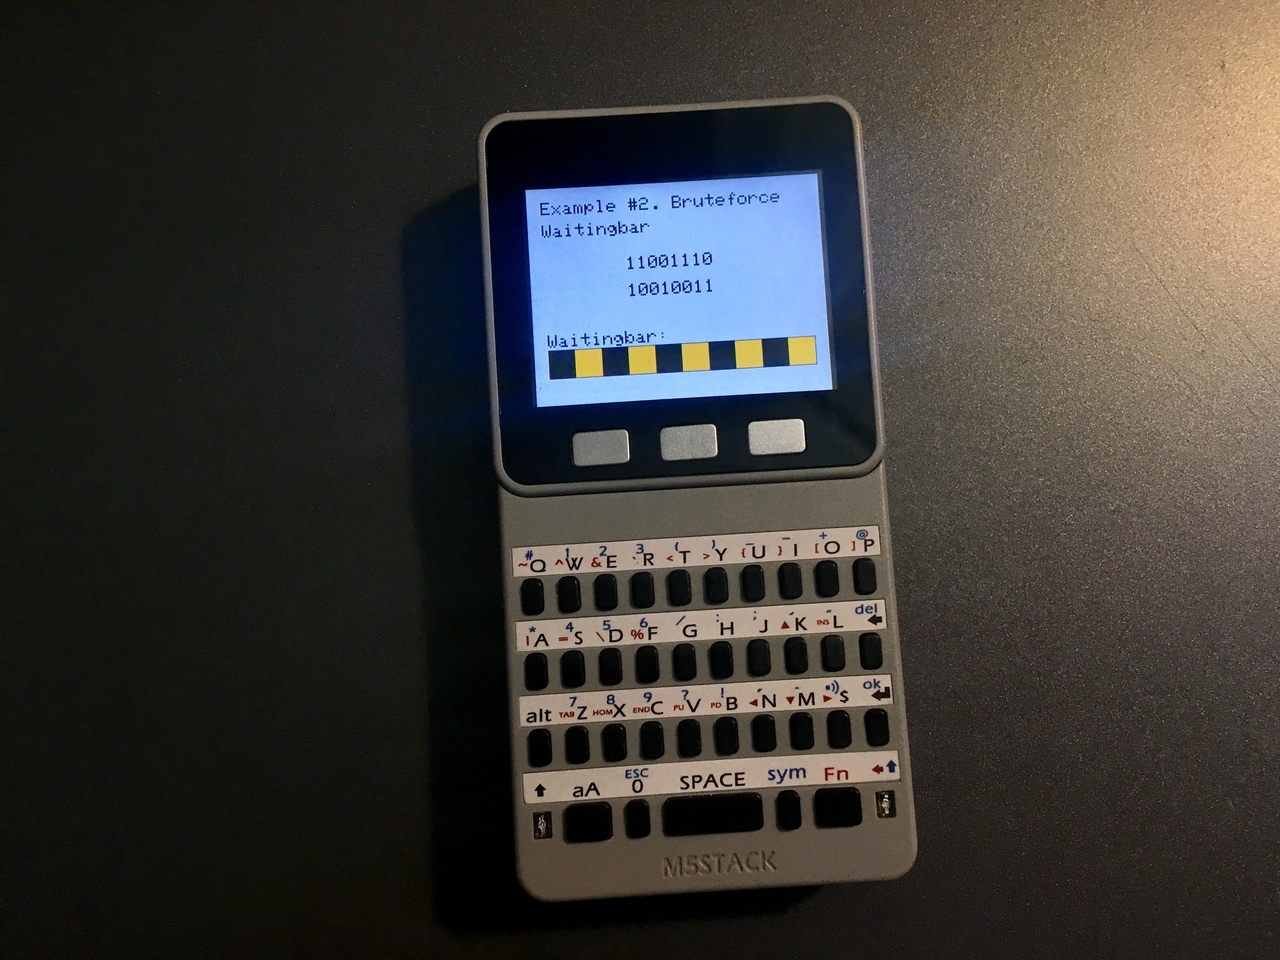
5. Bruteforce Waitingbar ≧(◕ ‿‿ ◕)≦
Waitingbar. 8- , . Waitingbar. , Waitingbar . Enter (. 5).

5.
default void UIDiable(bool, String*) . , Waitingbar .
/* Function for layer default: */
void LayerFunction_default(String* rootVar) {
 /* UI Elements */
 ...
 UIDisable(true, &UIWaitingbar_yksk2w8);
}
void UIDisable(bool, String*) void UISet(String*, int) , . bool — true/false .. / ; String* — rootVar ( ) .
void Brutforce(String*):
/* User functions: */
void Brutforce(String* rootVar) {
  /* make random original key */
  uint8_t okey = random(0, 256);
  String okeyString = "";
  for (int i = 0; i < 8; i++) {
    okeyString += String((okey >> i) & 1);
  }
  UISet(&UITextbox_sxjzx0g, okeyString); // set value for Textbox

  UIDisable(false, &UIWaitingbar_yksk2w8); // show the Waitingbar

  uint8_t key;

  while (true) {
    key++;
    String keyString = String();
    for (int i = 0; i < 8; i++) {
      keyString += String((key >> i) & 1);
    }
    UISet(&UITextbox_eyar2x, keyString);
    Serial.print(key);
    Serial.print(" ");
    Serial.println(okey);
    if (key == okey) break;
    M5.Speaker.tone(800);
    delay(40);
    M5.Speaker.mute();
  }
  UIDisable(true, &UIWaitingbar_yksk2w8);
  M5.Speaker.tone(600);
  delay(75);
  M5.Speaker.mute();
  M5.Speaker.tone(800);
  delay(75);
  M5.Speaker.mute();
  M5.Speaker.tone(500);
  delay(75);
  M5.Speaker.mute();
}
, void UISet(String*, String) void UISet(String*, int). String* — rootVar ( ) ; String int — .
, (. 5.1).
5.1
6. BatteryCheck Progressbar Σ(O_O)
A, AA, AAA. Progressbar , Textbox (. 6).

6.
/* Function for layer default: */
void LayerFunction_default(String* rootVar) {
 /* To open this layer use: */
 ...
 // BattaryCheck
 while (true) {
  int voltage = analogRead(35) * 3400 / 4096;
  int percentage = voltage * 100 / 1600;
  UISet(&UIProgressbar_1mlmhcu, percentage);
  UISet(&UITextbox_gtaetjh, voltage);
  delay(500);
 }
}
, 500 , 0 ( 35).
: 3400 — , 4096 — . 6.1.
— M5 Bottom FACES

6.1.
! (. 6.2).

6.2
7. LEDshift Selectbox ( ◡‿◡ *)
(, , ) 74HC595N M5 7.

7. M5
M5 UI Designer, , (. 7.1).
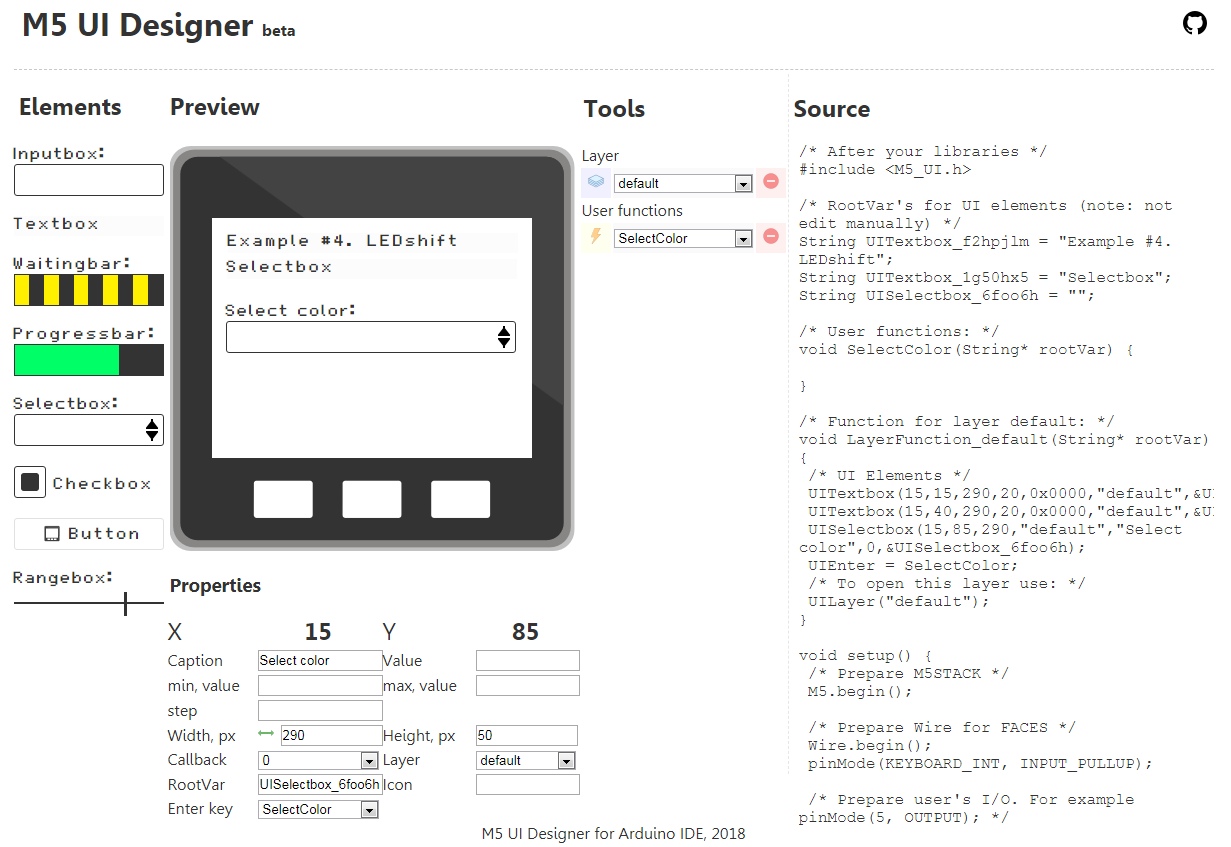
7.1.
.
M5 74HC595N RootVar's:
/* RootVar's for UI elements (note: not edit manually) */
...
// Shift register pinout
int SH_CP = 17;
int ST_CP = 2;
int DS = 5;
void SelectColor(String*):
/* User functions: */
void SelectColor(String* rootVar) {
  int led = UIOptionValue(&UISelectbox_6foo6h).toInt();
  digitalWrite(ST_CP, LOW);
  shiftOut(DS, SH_CP, MSBFIRST, led);
  digitalWrite(ST_CP, HIGH);
  delay(100);
}
, Selectbox String UIOptionValue(String*).
Selectbox . 5 :
/* Function for layer default: */
void LayerFunction_default(String* rootVar) {
 // add options to Selectbox
 UIOption("OFF", "0", &UISelectbox_6foo6h);
 UIOption("RED", "17", &UISelectbox_6foo6h);
 UIOption("YELLOW", "3", &UISelectbox_6foo6h);
 UIOption("GREEN", "5", &UISelectbox_6foo6h);
 UIOption("ORANGE", "9", &UISelectbox_6foo6h);
 ...
}
, Selectbox void UIOption(String, String, String*). String — , ; String — , ; String* — rootVar ( )
. M5 :
void setup() {
 ...
 /* Prepare user's I/O. For example pinMode(5, OUTPUT); */
 pinMode(SH_CP, OUTPUT);
 pinMode(ST_CP, OUTPUT);
 pinMode(DS, OUTPUT);
 ...
}
! :) (. 7.2).

7.2
Rangebox, Checkbox Button? ! — . (, ), ( ), , , ! , , , : Checkbox.

8
Rangebox . (. 8). — ;)
Enter , Enter key ().
Drill Callback .
? RootVar's bool startStatus, .
/* RootVar's for UI elements (note: not edit manually) */
...
// User's variables
bool startStatus = false;
void Drill(String*):
void Drill(String* rootVar) {
  startStatus = (startStatus) ? false : true;
  if (startStatus)
  {
    int power = UIRangebox_ztj619h.toInt() * 255 / 100;
    dac_out_voltage(DAC_CHANNEL_1, power);
    if (UICheckbox_1n9gs0b == "true")
    {
      UICaption("WAIT", &UIButton_enhu9fc);
      delay(25000);
      Drill(0);
      return;
    }
    UICaption("STOP", &UIButton_enhu9fc);
  }
  else
  {
    dac_out_voltage(DAC_CHANNEL_1, 0);
    UICaption("START", &UIButton_enhu9fc);
  }
}
, dac_out_voltage(DAC_CHANNEL_1, int). DAC_CHANNEL_1 — ( 25), int —
;
, UI- UICaption(String, String). String — ; String\ — rootVar ( )
! (. 8.1).

8.1
9. !
"" . .
\ Downloads