Hello everyone! Today we will write a bootloader that will output “Hello World” and run it on VirtualBox. We will write in assembler FASM. You can download it from here . We will also need VirtualBox and UltraISO . Before writing code, we will understand how operating systems load.So, when we press the large power button on our computer, the system starts, which is on any computer - BIOS (Basic Input / Output System or basic input / output system). The BIOS task is:
- Detect all connected devices and check their operability. The POST program (Power On Self Test, power-on self-test) is responsible for this. If vital iron is not detected, then the system speaker (if any) will squeak something incomprehensible and the download will not go further.
- Provide the operating system with functions for working with hardware.
- Read the very first sector of the boot device into the zero segment of RAM at offset 0x7C00h and transfer control there. 1 sector on the disk is 512 bytes. Therefore, our bootloader should not exceed 512 bytes. The BIOS determines that the sector is bootable by the presence of 0x55 and 0xAA in its last two bytes.
Now you can start writing code. Run the file FASMW.EXE, which is located in the archive with FASM, and insert the following code there:org 7C00h
start:
cli ; ( )
xor ax, ax ; ax
mov ds, ax ; dataSegment
mov es, ax ; es
mov ss, ax ; StackSegment
mov sp, 07C00h ;
sti ;
;
  mov ax, 3
  int 10h
  mov ah, 2h
  mov dh, 0
  mov dl, 0
  xor bh, bh
  int 10h
;
  mov ax, 1301h
  mov bp, message
  mov cx, 12
  mov bl, 02h
  int 10h
jmp $
message db 'Hello World!',0
times 510 - ($ - $$) db 0 ; 510-
db 0x55, 0xAA ;
This code requires a little explanation. The teamorg 7C00h
we say that the code needs to be loaded into RAM at 0x7C00. In lines mov ax, 3
int 10h
we set the video mode to 80x25 (80 characters per line and 25 lines) and thereby clear the screen. mov ah, 2h
mov dh, 0
mov dl, 0
xor bh, bh
int 10h
Here we set the cursor. The 2h interrupt 10h function is responsible for this. In the register dh we put the coordinate of the cursor in Y, and in the register dl in X. mov ax, 1301h
mov bp, message
mov cx, 12
mov bl, 02h
int 10h
We print a line. The 13h interrupt 10h function is responsible for this. In the bp register we put the string itself, in the cx register the number of characters in the string, in the bl register the attribute, in our case the color, it will be green. The first 4 bits affect the background color, the second 4 bits affect the text color. Below is the color chart0 - , 1 - , 2 - , 3 - , 4 - , 5 - , 6 - , 7 - -, 8 - -, 9 - -, A - -, B - -, C - -, D- -, E - -, F – .
In linejmp $
The program freezes.We compile the code by pressing Ctrl + F9 and save the resulting file as boot.bin.Launch
Launch UltraISO and drag our binary into a special area (marked with a red arrow).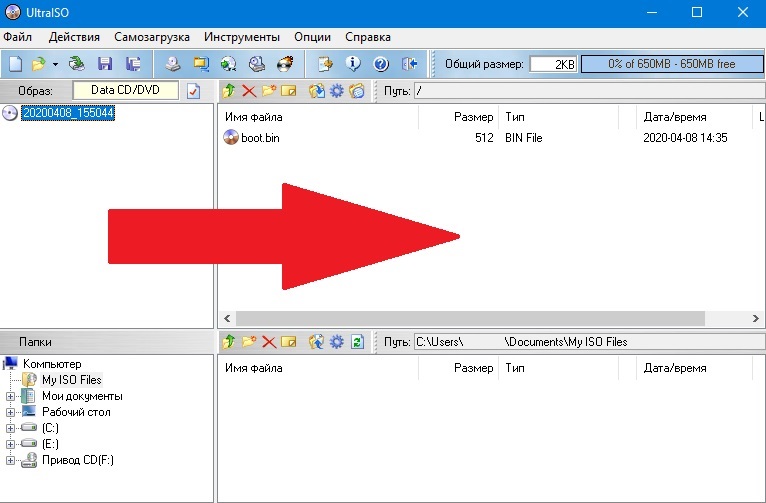 Next, right-click on the binarink and press the button with the following inscription: “Install as boot file”. Next, save our file in ISO format.Open VIrtualBox and create a new virtual machine (if you don’t know how to do this, click here ). So, after you have created the virtual machine, click “Configure, select the“ Media ”item, click on“ Empty ”, where“ Drive ”is the optical disk icon. We click on it and select “Select Optical Disk Image”, look for our ISO file, click “Open”. We save all the settings and start the virtual machine. Our “Hello World!” Appears on the screen.
On this, the first issue comes to an end. In the next part, we will teach our bootloader to read disk sectors and boot up its first kernel!