Foreword
Continuation of the cycle on work with Azure B2C. In this article I will talk about the most difficult and non-obvious point, namely the Identity Experience Framework.The main goal is to put together a picture for those who are not at all in the subject and help set up some basic features.Links to related postsBasic setting
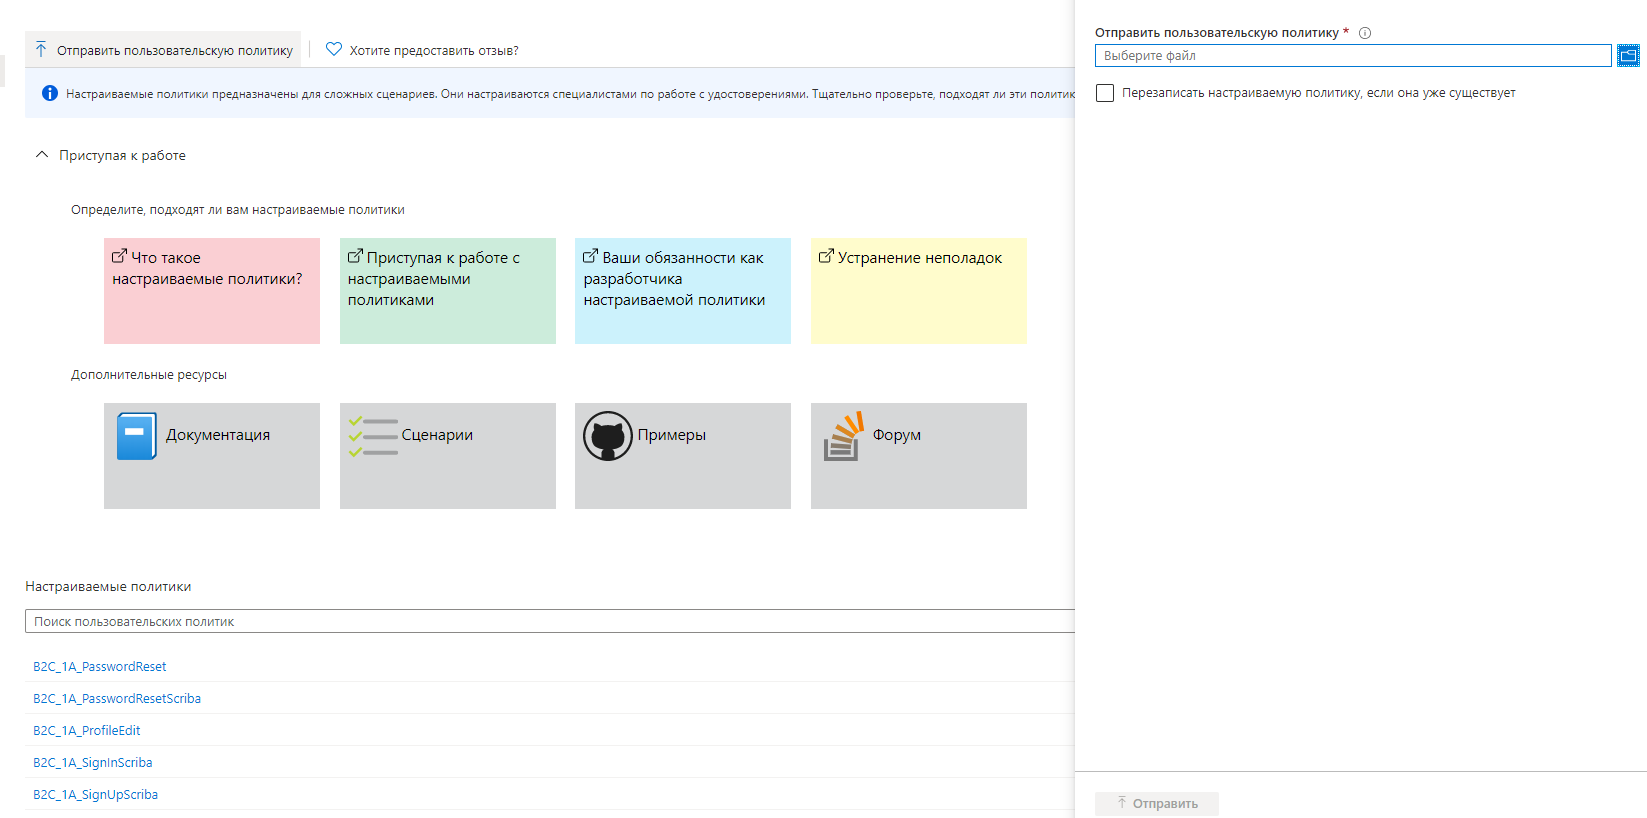
Before starting the basic setup, I would like to tell you how the process of loading new rules occurs:- Go to the Identity Experience Framework
- Click send user policy
- Select a file (do not forget to click "Overwrite custom policy, if it already exists")
- We send
 In fact, nothing has changed from the last time, BUT:
If you change the file TrustFrameworkExtension.xml or TrustFrameworkBase.xml - periodically download the file that refers to them.
Sometimes, when you make changes to one of these files, you test, it happens that your changes do not appear. This is due to the fact that
you changed something in the base file so that during the verification the child file will result in an error.
In the last article, we settled on the fact that we added the following files:a.TrustFrameworkBase.xml
b.TrustFrameworkExtensions.xml
c.SignUpOrSignin. XML
d.ProfileEdit. XML
e.PasswordReset. XML
Now I would like to tell in detail about each of them.TrustFrameworkBase.xmlThis file contains the basic setting. In fact, it is the basis of the basics, but in the tutorials they mostly say "Better not touch this file." This is partly true, but there are a few points that are not talked about:- Any tutorial that says to make changes to TrustFrameworkExtensions.xml essentially rewrites the rules from TrustFrameworkBase.xml
- There are situations when it is more convenient to change something in TrustFrameworkBase.xml .
- If you find in other files a link to an object that is not in these files, then it lies 100% in TrustFrameworkBase.xml and you can open it and see
From my experience I’ll say - I changed only two things in this file (Localization and deleted one field).TrustFrameworkExtension.xmlWith this file you will spend a lot of time together. In fact, this is the main file for your settings. He is constantly mentioned in tutorials.SignUpOrSignin. XML, ProfileEdit. XML, PasswordReset. XMLThese files are leaf pages. You probably want to add yours. They will have the least amount of change.Now let's talk about the file structure . All files have a similar structure, so I will describe it on the basis of the TrustFrameworkExtension.xml file .The file is divided into several main blocks<TrustFrameworkPolicy>
<BasePolicy>
<TenantId>customtenant.onmicrosoft.com</TenantId>
<PolicyId>B2C_1A_TrustFrameworkBase</PolicyId>
</BasePolicy>
<BuildingBlocks>
</BuildingBlocks>
<ClaimsProviders>
</ClaimsProviders>
<UserJourneys>
</UserJourneys>
</TrustFrameworkPolicy>
Now about each block separately.Building blocks
In this block we add “tools” that we can use in future work.ClaimsSchemaelement ClaimsSchema determines the types of statements, which can be referenced within the policy. <BuildingBlocks>
<ClaimsSchema>
<ClaimType Id="picture">
<DisplayName>Picture</DisplayName>
<DataType>string</DataType>
</ClaimType>
<ClaimType Id="country">
<DisplayName>Country</DisplayName>
<DataType>string</DataType>
<UserInputType>DropdownSingleSelect</UserInputType>
<Restriction>
<Enumeration Text="Russia" Value="russia" SelectByDefault="false" />
<Enumeration Text="Other" Value="other" SelectByDefault="false" />
</Restriction>
</ClaimType>
...
</ClaimsSchema>
PredicatesPredicates and predicate validation elements allow validation to ensure that only correctly formed data is entered into the Azure Active Directory B2C client (Azure AD B2C). <Predicates>
<Predicate Id="LengthRange" Method="IsLengthRange">
<UserHelpText>The password must be between 6 and 64 characters.</UserHelpText>
<Parameters>
<Parameter Id="Minimum">6</Parameter>
<Parameter Id="Maximum">64</Parameter>
</Parameters>
</Predicate>
<Predicate Id="Lowercase" Method="IncludesCharacters">
<UserHelpText>a lowercase letter</UserHelpText>
<Parameters>
<Parameter Id="CharacterSet">a-z</Parameter>
</Parameters>
</Predicate>
...
</Predicates>
PredicateValidationsWhereas predicates determine whether an assertion type is validated, PredicateValidations groups a set of predicates to form a user input check that matches the assertion type. <PredicateValidations>
<PredicateValidation Id="CustomPassword">
<PredicateGroups>
<PredicateGroup Id="LengthGroup">
<PredicateReferences MatchAtLeast="1">
<PredicateReference Id="LengthRange" />
</PredicateReferences>
</PredicateGroup>
<PredicateGroup Id="CharacterClasses">
<UserHelpText>The password must have at least 1 of the following:</UserHelpText>
<PredicateReferences MatchAtLeast="2">
<PredicateReference Id="Lowercase" />
<PredicateReference Id="Uppercase" />
...
</PredicateReferences>
</PredicateGroup>
</PredicateGroups>
</PredicateValidation>
</PredicateValidations>
ClaimsTransformationselement ClaimsTransformations contains a list of assertions transformation functions that can be used in the way of user interaction as part of a custom policy. <ClaimsTransformations>
<ClaimsTransformation Id="GenerateSendGridRequestBody" TransformationMethod="GenerateJson">
<InputClaims>
<InputClaim ClaimTypeReferenceId="email" TransformationClaimType="personalizations.0.to.0.email" />
<InputClaim ClaimTypeReferenceId="otp" TransformationClaimType="personalizations.0.dynamic_template_data.otp" />
<InputClaim ClaimTypeReferenceId="email" TransformationClaimType="personalizations.0.dynamic_template_data.email" />
</InputClaims>
<InputParameters>
<InputParameter Id="template_id" DataType="string" Value="d-b0000000000000000000000000000000" />
<InputParameter Id="from.email" DataType="string" Value="custom@email.com" />
<InputParameter Id="personalizations.0.dynamic_template_data.subject" DataType="string" Value="Welcome to Habr!"/>
</InputParameters>
<OutputClaims>
<OutputClaim ClaimTypeReferenceId="sendGridReqBody" TransformationClaimType="outputClaim" />
</OutputClaims>
</ClaimsTransformation>
...
</ClaimsTransformations>
ContentDefinitionsAllows you to define templates for each of your pages. <ContentDefinitions>
<ContentDefinition Id="api.signuporsignin">
<LoadUri>https://azure.blob.core.windows.net/yourblobstorage/pagelayoutfile.html</LoadUri>
<RecoveryUri>~/common/default_page_error.html</RecoveryUri>
<DataUri>urn:com:microsoft:aad:b2c:elements:contract:unifiedssp:1.2.0</DataUri>
</ContentDefinition>
...
</ContentDefinitions>
DisplayControlsThe Display control is a user interface element that has special features and interacts with the Azure Active Directory B2C server service (Azure AD B2C) <DisplayControls>
<DisplayControl Id="emailVerificationControl" UserInterfaceControlType="VerificationControl">
<DisplayClaims>
<DisplayClaim ClaimTypeReferenceId="email" Required="true" />
<DisplayClaim ClaimTypeReferenceId="verificationCode" ControlClaimType="VerificationCode" Required="true" />
</DisplayClaims>
<OutputClaims>
<OutputClaim ClaimTypeReferenceId="email" />
</OutputClaims>
<Actions>
<Action Id="SendCode">
<ValidationClaimsExchange>
<ValidationClaimsExchangeTechnicalProfile TechnicalProfileReferenceId="GenerateOtp" />
<ValidationClaimsExchangeTechnicalProfile TechnicalProfileReferenceId="SendGrid" />
</ValidationClaimsExchange>
</Action>
...
</Actions>
</DisplayControl>
...
</DisplayControls>
</BuildingBlocks>
ClaimsProviders
In this block, we will create the pages themselves, or rather their content. Here we will indicate what the page has input and output data.ClaimsProvider links technical profiles to the claims provider. <ClaimsProviders>
<ClaimsProvider>
<DisplayName>Self Asserted</DisplayName>
The TechnicalProfiles element contains a set of technical profiles supported by the claims provider. <TechnicalProfiles>
<TechnicalProfile Id="SelfAsserted-Social">
<DisplayName>User ID signup</DisplayName>
<Protocol Name="Proprietary" Handler="Web.TPEngine.Providers.SelfAssertedAttributeProvider, Web.TPEngine, Version=1.0.0.0, Culture=neutral, PublicKeyToken=null" />
<Metadata>
<Item Key="ContentDefinitionReferenceId">api.selfasserted</Item>
</Metadata>
<CryptographicKeys>
<Key Id="issuer_secret" StorageReferenceId="B2C_1A_TokenSigningKeyContainer" />
</CryptographicKeys>
<InputClaims>
<InputClaim ClaimTypeReferenceId="givenName" />
<InputClaim ClaimTypeReferenceId="surname" />
</InputClaims>
<OutputClaims>
<OutputClaim ClaimTypeReferenceId="objectId" />
<OutputClaim ClaimTypeReferenceId="newUser" />
<OutputClaim ClaimTypeReferenceId="executed-SelfAsserted-Input" DefaultValue="true" />
<OutputClaim ClaimTypeReferenceId="givenName" Required="true"/>
<OutputClaim ClaimTypeReferenceId="surname" Required="true"/>
<OutputClaim ClaimTypeReferenceId="country" Required="true"/>
</OutputClaims>
</TechnicalProfile>
</ClaimsProvider>
Example of adding Facebook identity providers <ClaimsProvider>
<DisplayName>Facebook</DisplayName>
<TechnicalProfiles>
<TechnicalProfile Id="Facebook-OAUTH">
<Metadata>
<Item Key="client_id">FACEBOOK_ID</Item>
<Item Key="scope">email public_profile</Item>
<Item Key="ClaimsEndpoint">https://graph.facebook.com/me?fields=id,first_name,last_name,name,email,picture</Item>
</Metadata>
<OutputClaims>
<OutputClaim ClaimTypeReferenceId="picture" PartnerClaimType="picture" />
</OutputClaims>
</TechnicalProfile>
</TechnicalProfiles>
</ClaimsProvider>
TrustFrameworkBase.xml
<ClaimsProvider>
<Domain>facebook.com</Domain>
<DisplayName>Facebook</DisplayName>
<TechnicalProfiles>
<TechnicalProfile Id="Facebook-OAUTH">
<DisplayName>Facebook</DisplayName>
<Protocol Name="OAuth2" />
<Metadata>
<Item Key="ProviderName">facebook</Item>
<Item Key="authorization_endpoint">https://www.facebook.com/dialog/oauth</Item>
<Item Key="AccessTokenEndpoint">https://graph.facebook.com/oauth/access_token</Item>
<Item Key="HttpBinding">GET</Item>
<Item Key="UsePolicyInRedirectUri">0</Item>
<Item Key="AccessTokenResponseFormat">json</Item>
</Metadata>
<CryptographicKeys>
<Key Id="client_secret" StorageReferenceId="B2C_1A_FacebookSecret" />
</CryptographicKeys>
<InputClaims />
<OutputClaims>
<OutputClaim ClaimTypeReferenceId="issuerUserId" PartnerClaimType="id" />
<OutputClaim ClaimTypeReferenceId="givenName" PartnerClaimType="first_name" />
<OutputClaim ClaimTypeReferenceId="surname" PartnerClaimType="last_name" />
<OutputClaim ClaimTypeReferenceId="displayName" PartnerClaimType="name" />
<OutputClaim ClaimTypeReferenceId="email" PartnerClaimType="email" />
<OutputClaim ClaimTypeReferenceId="identityProvider" DefaultValue="facebook.com" AlwaysUseDefaultValue="true" />
<OutputClaim ClaimTypeReferenceId="authenticationSource" DefaultValue="socialIdpAuthentication" AlwaysUseDefaultValue="true" />
</OutputClaims>
<OutputClaimsTransformations>
<OutputClaimsTransformation ReferenceId="CreateRandomUPNUserName" />
<OutputClaimsTransformation ReferenceId="CreateUserPrincipalName" />
<OutputClaimsTransformation ReferenceId="CreateAlternativeSecurityId" />
</OutputClaimsTransformations>
<UseTechnicalProfileForSessionManagement ReferenceId="SM-SocialLogin" />
</TechnicalProfile>
</TechnicalProfiles>
</ClaimsProvider>
Userjourneys
The user’s UserJourneys indicate explicit paths through which the policy allows the claims-based application to provide the user with the required claims.Below I added a couple of simple things, the rest is easy to find in the tutorials that I will add below. <UserJourneys>
<UserJourney Id="SignUp">
<OrchestrationSteps>
<OrchestrationStep Order="1" Type="ClaimsExchange" ContentDefinitionReferenceId="api.localaccountsignup">
<ClaimsExchanges>
<ClaimsExchange Id="SignUpWithLogonEmailExchange" TechnicalProfileReferenceId="LocalAccountSignUpWithLogonEmail-2" />
</ClaimsExchanges>
</OrchestrationStep>
<OrchestrationStep Order="2" Type="SendClaims" CpimIssuerTechnicalProfileReferenceId="JwtIssuer" />
</OrchestrationSteps>
<ClientDefinition ReferenceId="DefaultWeb" />
</UserJourney>
<UserJourney Id="PasswordReset">
<OrchestrationSteps>
<OrchestrationStep Order="1" Type="ClaimsExchange">
<ClaimsExchanges>
<ClaimsExchange Id="PasswordResetUsingEmailAddressExchange" TechnicalProfileReferenceId="LocalAccountDiscoveryUsingEmailAddress" />
</ClaimsExchanges>
</OrchestrationStep>
<OrchestrationStep Order="2" Type="ClaimsExchange">
<ClaimsExchanges>
<ClaimsExchange Id="NewCredentials" TechnicalProfileReferenceId="LocalAccountWritePasswordUsingObjectId" />
</ClaimsExchanges>
</OrchestrationStep>
<OrchestrationStep Order="3" Type="SendClaims" CpimIssuerTechnicalProfileReferenceId="JwtIssuer" />
</OrchestrationSteps>
<ClientDefinition ReferenceId="DefaultWeb" />
</UserJourney>
...
</UserJourneys>
ClaimsExchange Exchange ExampleClaimsExchanges .
    <ClaimsProviderSelections>
      <ClaimsProviderSelection TargetClaimsExchangeId="FacebookExchange" />
      <ClaimsProviderSelection TargetClaimsExchangeId="GoogleExchange" />
      <ClaimsProviderSelection ValidationClaimsExchangeId="LocalAccountSigninEmailExchange" />
    </ClaimsProviderSelections>
    <ClaimsExchanges>
      <ClaimsExchange Id="LocalAccountSigninEmailExchange" TechnicalProfileReferenceId="SelfAsserted-LocalAccountSignin-Email" />
    </ClaimsExchanges>
Typical Tasks
As a result of the above, it will be easier for you to understand the tutorials below.SignUpOrSignin.XML, ProfileEdit.XML, PasswordReset.XML
These are the final files where you can overwrite \ add BuildingBlocks and where we indicate what data to add to the token. <?xml version="1.0" encoding="UTF-8" standalone="yes"?>
<TrustFrameworkPolicy xmlns:xsi="http://www.w3.org/2001/XMLSchema-instance"
xmlns:xsd="http://www.w3.org/2001/XMLSchema"
xmlns="http://schemas.microsoft.com/online/cpim/schemas/2013/06" PolicySchemaVersion="0.3.0.0" TenantId="antekesd.onmicrosoft.com" PolicyId="B2C_1A_signup_signin" PublicPolicyUri="http://antekesd.onmicrosoft.com/B2C_1A_signup_signin">
<BasePolicy>
<TenantId>antekesd.onmicrosoft.com</TenantId>
<PolicyId>B2C_1A_TrustFrameworkExtensions</PolicyId>
</BasePolicy>
<BuildingBlocks>
<ContentDefinitions>
<ContentDefinition Id="api.signuporsignin">
<LoadUri>https://some.blob.core.windows.net/some/some.html</LoadUri>
<RecoveryUri>~/common/default_page_error.html</RecoveryUri>
<DataUri>urn:com:microsoft:aad:b2c:elements:contract:unifiedssp:1.2.0</DataUri>
</ContentDefinition>
</ContentDefinitions>
</BuildingBlocks>
<RelyingParty>
<DefaultUserJourney ReferenceId="SignUpOrSignIn" />
<TechnicalProfile Id="PolicyProfile">
<DisplayName>PolicyProfile</DisplayName>
<Protocol Name="OpenIdConnect" />
<OutputClaims>
<OutputClaim ClaimTypeReferenceId="signInName" PartnerClaimType="email"/>
<OutputClaim ClaimTypeReferenceId="givenName" Required="true"/>
<OutputClaim ClaimTypeReferenceId="surname" Required="true"/>
<OutputClaim ClaimTypeReferenceId="email" />
<OutputClaim ClaimTypeReferenceId="objectId" PartnerClaimType="sub"/>
<OutputClaim ClaimTypeReferenceId="identityProvider" />
<OutputClaim ClaimTypeReferenceId="tenantId" AlwaysUseDefaultValue="true" DefaultValue="{Policy:TenantObjectId}" />
<OutputClaim ClaimTypeReferenceId="picture" />
<OutputClaim ClaimTypeReferenceId="country" Required="true"/>
</OutputClaims>
<SubjectNamingInfo ClaimType="sub" />
</TechnicalProfile>
</RelyingParty>
</TrustFrameworkPolicy>
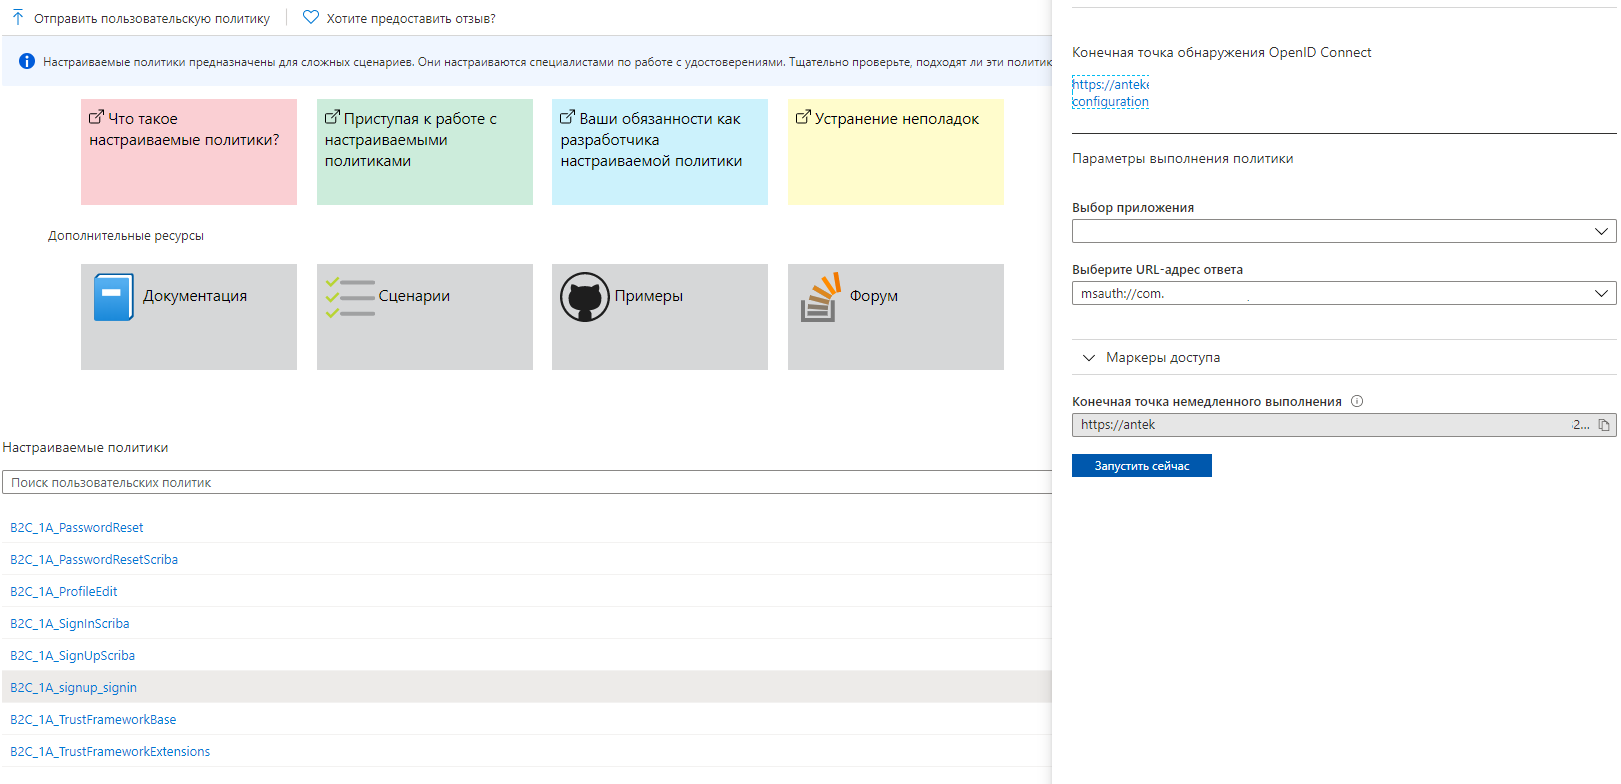
Testing
In order to test the latest changes you need:- Go to the Identity Experience Framework
- Select the Policy you want to test.
- Click "Run Now"
Conclusion
As a result, you will receive an authorization form that fully (or almost) meets your / customer’s requirements.Thank you for the attention!