Hello, Habr!Some time ago, STMicroelectronics released interesting STM32MP1 series processors. When I finally got my hands on the debug board based on this processor, I was surprised to find that it lacks any builds based on popular distributions (Debian, Arch Linux, etc.). All that remained was to try to adapt some distribution kit for this board yourself. Based on the results of this, this article appeared.
What are the characteristics?
This article would not be complete without at least a brief overview of the characteristics of the STM32MP1 series processors. There are three families of processors in the STM32MP1 series: STM32MP151, STM32MP153, and STM32MP157. Their main characteristics are given in the table. As you can see from the table, the difference between the families is that STM32MP151 has one Cortex-A7 core, while STM32MP153 and STM32MP157 have two such cores, and STM32MP157 also has 3D GPU support. But in general, the characteristics of these processors in 2020 do not make any impression, they are rather modest. Why did I still pay attention to them?
Why STM32MP1?
Indeed, a completely logical question may arise: is there a Raspberry Pi, there is a Banana Pi, there is an Orange Pi, and finally - why do we need some other STM32MP1? Moreover, all these boards usually have significantly higher performance than the object of our study. The answer is simple - while you are doing any crafts for home use, it is, you need to take the raspberry and it will be right. But if we are talking about mass-produced products for industrial applications - here other things begin to play a decisive role, thanks to which the STM32MP1 is the winner:- Operating temperature range. For STM32MP1, it starts at minus 40 degrees, while for many processors of other single-board computers it is good if it is minus 20.
- . STMicroelectronics , .
- . DigiKey Mouser STM32MP1, .
Of course, ST32MP1 is not the only processor on the market for industrial applications. There are both NXP and TI. As for TI, I had a project of a rather complex module based on it, and there was a sediment from a noticeable number of hardware features that were not covered in the documentation, but if not respected, the processor could completely fail, and not immediately, but over time and at the most inopportune moment. In addition, it was a single-core processor, and with an increase in the number of tasks assigned to it, performance problems more and more often arose. At the same time, I was dealing with STMicroelectronics microcontrollers, and they proved to be quite good, so I decided to try to pick this new little one.Debug board
For experiments, I purchased a STM32MP157A-DK1 debug board. This board is rather modest in terms of equipment: it does not have an LCD display like the STM32MP157C-DK2 or such a rich peripheral as the STM32MP157A-EV1. However, there is a microSD card slot, a USB-UART console, several USB ports and Ethernet. For the first start, more than enough. And to dilute the dry story with a picture, I am attaching a photo of this debug board.
What is from ready-made software?
At STMicroelectronics, everything is usually quite good in terms of hardware, but terrible in terms of software. All these modifications of Atollic True Studio, CubeMX, CubeIDE, which are buggy more and more with each new release, evoke some anguish. The situation is slightly better with STM32MP1 support. STMicroelectronics offers only a certain assembly of OpenSTLinux. This assembly is a distribution built using the Yocto Project. Of course, all this can exist in this form, but for me the main drawback was the lack of access to repositories of well-known distributions. This means that you will not be able to put on your board any utility from the repositories of popular distributions simply by running a command like apt-get install. Often this is not required for embedded solutions, but situations are possible,when such an opportunity will definitely not be superfluous.What do we do?
So, the task is clear - we need to run some popular distribution on our debug board. My choice fell on Arch Linux. This is not the easiest distribution, but it is well adapted for ARM devices: there are ready-made assemblies and an official site dedicated to this.The first thing I tried to solve the problem with a snap - I just slipped the bootloader ready core from the distribution of Arch Linux, assembled under armv7. This sometimes worked on other boards, but there was a fiasco waiting for me: despite the fact that the kernel was assembled for the correct architecture, it did not start. Well, then you need to assemble your kernel and at the same time your loader. My action plan was this:- Build the U-Boot bootloader.
- Build the Linux kernel.
- We mark the microSD card.
- We write the bootloader, the kernel and the root file system to the microSD card.
- Profit
Assembly preparation
To implement this plan, we need a computer with Linux and a card reader for recording on a microSD-card. I used a laptop with Debian 10, but in general this is not important, the names of the utilities may only slightly differ. So, we put the required utilities. I note right away that now and further all the commands must be executed as root or through sudo.apt-get install git
apt-get install make
apt-get install gcc
apt-get install gcc-arm-linux-gnueabihf
apt-get install bison
apt-get install flex
apt-get install g++
apt-get install rsync
apt-get install libncurses-dev
In preparation for the assembly, we create three directories in the working directory: u-boot (for the bootloader), buildroot (for the system build) and archlinux (for the distribution):mkdir u-boot
mkdir buildroot
mkdir archlinux
We will need these directories further. I will refer to these names later in the text of the article.U-boot assembly
A lot of articles have already been written about U-Boot, and as part of this, I will not go deep with explanations of what it is, what it is for, and how it works. I can only say that this is a bootloader that provides Linux startup on ARM devices. The source code for the U-Boot bootloader is available on GitHub.In order to build U-Boot, first of all we clone the U-Boot repository into the u-boot directory that we created earlier:git clone https:
To successfully build U-Boot, we need a device tree file and a U-Boot configuration file.The device tree file is a device dependent file. This file describes the configuration of the processor for a specific board. If you make your hardware based on any ARM processor and plan to run Linux on it, then you will need to develop your device tree file for it (or adapt some ready-made one). However, many debug boards already have ready-made files: caring U-Boot developers include them in their repository. So, look at the u-boot / arch / arm / dts directory. It should contain the stm32mp157a-dk1.dtb file - this is the device tree file for our debug board.In the U-Boot configuration file, the basic bootloader settings are written.Configuring U-Boot from scratch is a rather long and laborious process, because there are so many settings. For these purposes, there are both console and graphical configurators. However, here we were lucky: in the u-boot / configs directory there is a stm32mp15_basic_defconfig file . This is the U-Boot basic configuration file for the STM32MP15 debug boards. We open this file and see that for us to quickly start it is enough to change only one line: insteadCONFIG_DEFAULT_DEVICE_TREE=”stm32mp157c-ev1”
writeCONFIG_DEFAULT_DEVICE_TREE=”stm32mp157a-dk1”
With this line, we tell the bootloader that we need to use the device tree file for our board.Now you are ready to build U-Boot. We use our config:make CROSS_COMPILE=arm-linux-gnueabihf- stm32mp15_basic_defconfig
And run the assembly:make CROSS_COMPILE=arm-linux-gnueabihf-
If everything went smoothly, then in the u-boot directory we should have a bunch of files. Of these, two are of interest to us: u-boot-spl.stm32 and u-boot.img .The first file is the so-called First Stage Boot Loader (FSBL). It is located in front of the U-Boot, starts first and initializes the DDR3 memory, which is necessary to start U-Boot. In other boards, FSBL is often combined with U-Boot into one image, but here you have to write each image to a USB flash drive separately.That's all with U-Boot for now, save the designated files and proceed directly to the Linux kernel assembly.Linux kernel assembly
I will use Buildroot to build the Linux kernel. Of course, for these purposes, you can use the equally popular Yocto, or even try to build the kernel from source from kernel.org. However, I had some experience working with Buildroot, so I decided on it. In addition, Buildroot also builds the root file system (rootfs) and even the U-Boot loader.Now, by any available means, download the archive from Buildroot from the official website , unpack it into the buildroot directory and go to it.As in the case of U-Boot, the first thing you need to take care of is the configuration file for our hardware.We go to the buildroot / configs directory and see that the developers have already added a configuration file for our board: there is a filestm32mp157a_dk1_defconfig (true for Buildroot-2020.05 build, in earlier versions of this file there wasn’t yet).I tried to build the 5.4.26 kernel using this configuration file, and it generally successfully started on my board. However, for some reason, the Linux device tree file in this assembly turned out to be truncated: by default there was not even support for USB ports. Let's hope that over time this bug will be fixed, but what to do now?I went google this problem and came across STMicroelectronics repositories, where I found Linux 4.19 sources with patches for their products. Including, the correct DTB files were also there. It remains only to tell Buildroot to use this repository when building the kernel. To do this, copy the stm32mp157a_dk1_defconfig file and rename it to stm32mp157a_dk1_new_defconfig . Open it and make the following changes:InsteadBR2_PACKAGE_HOST_LINUX_HEADERS_CUSTOM_5_4=y
We writeBR2_PACKAGE_HOST_LINUX_HEADERS_CUSTOM_4_19=y
InsteadBR2_LINUX_KERNEL_CUSTOM_VERSION=y
BR2_LINUX_KERNEL_CUSTOM_VERSION_VALUE="5.4.26"
We writeBR2_LINUX_KERNEL_CUSTOM_TARBALL=y
BR2_LINUX_KERNEL_CUSTOM_TARBALL_LOCATION="$(call github,STMicroelectronics,linux,v4.19-stm32mp-r1.2)/linux-v4.19-stm32mp-r1.2.tar.gz"
Save and close the file. The configuration file is ready, let's apply it (you need to execute it from the buildroot directory):make CROSS_COMPILE=arm-linux-gnueabihf- stm32mp157a_dk1_new_defconfig
This command will transfer information from our configuration file stm32mp157a_dk1_defconfig to the .config file, which is located in the buildroot directory. In the future, the assembly will be built on the basis of the .config file.So, now everything is almost ready to start the build process, but before that you need to configure our kernel.Here it is worth saying that by default minimal functionality will be included in the kernel. If we want to expand it, then the kernel will need to be configured for ourselves. At a minimum, you will need to add support for the Control Group to the kernel: without this, our Arch Linux will not start. Additionally, as an example, I will demonstrate how to add support for USB-flash drives to the kernel: as a result, our debug board will be able to work with flash drives.To start the kernel configurator from the buildroot directory, execute the commandmake linux-menuconfig
and go to drink tea. This process is not fast and depending on the power of your computer can take from fifteen minutes to several hours. Important: during the work of buildroot you need a stable connection to the Internet, many different packages will be downloaded.If in the process an error pops upconfigure: error: you should not run configure as root (set FORCE_UNSAFE_CONFIGURE=1 in environment to bypass this check)
See `config.log' for more details
will need to execute the commandexport FORCE_UNSAFE_CONFIGURE=1
and restart the kernel configurator.As a result, the configurator window should appear: Add Control Group support: General setup -> Control Group support and set the asterisk with a space:
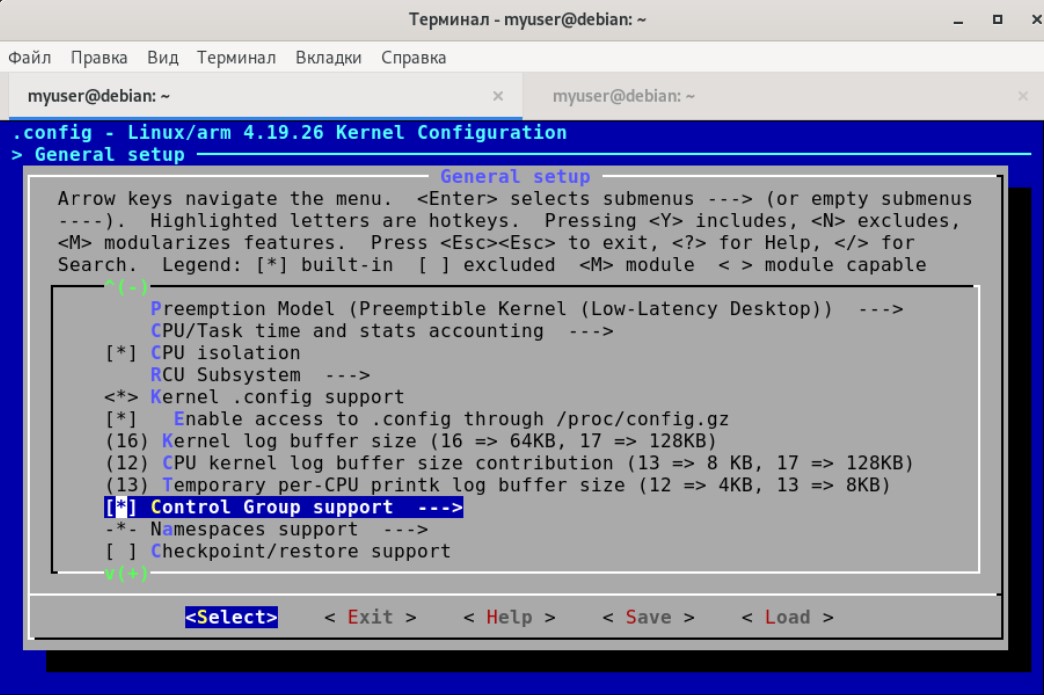
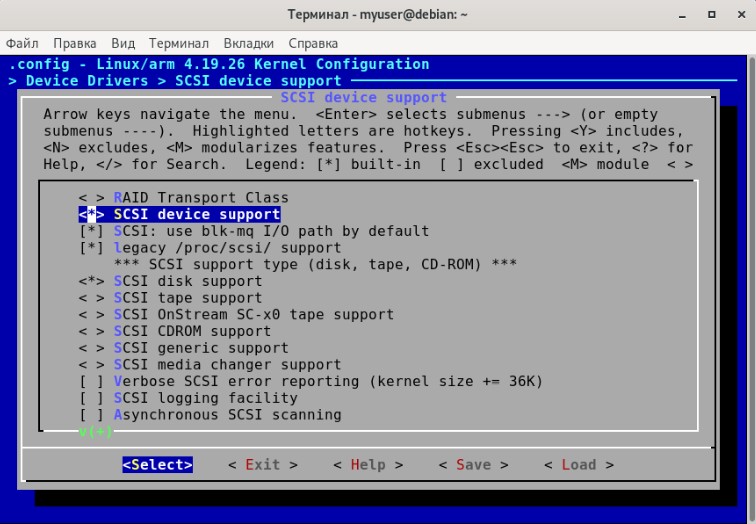
And how to add flash drive support?SCSI . 80- , , , USB FLASH .
Device Drivers -> SCSI support :
USB FLASH .
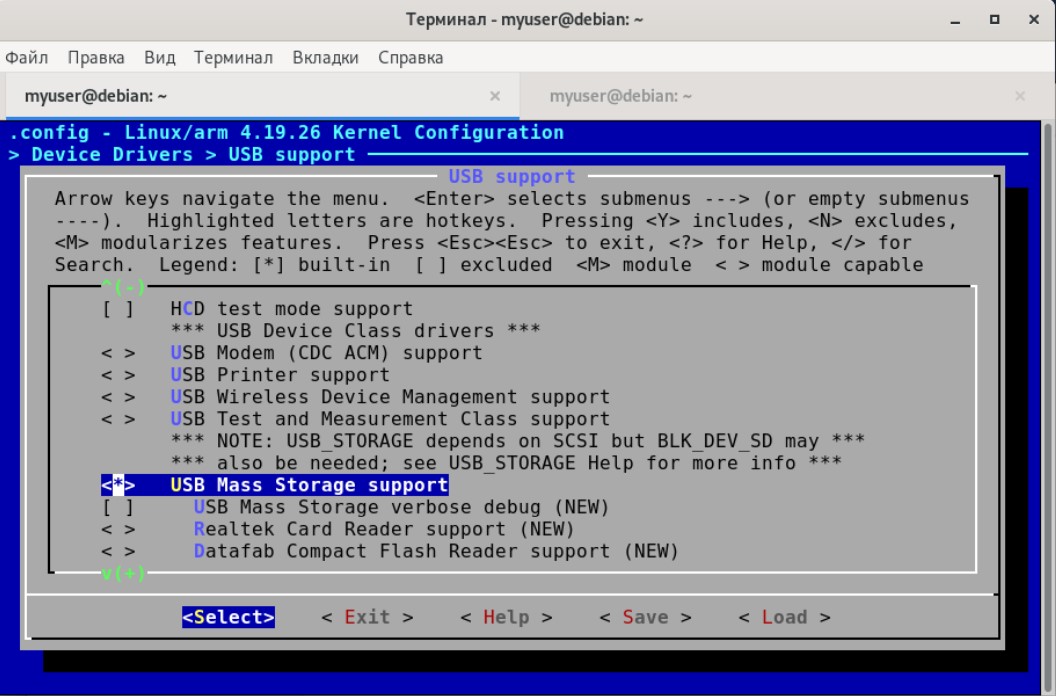
Device Drivers -> USB support USB Mass Storage support:
, FLASH :
File systems -> Native language support -> Codepage 437 File systems -> Native language support -> NLS ISO 8859-1: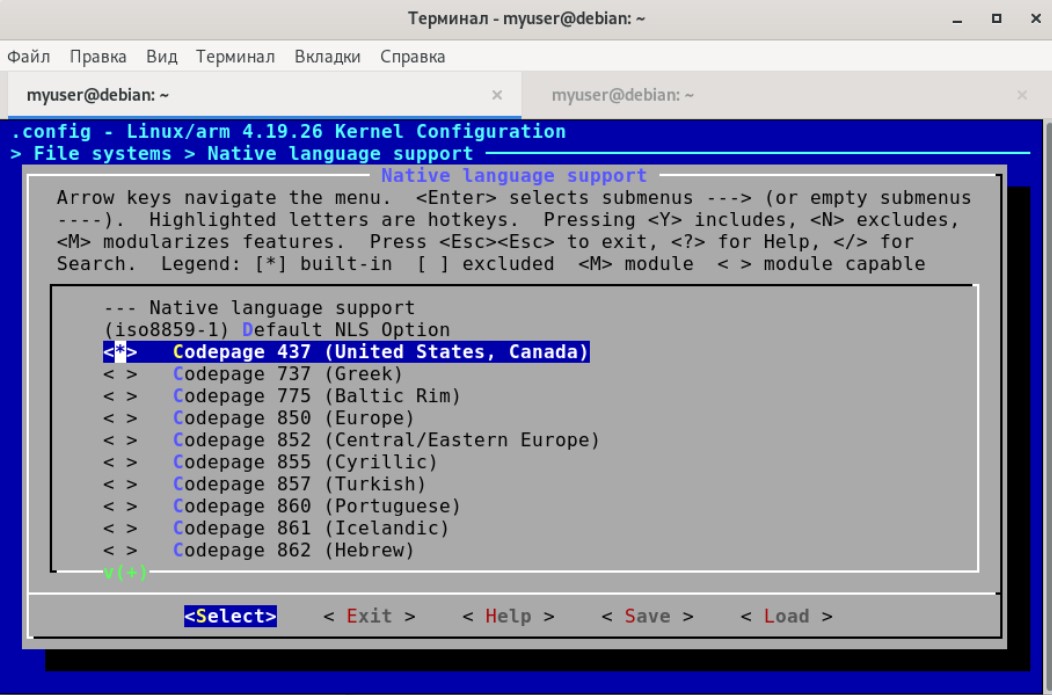

, USB FLASH .
After all the settings in the kernel configurator are made, save them with the Save button and exit the configurator with the Exit button .Now it remains only to start the build process with the command:make CROSS_COMPILE=arm-linux-gnueabihf-
and you can go to drink tea a second time, this process also takes a lot of time.If everything went smoothly, then the following set of files should appear in the buildroot / output / images directory:- rootfs.ext2 is a compiled root file system with ext2. It is not of interest to us;
- rootfs.ext4 is a compiled root file system with ext4. It will be useful to us a little later;
- sdcard.img - An image of a microSD card, including FSBL + U-Boot + zImage + rootfs. A file for the lazy, it allows you not to bother marking up a microSD card and immediately upload the entire system to it. Of course, this is not our way :).
- stm32mp157a-dk1.dtb - device tree file. Be sure to come in handy for starting the system;
- u-boot.img and u-boot-spl.stm32 - file FSBL and U-Boot. Since we collected them at the last step, we do not need them;
Why did we collect them separately?, Buildroot U-Boot. , . U-Boot, – Linux.
- zImage - the heart of the entire system - a compressed Linux kernel file.
So, the assembly process is completed, now we proceed to marking the microSD-memory card and creating partitions on it.Partitioning and sections of a microSD-card
Marking a microSD-card and creating partitions is a very important stage, strongly tied to a specific hardware platform. Unfortunately, information on this issue on a specific processor is not always easy to find, and even if you collect fully functional U-Boot and the Linux kernel, none of this will work with the slightest error in the layout of the microSD card.Immediately, I note that the microSD card with which the system is launched on the STM32MP1 must have GPT markup. The gdisk utility will help us with this , but more on that later.The microSD card sections should look like this: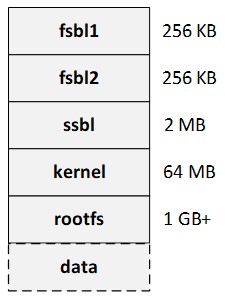 As you can see from the figure, the card must contain at least 5 partitions: fsbl1, fsbl2, ssbl, kernel, rootfs. Additionally, you can also create one or more data sections to store any information on them.The fsbl1 and fsbl2 sections are completely identical and the primary bootloader is written to them (as you remember, this is the u-boot-spl.stm32 file that we received during the U-Boot assembly process). Despite the fact that everything should work and with only one such section, the documentation on STM2MP1 recommends doing two of them. Other requirements apply to these sections:
- Each partition must be 256 KB in size.
- , fsbl (fsbl1 fsbl2). : , .
The ssbl section is intended for writing the U-Boot bootloader (the u-boot.img file that we received during the U-Boot assembly process). The recommended ssbl partition size is 2 MB.The kernel section is intended for writing to it the Linux kernel ( zImage file ), the device tree ( stm32mp157a-dk1.dtb file ), as well as the script for U-Boot, with which the system will be launched. The recommended kernel partition size is 64 MB.The rootfs section is for writing the root file system. We will try to write to it the root file system compiled by Buildroot, as well as the root file system of Arch Linux. The recommended rootfs partition size is 1 GB or more.The data section is intended for storing user data. You can make one such section or several. And you can do without it at all. In this article, I will not create this section.So, we begin to markup. We insert the microSD-card into the card reader of our computer with Linux on board and using any available means (for example, using dmesg) determine the name of the device that appears. In my case, this is / dev / sdb. In your case, it may be a different name.Run the gdisk utility and completely delete the markup on the microSD card:root@debian:/home/myuser# gdisk /dev/sdb
GPT fdisk (gdisk) version 1.0.3
Partition table scan:
MBR: protective
BSD: not present
APM: not present
GPT: present
Found valid GPT with protective MBR; using GPT.
Command (? for help): x
Expert command (? for help): z
About to wipe out GPT on /dev/sdb. Proceed? (Y/N): y
GPT data structures destroyed! You may now partition the disk using fdisk or
other utilities.
Blank out MBR? (Y/N): y
Just in case, we hammer the beginning of the microSD card with zeros.dd if=/dev/zero of=/dev/sdb bs=1M count=64
Now run gdisk again, add the markup and create 5 partitions on the microSD card according to the table that I gave above:root@debian:/home/myuser# gdisk /dev/sdb
GPT fdisk (gdisk) version 1.0.3
Partition table scan:
MBR: not present
BSD: not present
APM: not present
GPT: not present
Creating new GPT entries.
Command (? for help): o
This option deletes all partitions and creates a new protective MBR.
Proceed? (Y/N): y
Command (? for help): n
Partition number (1-128, default 1): 1
First sector (34-30873566, default = 2048) or {+-}size{KMGTP}:
Last sector (2048-30873566, default = 30873566) or {+-}size{KMGTP}: +256K
Current type is 'Linux filesystem'
Hex code or GUID (L to show codes, Enter = 8300):
Changed type of partition to 'Linux filesystem'
Command (? for help): n
Partition number (2-128, default 2): 2
First sector (34-30873566, default = 4096) or {+-}size{KMGTP}:
Last sector (4096-30873566, default = 30873566) or {+-}size{KMGTP}: +256K
Current type is 'Linux filesystem'
Hex code or GUID (L to show codes, Enter = 8300):
Changed type of partition to 'Linux filesystem'
Command (? for help): n
Partition number (3-128, default 3): 3
First sector (34-30873566, default = 6144) or {+-}size{KMGTP}:
Last sector (6144-30873566, default = 30873566) or {+-}size{KMGTP}: +2M
Current type is 'Linux filesystem'
Hex code or GUID (L to show codes, Enter = 8300):
Changed type of partition to 'Linux filesystem'
Command (? for help): n
Partition number (4-128, default 4): 4
First sector (34-30873566, default = 10240) or {+-}size{KMGTP}:
Last sector (10240-30873566, default = 30873566) or {+-}size{KMGTP}: +64M
Current type is 'Linux filesystem'
Hex code or GUID (L to show codes, Enter = 8300):
Changed type of partition to 'Linux filesystem'
Command (? for help): n
Partition number (5-128, default 5): 5
First sector (34-30873566, default = 141312) or {+-}size{KMGTP}:
Last sector (141312-30873566, default = 30873566) or {+-}size{KMGTP}:
Current type is 'Linux filesystem'
Hex code or GUID (L to show codes, Enter = 8300):
Changed type of partition to 'Linux filesystem'
Command (? for help): w
Final checks complete. About to write GPT data. THIS WILL OVERWRITE EXISTING
PARTITIONS!!
Do you want to proceed? (Y/N): y
OK; writing new GUID partition table (GPT) to /dev/sdb.
The operation has completed successfully.
Next, add the names to the sections on the microSD-card. As you remember, this is especially critical for the first sections where FSBL will be written: if you do not assign the required names to them, the system will not start:root@debian:/home/myuser# gdisk /dev/sdb
GPT fdisk (gdisk) version 1.0.3
Partition table scan:
MBR: protective
BSD: not present
APM: not present
GPT: present
Found valid GPT with protective MBR; using GPT.
Command (? for help): c
Partition number (1-5): 1
Enter name: fsbl1
Command (? for help): c
Partition number (1-5): 2
Enter name: fsbl2
Command (? for help): c
Partition number (1-5): 3
Enter name: ssbl
Command (? for help): c
Partition number (1-5): 4
Enter name: kernel
Command (? for help): c
Partition number (1-5): 5
Enter name: roootfs
Command (? for help): w
Final checks complete. About to write GPT data. THIS WILL OVERWRITE EXISTING
PARTITIONS!!
Do you want to proceed? (Y/N): y
OK; writing new GUID partition table (GPT) to /dev/sdb.
The operation has completed successfully.
At the end of work with the microSD-card, we need to add the legacy BIOS bootable attribute to the section on which we will write the Linux kernel. Without this attribute, the kernel refused to start:root@debian:/home/myuser# gdisk /dev/sdb
GPT fdisk (gdisk) version 1.0.3
Partition table scan:
MBR: protective
BSD: not present
APM: not present
GPT: present
Found valid GPT with protective MBR; using GPT.
Command (? for help): x
Expert command (? for help): a
Partition number (1-5): 4
Known attributes are:
0: system partition
1: hide from EFI
2: legacy BIOS bootable
60: read-only
62: hidden
63: do not automount
Attribute value is 0000000000000000. Set fields are:
No fields set
Toggle which attribute field (0-63, 64 or <Enter> to exit): 2
Have enabled the 'legacy BIOS bootable' attribute.
Attribute value is 0000000000000004. Set fields are:
2 (legacy BIOS bootable)
Toggle which attribute field (0-63, 64 or <Enter> to exit):
Expert command (? for help): w
Final checks complete. About to write GPT data. THIS WILL OVERWRITE EXISTING
PARTITIONS!!
Do you want to proceed? (Y/N): y
OK; writing new GUID partition table (GPT) to /dev/sdb.
The operation has completed successfully.
That's all, the layout of the memory card is ready. Just in case, check that everything is recorded as it should. To do this, run gdisk again and run the p command . The result should advise the picture: Now create the ext4 file system on / dev / sdb4 and / dev / sdb5:
mkfs.ext4 /dev/sdb4
mkfs.ext4 /dev/sdb5
And we prescribe volume labels so that later it is easier to access them:e2label /dev/sdb4 kernel
e2label /dev/sdb5 rootfs
This completes the creation of sections of the memory card, you can proceed to write files to it.MicroSD card recording
So, at the current stage, everything is ready for recording on a microSD card. We insert it into the card reader of the Linux computer and write the primary bootloader (FSBL) in the first and second sections of the mocroSD card:dd if=u-boot/u-boot-spl.stm32 of=/dev/sdb1
dd if=u-boot/u-boot-spl.stm32 of=/dev/sdb2
Now write U-Boot to the third section of the microSD card:dd if=u-boot/u-boot.img of=/dev/sdb3
Next, you need to copy the kernel, the device tree file and the boot script to the fourth section on the microSD-card.Before you start copying files, you need a little explanation about the download script. In this script, in fact, various information for U-Boot is indicated, with the help of which it can boot the system and transfer control to the kernel. There are different ways to write these scripts, but the simplest (in my opinion) is described in the documentation for STM32MP1: you need to create the / extlinux directory in the root of the kernel section and create a text file with the name extlinux.conf with the following contents:LABEL stm32mp157a-dk1
KERNEL /zImage
FDT /stm32mp157a-dk1.dtb
APPEND root=/dev/mmcblk0p5 rootwait rw console=ttySTM0,115200
Everything is quite simple here: we tell the loader where to get the kernel, the device tree, the root file system and say that we will have the ttySTM0 port as the working console.Now copy the kernel:cp -a buildroot/output/images/zImage /media/myuser/kernel/
Note: in the / media / myuser / directory, I mount a microSD card when installed in the card reader. In your case, it may be a different directory.Copy the device tree file:cp -a buildroot/output/images/stm32mp157a-dk1.dtb /media/myuser/kernel/
Create a directory:mkdir /media/myuser/kernel/extlinux
Create a file:nano /media/myuser/kernel/extlinux/extlinux.conf
and fill it with the contents:LABEL stm32mp157a-dk1
KERNEL /zImage
FDT /stm32mp157a-dk1.dtb
APPEND root=/dev/mmcblk0p5 rootwait rw console=ttySTM0,115200
Save the file and close the editor.On this, the fourth section of the microSD card is ready: the linux kernel and all the auxiliary files for it are already written. Already at this stage, if you insert a microSD-card into the debug board, the Linux kernel should be loaded, however, in the end it will crash into kernel panic due to the fact that the root file system cannot be mounted. This is not surprising, because we have recorded it so far.There is the final stage, at which we will write the root file system to the microSD-card. And here various options are possible:- Write the root file system generated by Buildroot
- Rewrite the Arch Linux root file system
First, write down the root file system that Buildroot generated for us and try to start with it. This was not the purpose of this article, but it seemed to me that in general it might be useful for any applications, especially since this action does not take much time. The root file system is written to the fifth section of our microSD card with just one command:dd if=buildroot/output/images/rootfs.ext4 of=/dev/sdb5
Now insert the memory card into the debug board and start the system. We will observe the output of debugging information via the USB-UART console: access to it is provided through a microUSB port on the STM32MP157A-DK1 board. Displaying the displayed information is possible in any terminal program, for example Putty or Minicom. For the purposes of this article, I used the latter by opening another terminal window in Debian.Now we insert the microSD-card into the debug board, supply power to the board and look at the terminal. If everything was done correctly, then the FSBL, U-Boot, kernel logs should be poured in there and ultimately - an invitation to enter the login will appear. We enter root and - voila - we get to the console of the system we just collected: Yes, it doesn’t even have a package manager, and in general the functionality is very poor, but with the help of Buildroot you can build it very cool and create a really working complex system. In the meantime, its size is only 7 megabytes!
 After making sure that the homemade root file system starts up successfully, it's time to start Arch Linux. Again, insert the microSD-card into the card reader of our computer and format again the fifth section of the memory card:
mkfs.ext4 /dev/sdb5
Download the archive with Arch Linux, assembled under armv7, from the official site. Unpack the archive into the archlinux directory and using the command:cp -a archlinux
Copy it to the rootfs section of the microSD card.We clean the directory / media / myuser / rootfs / boot: we don’t need the contents, because the kernel and the device tree are in a separate section of the microSD card:rm –rf /media/myuser/rootfs/boot
Later, you can mount the / dev / sdb4 partition in the boot directory, where we have the kernel image.After that, insert the microSD card into the debug board, power on and enjoy working ArchLinux: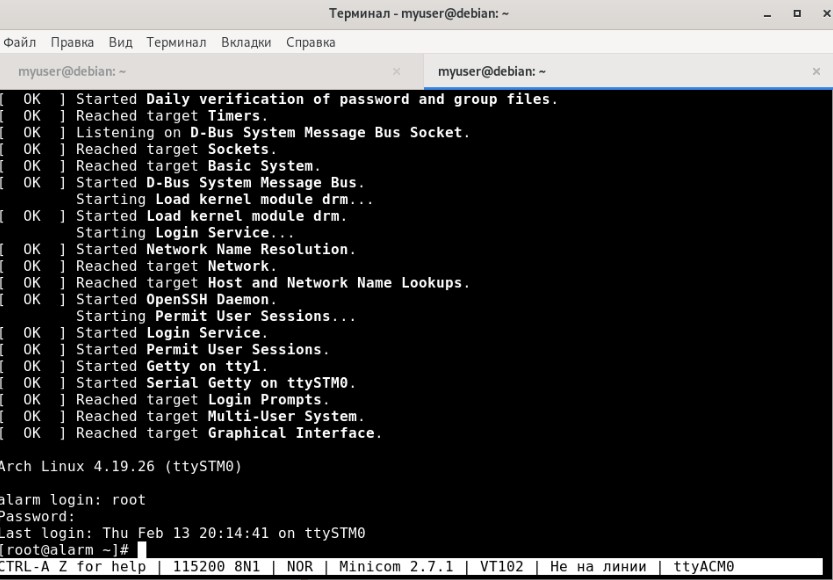 After Arch Linux successfully started, I decided to try running Debian on the debug board as well. Using absolutely similar manipulations with the root file system, it successfully worked:
Conclusion
In the course of this article, we played enough with the STM32MP157A-DK1 debug board: we built U-Boot, the Linux kernel, our own root file system for it, and also launched Arch Linux and Debian. I hope this material will be useful to someone both when working with processors of the STM32MP1 family, or with any other single-board on ARM.