Today we look at a number of basic operations that the administrator of the virtualization environment will regularly need to perform. The article is a continuation of the oVirt series: part 1 , part 2 and part 3 :Content
Articles
- Introduction
- Installation of the manager (ovirt-engine) and hypervisors (hosts)
- Additional settings
- Basic Operations - We Are Here
Traditionally, for details on administrative tasks, welcome to the documentation .When entering oVirt you will see 2 portals:- Administration portal
- VM Portal
The first is intended for the administrator and administrative tasks, the second - for customers of machines, but can also be used by the administrator - it’s even more convenient to make some functions there.At the top of the window of each collection of oVirt objects there is a powerful search box, with contextual prompts.As an example, selecting problem hosts in the control panel actually causes a filter:status = unassigned or status = maintenance or status = installing or status = reboot or status = preparingformaintenance or status = pendingapproval or status = connecting or status = installingos or status = kdumping
Create VM and template
I think you created a simple VM already in Part 2, now we will get to know other oVirt entities that are directly related to virtual machines - virtual machines themselves, templates, and pools.A template is a copy of a machine (usually pre-prepared) designed to create identical machines (cloning). The template may have a version, it’s convenient, because no need to make a new separate template after each update of the reference machine. More details in the documentation .A pool is a group of identical machines generated from a single template. Convenient for VDI (virtual desktop infrastructure), when dozens or hundreds of users need to provide an identical working environment and this is done literally in the blink of an eye. Read more about pools in the documentation .Let's create a template for which we can clone a previously created machine, but for demonstration we will go the other way - import a template from the external collection Glance Images: Storage -> Domains -> ovirt-image-repository (1), Import (2): Fig. 1 - Import of the Fedora 32 image.We mark “Import as Template” (3, Import as Template), give the template a name (4). It is strongly recommended that the disk be given a friendly name (5, Disk Alias).The progress of tasks is conveniently monitored in the Tasks section .
 Fig. 2 - Progress in completing tasks in oVirt.After successful upload, the template is added to the list.
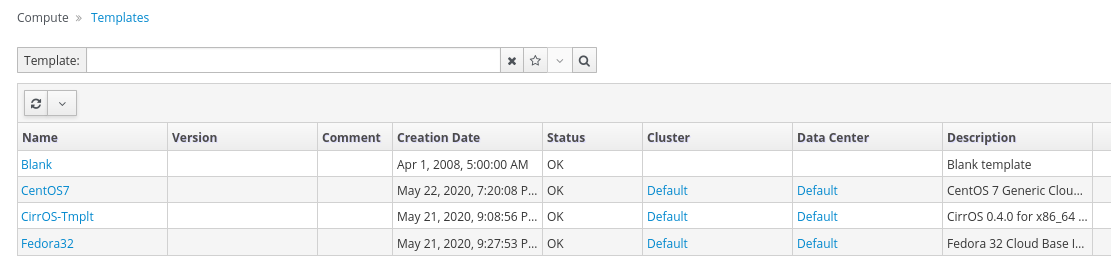 Fig. 3 - Templates.Based on the loaded template, create a pool:
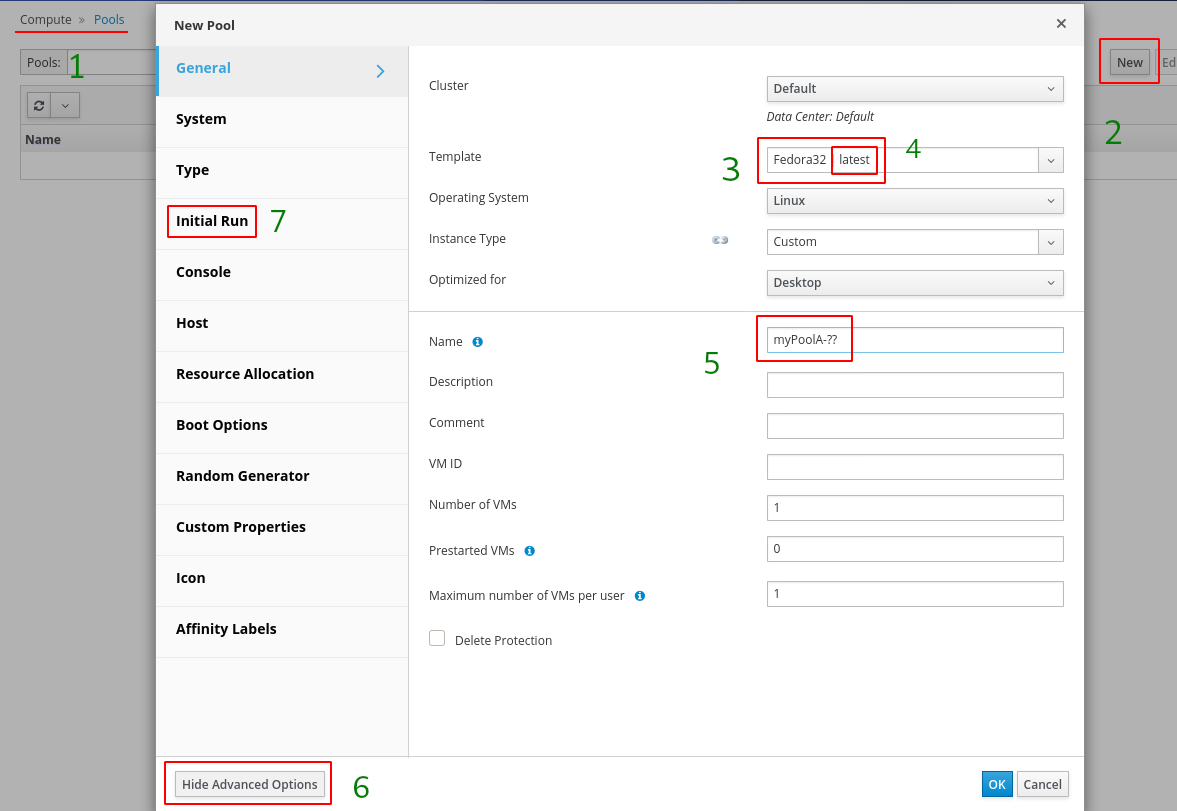 Fig. 4 - Creating a pool.We go to Compute -> Pools (1), New (2), select the Fedora32 (3) template, the version - latests (4), assign the name "myPoolA- ??" (5). We do not touch the Number of VM and Prestarted VM fields yet, we will return to them in the next step. Next, turn on the advanced settings (6) and move on to setting up Initial Run.
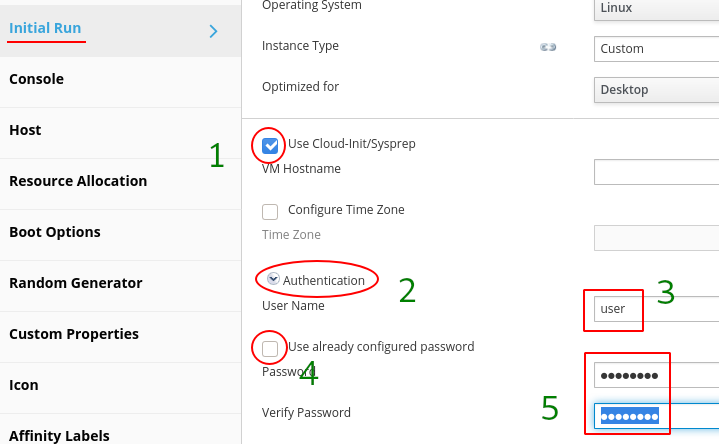 Fig. 4 - Configure initial startup.
Because from Glance Images we downloaded Cloud Image, we need to configure authentication. Check that “Use Cloud-Init / Sysprep” (1) is enabled, open Authentication (2), specify the username, for example, root or user (3). To create a unique password for the pool, disable “Use Already Configured Password” (4) and enter your password (5). Click “OK” - the pool is created, identical machines appeared in Compute -> Virtual Machines (pay attention to their icon, it is different from a separately working machine).Note on the name of the pool. As you noticed, at the end is "- ??". This includes the "normalized" numbering of machines (supplemented by zeros - 01, 02, ..., 09, 10, etc.) Otherwise, the numbering will be natural numbers without alignment (1, 2, ..., 9, 10, ...)Before continuing, let's go back to the pool settings. Notice that the Number of VM field has changed to Increase number of VMs in pool by. We specify 31 here and the number of machines in the pool almost instantly becomes 32. Now in the “Prestarted VM” field we enter 16 - this will force oVirt to keep the specified number of machines pre-started and ready to connect users. This is where we will finish about machines, templates, and pools and move on to migration.Key VM Icons:- rack unit - server;
- monitor - desktop;
- 3 towers - server from the pool;
- 3 monitors - desktop from the pool;
- rewind (rewind) - stateless (the machine resets its state to its original state after shutdown; all changes are rolled back);
- triangle in the orange monitor - the requested configuration change requires a reboot.
VM migration (live migration)
Migration of the state of the switched on machine is simple - right-click on a machine or a group of machines. The procedure is similar to that of vMotion in vSphere.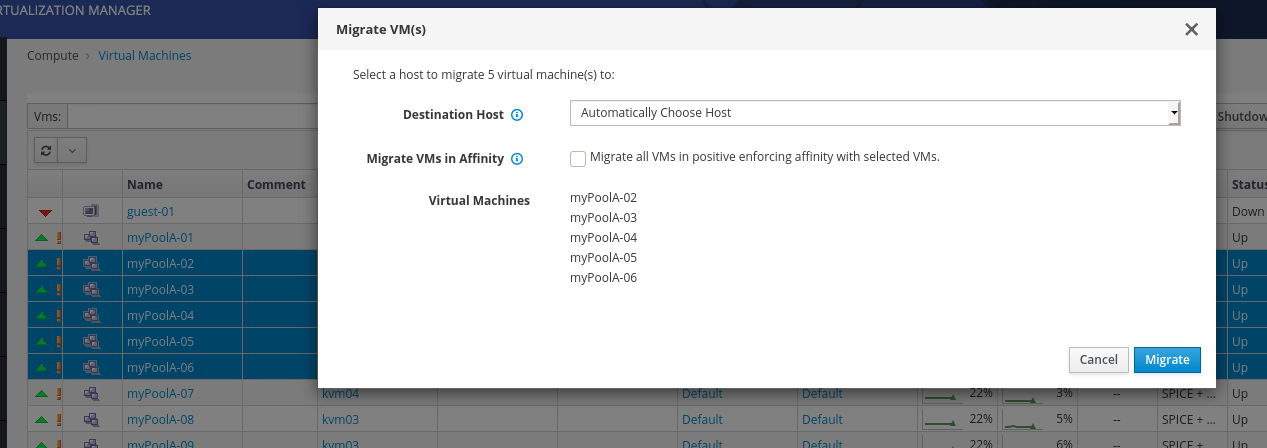 Fig. 5 - Start migration.Compute -> Virtual Machine, select one or more machines, Migrate.
 Fig. 6 - The migration process can be observed in hosts (Compute -> Hosts).
At one time, no more than 2 cars are moving.Storage migration
But this procedure may seem unusual to the VMware vSphere user, because approaches to storing both disk images and machine configurations in systems differ.To transfer VM storage, go to the disks (Storage -> Disks) or domains (Storage -> Domains -> {Domain Name} -> Disks). Select drive (s) and press Move . That's it, the drive (s) are sent to another storage.Note: due to internal organization, there are restrictions for migrating the template store and pool. Familiarity with storage migration is best done on a separate machine, outside the pool.Disk copying is performed in the same menus as manual loading / unloading.Rename VM and disk
Changing the name of a machine or template is very simple - Edit and enter a new name. Renaming a pool requires deleting its machines and re-creating it, because based on it VMs are generated with the corresponding names and configuration.Renaming a disk is also possible, but the path is longer thane: Compute -> Virtual Machine -> {VM Name} -> Disks -> {VM Disk Alias} -> Edit, Alias.Internal object identifiers are built on UUIDs. When renaming, we actually change the aliases.The section deals with the update, which is update (minor), not upgrade (major), when the version number changes (this is a more complicated procedure and is not part of daily tasks).Update oVirt-Host (hypervisor)
Host updates are simpler than in vSphere, the update manager in oVirt is organically integrated into the platform and does not require any settings. Official update documentation .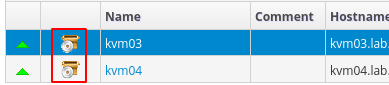 Fig. 7 - If there are updates, the manager will report them with a CD icon.
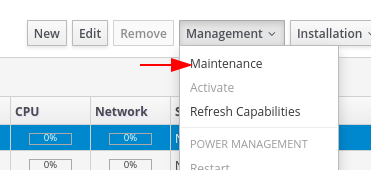 Fig. 8 - Before starting the update, you need to enable the maintenance mode (Management -> Maintenance), it will automatically start the VM migration to other hosts (see Fig. 6) and prepare for the update.
 Fig. 9 - The wrench icon indicates that the host is ready for service.
 Fig. 10 - Installation -> Upgrade starts the upgrade procedure.
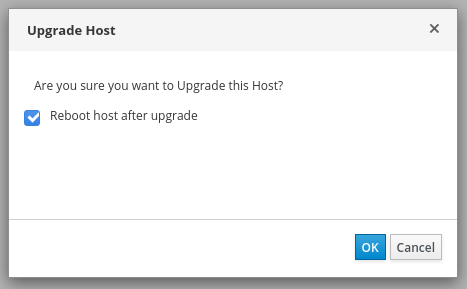 Fig. 11 - We can ask the manager to instruct the host to restart after the update is completed, for it to take effect.
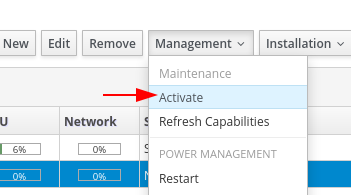 Fig. 12 - After the reboot, we bring the hypervisor out of service mode (Management -> Activate).We go through all the hosts and update them.
Update oVirt-Engine (manager)
At first, this can be confusing, but the manager update is performed using the engine-setup, with additional steps, as described in the documentation .- If possible, make an archive or a snapshot of the machine, make sure that the last scheduled backup was successful.
- We check and update installation packages:
$ sudo engine-upgrade-check
$ sudo update ovirt\*setup\*
- The main part of the update is performed by the engine-setup program. She will ask a number of configuration questions, then stop the ovirt-engine service, download and install updated packages, create an archive and update the database, apply the updated configuration, and start the ovirt-engine service.
$ sudo engine-setup
Upon successful update, we will receive the message:
Execution of setup completed successfully
Example output from the engine-setup script$ sudo engine-setup
[ INFO  ] Stage: Initializing
[ INFO  ] Stage: Environment setup
          Configuration files: ['/etc/ovirt-engine-setup.conf.d/10-packaging-jboss.conf', '/etc/ovirt-engine-setup.conf.d/10-packaging.conf', '/etc/ovirt-engine-setup.conf.d/20-setup-ovirt-post.conf']
          Log file: /var/log/ovirt-engine/setup/ovirt-engine-setup-20200522232449-o97vyx.log
          Version: otopi-1.8.2 (otopi-1.8.2-1.el7)
[ INFO  ] Stage: Environment packages setup
[ INFO  ] Stage: Programs detection
[ INFO  ] Stage: Environment setup (late)
[ INFO  ] Stage: Environment customization

          --== PRODUCT OPTIONS ==--


          --== PACKAGES ==--

[ INFO  ] Checking for product updates...
          Setup needs to install or update the following packages:
          [updated] ovirt-engine-4.3.5.5-1.el7.noarch will be updated
...
          [update] ovirt-engine-wildfly-overlay-17.0.1-1.el7.noarch is an update
          Replying "No" will abort Setup. You can pass the option "--offline" to prevent installing or updating packages.
          Do you wish to update them now? (Yes, No) [Yes]:
[ INFO  ] Checking for an update for Setup...

          --== NETWORK CONFIGURATION ==--

          Setup can automatically configure the firewall on this system.
          Note: automatic configuration of the firewall may overwrite current settings.
          NOTICE: iptables is deprecated and will be removed in future releases
          Do you want Setup to configure the firewall? (Yes, No) [Yes]:
[ INFO  ] firewalld will be configured as firewall manager.

          --== DATABASE CONFIGURATION ==--

          The detected DWH database size is 439 MB.
          Setup can backup the existing database. The time and space required for the database backup depend on its size. This process takes time, and in some cases (for instance, when the size is few GBs) may take several hours to complete.
          If you choose to not back up the database, and Setup later fails for some reason, it will not be able to restore the database and all DWH data will be lost.
          Would you like to backup the existing database before upgrading it? (Yes, No) [Yes]:
          Perform full vacuum on the oVirt engine history
          database ovirt_engine_history@localhost?
          This operation may take a while depending on this setup health and the
          configuration of the db vacuum process.
          See https://www.postgresql.org/docs/10/sql-vacuum.html
          (Yes, No) [No]:

          --== OVIRT ENGINE CONFIGURATION ==--

          Perform full vacuum on the engine database engine@localhost?
          This operation may take a while depending on this setup health and the
          configuration of the db vacuum process.
          See https://www.postgresql.org/docs/10/sql-vacuum.html
          (Yes, No) [No]:

          --== STORAGE CONFIGURATION ==--


          --== PKI CONFIGURATION ==--


          --== APACHE CONFIGURATION ==--


          --== SYSTEM CONFIGURATION ==--


          --== MISC CONFIGURATION ==--


          --== END OF CONFIGURATION ==--

[ INFO  ] Stage: Setup validation
          During execution engine service will be stopped (OK, Cancel) [OK]:
[ INFO  ] Cleaning stale zombie tasks and commands

          --== CONFIGURATION PREVIEW ==--

          Default SAN wipe after delete           : False
          Firewall manager                        : firewalld
          Update Firewall                         : True
          Host FQDN                               : ovirt.example.com
          Upgrade packages                        : True
          Set up Cinderlib integration            : False
          Engine database secured connection      : False
          Engine database user name               : engine
          Engine database name                    : engine
          Engine database host                    : localhost
          Engine database port                    : 5432
          Engine database host name validation    : False
          Engine installation                     : True
          PKI organization                        : JSC Open Lab
          Set up ovirt-provider-ovn               : False
          Configure WebSocket Proxy               : True
          DWH installation                        : True
          DWH database secured connection         : False
          DWH database host                       : localhost
          DWH database user name                  : ovirt_engine_history
          DWH database name                       : ovirt_engine_history
          Backup DWH database                     : True
          DWH database port                       : 5432
          DWH database host name validation       : False
          Configure Image I/O Proxy               : True
          Configure VMConsole Proxy               : True

          Please confirm installation settings (OK, Cancel) [OK]:
[ INFO  ] Cleaning async tasks and compensations
[ INFO  ] Unlocking existing entities
[ INFO  ] Checking the Engine database consistency
[ INFO  ] Stage: Transaction setup
[ INFO  ] Stopping engine service
[ INFO  ] Stopping ovirt-fence-kdump-listener service
[ INFO  ] Stopping dwh service
[ INFO  ] Stopping Image I/O Proxy service
[ INFO  ] Stopping vmconsole-proxy service
[ INFO  ] Stopping websocket-proxy service
[ INFO  ] Stage: Misc configuration (early)
[ INFO  ] Stage: Package installation
[ INFO  ] Yum Status: Downloading Packages
...
[ INFO  ] Stage: Misc configuration
[ INFO  ] Upgrading CA
[ INFO  ] Not rewriting /etc/ovirt-imageio-proxy/ovirt-imageio-proxy.conf because it was changed manually. You might want to compare it with /etc/ovirt-imageio-proxy/ovirt-imageio-proxy.conf.new and edit as needed.
[ INFO  ] Backing up database localhost:ovirt_engine_history to '/var/lib/ovirt-engine-dwh/backups/dwh-20200522233531.6LDItj.dump'.
[ INFO  ] Creating/refreshing DWH database schema
[ INFO  ] Configuring Image I/O Proxy
[ INFO  ] Configuring WebSocket Proxy
[ INFO  ] Backing up database localhost:engine to '/var/lib/ovirt-engine/backups/engine-20200522233538.LZCwME.dump'.
[ INFO  ] Creating/refreshing Engine database schema
[ INFO  ] Creating/refreshing Engine 'internal' domain database schema
          Unregistering existing client registration info.
[ INFO  ] Generating post install configuration file '/etc/ovirt-engine-setup.conf.d/20-setup-ovirt-post.conf'
[ INFO  ] Stage: Transaction commit
[ INFO  ] Stage: Closing up
[ INFO  ] Starting engine service
[ INFO  ] Starting dwh service
[ INFO  ] Restarting ovirt-vmconsole proxy service

          --== SUMMARY ==--

[ INFO  ] Restarting httpd
          Web access is enabled at:
              http://ovirt.example.com:80/ovirt-engine
              https://ovirt.example.com:443/ovirt-engine
          SSH fingerprint: SHA256:JvilhbwRuMjBCJEjQVPlFQgk0aLaKz7Od0WzsZtx4j4
          Did not update /etc/ovirt-imageio-proxy/ovirt-imageio-proxy.conf because it was changed manually. You might want to compare it with /etc/ovirt-imageio-proxy/ovirt-imageio-proxy.conf.new and edit as needed.

          --== END OF SUMMARY ==--

[ INFO  ] Stage: Clean up
          Log file is located at /var/log/ovirt-engine/setup/ovirt-engine-setup-20200522232449-o97vyx.log
[ INFO  ] Generating answer file '/var/lib/ovirt-engine/setup/answers/20200522233608-setup.conf'
[ INFO  ] Stage: Pre-termination
[ INFO  ] Stage: Termination
[ INFO  ] Execution of setup completed successfully
- We update the OS and other additional packages:
$ sudo yum update
If necessary (updating the kernel or its components) we reboot the machine.
Import VM
You can import from VMware, Export Domain (a special entity oVirt for exchanging images between the Data Center), Virtual Appliance (OVA), XEN, KVM. All officially supported options:- Import VM from VMware ESXi / VSPHERE runs on on host + authentication to the host wher ESXi / VSPHERE runs on
- Import KVM / Xen VM from Libvirt: The user specify URL + authentication to the host where Libvirt runs on
- Import KVM / Xen VM from a given path: The user specify nfs / posix path to the VM configuration & disks
- Import VM which was exported from VMware: The user specify nfs / posix path to ova file
- Upload KVM / Xen VM: The user specify files of the configuration and the disks
- Upload VM which was exported from VMware: The user specify ova file
- Import VM from folder: The user specify path to folder that contains KVM / Xen VMs or VM exported from VMware
Let us dwell on 2 options - import from vSphere and a stand-alone machine with KVM. To start the import mater in Compute -> Virtual Machines, click the button for additional menu items (3 vertical points, see Fig. 13). The source machine must be turned off.Import machines from vCenter
In the wizard:- Data Source: VMware;
- External Provider: in Administration -> Providers you can configure a template for frequent operations;
- vCenter: name or address of the vCenter server;
- ESXi: from which hypervisor will we pick up the car;
- Data Ceter: full path to the cluster;
- Cluster: containing a hypervisor cluster;
- Username / password: username and password for connecting to vCenter;
- Verify server's SSL certificate: when using self-signed certificates, you will have to disable their verification.
 Fig. 13 - Import VMs from VMware vSphere.
Import machines from KVM
Details about importing from KVM in the documentation .First, you must enable connection to the KVM from the outside, if this has not been configured before.Permission to export machines to KVM, . ! , , , . , .,
ArchLinux.
, libvirtd
$ sudo vim /etc/sysconfig/libvirtd
LIBVIRTD_ARGS="--listen"
$ sudo cp /etc/libvirt/libvirtd.conf /etc/libvirt/libvirtd.conf.`date +%F`
$ sudo vim /etc/libvirt/libvirtd.conf
:
listen_tls = 0
listen_tcp = 1
listen_addr = "0.0.0.0"
auth_tcp = "none"
log_outputs="3:syslog:libvirtd"
libvirtd. , libvirtd > 0.6 ( libvirtd --version), .
$ sudo service libvirtd restart
tcp:16509.
CentOS 7 ( permanent):
$ sudo firewall-cmd --add-rich-rule='rule family="ipv4" source address="172.17.71.32/30" port port="16509" protocol="tcp" accept'
:
$ virsh -r -c 'qemu+tcp://mgmt@kvm46.example.com/system' list --all
Further, the import itself is very simple:Compute -> Virtual Machines ->: (additional menu, 3 vertical points) -> Import -> Source (KVM via libvirt) -> URI (qemu + tcp: //kvm46.example.com / system) -> Require Authentication (Disable) -> Load.We mark the necessary machines, select the allocation policy (Allocation Policy).Allocation Policy - Preallocated is preferred for storage volumes with hardware zero detection, for volumes with high I / O, volumes with high occupancy, etc., otherwise thin provisioned can be. In any case, we look at the situation and analyze it.The checked “Clone” ticks, but does not copy the car. For example, a new MAC address for the network interface will be assigned.On the General tab, it is important to specify the correct OS type, and on the Network Interfaces tab, you can specify the desired network. Next, “import”, and, depending on the speed of the equipment, we get the imported machine. After importing (or before) do not forget to install ovirt-guest-agent.Task management
When tasks freeze, difficult “dances” begin, some of which I will try to touch upon. With regular behavior, one can observe them in Fig. 2.If the task is performed more or less normally, regular tools are enough. With pimers and pictures you can see here .Tasks are performed on oVirt-host.[mgmt@ovirt-nodeNN] $ sudo vdsm-client Host getAllTasksInfo
[mgmt@ovirt-nodeNN] $ sudo vdsm-client Task getStatus taskID=<TASKID>
[mgmt@ovirt-nodeNN] $ sudo vdsm-client Task stop taskID=<TaskID>
[mgmt@ovirt-nodeNN] $ sudo vdsm-client Task clear taskID=<TaskID>
[mgmt@ovirt-nodeNN] $ sudo vdsm-client Host getAllTasksInfo
Additionally, vdsm-client may try to roll back the task, all supported methods:$ sudo vdsm-client Task -h
...Task methods:method [arg = value]getStatus Get Task status information.revert Rollback a Task to restore the previous system state.clear Discard information about a finished Task.getInfo Get information about a Task.stop Stop a currently running Task.However, the movements become more complicated if the task cannot be stopped using standard methods.Officially, the taskcleaner tool is used for this:[mgmt@ovirt-engine] $ sudo /usr/share/ovirt-engine/setup/dbutils/taskcleaner.sh --help
For even more severe cases, direct editing of the database is required. This method should be resorted to only as a last resort, having fresh archives of oVirt and the affected machines.So, we connect software collection[mgmt@ovirt-engine] $ sudo scl enable rh-postgresql10 "psql -d engine -U postgres"
Next, connect to the databasesu postgres
psql -d engine -U postgres
select * from job order by start_time desc;
And direct removal - running the DeleteJob procedure for the problematic task:select DeleteJob('UUID_HERE');
Example:select DeleteJob('ed0127c7-b052-4ec2-a67c-8b3a65d55e19');
That's all for today, and I hope you never need to manually edit a database!