Continuation of the first part of the article “IoT where you did not wait. Development and testing (part 1) ”was not long in coming. This time I will tell you what the architecture of the project was and what kind of rake we stepped on when we started testing our solution.Disclaimer: not a single trash bin was hit hard.
Project architecture
We got a typical microservice project. The layer of microservices of the “lower level” receives data from devices and sensors, stores them in Kafka, after which business-oriented microservices can work with data received from Kafka to show the current state of devices, build analytics and fine-tune their models.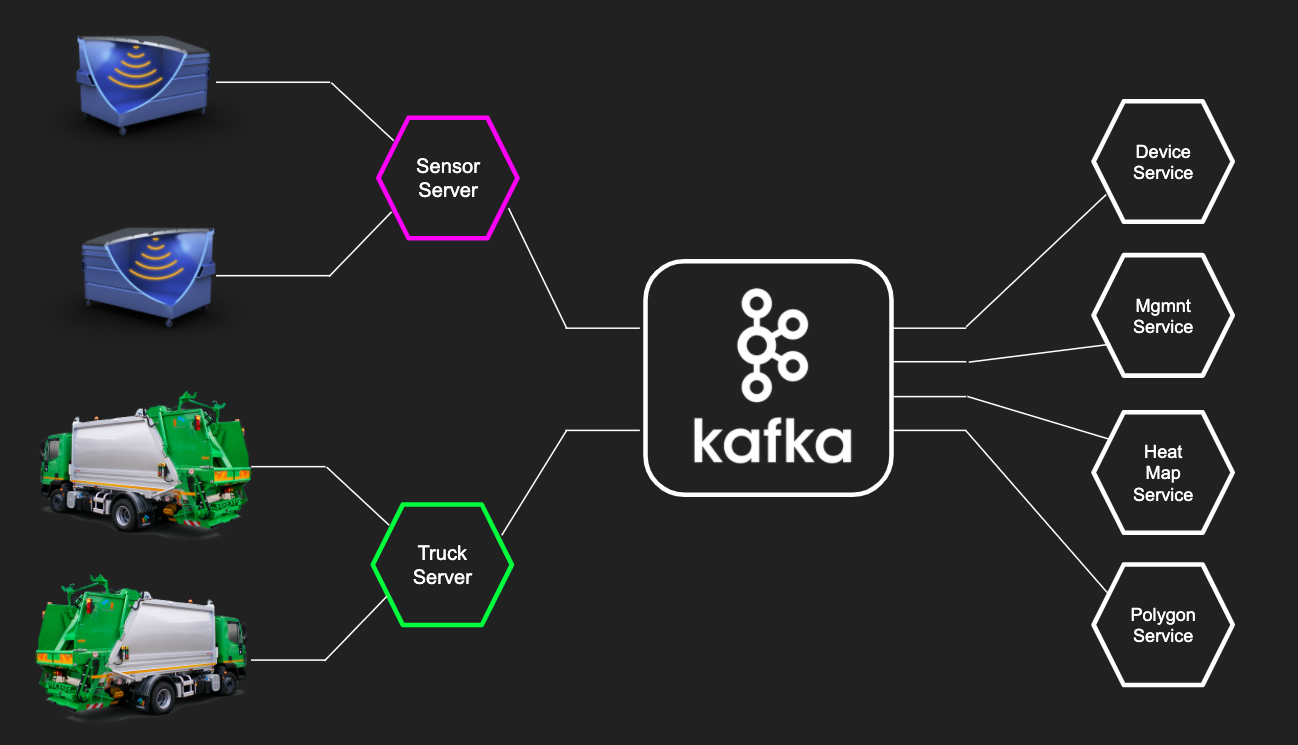 Kafka in the IoT project went very cool. Compared to other systems like RabbitMQ, Kafka has several advantages:
- Work with streams : raw data from sensors can be processed to get a stream. And with streams, you can flexibly configure what you want to filter in them, and it’s easy to do streaming (create new data streams)
- : Kafka , , , . - , - , . , Kafka , . , , , .
Backend
First, let's take a look at the backend that is familiar to us, the entire business layer of the application is built on the same Java and Spring stack. To test microservice applications in a real environment, we use the test-containers library. It allows you to easily deploy external bindings (Kafka, PostgreSQL, MongoDB, etc.) in Docker.First, we raise the required container in Docker, launch the application and on the real instance we are already running test data.About exactly how we do this, I spoke in detail at the Heisenbug 2019 Piter in the report “Microservice Wars: JUnit Episode 5 - TestContainers Strikes Back”:Let's look at a small example of how it looked. The lower-level service takes data from devices and throws it to Kafka. And the Heat Map service from the business part takes data from kafka and builds a heat map. Let's test receiving data with the Heat Map service (via Kafka)
@KafkaTestContainer
@SpringBootTest
class KafkaIntegrationTest {
@Autowired
private KafkaTemplate kafkaTemplate;
@Test
void sendTest() {
kafkaTemplate.send(TOPIC_NAME, MEASSAGE_BODY)
}
}
We are writing a regular integration SpringBoot test, however, it differs in annotation-based style of test environment configuration. Annotation is @KafkaTestContainerneeded to raise Kafka. To use it, you need to connect the library:spring-test-kafkaWhen the application starts, Spring starts and the Kafka container starts in Docker. Then in the test we use it kafkaTemplate, inject it into the test case and send the data to Kafka to test the logic of processing new data from the topic.All this happens on a normal Kafka instance, no embedded options, but only the version that spins in production. The Heat Map service uses MongoDB as storage, and the test for MongoDB looks similar:
@MongoDbDataTest
class SensorDataRecordServiceTest {

    @Autowired
    private SensorDataRecordRepository repository;

    @Test
    @MongoDataSet(value ="sensor_data.json")
    void findSingle() {
        var log = repository.findAllByDeviceId("001");
        assertThat(log).hasSize(1);
        ...
    }
}
Annotation @MongoDbDataTestlaunches MongoDB in Docker similarly to Kafka. After the application has been launched, we can use the repository to work with MongoDB.To use this functionality in your tests, all you need is to connect the library:spring-test-mongoBy the way, there are many other usefulnesses there, for example, you can load the database into the database through the annotation before executing the test, @MongoDataSetas in the example above, or using the annotation, @ExpectedMongoDataSetverify that after completing the test case in the database, the exact data set that we expect has appeared.I’ll tell you more about working with test data at the Heisenbug 2020 Piter , which will be held online June 15-18.
Testing IoT-specific things
If the business part is a typical backend, then working with data from devices contained a lot of rakes and specifics related to hardware.You have a device, and you need to pair with it. For this you will need documentation. It’s good when you have a piece of iron and docks on it. However, it all started in a different way: there was only documentation, and the device was still on the way. We filmed a small application, which in theory should have worked, but as soon as real devices arrived, our expectations were faced with reality.We thought that the input would be a binary format, and the device began to throw at us some XML file. And in such a tough form, the first rule for the IoT project was born:Never believe the documentation!
In principle, the data received from the device was more or less clear: Time- this is the time stamp, DevEUI- the identifier of the device, LrrLATand LrrLON- the coordinates. But what is it
 payload_hex? We see 8 digits, what can be in them? Is it the distance to the trash, the voltage of the sensor, the signal level, the angle of inclination, temperature, or all taken together? At some point, we thought that the Chinese manufacturers of these devices knew some kind of archiving Feng Shui and were able to pack everything that was possible in 8 digits. But if you look above, you can see that the time is written in a regular line and contains 3 times more bits, that is, bytes obviously no one saved. As a result, it turned out that specifically in this firmware, half of the sensors in the device are simply turned off, and you need to wait for a new firmware.While they were waiting, we made a test bench in the office, which, in fact, was an ordinary cardboard box. We attached the device to its cover and threw any office stuff into the box. We also needed a test copy of the carrier’s car, and its role was played by the machine of one of the developers in the project.Now we saw on the map where the cardboard boxes stood, and we knew where the developer was traveling (spoiler: work-home, and no one canceled the bar on Friday evenings). However, the system with test benches did not last long, because there are big differences from real containers. For example, if we talk about the accelerometer, then we turned the box from side to side and received readings from the sensor, and everything seemed to work. But in reality there are some limitations.
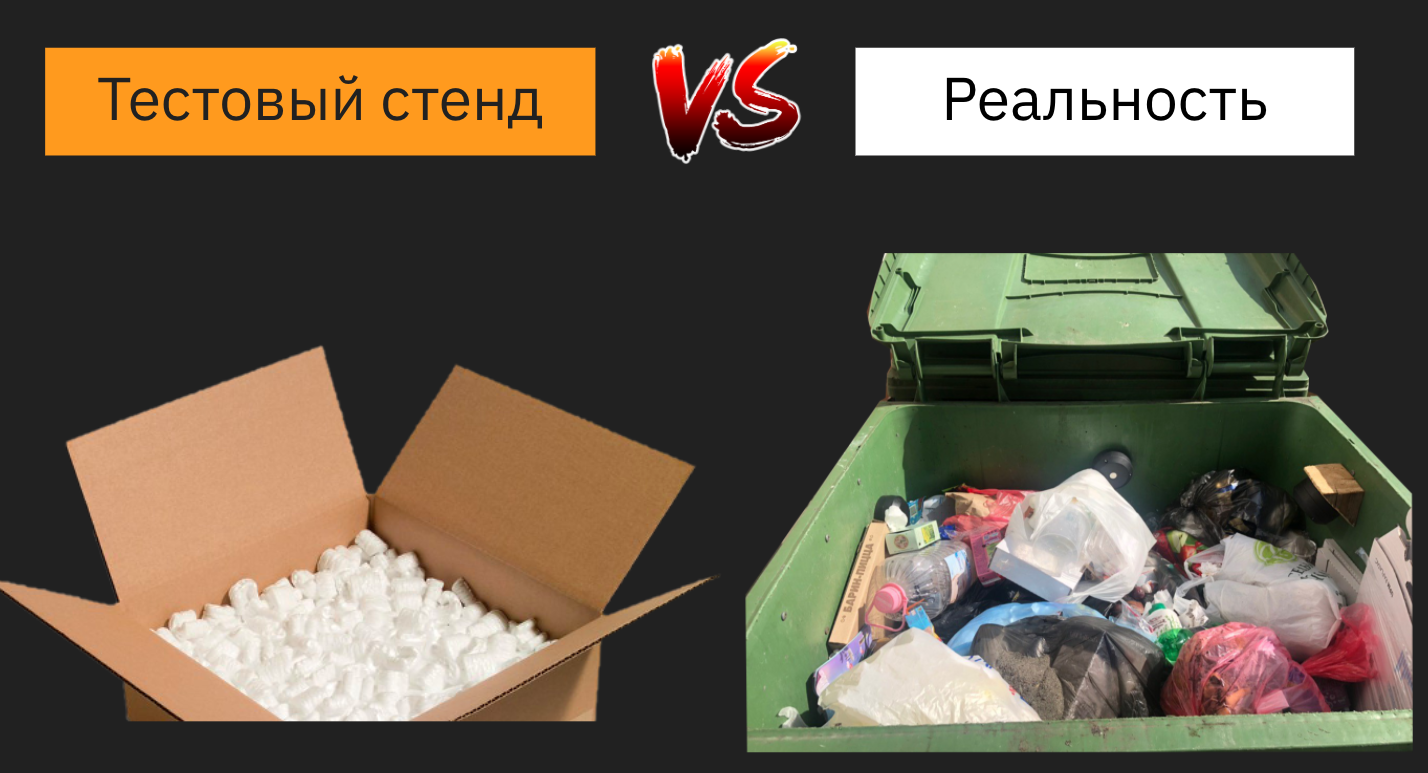 In the first versions of the device, the angle was not measured in absolute values, but in relative values. And when the box was tilted more than the delta fixed in the firmware, the sensor began to work incorrectly or even could not fix the turn.
 Of course, all these errors were corrected in the process, but at the start the differences between the box and the container brought a lot of problems. And we drilled the tank from all sides, while deciding how to place the sensor in the container, so that when lifting the tank with the carrier’s car, we accurately recorded that the garbage was unloaded.In addition to the problem with the angle of inclination, at first we did not take into account what the real garbage in the container will be. And if we threw polystyrene and pillows into that box, then in reality people put everything in a container, even cement and sand. And as a result, once the sensor showed that the container was empty, although in fact it was full. As it turned out, someone during the repair threw a cool sound-absorbing material, which damped the signals from the sensor.At this point, we decided to agree with the landlord of the business center where the office is located in order to install sensors on its garbage containers. We equipped the site in front of the office, and from that moment the life and everyday life of the project developers changed dramatically. Usually at the beginning of the working day you want to drink coffee, read the news, and here you have the whole tape full of garbage, literally:
 When testing the temperature sensor, as in the case of the accelerometer, reality presented new scenarios. The threshold value for temperature is quite difficult to choose so that we know in time that the sensor is on, and do not say goodbye to it. For example, in the summer, containers heat up very much under the sun, and setting a threshold temperature too low is fraught with constant notifications from the sensor. And if the device really burns, and someone starts to extinguish it, then you need to prepare for the tank being filled with water to the top, then someone will drop it, and they will extinguish on the floor. In this scenario, the sensor will obviously not survive.
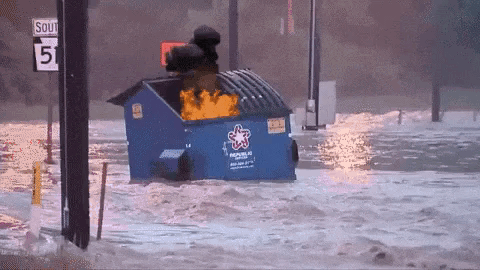
Therefore, the second rule: read the first rule. That is - never trust the documentation.
What can be done? For example, do reverse engineering: we sit with the console, collect data, twist-twist the sensor, put something in front of it, try to identify patterns. So you can isolate the distance, the status of the container and the checksum. However, some of the data was difficult to interpret, because our Chinese device manufacturers apparently love bicycles. And in order to pack a floating-point number in binary format for interpreting the angle of inclination, they decided to take two bytes and divide by 35. And in this whole story, it helped us a lot that the bottom layer of services working with devices was isolated from the top, and all data was poured through kafka, contracts for which were agreed and secured.This helped a lot in terms of development, because if the lower level broke, then we quietly saw business services, because the contract is rigidly fixed in them. Therefore, this second rule for developing IoT projects is to isolate services and use contracts.
The report was still much more interesting: simulation, load testing, and in general, I would advise you to see this report.
In the third part I will talk about a simulation model, stay tuned!