This is the second LabVIEW NXG tutorial article in which we will cover the basics of working with the Front Panel.
Imagine that we were in America, the hotel has air conditioning, but the temperature controller there is equipped with a scale in degrees Fahrenheit. We want to set a comfortable twenty degrees, but how much will it be on the Fahrenheit scale? So let's count it in LabVIEW NXG. We are still at a very basic level - under the cut will be a lot of words about the simple (so that in the future you can talk just about the complex)
Previous Part - Basics and Block Diagram
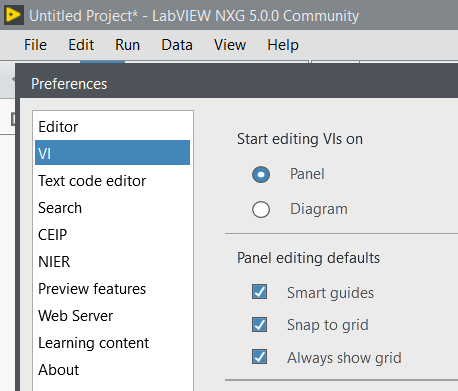
As usual, launch LabVIEW NXG and create a new empty Virtual Tool. But now our main space is the Front Panel (in fact, it opens by default, and this behavior can be changed in the File-> Preferences settings):
The principle of operation is identical to the Block Diagram - we have palettes (controls in our case) and we will drag the necessary elements from the palettes to the panel. If you have worked with similar tools before (Visual Studio with Winforms or WPF, well, or with Delphi), then you can easily get comfortable - everything is very simple and intuitive here, in addition, the palettes are conveniently grouped:

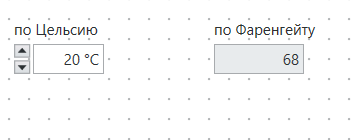
For our exercise, we need a couple of elements from the palette of working with numbers - in one we will enter the temperature in degrees Celsius, and in the second we will get the values in degrees Fahrenheit.
Controls and Indicators
, , , ( ). , . , — , — . — ( "" — ).
, , :

, , — QuckDrop, Ctrl+Space "" "nc" "nn":

" "- , , :

, , . , , :

, , , , , ( - — ). , Visual Studio, C#/WPF, , " " , — - .
, , — -. , , (LabVIEW — ):

— - "". -, Ctrl+E. — . , , LabVIEW, , — , .
, - , , "" , ( — ):

- , , , (Uplaced Items) "2"

, , , . :

, — ( Data Flow):

.
, , — , (Label) , :

, , , — . , , ( Reference).
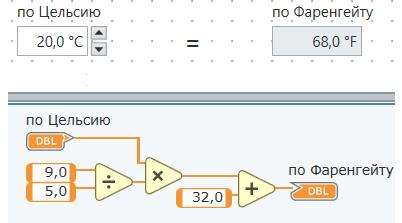
. : (T°C × 9/5) + 32 = T°F ( , "google.com/search?q=c in f", ), #
double tC = 20.0;
double tF = tC * 9.0/5.0 + 32.0;
Console.WriteLine(tF);
LabVIEW :

— " , " — , , ...
— "9", "5" "32" , ( Coercion Dots). , . , ( "Representation", , ), "9,0" "5,0" ( "9.0" "5.0") — LabVIEW , :

, , , , — , :

( , ):

(Ctrl+E), "20" (Ctrl+R):
— , 1k — .
— . . — "Find on Panel/Find on Diagram".
— , :

, , " ", <Ctrl+U> :

, . .
. :

. , , , , . , — , Quick Drop, … , "Ctrl" , . , - (Unplaced Items) . — , . , .
( ) LabVIEW.
LabVIEW ? "" LabVIEW ("Variables"), ( , , ). LabVIEW NXT — "" (Duplicate Terminal), ( ) .
, , , .
, :

" " ( "Create duplicate terminal") :

, "" , , , .
— , . " ".
, , temp:
double tC = 20.0;

double temp = 9.0/5.0;
double tF = tC * temp + 32.0;

Console.WriteLine(tF);
, , LabVIEW: , "temp", , :

, LabVIEW , " " .
, , , , temp . , , , :

, , , . - temp, .
— "" , , :

, Ctrl+B (Remove Broken Wires — Ctrl+U). — , "" , (, ).
, . LabVIEW . . , , "" , .
Duplicate Terminal, . , "" , , , "" - GoTo, , , , . , (, , , , , ), . - , .
( — ), , , , "Make current value default" ( "Capture Data", "Create Reference" "Change to Type Definition"):

, :

— , . , . .
— , , , — :

— , :

, , , — .
To summarize - today we examined the basic principles of working with the panel, learned how to quickly switch to the block diagram via Ctrl + E, and most importantly, a little deeper into the dataflow .
I left behind the scenes very obvious things like zooming the front panel - this can be done not only from the drop-down list, but also with the mouse wheel. At this stage, it already makes sense to go over the settings (not all of them will be clear, but there aren’t many of them yet) and experiment - for example, it’s more convenient for me to work with conductors in this mode, when a click near the conductor starts creating a new branch:

And in the next short lesson, we will look at simple data types and their coercion, which was mentioned above.