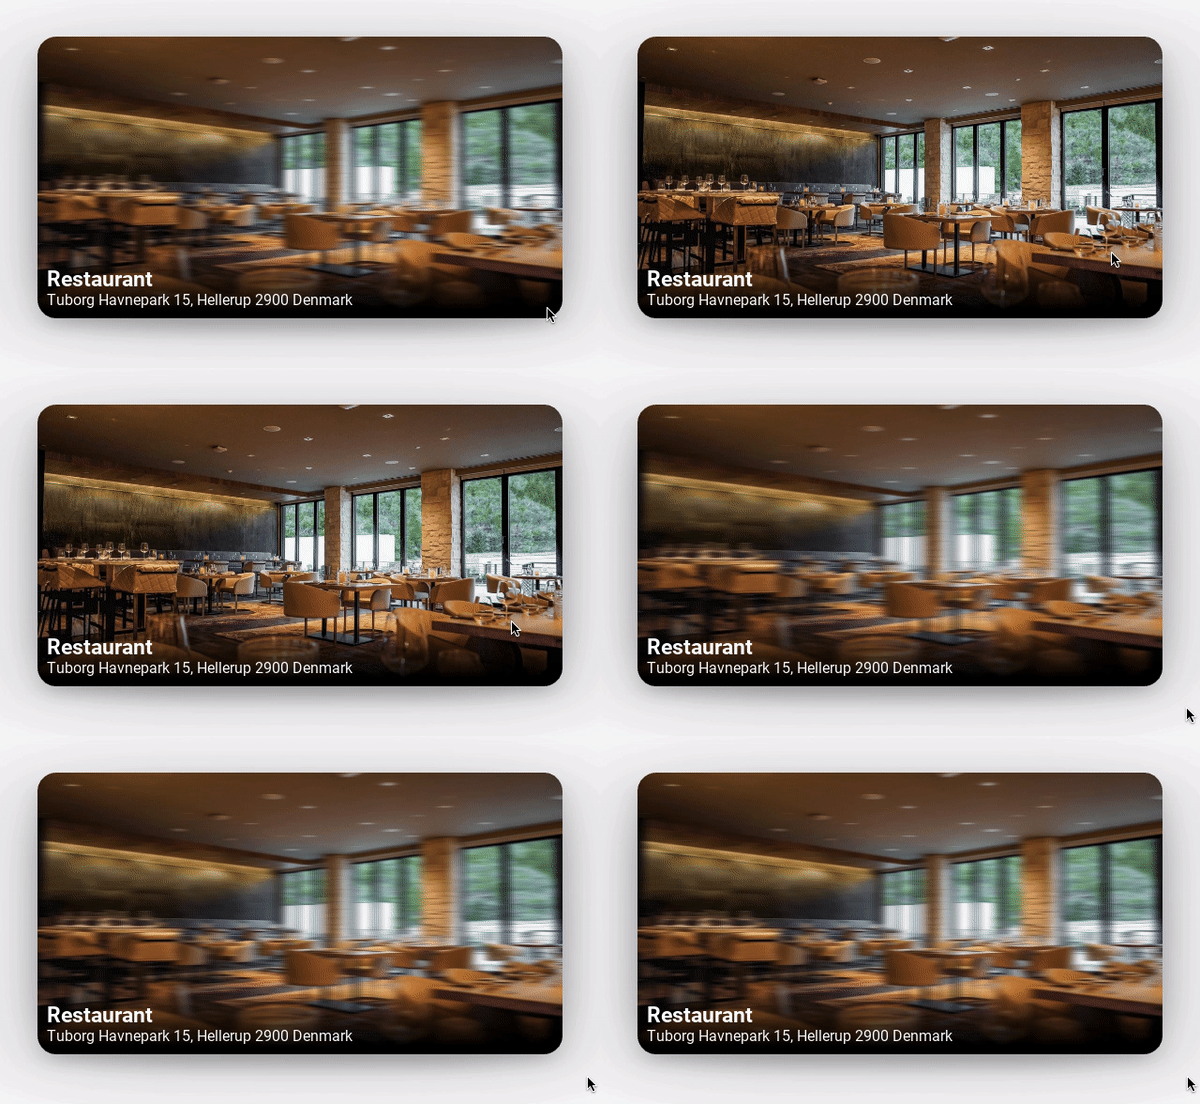
Greetings, dear lovers and experts in Python!In this article, I will show you how to apply OpenGL effects to your custom cards if you use cross-platform tools such as the Kivy framework and the material design library for this framework, KivyMD , in your applications . Let's go!KivyMD has a standard component MDCard - the base class for creating various custom cards ( Material Design spec, Cards ). If you do not go into details, then under the hood of the MDCard is the usual BoxLayout - a container that allows you to place other widgets in a vertical or horizontal orientation. That is, if you needed to make some kind of card, for example, information about the user, you do it yourself. MDCard only implements ripple_behavior , touch_behavior and cast shadows:An example of a program that displays a blank card is as follows:from kivy.lang import Builder
from kivymd.app import MDApp
KV = '''
Screen: #
MDCard: #
#
size_hint: .6, .5
pos_hint: {"center_x": .5, "center_y": .5}
'''
class TestCard(MDApp):
def build(self):
return Builder.load_string(KV)
TestCard().run()
Result:It looks pretty simple. But what if we want a beautiful card with a Blur effect in the event of receiving focus? Such as, for example, in the Flutter UI Designs application :Will have to do it yourself! Moreover, there is nothing complicated about this. First, create the base class of the future map:class RestaurantCard(MDCard):
source = StringProperty()
shadow = StringProperty()
text = StringProperty()
The main image of the card:Shadow Image:Now we’ll fill the map with components whose properties we have determined using the special Kv-Language DSL language , designed for convenient design of interface layouts:<RestaurantCard>
elevation: 12
RelativeLayout:
# , .
FitImage: #
source: root.source
FitImage: # -
source: root.shadow
size_hint_y: None
height: "120dp"
MDLabel: #
text: root.text
markup: True
size_hint_y: None
height: self.texture_size[1]
x: "10dp"
y: "10dp"
theme_text_color: "Custom"
text_color: 1, 1, 1, 1
We put the RelativeLayout widget on the map , which allows us to mix the components one above the other in this way:First, we placed the main image, put a shadow and text on top. Now if we run our code:from kivy.lang import Builder
from kivy.properties import StringProperty
from kivymd.app import MDApp
from kivymd.uix.card import MDCard
KV = """
<RestaurantCard>
elevation: 12
RelativeLayout:
FitImage:
source: root.source
FitImage:
source: root.shadow
size_hint_y: None
height: "120dp"
MDLabel:
text: root.text
markup: True
size_hint_y: None
height: self.texture_size[1]
x: "10dp"
y: "10dp"
theme_text_color: "Custom"
text_color: 1, 1, 1, 1
Screen:
RestaurantCard:
text: "[size=23][b]Restaurant[/b][/size]\\nTuborg Havnepark 15, Hellerup 2900 Denmark"
shadow: "shadow-black.png"
source: "restourant.jpg"
pos_hint: {"center_x": .5, "center_y": .5}
size_hint: .7, .5
"""
class RestaurantCard(MDCard):
source = StringProperty()
text = StringProperty()
shadow = StringProperty()
class BlurCard(MDApp):
def build(self):
return Builder.load_string(KV)
BlurCard().run()
... we get the result:And the result, of course, is far from the expected one, because we will not see any blur effect or rounded edges at the card. Let's start with the blur effect. Kivy has a standard EffectWidget widget that can apply various graphic effects to its children. It works by rendering Fbo instances using custom OpenGL shaders. We need to apply the blur effect to the main image and the shadow image on the card. Therefore, we must put their components in the EffectWidget widget:#:import effect kivy.uix.effectwidget.EffectWidget
#:import HorizontalBlurEffect kivy.uix.effectwidget.HorizontalBlurEffect
<RestaurantCard>
...
RelativeLayout:
# , .
EffectWidget:
# .
effects: (HorizontalBlurEffect(size=root.blur),)
FitImage:
source: root.source
FitImage:
source: root.shadow
size_hint_y: None
height: "120dp"
...
Add a field for the value of the degree of blur effect:class RestaurantCard(MDCard):
...
blur = NumericProperty(8)
We start and see:When you hover over (if it's a desktop) or tap (if it's mobile) nothing happens. For the card to respond to the on_focus event, we must enable reading of this event in the properties of the RestaurantCard rule and assign methods that will be executed when this event is registered:#:import Animation kivy.animation.Animation
<RestaurantCard>
focus_behavior: True # on_focus
# , .
# Animation, .
on_enter: Animation(blur=0, d=0.3).start(self)
on_leave: Animation(blur=8, d=0.3).start(self)
Already better:To trim the corners of the card, I decided to apply a Stencil (stencil) to the EffectWidget widget:#:import Stencil kivymd.uix.graphics.Stencil
# , EffectWidget Stencil.
<Effect@EffectWidget+Stencil>
radius: [20,]
<RestaurantCard>
...
RelativeLayout:
Effect:
...
And now everything works as we planned:
Full example codefrom kivy.lang import Builder
from kivy.properties import StringProperty, NumericProperty
from kivymd.app import MDApp
from kivymd.uix.card import MDCard
KV = """
#:import Stencil kivymd.uix.graphics.Stencil
#:import Animation kivy.animation.Animation
#:import effect kivy.uix.effectwidget.EffectWidget
#:import HorizontalBlurEffect kivy.uix.effectwidget.HorizontalBlurEffect
<Effect@EffectWidget+Stencil>
radius: [20,]
<RestaurantCard>
md_bg_color: 0, 0, 0, 0
elevation: 12
focus_behavior: True
on_enter: Animation(blur=0, d=0.3).start(self)
on_leave: Animation(blur=8, d=0.3).start(self)
radius: [20,]
RelativeLayout:
Effect:
effects: (HorizontalBlurEffect(size=root.blur),)
FitImage:
source: root.source
FitImage:
source: root.shadow
size_hint_y: None
height: "120dp"
MDLabel:
text: root.text
markup: True
size_hint_y: None
height: self.texture_size[1]
x: "10dp"
y: "10dp"
theme_text_color: "Custom"
text_color: 1, 1, 1, 1
FloatLayout:
RestaurantCard:
text: "[size=23][b]Restaurant[/b][/size]\\nTuborg Havnepark 15, Hellerup 2900 Denmark"
shadow: "shadow-black.png"
source: "restourant.jpg"
pos_hint: {"center_x": .5, "center_y": .5}
size_hint: .7, .5
"""
class RestaurantCard(MDCard):
source = StringProperty()
text = StringProperty()
shadow = StringProperty()
blur = NumericProperty(8)
class BlurCard(MDApp):
def build(self):
return Builder.load_string(KV)
BlurCard().run()
Well, finally, I want to show a video in which two programs work: One, written using the Flutter framework, and the second - using Kivy and KivyMD. At the end of the article I leave a survey in which you need to guess which technology is used and where.