In this article, we will look at a number of optional but useful settings:This article is a sequel, start see oVirt in 2 hours Part 1 and Part 2 .Articles
- Introduction
- Installation of the manager (ovirt-engine) and hypervisors (hosts)
- Advanced Settings - We Are Here
- Basic operations
Additional manager settings
For convenience, we will supply additional packages:$ sudo yum install bash-completion vim
To enable autocompletion, bash-completion commands should be switched to bash.Adding Additional DNS Names
This is required when you need to connect to the manager by an alternative name (CNAME, alias or just a short name without a domain suffix). For security reasons, the manager only allows connections using the allowed list of names.Create a configuration file:$ sudo vim /etc/ovirt-engine/engine.conf.d/99-custom-sso-setup.conf
the following content:SSO_ALTERNATE_ENGINE_FQDNS="ovirt.example.com some.alias.example.com ovirt"
and restart the manager:$ sudo systemctl restart ovirt-engine
Configure authentication through AD
oVirt has a built-in user base, but external LDAP providers are also supported, including AD.The simplest way for a typical configuration is to start the wizard and restart the manager:$ sudo yum install ovirt-engine-extension-aaa-ldap-setup
$ sudo ovirt-engine-extension-aaa-ldap-setup
$ sudo systemctl restart ovirt-engine
Wizard example$
sudo ovirt-engine-extension-aaa-ldap-setupAvailable LDAP implementations:
…
3 — Active Directory
…
Please select:
3Please enter Active Directory Forest name:
example.com
Please select protocol to use (startTLS, ldaps, plain)
[startTLS]:
Please select method to obtain PEM encoded CA certificate (File, URL, Inline, System, Insecure):
URLURL:
wwwca.example.com/myRootCA.pemEnter search user DN (for example uid=username,dc=example,dc=com or leave empty for anonymous):
CN=oVirt-Engine,CN=Users,DC=example,DC=comEnter search user password:
*password*[ INFO ] Attempting to bind using 'CN=oVirt-Engine,CN=Users,DC=example,DC=com'
Are you going to use Single Sign-On for Virtual Machines (Yes, No)
[Yes]:
Please specify profile name that will be visible to users
[example.com]:
Please provide credentials to test login flow:
Enter user name:
someAnyUserEnter user password:
…
[ INFO ] Login sequence executed successfully
…
Select test sequence to execute (Done, Abort, Login, Search)
[Done]:
[ INFO ] Stage: Transaction setup
…
CONFIGURATION SUMMARY
…
Using the wizard is suitable for most cases. For complex configurations, the settings are manual. Read more in the oVirt, Users and Roles documentation . After successfully connecting Engine to AD, an additional profile will appear in the connection window, and on the Permissions tab for system objects, the ability to issue permissions to users and AD groups. It should be noted that the external directory of users and groups can be not only AD, but also IPA, eDirectory, etc.Multipathing
In a production environment, the storage system must be connected to the host by several independent multiple I / O paths. As a rule, in CentOS (and therefore oVirt) there are no problems with building multiple device paths (find_multipaths yes). Additional settings for FCoE are described in Part 2 . It is worth paying attention to the recommendation of the manufacturer of storage systems - many recommend using the round-robin policy, by default, service Linux is used in Enterprise Linux 7.For example, 3PARHPE 3PAR Red Hat Enterprise Linux, CentOS Linux, Oracle Linux, and OracleVM Server Implementation Guide EL Host Generic-ALUA Persona 2, /etc/multipath.conf :
defaults {
           polling_interval      10
           user_friendly_names   no
           find_multipaths       yes
          }
devices {
          device {
                   vendor                   "3PARdata"
                   product                  "VV"
                   path_grouping_policy     group_by_prio
                   path_selector            "round-robin 0"
                   path_checker             tur
                   features                 "0"
                   hardware_handler         "1 alua"
                   prio                     alua
                   failback                 immediate
                   rr_weight                uniform
                   no_path_retry            18
                   rr_min_io_rq             1
                   detect_prio              yes
                   fast_io_fail_tmo         10
                   dev_loss_tmo             "infinity"
                 }
}
:
systemctl restart multipathd
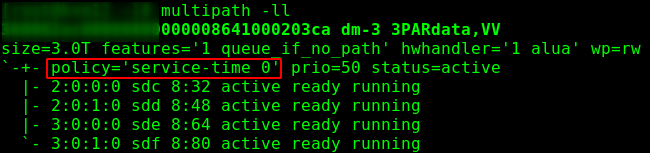 . 1 — - .
 . 2 — - .
 Power Management Setup
Allows you to perform, for example, a hardware reset of the machine, if Engine cannot receive a response from Host for a long time. Implemented through the Fence Agent.Compute -> Hosts -> HOST - Edit -> Power Management, then enable "Enable Power Management" and add the agent - "Add Fence Agent" -> + .We indicate the type (for example, ilo4 must be specified for iLO5), the name / address of the ipmi interface, as well as the user name / password. It is recommended that you create a separate user (e.g., oVirt-PM) and, in the case of iLO, give him privileges:- Login
- Remote console
- Virtual power and reset
- Virtual media
- Configure iLO Settings
- Administer user accounts
Do not ask why, it is chosen empirically. The console fencing agent requires a smaller set of rights.When setting up access control lists, it should be borne in mind that the agent does not run on the engine, but on the "neighboring" host (the so-called Power Management Proxy), that is, if there is only one node in the cluster, power management will not work .SSL setup
The full official instructions are in the documentation , Appendix D: oVirt and SSL - Replacing the oVirt Engine SSL / TLS Certificate.The certificate can be either from our corporate CA, or from an external commercial certification authority.Important note: the certificate is designed to connect to the manager, it will not affect the interaction between Engine and nodes - they will use self-signed certificates issued by Engine.Requirements:- certificate of the issuing CA in PEM format, with the entire chain to the root CA (from the subordinate issuer at the beginning to the root at the end);
- Apache certificate issued by the issuing CA (also supplemented by the entire CA certificate chain)
- private key for Apache, no password.
Suppose our publishing certification authority is running CentOS, called subca.example.com, and the requests, keys, and certificates are located in the / etc / pki / tls / directory.We perform backups and create a temporary directory:$ sudo cp /etc/pki/ovirt-engine/keys/apache.key.nopass /etc/pki/ovirt-engine/keys/apache.key.nopass.`date +%F`
$ sudo cp /etc/pki/ovirt-engine/certs/apache.cer /etc/pki/ovirt-engine/certs/apache.cer.`date +%F`
$ sudo mkdir /opt/certs
$ sudo chown mgmt.mgmt /opt/certs
Download certificates, execute it from our workstation or transfer it in another convenient way:[myuser@mydesktop] $ scp -3 causer@subca.example.com:/etc/pki/tls/cachain.pem mgmt@ovirt.example.com:/opt/certs
[myuser@mydesktop] $ scp -3 causer@subca.example.com:/etc/pki/tls/private/ovirt.key mgmt@ovirt.example.com:/opt/certs
[myuser@mydesktop] $ scp -3 causer@subca.example.com/etc/pki/tls/certs/ovirt.crt mgmt@ovirt.example.com:/opt/certs
As a result, you should see all 3 files:$ ls /opt/certs
cachain.pem ovirt.crt ovirt.key
Certificate Installation
We copy files and update trust lists:$ sudo cp /opt/certs/cachain.pem /etc/pki/ca-trust/source/anchors
$ sudo update-ca-trust
$ sudo rm /etc/pki/ovirt-engine/apache-ca.pem
$ sudo cp /opt/certs/cachain.pem /etc/pki/ovirt-engine/apache-ca.pem
$ sudo cp /opt/certs/ovirt03.key /etc/pki/ovirt-engine/keys/apache.key.nopass
$ sudo cp /opt/certs/ovirt03.crt /etc/pki/ovirt-engine/certs/apache.cer
$ sudo systemctl restart httpd.service
Add / update configuration files:$ sudo vim /etc/ovirt-engine/engine.conf.d/99-custom-truststore.conf
ENGINE_HTTPS_PKI_TRUST_STORE="/etc/pki/java/cacerts"
ENGINE_HTTPS_PKI_TRUST_STORE_PASSWORD=""
$ sudo vim /etc/ovirt-engine/ovirt-websocket-proxy.conf.d/10-setup.conf
SSL_CERTIFICATE=/etc/pki/ovirt-engine/certs/apache.cer
SSL_KEY=/etc/pki/ovirt-engine/keys/apache.key.nopass
$ sudo vim /etc/ovirt-imageio-proxy/ovirt-imageio-proxy.conf
# Key file for SSL connections
ssl_key_file = /etc/pki/ovirt-engine/keys/apache.key.nopass
# Certificate file for SSL connections
ssl_cert_file = /etc/pki/ovirt-engine/certs/apache.cer
Next, we restart all affected services:$ sudo systemctl restart ovirt-provider-ovn.service
$ sudo systemctl restart ovirt-imageio-proxy
$ sudo systemctl restart ovirt-websocket-proxy
$ sudo systemctl restart ovirt-engine.service
Done! It's time to connect to the manager and verify that the connection is protected by a signed SSL certificate.Archiving
Where without her! In this section, we will discuss manager archiving; VM archiving is a separate issue. We will make archive copies once a day and put it on NFS, for example, on the same system where we placed the ISO images - mynfs01.example.com:/exports/ovirt-backup. It is not recommended to store archives on the same machine where Engine is running.Install and enable autofs:$ sudo yum install autofs
$ sudo systemctl enable autofs
$ sudo systemctl start autofs
Create a script:$ sudo vim /etc/cron.daily/make.oVirt.backup.sh
the following content:#!/bin/bash
datetime=`date +"%F.%R"`
backupdir="/net/mynfs01.example.com/exports/ovirt-backup"
filename="$backupdir/`hostname --short`.`date +"%F.%R"`"
engine-backup --mode=backup --scope=all --file=$filename.data --log=$filename.log
We make the file executable:$ sudo chmod a+x /etc/cron.daily/make.oVirt.backup.sh
Now every night we will receive the manager settings archive.Host Management Interface
Cockpit is a modern administrative interface for Linux systems. In this case, it plays a role close to the ESXi web interface. Fig. 3 - appearance of the panel.It installs very simply, you need cockpit packages and the cockpit-ovirt-dashboard plugin:
$ sudo yum install cockpit cockpit-ovirt-dashboard -y
Turning on Cockpit:$ sudo systemctl enable --now cockpit.socket
Firewall Setup:sudo firewall-cmd --add-service=cockpit
sudo firewall-cmd --add-service=cockpit --permanent
Now you can connect to the host: https: // [Host IP or FQDN]: 9090VLANs
Read more about networks in the documentation . There are many possibilities, here we describe the connection of virtual networks.To connect other subnets, they must first be described in the configuration: Network -> Networks -> New, here only the name is a required field; the VM Network checkbox, which allows machines to use this network, is turned on, and to connect the tag, enable Enable VLAN tagging , enter the VLAN number and click OK.Now you need to go to the Compute -> Hosts -> kvmNN -> Network Interfaces -> Setup Host Networks hosts. Drag the added network from the right side of Unassigned Logical Networks to the left in Assigned Logical Networks: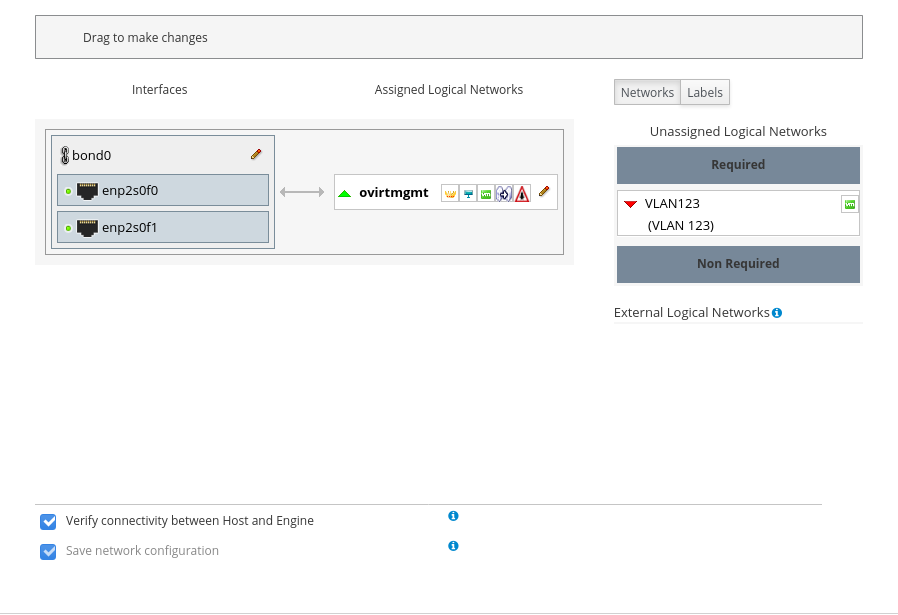 Fig. 4 - before adding a network.
 Fig. 5 - after adding a network.To connect several networks to the host in bulk, it is convenient to assign them a label (s) when creating networks, and add networks by labels.After the network is created, the hosts will go into Non Operational state until the network is added to all nodes of the cluster. This behavior is caused by the Require All flag on the Cluster tab when creating a new network. In the case when the network is not needed on all nodes of the cluster, this symptom can be disabled, then the network when added to the host will be on the right in the Non Required section and you can choose whether to connect it to a specific host.
 Fig. 6 - selection of a sign of a network requirement.
HPE specific
Almost all manufacturers have tools that increase the usability of their products. Using the HPE example, AMS (Agentless Management Service, amsd for iLO5, hp-ams for iLO4) and SSA (Smart Storage Administrator, working with a disk controller), etc. are useful.Connect HPE RepositoryHPE:
$ sudo rpm --import https://downloads.linux.hpe.com/SDR/hpePublicKey2048_key1.pub
$ sudo vim /etc/yum.repos.d/mcp.repo
:
[mcp]
name=Management Component Pack
baseurl=http://downloads.linux.hpe.com/repo/mcp/centos/$releasever/$basearch/current/
enabled=1
gpgkey=file:///etc/pki/rpm-gpg/GPG-KEY-mcp

[spp]
name=Service Pack for ProLiant
baseurl=http://downloads.linux.hpe.com/SDR/repo/spp/RHEL/$releasever/$basearch/current/
enabled=1
gpgkey=file:///etc/pki/rpm-gpg/GPG-KEY-mcp
():
$ sudo yum --disablerepo="*" --enablerepo="mcp" list available
$ yum info amsd
Installation and launch:$ sudo yum install amsd ssacli
$ sudo systemctl start amsd
An example of a disk controller utility That's all for now. In the following articles I plan to tell some basic operations and applications. For example, how to make VDI in oVirt.