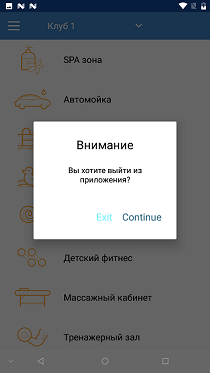
The previous article briefly showed the advantages of declarative programming of client-server applications for android in comparison with imperative.Now we will write a small, but sufficient, project to evaluate the effectiveness of the DePro library. It is part of one of the educational examples of the library . The design of all the screens that we describe is shown in the following figures: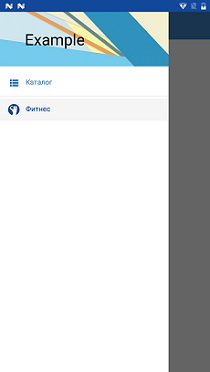
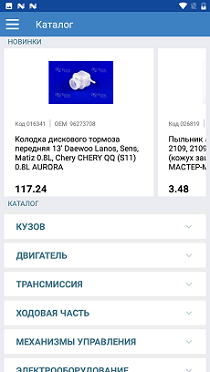
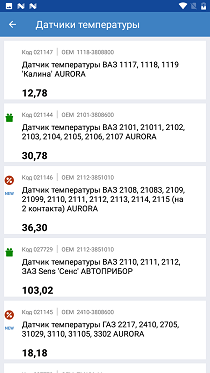
DRAWER screen CATALOG screen PRODUCT_LIST screen

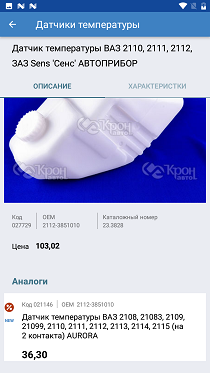

CATALOG_ DESCRIPT CHARACTERISTIC


FITNESS FITNESS_
From these screens, their functionality is generally understood. The side menu contains two items “Catalog” and “Fitness”. When you select an item, the corresponding screen is displayed. The CATALOG screen contains a horizontal "News" list. When you click on any “new product”, a screen with a description of this product is displayed. Description consists of two tabs: “Description” and “Characteristics”. Also on the CATALOG screen there is a drop-down list "Catalog". When you click on the down arrow, the directory opens (closes). When you click on the entire line, the PRODUCT_LIST screen is displayed with a list of products for the selected item in the catalog.When you click on the item “Fitness”, the FITNESS screen with a list of services is displayed. The list depends on the club selected in the spinner. When you try to exit the application, a warning dialog is displayed.The server transfers data in json format to the application. The data structure for each screen is described below. In applications written in DePro from the API, only the URL is used, the data structure is needed only to correctly set the name (id) view, because the binding is carried out by name. It is worth noting that data is an incomplete slice of real data. Therefore, there may be no connections on names, images. In particular, product images total 20 pcs. Therefore, the same picture can be in many products.API for example screensCATALOG () URL depro/cron/news, GET. . .
    {
        "product_id":4610,
        "catalog_id":15984,
        "product_name":"  20  6  ( 1*20) APRO",
        "catalog_code":"ZRG-20kit",
        "picture":"depro/cronimg/picture_1.jpeg",
        "bar_code":"4824041010653",
        "oem":"",
        "price":175.98,
        "brand":"APRO",
        "product_code":"032578",
        "gift":0,
        "bonus":0,
        "new_product":1,
        "quantity":5
    },
    . . .
URL depro/cron/catalog.
URL depro/cron/catalog_ex catalog_id id , .
:
[
    {
        "catalog_id":15510,
        "parent_id":0,
        "catalog_name":""
    },
    {
        "catalog_id":15584,
        "parent_id":0,
        "catalog_name":""
    },
    . . .
]
PRODUCT_LIST URL depro/cron/product_list : expandedLevel catalog_id.
expandedLevel — (0, 1 2), catalog_id — id .
0 1 , , .
GET
()
URL depro/cron/product_barcode
barcode_scanner.
URL depro/cron/product_search product_name. LIKE. product_name .
.
DESCRIPT
: URL depro/cron/product_id product_id. GET.
{
    "product_id":2942,
    "catalog_id":15594,
    "product_name":"   2110, 2111, 2112,  Sens ''  ",
    "catalog_code":"23.3828"
    ,"picture":"depro/cronimg/picture_16.jpeg",
    "bar_code":"2000000148472",
    "oem":"2112-3851010",
    "price":103.02,
    "brand":", . , ",
    "product_code":"027729",
    "gift":1,
    "bonus":0,
    "new_product":0,
    "quantity":16
}
: URL depro/cron/product_analog product_id. GET.
[
    {
        "product_id":561,
        "catalog_id":15587,
        "product_name":"   2110, 2111, 2112 (  16 . ) AURORA",
        "catalog_code":"WP-LA2112",
        "picture":"depro/cronimg/picture_12.jpeg",
        "bar_code":"2900011680711",
        "oem":"2112-1307010",
        "price":188.16,
        "brand":"AURORA, Poland",
        "product_code":"016807",
        "gift":0,
        "bonus":1,
        "new_product":0,
        "quantity":15
    },
    . . .
]
CHARACTERISTIC URL depro/cron/product_charact product_id. GET.
[
    {
        "prop_id":2764,
        "product_id":2942,
        "name":"",
        "value":", . , "
    },
    {
        "prop_id":2765,
        "product_id":2942,
        "name":"   ",
        "value":","
    },
    . . .
]
Now consider our steps for writing an application.1. In the studio we will create a new project. The name can be set at your discretion.2. Deployment of resources. As mentioned in the first article, resource files (XML) are used conventional. Therefore, in order not to waste time on known things, we simply download all the necessary resources .Unzip the resulting res_example.zip file. In the studio, delete the entire contents of the res folder.Transfer the contents of the unzipped res folder to the res folder of the project. After that, taking into account the features of Android Studio, you may need to clear the project and / or run the Invalid Caches / Restart command.3. Connection of the libraryIn the dependencies section of the build.gradle file of the module, you need to specify: implementation 'github.com/deprosystem/depro:compon:3.0.1'
In the android section of the build.gradle file of the module, you need to specify: packagingOptions {
exclude 'META-INF/DEPENDENCIES'
}
compileOptions {
sourceCompatibility JavaVersion.VERSION_1_8
targetCompatibility JavaVersion.VERSION_1_8
}
When choosing the minSdkVersion attribute, you need to consider that the library supports minSdkVersion = 17. After changing build.gradle, you need to synchronize the project.4. Creation of necessary classes (files). When working with the library, only 4 classes are used: MyDeclareScreens - all screens are described; MyParams - set the necessary parameters for the application; MyApp - the DePro library is initiated; MainActivity - starting activity. You can use your own class names.Create the class MyDeclareScreens.java. Its contents are as follows:public class MyDeclareScreens extends DeclareScreens {
public final static String
MAIN = "main", DRAWER = "DRAWER", CATALOG = "CATALOG",
DESCRIPT = "DESCRIPT", CHARACTERISTIC = "CHARACTERISTIC",
PRODUCT_LIST = "PRODUCT_LIST", PRODUCT_DESCRIPT = "PRODUCT_DESCRIPT",
FITNESS = "FITNESS";
@Override
public void declare() {
activity(MAIN, R.layout.activity_main)
.navigator(finishDialog(R.string.attention, R.string.finishOk))
.drawer(R.id.drawer, R.id.content_frame, R.id.left_drawer, null, DRAWER);
fragment(DRAWER, R.layout.fragment_drawer)
.menu(model(menu), view(R.id.recycler));
fragment(CATALOG, R.layout.fragment_catalog)
.navigator(handler(R.id.back, VH.OPEN_DRAWER))
.component(TC.RECYCLER_HORIZONTAL, model(Api.NEWS_PROD).pagination().progress(R.id.progr),
view(R.id.recycler_news, R.layout.item_news_prod),
navigator(start(PRODUCT_DESCRIPT)))
.component(TC.RECYCLER, model(Api.CATALOG),
view(R.id.recycler, "expandedLevel", new int[]{R.layout.item_catalog_type_1,
R.layout.item_catalog_type_2, R.layout.item_catalog_type_3})
.expanded(R.id.expand, R.id.expand, model(Api.CATALOG_EX, "catalog_id")),
navigator(start(PRODUCT_LIST)));
activity(PRODUCT_LIST, R.layout.activity_product_list, "%1$s", "catalog_name").animate(AS.RL)
.navigator(back(R.id.back))
.component(TC.RECYCLER, model(Api.PRODUCT_LIST, "expandedLevel,catalog_id"),
view(R.id.recycler, R.layout.item_product_list)
.visibilityManager(visibility(R.id.bonus_i, "bonus"),
visibility(R.id.gift_i, "gift"),
visibility(R.id.newT, "new_product")),
navigator(start(PRODUCT_DESCRIPT)));
activity(PRODUCT_DESCRIPT, R.layout.activity_product_descript, "%1$s", "catalog_name").animate(AS.RL)
.navigator(back(R.id.back))
.setValue(item(R.id.product_name, TS.PARAM, "product_name"))
.component(TC.PAGER_F, view(R.id.pager, DESCRIPT, CHARACTERISTIC)
.setTab(R.id.tabs, R.array.descript_tab_name));
fragment(DESCRIPT, R.layout.fragment_descript)
.component(TC.PANEL, model(Api.PRODUCT_ID, "product_id"),
view(R.id.panel).visibilityManager(visibility(R.id.bonus, "bonus")))
.component(TC.RECYCLER, model(Api.ANALOG_ID_PRODUCT,"product_id"),
view(R.id.recycler, R.layout.item_product_list).noDataView(R.id.not_analog)
.visibilityManager(visibility(R.id.bonus_i, "bonus"),
visibility(R.id.gift_i, "gift"),
visibility(R.id.newT, "new_product")),
navigator(start(0, PRODUCT_DESCRIPT, PS.RECORD),
handler(0, VH.BACK))) ;
fragment(CHARACTERISTIC, R.layout.fragment_characteristic)
.component(TC.RECYCLER, model(Api.CHARACT_ID_PRODUCT, "product_id"),
view(R.id.recycler, "2", new int[] {R.layout.item_property, R.layout.item_property_1}));
fragment(FITNESS, R.layout.fragment_fitness)
.navigator(handler(R.id.back, VH.OPEN_DRAWER))
.component(TC.SPINNER, model(JSON, getString(R.string.clubs)),
view(R.id.spinner, R.layout.item_spin_drop, R.layout.item_spin_hider))
.component(TC.RECYCLER, model(Api.FITNESS, "clubId"),
view(R.id.recycler, R.layout.item_fitness), null).eventFrom(R.id.spinner);
}
Menu menu = new Menu()
.item(R.drawable.list, R.string.m_catalog, CATALOG, true)
.divider()
.item(R.drawable.ic_aura, R.string.fitness, FITNESS);
}
We will later describe all the DePro constructions used. To connect the import, use the alt + enter keys. Red will also be highlighted Api class in which the addresses for all requests are set. Its contents will be given later.Create the class MyParams.java. In most cases, default settings are sufficient. In our case, we will set only the base URL.public class MyParams extends AppParams {
@Override
public void setParams() {
baseUrl = "https://deprosystem.com/";
}
}
Change the content created by the studio of the MainActivity class to the following:public class MainActivity extends BaseActivity {
@Override
public String getNameScreen() {
return MyDeclareScreens.MAIN;
}
}
In the manifest for MainActivity, you can specify portrait orientation. In principle, the library supports screen rotation, but in this version for screens of the activity () type, apart from the start, portrait orientation is also prescribed.Create the MyApp class:public class MyApp extends Application {
private static MyApp instance;
private Context context;
public static MyApp getInstance() {
if (instance == null) {
instance = new MyApp();
}
return instance;
}
@Override
public void onCreate() {
super.onCreate();
instance = this;
context = getApplicationContext();
DeclareParam.build(context)
.setAppParams(new MyParams())
.setDeclareScreens(new MyDeclareScreens());
}
}
This is a regular singleton in the onCreate method of which MyParams and MyDeclareScreens are set.Remember to describe MyApp in the manifest.To finish, create the Api class:public class Api {
public static final String CATALOG = "depro/cron/catalog",
NEWS_PROD = "depro/cron/news_prod",
PRODUCT_LIST = "depro/cron/product_list",
PRODUCT_ID = "depro/cron/product_id",
ANALOG_ID_PRODUCT = "depro/cron/product_analog",
CHARACT_ID_PRODUCT = "depro/cron/product_charact",
FITNESS = "depro/cron/fitness",
CATALOG_EX = "depro/cron/catalog_ex";
}
5. Now you can run the application for execution.If everything is entered correctly, then when the application starts, all specified screens will be displayed (and work).As we see, we have only five simple classes for the entire application. And four of them are auxiliary. Their contents are independent of the number of screens. The description, generally not trivial, of the screens also takes up a bit of space (less than 80 lines). Now we show that the description is not only not large, but also not complicated. To do this, we describe the operation of the used library components.As indicated in the first article, screens in the library can be either activity or fragment, which sets the screen name (line) and layout. Links to screens are made by their names. The choice of which type of screen to use is carried out in the usual way.MAIN screenSo, from the design it can be seen that the start screen has a side menu and a container for fragments. In the markup of R.layout.activity_main, a standard DrawerLayout is set. Therefore, in the description of the MAIN screen, we specify the drawer component, to which we pass the id of the DrawerLayout itself and its containers for the sidebar and fragments. We also indicate the name of the screen (DRAWER), which will be displayed in the sidebar. The finishDialog navigator indicates that before exiting the application you need to issue a confirmation dialog.DRAWER screenContains only one menu component with a menu type variable specified in the model, and a RecyclerView type markup element in the id view, which will display the menu. The menu itself indicates that the “CATALOG” menu item will be displayed in the fragments container when the menu starts.CATALOG screenContains one horizontal New List. When receiving data from the server, his model uses pagination, and displays the progress in R.id.progr. If your Internet is fast, then you may not notice the appearance of a panel with progress. If you want to watch it, you can switch to a slower Internet, or change the background color of R.id.progr. In this case, you will at least see it blinking. For pagination, the parameters specified in AppParams by default are used. The view is given R.id.recycler_news with a RecyclerView and layout for items. When you click on any item in the list, the PRODUCT_DESCRIPT screen starts.The Directory list is a drop down. The disclosure level is defined in the "expandedLevel" field. If it is not transmitted with the source data, the library itself will deal with this. The same parameter sets which layout from the list to use at each level of disclosure. The fact that the list is drop-down serves the expanded (...) functionality. The model will be set in the cator to receive data from the server for the next levels. The model specifies the address of the Api.CATALOG_EX request and the name of the request parameter “catalog_id”. In expanded, R.id.expand is also indicated - a markup element in items by clicking on which the list will be expanded and the id of the element that will be animatedly rotated by 180 degrees when expanding - closing the list. And finally, the navigator indicatesthat when you click on the list item, the PRODUCT_LIST screen will be called up.The navigator, which refers to the entire screen, indicates that when you click on the R.id.back element, a side panel will open.PRODUCT_LIST screenWhen specifying a screen, it is indicated that the current value of the catalog_name parameter will be shown in the header and the output animation will be from right to left (AS.RL). The list description is already familiar to us. The only thing for the presentation is the visibilityManager, which controls the visibility of the markup elements depending on the values of the corresponding data. The navigator related to the entire screen indicates that when you click on the R.id.back element, you will be returned to the previous screen.PRODUCT_DESCRIPT screenNew to us is a component of type PAGER_F. It is associated with a regular ViewPager. He is shown a list of screens (fragments) to be displayed, and TabLayout (setTab) is connected.The PRODUCT_DESCRIPT screen appears in the DESCRIPTION tab.A component of the PANEL type displays data obtained by the model. The “Analogs” list displays a list of similar products, if any, or using the noDataView () functionality, the message “Analogs are missing”.CHARACTERISTIC screenDisplays a list of product features.FITNESS screenA component of type SPINNER displays a list of clubs with the option to select one. The list of clubs is set in the model as a json string.The list of categories of classes is normal. The eventFrom (...) functional indicates that when changing the component associated with R.id.spinner (in our case, the spiner), it is necessary to update the data.The code of the application discussed in the article can be viewed on Github .The article is for guidance only. More fully with the capabilities of the DePro library is available in the documentation .