Hello everyone! My name is Mikhail Zotiev, I work as a Flutter developer at Surf. I, like probably the majority of other developers who work with Flutter, most of all like how easy it is to create beautiful and convenient applications with its help. It takes very little time to get into Flutter development. I recently worked in game dev, and now I’ve completely switched to cross-platform mobile development on Flutter.What is the simplicity? With a dozen basic widgets, you can build pretty decent user interfaces. And over time, when the baggage used is quite decent, it’s unlikely that some kind of task will put you at a standstill: be it an unusual design or sophisticated animation. And the most interesting - most likely you can use it without even thinking about the question: “How does it work at all?”Since Flutter has open source, I decided to figure out what's under the hood (on the Dart side of the Force) and share it with you.
Widget
We all have heard the phrase from the framework development team more than once: "Everything in Flutter is widgets . " Let's see if this is really so. To do this, we turn to the Widget class (hereinafter - the widget) and begin to gradually familiarize ourselves with the contents.The first thing we will read in the documentation for the class:Describes the configuration for an [Element].
It turns out that the widget itself is just a description of some Element (hereinafter - the element).Widgets are the central class hierarchy in the Flutter framework. A widget is an immutable description of part of a user interface. Widgets can be inflated into elements, which manage the underlying render tree.
To summarize, the phrase "Everything in Flutter is a widget" is the minimum level of understanding how everything is arranged in order to use Flutter. The widget is the center class in the Flutter hierarchy. At the same time, there are many additional mechanisms around it that help the framework cope with its task.So, we learned a few more facts:- widget - an immutable description of a part of the user interface;
- the widget is associated with some advanced view called an element;
- an element controls some entity of the render tree.
You must have noticed a strange thing. The user interface and immutability fit very poorly together, I would even say that these are completely incompatible concepts. But we will return to this when a more complete picture of the Flutter world’s device will emerge, but for now, we’ll continue to get acquainted with the widget’s documentation.Widgets themselves have no mutable state (all their fields must be final).
If you wish to associate mutable state with a widget, consider using a [StatefulWidget], which creates a [State] object (via [StatefulWidget.createState]) whenever it is inflated into an element and incorporated into the tree.
This paragraph complements the first paragraph a bit: if we need a mutable configuration, we use the special State entity (hereinafter referred to as the state), which describes the current state of this widget. However, the state is not associated with the widget, but with its elemental representation.A given widget can be included in the tree zero or more times. In particular a given widget can be placed in the tree multiple times. Each time a widget is placed in the tree, it is inflated into an [Element], which means a widget that is incorporated into the tree multiple times will be inflated multiple times.
The same widget can be included in the widget tree many times, or not be included at all. But every time a widget is included in the widget tree, an element is mapped to it.So, at this stage, the widgets are almost done, let's summarize:- widget - the central class of the hierarchy;
- widget is some configuration;
- widget - an immutable description of a part of the user interface;
- the widget is associated with an element that controls rendering in some way;
- the widget’s changing state can be described by some entity, but it is connected not with the widget, but with the element that represents this widget.
Element
From what we learned, the question begs, “What are these elements that govern everything?” Do the same - open the documentation for the Element class.An instantiation of a [Widget] at a particular location in the tree.
An element is some representation of a widget in a specific place in a tree.Widgets describe how to configure a subtree but the same widget can be used to configure multiple subtrees simultaneously because widgets are immutable. An [Element] represents the use of a widget to configure a specific location in the tree. Over time, the widget associated with a given element can change, for example, if the parent widget rebuilds and creates a new widget for this location.
The widget describes the configuration of some part of the user interface, but as we already know, the same widget can be used in different places of the tree. Each such place will be represented by a corresponding element. But over time, the widget that is associated with the item may change. This means that the elements are more tenacious and continue to be used, only updating their connections.This is a fairly rational decision. As we have already defined above, widgets are an immutable configuration that simply describes a specific part of the interface, which means they must be very lightweight. And the elements in the area of which control is much more heavy, but they are not recreated unnecessarily.To understand how this is done, consider the life cycle of an element:- Widget.createElement , .
- mount . .
- .
- , (, ), . runtimeType key, . , , .
- , , , , ( deactivate).
- , . , , (unmount), .
- When you re-include elements in the tree, for example, if the element or its ancestors have a global key, it will be removed from the list of inactive elements, the activate method will be called, and the rendered object associated with this element will again be embedded in the render tree. This means that the item should appear on the screen again.
In the class declaration, we see that the element implements the BuildContext interface. A BuildContext is something that controls the position of a widget in a widget tree, as follows from its documentation. Almost exactly matches the item description. This interface is used to avoid direct manipulation of the element, but at the same time give access to the necessary context methods. For example, findRenderObject, which allows you to find the render tree object corresponding to this element.Renderderbject
It remains to deal with the last link of this triad - RenderObject . As the name implies, this is an object of the visualization tree. It has a parent object, as well as a data field that the parent object uses to store specific information regarding this object itself, for example, its position. This object is responsible for the implementation of basic rendering and layout protocols.RenderObject does not limit the model of using child objects: there may be none, one or many. Also, the positioning system is not limited to: the Cartesian system, polar coordinates, all this and much more is available for use. There are no restrictions on the use of location protocols: adjusting the width or height, limiting the size, specifying the size and location of the parent or, if necessary, using the data of the parent object.Flutter World Picture
Let's try to build a big picture of how everything works together.We already noted above, the widget is an immutable description, but the user interface is not at all static. This discrepancy is removed by dividing into 3 levels of objects and the division of responsibility zones.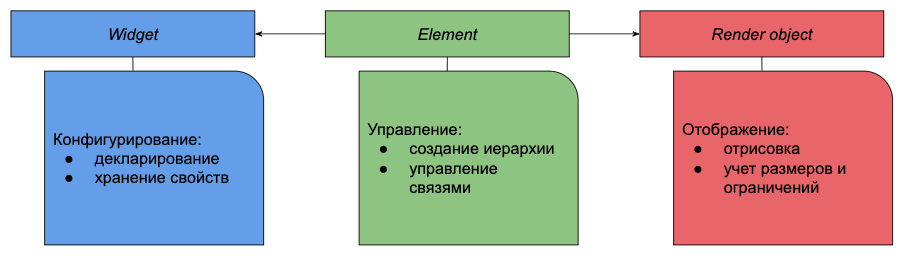 Let's look at how these trees look with a simple example:
 In this case, we have some StatelessWidget wrapped in a Padding widget and containing text inside.Let's put ourselves in place of Flutter - we were given this widget tree.Flutter: “Hey, Padding, I need your element”Padding: “Of course, hold SingleChildRenderObjectElement”
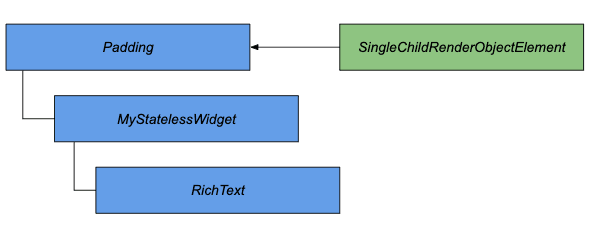 Flutter: “Element, here is your place, settle down”SingleChildRenderObjectElement: “Guys, everything’s ok, but I need RenderObject”Flutter: “Padding, like to draw you at all? ”Padding: “Hold it, RenderPadding”SingleChildRenderObjectElement: “Great, get to work”
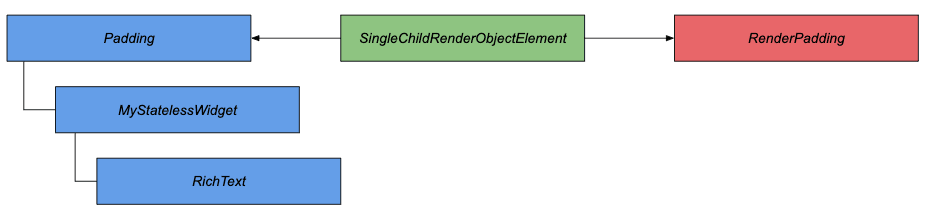 Flutter:“So who is next?” StatelessWidget, now you let the element »StatelessWidget: « Here StatelessElement »Flutter: « StatelessElement, you will be in subjection to SingleChildRenderObjectElement, here's the place, embarking »StatelessElement: « OK »
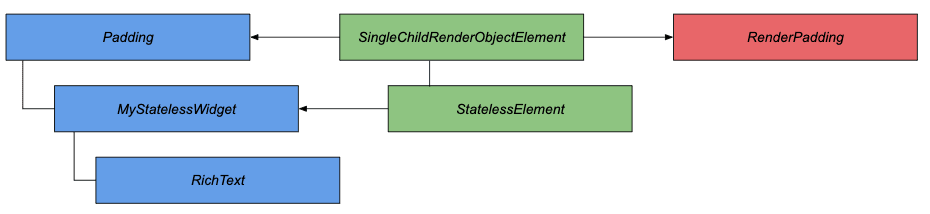 Flutter: « the RichText, elementik Present, please »the RichText gives MultiChildRenderObjectElementFlutter: “MultiChildRenderObjectElement, here you go, get started”MultiChildRenderObjectElement: “I need a render for work”Flutter: “RichText, we need a render object”RichText: “Here is a RenderParagraph”Flutter:“RenderParagraph you will receive instructions RenderPadding, and you will control MultiChildRenderObjectElement”MultiChildRenderObjectElement: “Now everything is OK, I'm ready”
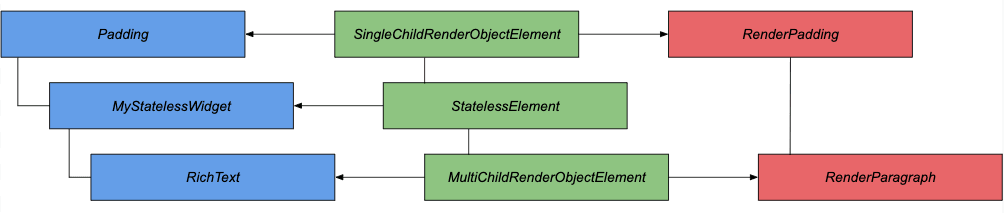 Surely you will ask a legitimate question: “Where is the rendering object for StatelessWidget, why is it not there, we decided above that the elements bind configurations with display? " Let's pay attention to the basic implementation of the mount method, which was discussed in this section of the life cycle description.
void mount(Element parent, dynamic newSlot) {
    assert(_debugLifecycleState == _ElementLifecycle.initial);
    assert(widget != null);
    assert(_parent == null);
    assert(parent == null || parent._debugLifecycleState == _ElementLifecycle.active);
    assert(slot == null);
    assert(depth == null);
    assert(!_active);
    _parent = parent;
    _slot = newSlot;
    _depth = _parent != null ? _parent.depth + 1 : 1;
    _active = true;
    if (parent != null)
        _owner = parent.owner;
    if (widget.key is GlobalKey) {
        final GlobalKey key = widget.key;
        key._register(this);
    }
    _updateInheritance();
    assert(() {
        _debugLifecycleState = _ElementLifecycle.active;
        return true;
    }());
}
We will not see in it the creation of a rendering object. But the element implements a BuildContext, which has a findRenderObject visualization object search method, which will lead us to the following getter:RenderObject get renderObject {
RenderObject result;
void visit(Element element) {
assert(result == null);
if (element is RenderObjectElement)
result = element.renderObject;
else
element.visitChildren(visit);
}
visit(this);
return result;
}
In the basic case, an element may not create a rendering object; only RenderObjectElement and its descendants are required to do this, however, in this case, an element at some nesting level must have a child element that has a rendering object.It would seem why all these difficulties. As many as 3 trees, different areas of responsibility, etc. The answer is quite simple - this is where Flutter's performance is built. Widgets are immutable configurations, therefore, they are often recreated, but at the same time they are quite lightweight, which does not affect performance. But Flutter is trying to reuse heavy elements as much as possible.Consider an example.Text in the middle of the screen. The code in this case will look something like this:body: Center(
child: Text(“Hello world!”)
),
In this case, the widget tree will look like this: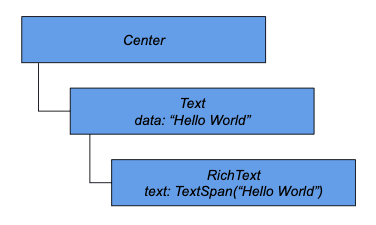 After Flutter builds all 3 trees, we get the following picture:
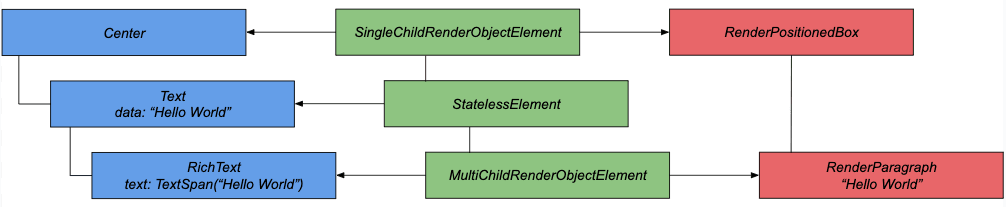 What happens if we change the text that we are going to display?
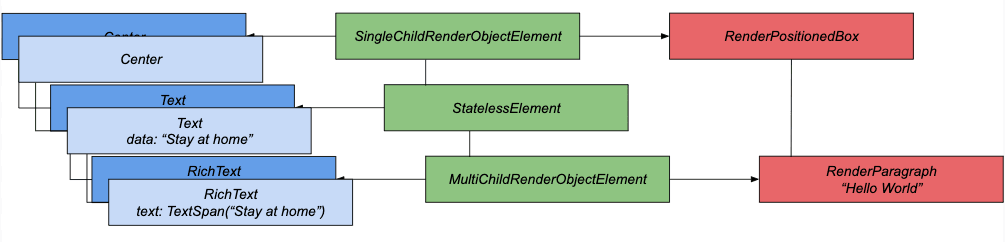 We now have a new widget tree. Above we talked about the maximum possible reuse of elements. Take a look at the Widget class method, under the talking name canUpdate .
static bool canUpdate(Widget oldWidget, Widget newWidget) {
    return oldWidget.runtimeType == newWidget.runtimeType && oldWidget.key == newWidget.key;
}
We check the type of the previous widget and the new one, as well as their keys. If they are the same, then there is no need to change the item.So, before the upgrade, the first element is Center, after the upgrade, also Center. Both have no keys, a complete coincidence. We can update the item link to a new widget.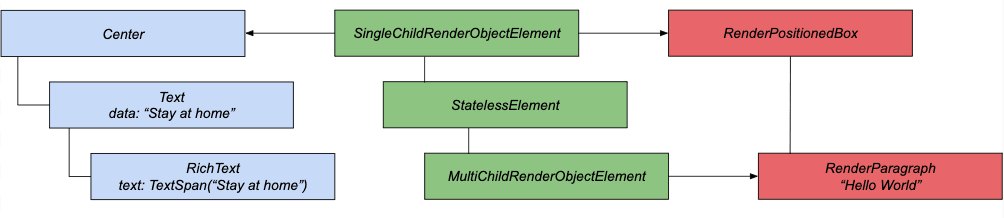 But in addition to the type and key, the widget is a description and configuration, and the values of the parameters that are necessary for the display could change. That is why the element, after updating the link to the widget, should initiate updates to the rendering object. In the case of Center, nothing has changed, and we continue to compare further.Once again, the type and key tell us that it makes no sense to recreate the element. The text is a descendant of StatelessWidget; it does not have a direct display object.
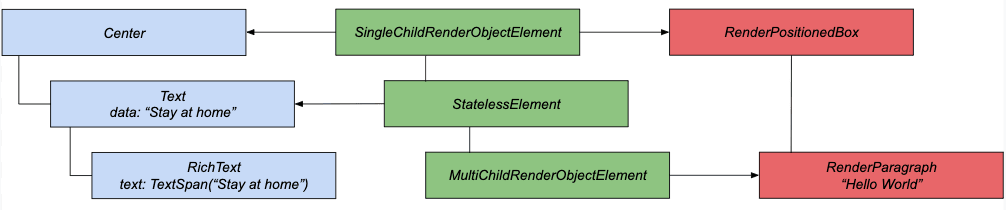 Go to RichText. The widget also has not changed its type; there are no discrepancies in the keys. The item updates its association with the new widget.
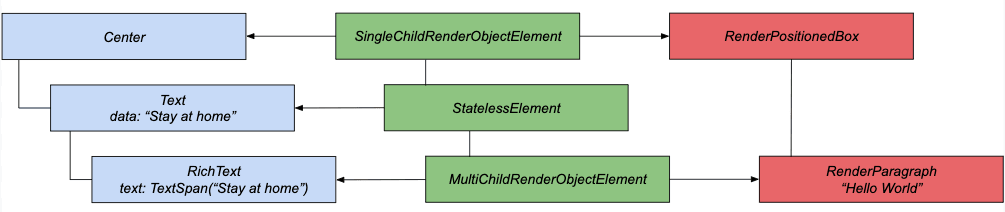 The connection is updated, it remains only to update the properties. As a result, RenderParagraph will display the new text value.
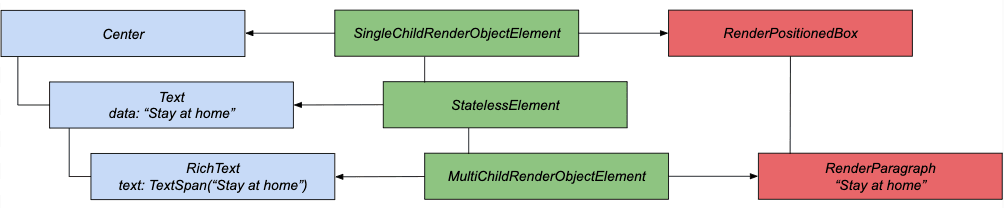 And as soon as the time comes for the next drawing frame, we will see the result we expect.Thanks to this kind of work, Flutter achieves such high performance.The example above describes the case when the widget structure itself has not changed. But what happens if the structure changes? Flutter, of course, will continue to try to maximize the use of existing objects, as we understood from the life cycle description, but new elements will be created for all new widgets, and old and more unnecessary ones will be deleted at the end of the frame.Let's look at a couple of examples. And in order to make sure of the above, we use the Android Studio tool - Flutter Inspector.
@override
Widget build(BuildContext context) {
    return Scaffold(
        body: Center(
            child: _isFirst ? first() : second(),
        ),
        floatingActionButton: FloatingActionButton(
            child: Text("Switch"),
            onPressed: () {
                setState(() {
                    _isFirst = !_isFirst;
                });
            },
        ),
    );
}

Widget first() => Row(
    mainAxisAlignment: MainAxisAlignment.center,
    children: <Widget>[
        Text(
            "test",
            style: TextStyle(fontSize: 25),
        ),
        SizedBox(
            width: 5,
        ),
        Icon(
            Icons.error,
        ),
    ],
);

Widget second() => Row(
    mainAxisAlignment: MainAxisAlignment.center,
    children: <Widget>[
        Text(
            "one more test",
            style: TextStyle(fontSize: 25),
        ),
        Padding(
            padding: EdgeInsets.only(left: 5),
        ),
        Icon(
            Icons.error,
        ),
    ],
);
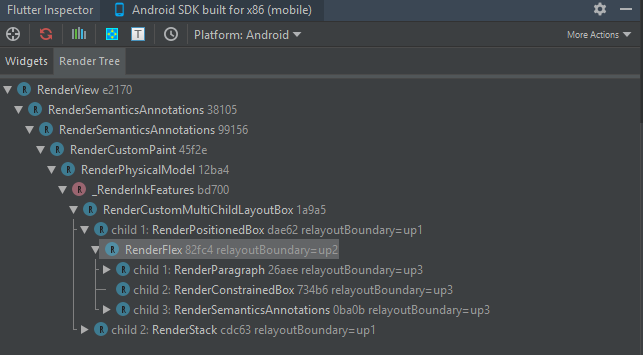
In this case, by clicking on the button, one of the widgets will change. Let's see what the inspector shows us.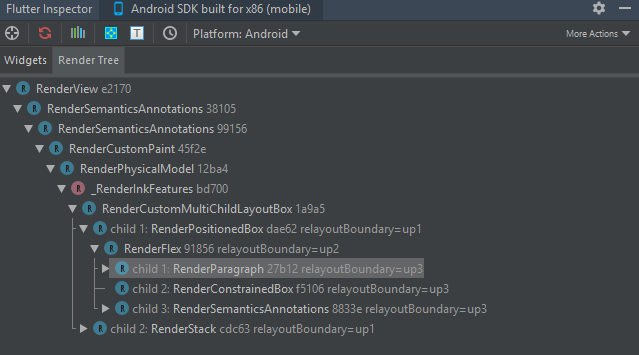
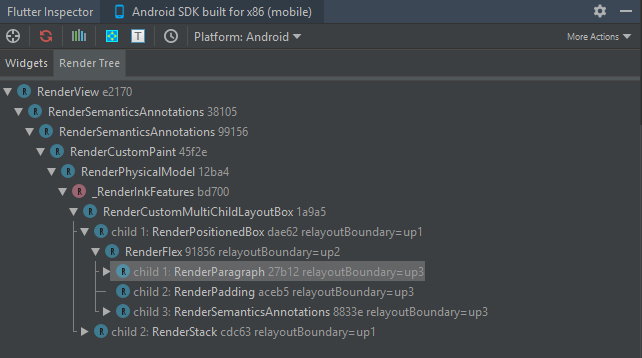 As we can see, Flutter recreated the render only for Padding, the rest just reused.Consider 1 more option in which the structure changes in a more global way - we change the levels of nesting.
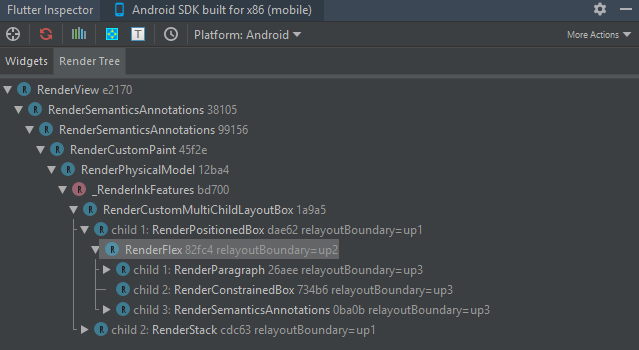
Widget second() => Container(child: first(),);
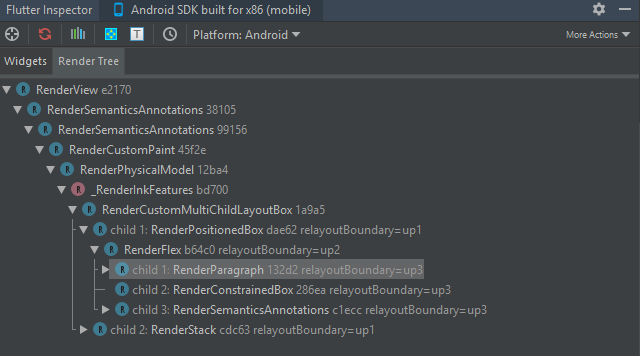
 Despite the fact that the tree did not visually change at all, the elements and objects of the rendering tree were recreated. This happened because Flutter compares by level (in this case, it doesn’t matter that most of the tree has not changed), sifting of this part took place at the time of comparing Container and Row. However, one can get out of this situation. This will help us GlobalKey. Add such a key for Row.
var _key = GlobalKey(debugLabel: "testLabel");

Widget first() => Row(
    key: _key,
    …
);
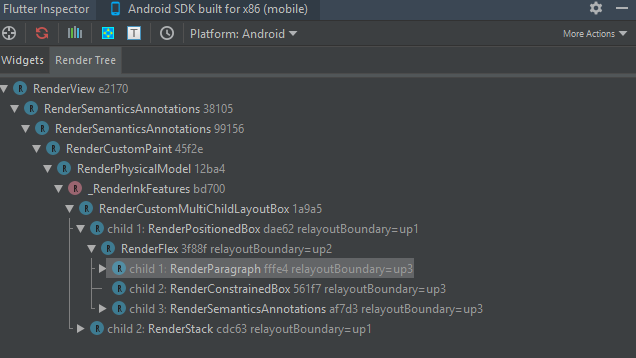
 As soon as we told Flutter that the part could be reused, he took advantage of the opportunity.
Conclusion
We got a little closer acquainted with Flutter magic and now we know that it is not only in widgets.Flutter is a well-thought out well-coordinated mechanism with its own hierarchy, areas of responsibility, with which you can create not only beautiful, but also productive applications. Of course, we have examined only a small, albeit rather important part of its device, so we will continue to analyze various aspects of the framework’s internal work in future articles.I hope the information in this article is helpful in understanding how Flutter works internally and helps you find elegant and productive solutions during development.Thank you for the attention!Resources
Flutter"How Flutter renders Widgets" by Andrew Fitz Gibbon, Matt Sullivan