Linux is an operating system. Like Windows (windows), only more secure. In Windows it is easy to catch a virus, in Linux it is almost impossible. And Linux is free, and you’re your own boss: no inevitable auto-updates for your system!True, understanding it is a little more complicated ... Because most operations are performed on the command line. And if you see a “knowledge of linux” in a vacancy - you are expected to have just the ability to perform simple operations - move to another directory, copy a file, create a daddy ... In this article I will talk about typical operations that a newbie should be able to do. Well, plus a couple of useful things for testers.I will give a brief description of the basic commands with examples (I checked everything on the cent os, red hat based system) + links to articles where you can read more. If you want to dig even deeper, then see the section "Books and videos on the topic." And also comments on the article, they wrote a lot of useful things)Content
Where I am? How to understand where you are
Pwd command:pwd ---
/home/test --- , test
A very useful command when you have nothing but the command line at hand. Stands for P rint W orking D irectory. Remember her, come in handy.How to understand what is in the folder
The ls command allows you to view the contents of a directory: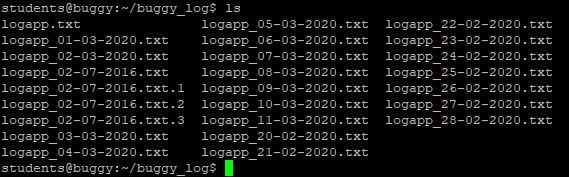 Although it is better to use the command immediately with the “l” flag:
ls -l
Such a command will display a more readable list where you can immediately see the date the file was created, its size, author and the rights granted to the file.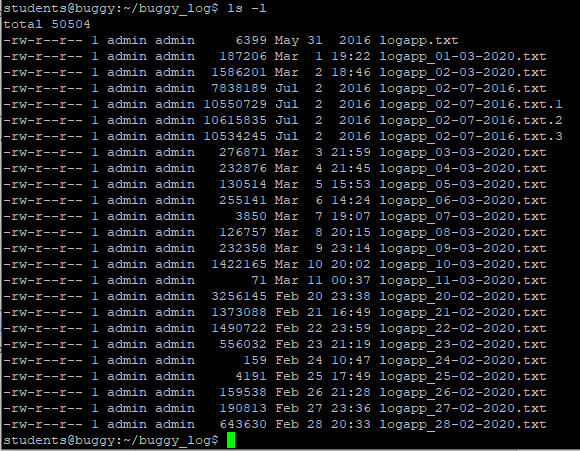 The team has other flags, but most often you will use exactly “ls - l”.See also:The ls Linux team - more about the team and all its flagsThe ls command - view the directory - about the team for beginners (without listing all the flags)
How to switch to another directory
Using the cd command:cd < >
The path can be absolute or relative.Along the absolute path
Either your path is written somewhere, “where to go,” or you spied it in the graphical interface (for example, in WinSCP ).Insert the path to the command line after "cd"cd /home/student/log
Well, we moved from the home directory (denoted by ~) to / home / student / log .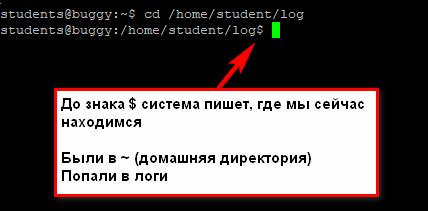
Relative path
The relative path is relative to your current directory where you are currently located. If I am already in / home / student , and I need to / home / student / log , the command will be like this:cd log --- log ,
If I need from / home / student / photo to / home / student / photo / city / msk / 2017 / cat_1 , the command will be like this:cd city/msk/2017/cat_1
I do not write / home / student / photo since I am already there. In Linux, you can set the path relative to the home folder of the current user. The home directory is denoted by ~ /. Note, not ~, namely ~ /. Further you can already specify subfolders:
cd ~/log
This team will work from everywhere. And move us to / home / user / log .Here is an example where I logged in as students. It was originally in the / var directory, but got into / home / students / log :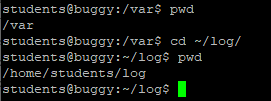
With auto completion
If you start typing the name of the folder and press Tab, the system itself will substitute it. If you just press Tab without entering anything, the system will begin to sort through the possible options:- (cd tab) Maybe you meant folder 1?- (tab) No? Maybe folder 2?- (tab) Not again? Maybe folder 3?- (tab) Not again? Maybe file 1 (it iterates over the names of all the files and directories that are in the one where you are now)?- (tab) I ran out of options, let's go first. Folder 1? cd lon (Tab) -> cd long-long-long-long-name-folder- began to enter the name of the folder and the system itself substituted the name (of those that are in the directory where we are).cd (Tab) (Tab) (Tab) - the system iterates over all files / folders in the current directory.This is very convenient when navigating the command line. No need to remember the exact name of the folder, but you can remember the first letter or two, this will reduce the number of options.
Go upstairs
Go up one level:cd ..
If you need to raise two levels higher, thencd ../..
And so on ad infinitum =) You can use a file lying at a higher level or just change the directory.Please note that the command for Linux is different from the command for Windows - the slash is different. In Windows it is "cd .. \ ..", and in Linux it is "cd ../ ..".See also:File path in linuxHow to create a directory
Use the mkdir command :mkdir test --- «test» ,
You can also create a folder in another place:mkdir /home/test --- «test» /home,
When is it needed? For example, if you need to backup logs. Create a folder and save the necessary logs there. Or if you read the instructions for installing the software and see “create a folder” there. This is done this way through the command line.See also:How to create a directory on Linux using the mkdir commandHow to create a file
Touch
command :touch app.log
Such a command will create an empty file with the name “app.log”. And then you can open the file in the editor and edit.How to edit a file
Here is my word, it’s better to do it through the graphical interface!But if there is no such possibility, well ... If you use programs that are everywhere, then you have two options:- nano is a simpler program designed for beginners
- vim - more complex, but allows you to do a bunch of everything
Let's start with nano. Specify the command name and path in the file:nano test_env.json
Use the arrow buttons to move through the file. After you finish editing the file, click:- Ctrl + O - to save
- Ctrl + X - to exit
The best part about nano is the hints at the bottom of the screen that click to exit.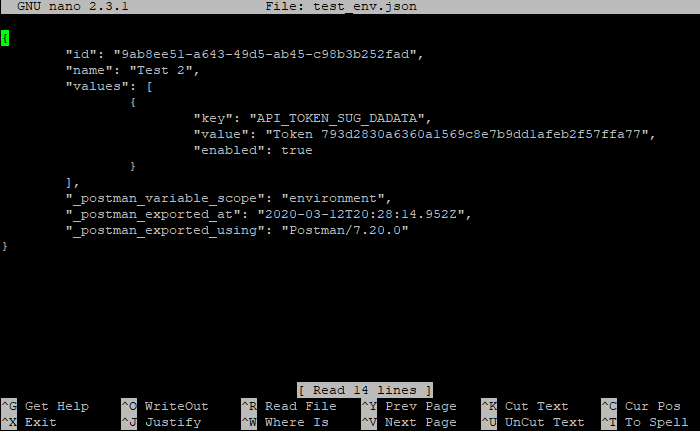 But with vim, this is more complicated. It is easy to go into it:
vim test_env.json
vi test_env.json     ( vim)
Logged in, but how to log out, ahhh? Here a slight panic begins, because none of the standard combinations work: Esc, ctrl + x, ctrl + q ... If you have a second laptop or at least a phone / tablet with the Internet on hand, you can google “how to get out of vim”, and if you have only one window with a terminal that you blocked with the editor?I share a secret, to exit you need to type:- : q - close the editor
- : q! - close the editor without saving (if something was changed, then simply “: q” will not work)
The colon starts the command mode, and there we enter the q command (quit) .Initially, when we open the file through vim, we see its contents, and below the file information: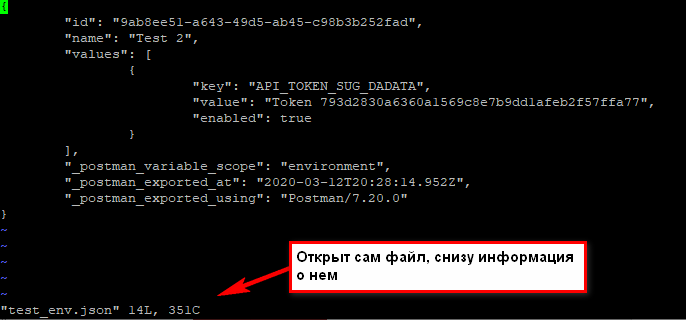 When we press the colon, it is printed below:
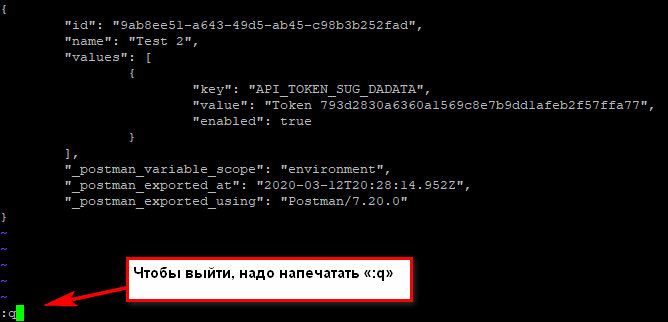 If it does not print, we don’t panic! Then try pressing Esc (return to normal mode), then Enter (confirm the command), and then type again. Fuh, it helped, we got out of there !!!In fact, now everything is not so scary. Even if you were sent to work in a bank where you do not have Internet access, and you are logged in to vi and do not know how to get out, you can always walk out of the phone. Glory to the mobile Internet! Well, if you know the login password from the server, you can just close the terminal and open it again.If you need to exit, saving the changes, use the command
:w —  ;
:q —  ;
Well, about the editing options, see the articles below =)See also:How to edit files in Ubuntu - more about the different waysHow to use the vim text editor - more about vim and all its optionsHow to exit the Vi or Vim editor? - why press EscHow to transfer / copy file
Suppose we have in the directory / opt / app / log is app.log , which we want to preserve elsewhere. How to transfer the log to the right place, if there is no graphical interface, only the command line?Copy file
Team:cp _ _
If we are in the / opt / app / log directory :cp app.log /home/olga
In this example, we used the relative path for “what to copy” - we are already near the log, so we just take it. And for "where to copy" we use the absolute path - copy to / home / olga .You can immediately rename the file:cp app.log /home/olga/app_test_2020_03_08.log
In this case, we took app.log and placed it in the / home / olga folder , renaming it app_test_2020_03_08.log . But you never know how many logs you already have in this folder, to distinguish between them, you can give the file a more speaking name.If there is already a file with the same name in the “where to copy” file, the system will not ask anything, it will simply overwrite it. For example, put the “app.log” file in the log folder inside the home directory , which is already there: No errors, the system just ran the command. See also: Copying files in linux
Copy directory
The command remains the same, “cp”, only the R key is used - “copy folder recursively”:cp -r __ ___
For instance:cp /opt/app/log /home/olga
So in the directory / home / olga will appear the folder "log" .Move file
If you need to move the file, and not copy it, then instead of cp (copy) we use mv (move) .cp app.log /home/olga
↓
mv app.log /home/olga
You can use relative and absolute paths:mv /opt/app/logs/app.log /home/olga — ,
You can immediately rename the file:mv app.log /home/olga/app_2020_03_08.log — /home/olga
Move directory
Similar to moving a file, the mv commandmv /opt/app/log/ /home/olga/bakup/
How to delete a file
Using the rm (remove) command :rm test.txt — test.txt
If you need to delete all the files in the current directory (say, we clean the old logs before reinstalling the application), use "*":rm * —
 If you need to delete the folder, you must add the -r (recursive) flag :
rm -r test_folder
If you are trying to delete files that are already used in the program or read-only, the system will ask again: Now imagine that you are cleaning a lot of files. And asks for each system, and you must constantly answer “yes, yes, yes ...” (y - enter, y - enter, y - enter) ... To delete everything without question, use the -f (force) flag :
rm -rf test_folder ---
 But keep in mind that this is a pretty dangerous team! This is how you get tired of confirming the deletion and enter “-rf”, and you specify the directory incorrectly ... Well, that’s it, sorry, goodbye to the necessary files. Be careful with this command, especially if you have root privileges!The -v option shows the names of the files to be deleted:
rm -rfv test_folder --- ,
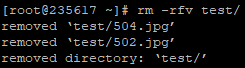 Here you can at least realize what you’ve done)))See also:How to remove the Linux directory
How to change file owner
If you have root access, then you will probably perform all the actions under it. Well, or many ... And then any created file, any folder will belong to the root user.This is bad, because no one else can work with them. But you can create the file as root, and then change its owner using the chown command. Lets say I'm raising testbase service . And he should have access to the user directory and the test.txt file in another directory. Since nobody else needs these files, and I created them under the root, I just change the owner:
chown testbase:testbase test.txt —
chown -R testbase:testbase user     —
As a result, it was the owner of root , and became testbase . What you need!See also:Linux chown commandHow to install the application
If you are used to Windows, then for you installing the application is to download a certain setup file, start and poke “next, next, further” all the way. In Linux, everything is a little different. Here the applications are delivered as packages. And for each system there is a package manager:- yum - red hat, centos
- dpkg, apt - debian
See also:5 Best Linux Package Managers for Linux NewbiesLet's look at an example of how this works. Using the command line is very convenient to work with Midnight Commander (mc) - it's like FAR on windows. Unfortunately, the program is far from always in a “clean” distribution.And so you raised the virtual machine on centos 7, you want to call Midnight Commander, but bummer.mc
 It's okay, install this application via yum:
yum install mc
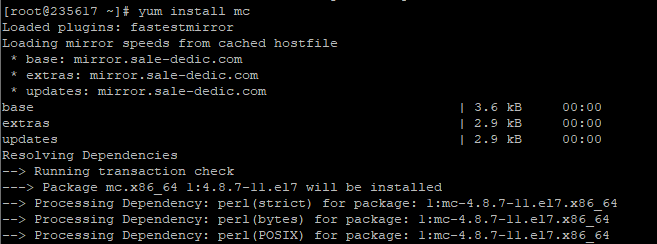 He will do something there, download, and then he will clarify whether you agree to put the program in view of its size. If yes, print “y”:
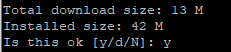 And the system finishes the installation.That's all! No dull “further, further, further,” said “install”, the program has been installed! Now, if you type “mc” on the command line, Midnight Commander starts:
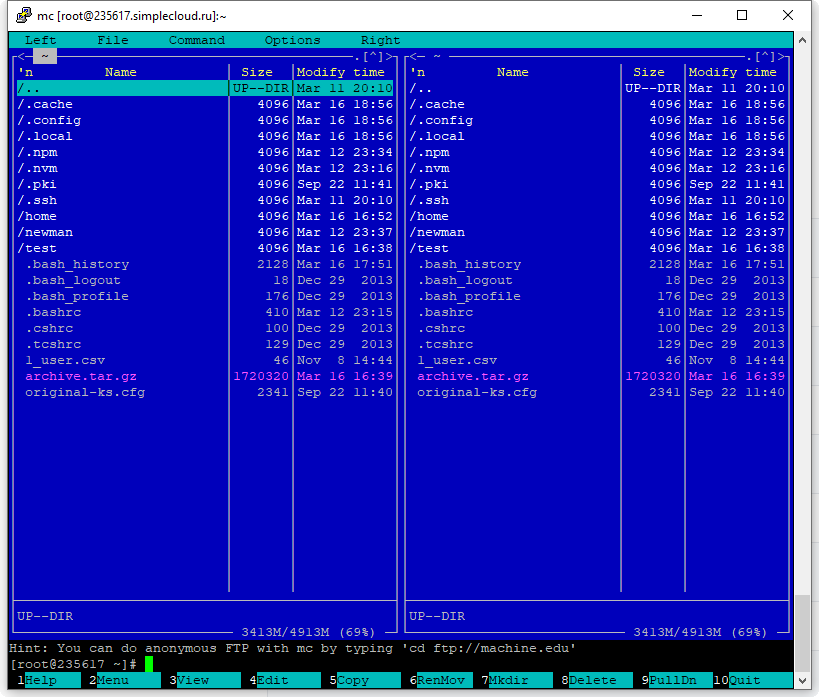 See also:How to install LinuxYum programs , cheat sheet - all sorts of options and plugins
How to run the application
Some applications run through scripts. For example, to start the WildFly application server, you need to go to the bin folder and run standalone.sh there . A file with the extension .sh is a script.To run the script, you need to specify the full path to it:/opt/cdi/jboss/bin/standalone.sh — standalone.sh
It is important! Even if you are in the folder where the script is, it will not be found if you simply specify the name of the sh-script. It is necessary to write like this:./standalone.sh — ,
Search is only in directories written to the PATH variable. So if the script is used often, add the path there and call simply by name:standalone.sh --- standalone.sh, PATH
See also:Running the sh script on Linux - more on scripts. If the application starts as a service, then it’s still easier:
service test start —     «test»
service test stop —
For the test service to start automatically when the system restarts, use the command:chkconfig test on
She will add the service to autorun.How to understand where the application is installed
For example, to integrate Jenkins and newman into Jenkins, you must specify the full path to the newman in the PATH parameter. But how to do this if newman was installed automatically through the install command? And have you already forgotten which installation path he brought up? Or didn’t you put it at all?To find out where the application was installed, use whereis (no space):whereis newman

How to create an archive
The standard utility that will work even on a bare system is tar. True, to use it you need to remember the flags. To create an archive, the standard combination of cvzf :tar -cvzf archive.tar.gz /home/test
 In this example, we packed the / home / test directory , inside which there were two pictures - 502.jpg and 504.jpg .To unpack, change the flag “c” to “x” and remove “z”:
tar -xvf archive.tar.gz
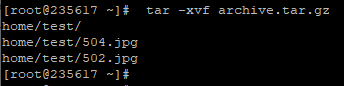 Although the system writes that it unpacked “/ home / test” , in fact the “test” folder appears where we are now.Let's see what all these flags mean:
- c - create archive in linux
- x - extract files from the archive
- v - show detailed information about the work process (without it, we would not see which files were packed / unpacked)
- f - file for recording the archive
- z - compression
For packaging, use the c - C reate option, and for unpacking x - e X tract. If you really want to use rar, then you have to cast out. Installation will not work through yum:
yum install rar
yum install unrar
Says there is no such package:No package rar available.
Error: Nothing to do
Have to complete a bunch of teams! First, download, unzip and compile:wget http://rarlabs.com/rar/rarlinux-x64-5.4.0.tar.gz
tar xzf rarlinux-x64-5.4.0.tar.gz
cd rar
make install
Install:mkdir -p /usr/local/bin
mkdir -p /usr/local/lib
cp rar unrar /usr/local/bin
cp rarfiles.lst /etc
cp default.sfx /usr/local/lib
And apply:unrar x test.rar
See also:Install RAR on LinuxHow to view previously used commands
So, let's say you performed some complex actions. Or not even you, but a developer or admin! Something has broken for you, a colleague has come in, swipe in and out with pens, magic - it works. What did he do? It’s interesting!Or maybe you wrote a long command, and now you need to repeat it. Pens again? Reluctance! Moreover, there are assistants:↑ ( «») —
history — 1000
If you need to “unwind” close, it’s easier to scroll through the arrow. Once pressed - the system showed the last command. Clicked again - the penultimate one. And so on up to 1,000 times (because that’s how much is stored in history). The big bonus is that Linux keeps a history even when you restart the console. This is not like in Windows - you copied the text, copied another, and the first one is already lost. And when you reboot the system, in general, everything was lost.If you don’t feel like poking at the arrow, or there have been commands for a long time, you can print “history” and carefully study the commands.See also:Linux Command History - more about history features
How to see the free space
How much free disk spacedf -h
How much does the directory weighdu -sh
du -sh * ---
How to find out the IP of a computer
If you have configured DNS names, you are connected to the linux machine using them. It’s easier to remember - it’s testbase, it’s bugred ... But sometimes you just need IP. For example, if a DNS connection works only inside the work network, and a colleague wants to connect from home, this is what IP addresses specify.To find out the IP of a machine, use the command:hostname -I
You can also use ifconfig :ifconfig — , IP
ip a — , Ifconfig ,
See also:Displaying private IP addressesHow to find out the OS version
You are sitting at the customer on a Linux machine. Trying to install something - does not work. Climb google, and installation methods are different for different operating systems. But how to understand which is installed on this machine?Use the command:cat /etc/*-release
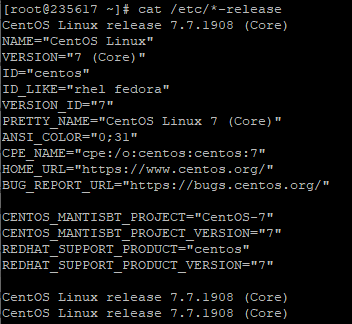 CentOs 7 is installed on this virtual machine.If you need a kernel version:
uname -a
See also:How to find out Linux versionHow to find out how a team works
If you don’t know how the command works, you can always ask the system about it using the built-in man command:man ls
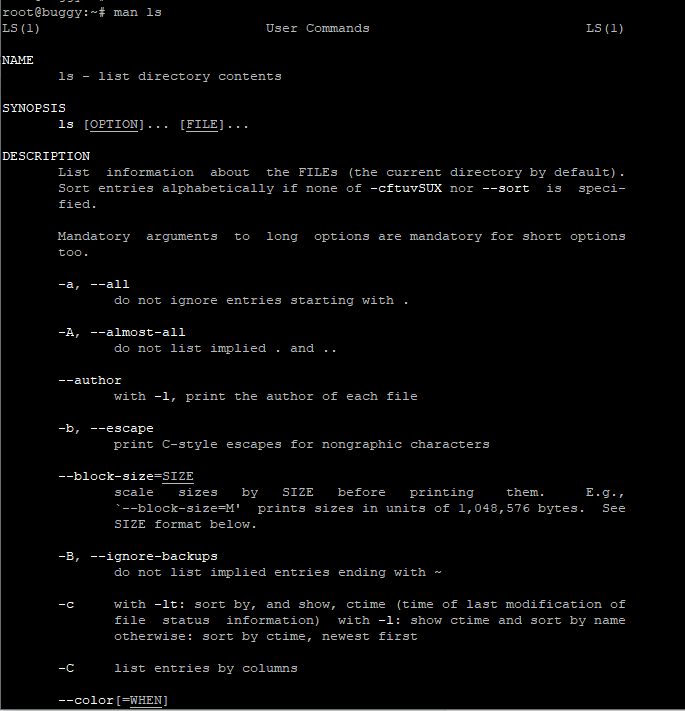 You can close the manual using the q key. For the first time in a Linux console, this is not at all obvious, and there are no tips everywhere.The command is convenient in that you do not even have to leave the command line, you immediately get all the information. In addition, this is always relevant information. And what you google there is unknown =))Although it’s easier for me personally to google some command, because in this way I will get a Russian description + first the most important flags (and there can be a lot of them). But I'm new to Linux myself, this is a newbie approach. And it’s better to immediately learn to pump the skill of searching by man. It is very useful for you for more complex tasks!If the program does not have man, use the -h (--help) flag :
ls -h
How to create many test folders and files
Let's say we have a certain test folder. Create a hundred directories in it and a bunch of files in each:mkdir -p test/dir--{000..100}
touch test/dir--{000..100}/file-{A..Z}
That's all, then you can play with them!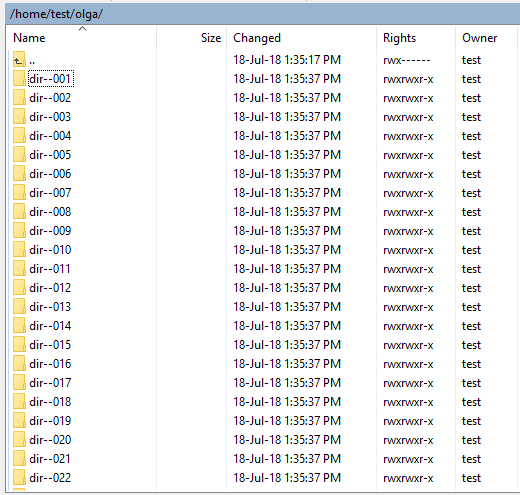 Now explanations:
- mkdir - create a directory
- touch - create a file (or modify an existing one, but if there is no file with the same name, the command will create a new, empty one)
And the expressions in parentheses play the role of a function that runs in a loop and does the manual work for you:- {000..100} - run through all the numbers from 0 to 100
- {A..Z} - will run through all the letters of the English alphabet from A to Z
How I tried this command. At first I looked where I was:$ pwd
/home/test
The $ character in the description of the commands indicates the beginning of the line where we write the command. So we separate what we ourselves entered (pwd) from the system response (/ home / test).Yeah, in the home directory. Create a sandbox for myself:mkdir olga
Here in it I will create!mkdir -p olga/dir--{000..100}
touch olga/dir--{000..100}/file-{A..Z}
And then you can check what happened:cd olga
ls -l
Something like this! IMHO, useful commands.I found them in the Linux Command Line. The Complete Guide, ”they are used to create a sandbox to probe the find command . I, like the author, admire the power of the command line in this case. Only 2 lines, and how much pain it would bring to make a similar structure through a graphical interface!And, most importantly, it’s useful for the tester - it can be useful for tests.How to test IOPS on Linux
This is very useful if the customer gives you a car. Are there exactly SSDs? And do they give good iops? If you are developing a server application, and you are required to withstand the load, you need to be sure that the disks were given to you according to the ToR.Our application actively uses the disk. Therefore, if the customer wants to see good results on the load, we want to see good results on the performance of the drives themselves.
But you cannot trust the administrators of the other side with the word. If the application runs slowly, they, of course, will say that everything is fine with them, that "they" are to blame. Therefore, we must test the disks ourselves.
I will talk about how we tested drives. How to check how many IOPS they issue. We use the fio utility - https://github.com/axboe/fio/releases .1) Download the latest version, unpack, go to the directory. In the commands below, you need to replace "fio-3.19" with the current version from the list
cd /tmp
wget https://github.com/axboe/fio/archive/fio-3.19.tar.gz
tar xvzf fio-3.19.tar.gz
rm fio-3.19.tar.gz
cd fio-fio-3.19
2) There should be packages for assemblyapt-get install -y gcc make libaio-dev | yum install -y make gcc libaio-devel
3) We collectmake
4) Testing./fio -readonly -name iops -rw=randread -bs=512 -runtime=20 -iodepth 32 -filename /dev/sda -ioengine libaio -direct=1
What should be the results:- The average SSD released 2-3 years ago is 50 thousand IOPS.
- Fresh Samsung 960 Pro, which stands on one of the glands in our office - 350 thousand IOPS.
Freshness is determined at the time of writing the article in 2017.If there should be 50 thousand, and the disk produces much less, then:- it is not an SSD;- there are network delays;- incorrectly mounted;- something else bad happened to them and it is worth raising the alarm.And it's all?
Of course not =))It's also useful to examine the find command and regular expressions. At a minimum, a tester needs to be able to “grab logs” - use grep. But this already remains an independent gugerage.The base that is always needed is pwd, cp, mv, mkdir, touch . You can easily google the rest as soon as the need arises.Here are a couple more links from me:To understand the folder structure, I recommend the article “ Linux OS folder structure. What folder is what you need for. What and where lies in Linux "Books and videos on the topic
Video:GNU / Linux software - video lectures by George Kuryachy - very good video lecturesBooks:Linux command line. William ShottsScott Granneman. Linux pocket guideWhere to train
You can raise the virtual machine. True, here you first have to figure out how to raise the virtualmachine ))) Or you can buy a cloud machine. When I needed to play with Linux, I went to SimpleCloud (he was one of the first to google and he has a friendly interface. But you can choose any analog) and bought the most cheap car - for 150 rubles a month. A month for your eyes to "touch-poke", and this machine with a minimum of memory, too.I once had a plan for myself to pay these 150 rubles for giving the car public access. But alas. As I did not try to enclose it (closed commands like ssh, ping, etc.), I did not succeed. There are always people who do not feed bread, let spoil someone else's. Share passwords? You have a ddos attack from your server. Well, the server is blocked. After the Nth block, I spat on this thing. Who wants to learn, will find 150r.To connect to the machine, use the tools:- Putty - command line
- WinSCP - GUI
See also:WinSCP - what is it and how to use it