The translation of the article was prepared on the eve of the launch of the advanced course "iOS Developer" .
Hello and welcome to our tutorial! In this series, we talk about how to navigate between views in SwiftUI (without using a navigation view!). Although this idea may seem trivial, but after understanding it a little deeper, we can learn a lot about the data flow concepts used in SwiftUI.In the previous part, we learned how to implement this using @ObservableObject. In this part, we will look at how to do the same, but more efficiently using @EnvironmentObject. We are also going to add a little transition animation.Here's what we're going to achieve:What we have
So, we just figured out how to navigate between different views using ObservableObject. In a nutshell, we created a ViewRouter and associated it with Mother View and our Content View. Next, we simply manipulate the CurrentPage ViewRouter property by clicking on the Content View buttons. After that, MotherView is updated to display the corresponding Content View!But there is a second, more efficient way to achieve this functionality: use @EnvironmentObject!Hint: You can download the latest developments here (this is the “NavigateInSwiftUIComplete” folder) : GitHubWhy use ObservableObjectis not the best solution
You are probably wondering: why should we implement this in any other way, when we already have a working solution? Well, if you look at the logic of the hierarchy of our application, then it will become clear to you. Our MotherView is the root view that initializes the ViewRouter instance. In MotherView, we also initialize ContentViewA and ContentViewB, passing them the ViewRouter instance as a BindableObject.As you can see, we must follow a strict hierarchy that passes an initialized ObservableObject downstream to all subviews. Now this is not so important, but imagine a more complex application with a lot of views. We always need to keep track of the transmission of the initialized Observable root view to all subviews and all subviews of subviews, etc., which in the end can be a rather tedious task.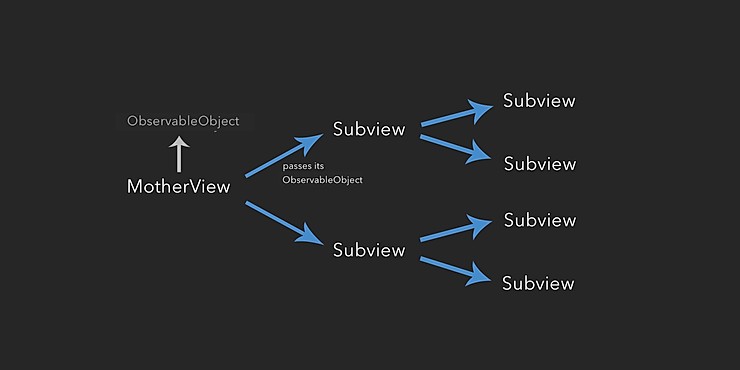 To summarize: using clean
 ObservableObjectcan be problematic when it comes to more complex application hierarchies.Instead, we could initialize the ViewRouter when the application starts so that all views can be directly connected to this instance, or, rather, watch it, regardless of the hierarchy of the application. In this case, the ViewRouter instance will look like a cloud that flies over the code of our application, to which all views automatically access without worrying about the correct initialization chain down the view hierarchy.This is just the job EnvironmentObject!What is EnvironmentObject?
EnvironmentObjectIs a data model that, after initialization, can exchange data with all representations of your application. What is especially good is what is EnvironmentObjectcreated by providing ObservableObject, so we can use ours ViewRouterto create EnvironmentObject!As soon as we declared ours ViewRouteras EnvironmentObject, all views can be attached to it as well as to normal ones ObservableObject, but without the need for a chain of initializations down the application hierarchy!As already mentioned, it EnvironmentObjectshould already be initialized the first time it is accessed. Since ours MotherView, as the root view, will look at the property CurrentPage ViewRouter, we must initialize it EnvironmentObjectwhen the application starts. Then we can automatically change currentPageEnvironmentObjectof ContentView, which then calls MotherViewfor re-rendering.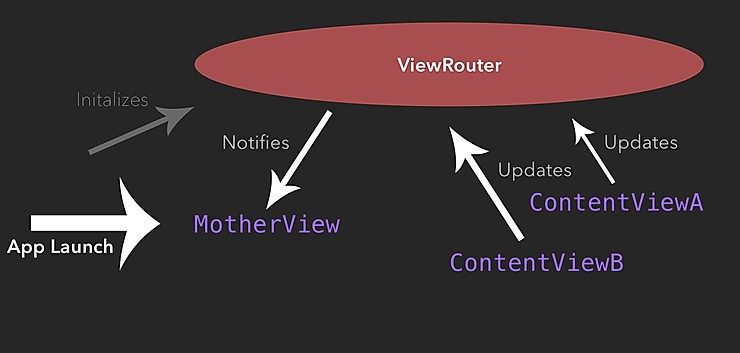
Implementation ViewRouterasEnvironmentObject
So, let's update the code of our application!First, change the wrapper of the property viewRouterinside MotherViewfrom @ObservableObjectto @EnvironmentObject.import SwiftUI
struct MotherView : View {
@EnvironmentObject var viewRouter: ViewRouter
var body: some View {
}
}
The property is viewRouternow looking ViewRouter-EnvironmentObject. Thus, we need to provide our structure MotherView_Previewswith the appropriate instance:#if DEBUG
struct MotherView_Previews : PreviewProvider {
static var previews: some View {
MotherView().environmentObject(ViewRouter())
}
}
#endif
As mentioned above - when starting our application, it should be immediately provided with an instance ViewRouterin quality EnvironmentObject, since it MotherViewnow refers to as the root representation EnvironmentObject. Therefore, update the scene function inside the file SceneDelegage.swiftas follows:func scene(_ scene: UIScene, willConnectTo session: UISceneSession, options connectionOptions: UIScene.ConnectionOptions) {
if let windowScene = scene as? UIWindowScene {
let window = UIWindow(windowScene: windowScene)
window.rootViewController = UIHostingController(rootView: MotherView().environmentObject(ViewRouter()))
self.window = window
window.makeKeyAndVisible()
}
}
Great, now when you start the application, SwiftUI creates an instance ViewRouterin quality EnvironmentObject, to which all views of our application can now be attached.Next, let's update ours ContentViewA. Change its viewRouterproperty to EnvironmentObjectand also update the structure ContentViewA_Previews.import SwiftUI
struct ContentViewA : View {
@EnvironmentObject var viewRouter: ViewRouter
var body: some View {
}
}
#if DEBUG
struct ContentViewA_Previews : PreviewProvider {
static var previews: some View {
ContentViewA().environmentObject(ViewRouter())
}
}
#endif
Hint: Again, the structure ContentViewsA_Previewshas its own instance ViewRouter, but ContentViewAis associated with the instance created when the application was launched!Let's repeat this for ContentViewB:import SwiftUI
struct ContentViewB : View {
@EnvironmentObject var viewRouter: ViewRouter
var body: some View {
}
}
#if DEBUG
struct ContentViewB_Previews : PreviewProvider {
static var previews: some View {
ContentViewB().environmentObject(ViewRouter())
}
}
#endif
Since viewRouterour properties are ContentViewnow directly related to / observe the initial instance ViewRouteras EnvironmentObject, we no longer need to initialize them in ours MotherView. So, let's update our MotherView:struct MotherView : View {
@EnvironmentObject var viewRouter: ViewRouter
var body: some View {
VStack {
if viewRouter.currentPage == "page1" {
ContentViewA()
} else if viewRouter.currentPage == "page2" {
ContentViewB()
}
}
}
}
This is just great: we no longer need to initialize ViewRouterinside ours MotherViewand pass its instance down to the ContentView, which can be very efficient, especially for more complex hierarchies.Great, let's run our application and see how it works.Adding transition animations
As a bonus, let's look at how to add a transition animation when switching from “page1” to “page2”.In SwiftUI, this is quite simple.Look at the willChangemethod that we call the file ViewRouter.swiftwhen CurrentPageupdated. As you already know, this causes a binding MotherViewto re-display your body, ultimately showing another ContentView, which means moving to another ContentView. We can add animation by simply wrapping the method willChangein a function withAnimation:var currentPage: String = "page1" {
didSet {
withAnimation() {
willChange.send(self)
}
}
}
Now we can add a transition animation when displaying another Content View.“WithAnimation (_: _ :) - returns the result of recalculating the view body with the animation provided”
Apple
We want to provide our application with a pop-up transition when navigating from ContentViewAto ContentViewB. To do this, go to the file MotherView.swiftand add the transition modifier when called ContentViewB. You can choose one of several predefined transition types or even create your own (but this is a topic for another article). To add a pop-up transition, we select a type .scale.var body: some View {
VStack {
if viewRouter.currentPage == "page1" {
ContentViewA()
} else if viewRouter.currentPage == "page2" {
ContentViewB()
.transition(.scale)
}
}
}
To see how it works, run your application in a regular simulator:Conclusion
That's all! We learned why it is better to use EnvironmentObjectto navigate between views in SwiftUI, and how to implement it. We also learned how to add transition animations to navigation. If you want to know more, follow us on Instagram and subscribe to our newsletter so as not to miss updates, tutorials and tips on SwiftUI and much more!
Free lesson: “Accelerating iOS apps with instruments”