Hello everyone!In this article, I would like to talk about how to use React and Atlaskit in Atlassian plugins in Server and Data Center environments.Introduction
Currently, if you are developing plugins for Atlassian products for Server and Data Center, then vm , soy , requirejs , jquery , backbone are available for you to develop the user interface from the box . Here here you can read my article on how to use available out of the box libraries.This technology stack is outdated and would like to use something newer. I chose typescript and react as the stack . Also, in order to make it easier to transfer server plug-ins to cloud, I chose the library of user interface elements atlaskit .In this article I will talk about Atlassian Jira, but the same approach can be used for other Atlassian server and data center products.In order to reproduce the examples from this article, you must install git and Atlassian SDK .So, let's begin!Install the Maven archetype and create a new project.
I made the Maven archetype to make it easier to create a new project that will already contain all the necessary settings for creating a plugin with React and Atlaskit.If you do not want to use the archetype, then you can take the already created plug-in from this archetype and go to the part We assemble and launch the project.Clone the archetype from my Bitbucket repository:git clone https://alex1mmm@bitbucket.org/alex1mmm/jira-react-atlaskit-archetype.git --branch v1 --single-branch
Go to the jira-react-atlaskit-archetype folder folder and install this archetype in your local Maven repository:cd jira-react-atlaskit-archetype
atlas-mvn install
After that, go to the folder one level higher and create a new project based on this archetype:cd ..
atlas-mvn archetype:generate -DarchetypeCatalog=local
A question will be asked to select the necessary archetype. Here are my archetypes in the local repository:1: local -> com.cprime.jira.sil.extension:sil-extension-archetype (This is the com.cprime.jira.sil.extension:sil-extension plugin for Atlassian JIRA.)
2: local -> ru.matveev.alexey.sil.extension:sil-extension-archetype (This is the ru.matveev.alexey.sil.extension:sil-extension plugin for Atlassian JIRA.)
3: local -> ru.matveev.alexey.atlas.jira:jira-react-atlaskit-archetype-archetype (jira-react-atlaskit-archetype-archetype)
I need to choose ru.matveev.alexey.atlas.jira: jira-react-atlaskit-archetype-archetype, so I indicated the number 3 as the answer.Then you need to specify groupid and artifactid for the new project:Define value for property 'groupId': react.atlaskit.tutorial
Define value for property 'artifactId': my-tutorial
Define value for property 'version' 1.0-SNAPSHOT: :
Define value for property 'package' react.atlaskit.tutorial: :
Confirm properties configuration:
groupId: react.atlaskit.tutorial
artifactId: my-tutorial
version: 1.0-SNAPSHOT
package: react.atlaskit.tutorial
Y: : Y
We assemble and install the project
In my case, the new project is in the my-tutorial folder. Let's go to this folder and build the project:cd my-tutorial
atlas-mvn package
After the project is assembled, go to the backend folder and run Atlassian Jira:cd backend
atlas-run
Test plugin
After the Atlassian Jira has started, go to the browser at the following address:http://localhost:2990/jira
You need to log in as admin: admin and go gear -> Manage apps. You will see a menu from our plugin. But before starting our Atlaskit elements, go to System -> Logging and Profiling and set the INFO logging level for react.atlaskit.tutorial.servlet package.
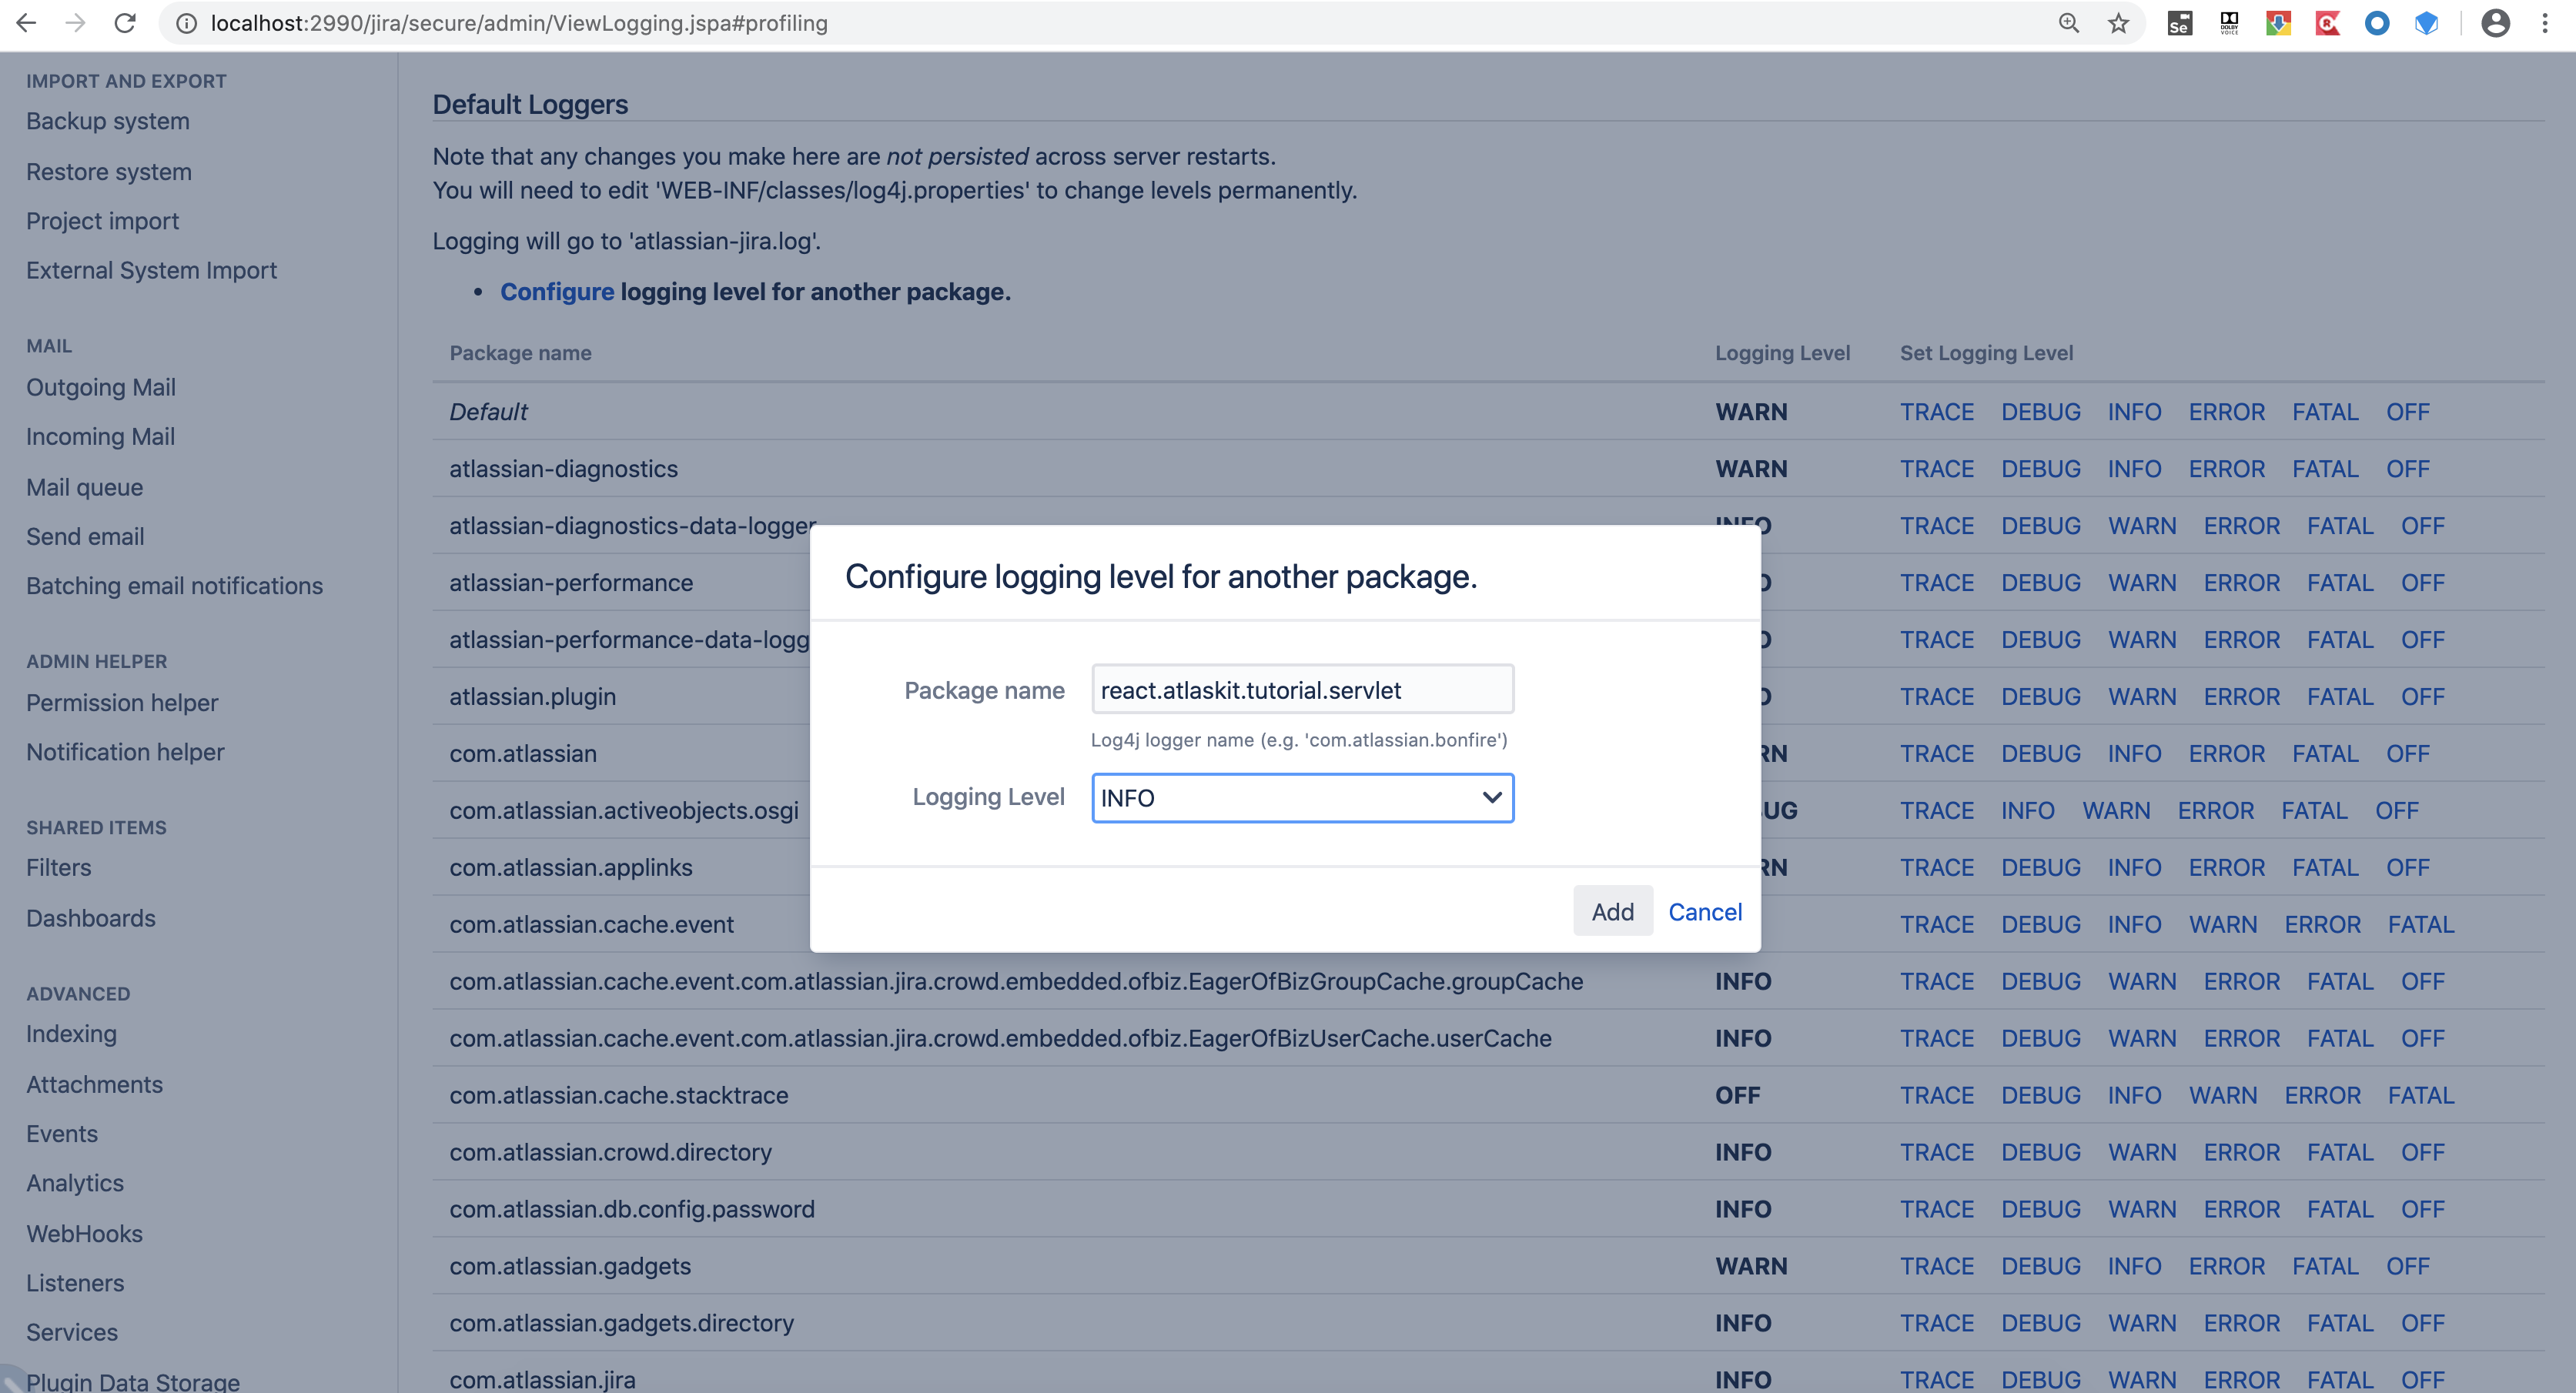 Now go back to Manage apps and click on the Form menu. We will see the data entry form that was displayed using the Atlaskit Form element :
 Fill in all the text fields and click on the Submit button:
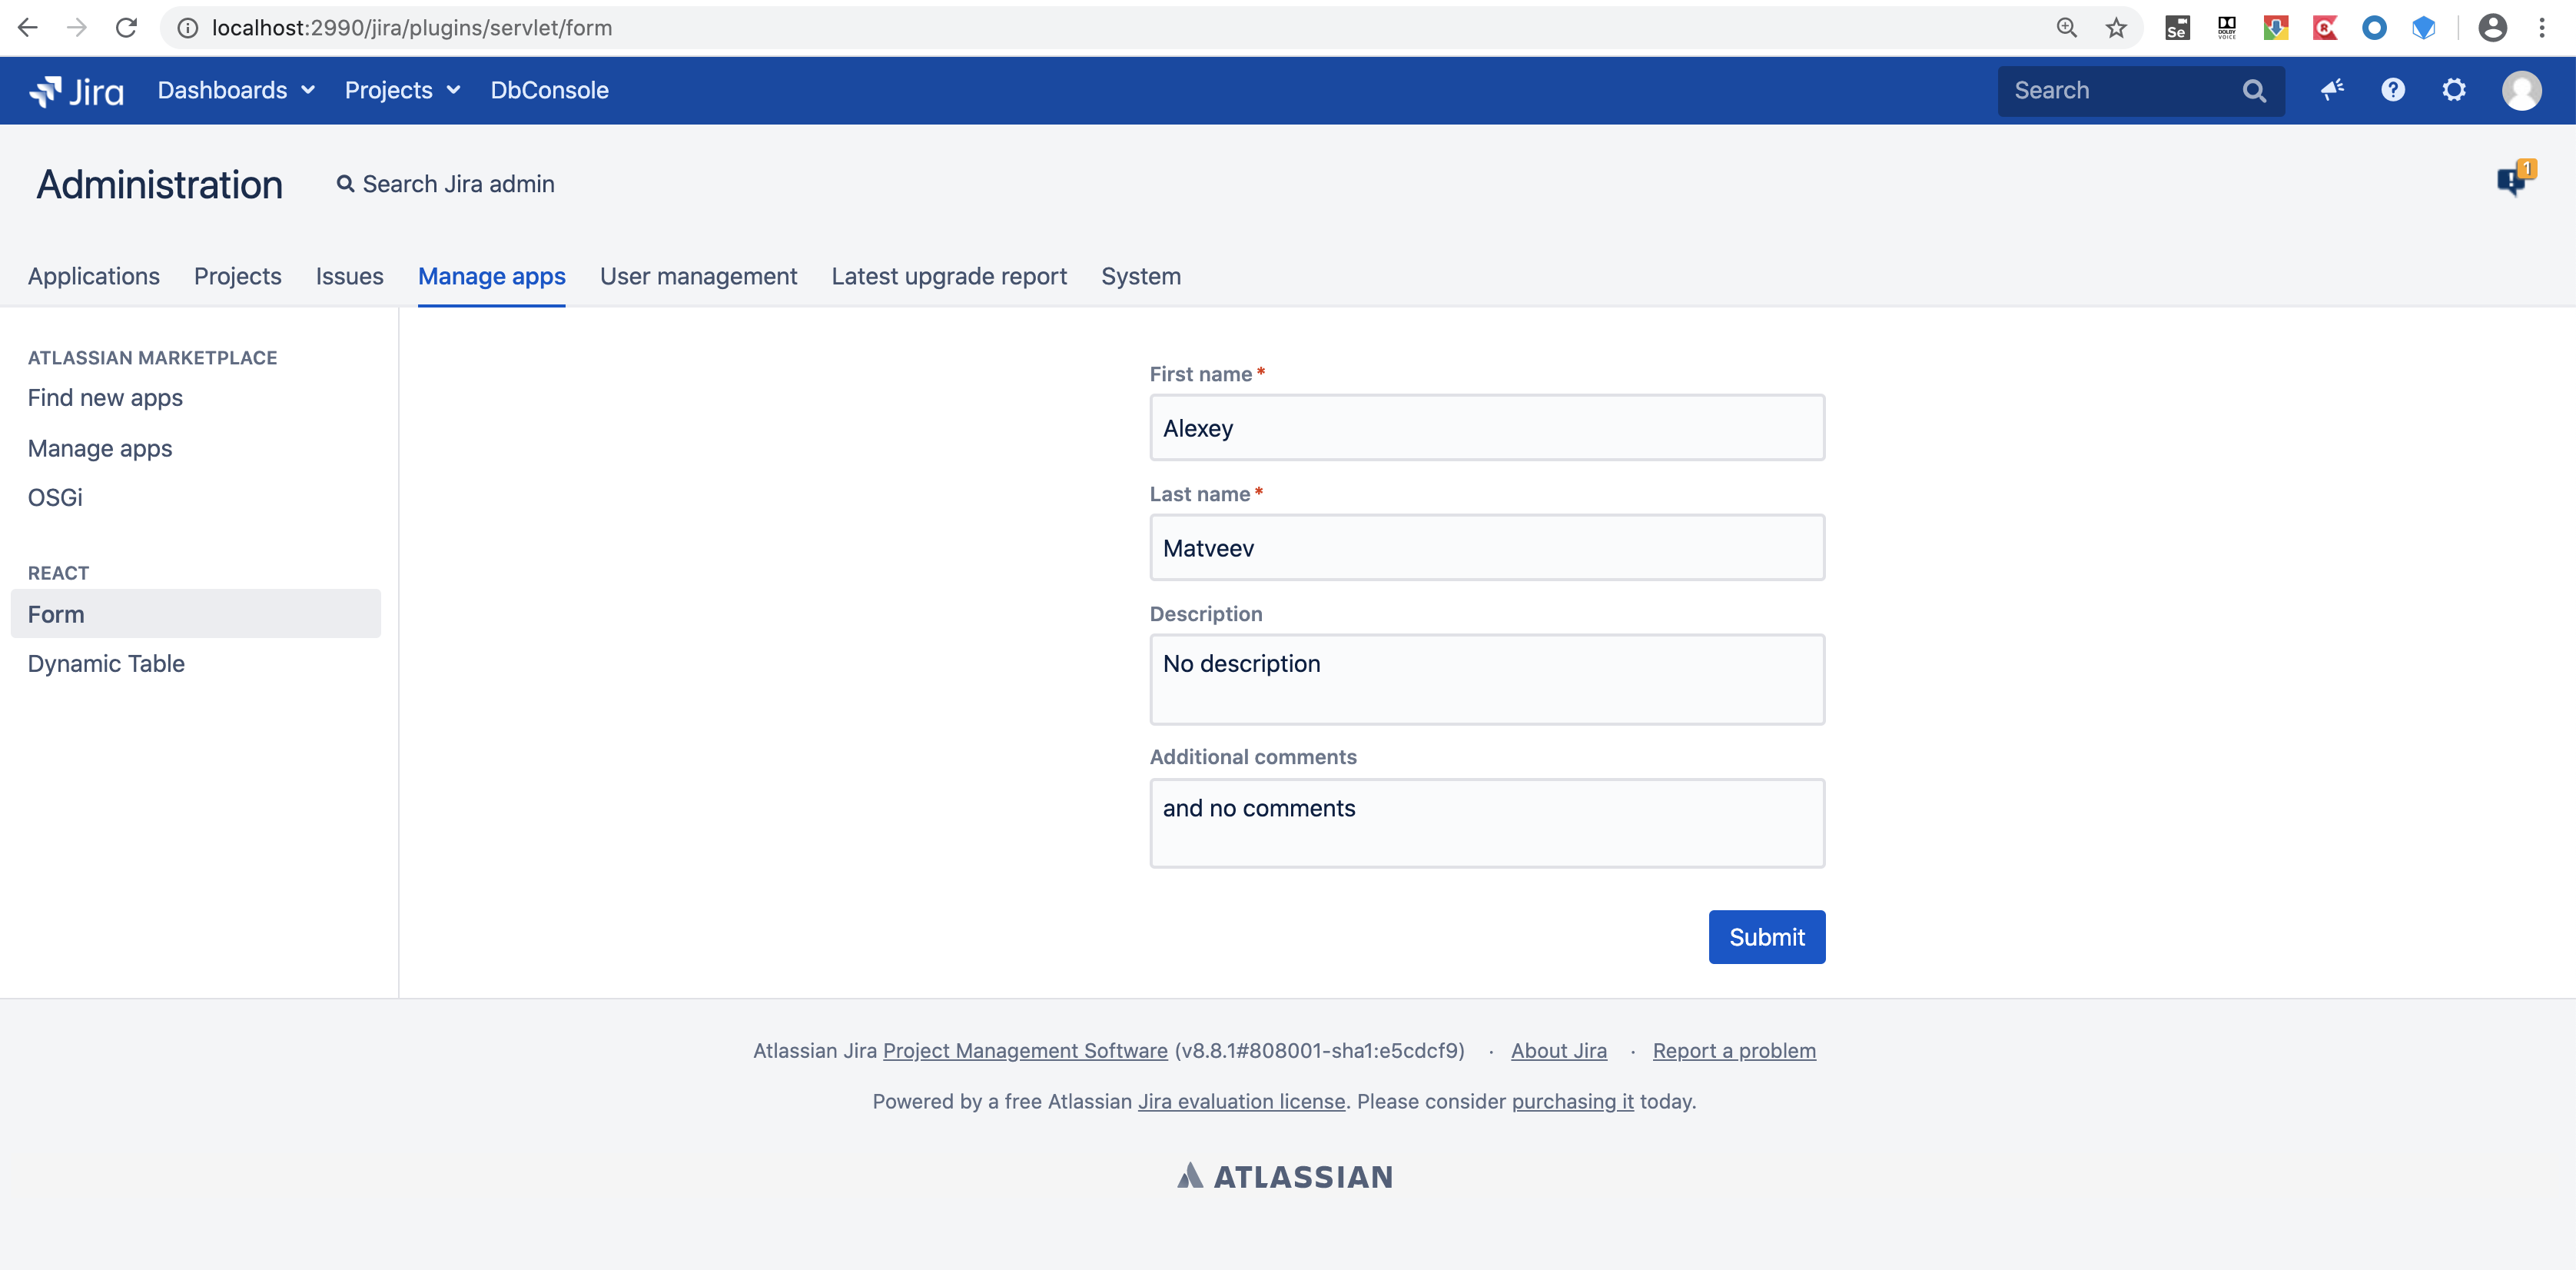 Now, if you open the atlassian-jira.log file, you will see something like this:
2020-05-10 08:44:29,701+0300 http-nio-2990-exec-4 INFO admin 524x12509x1 15awhw2 0:0:0:0:0:0:0:1 /plugins/servlet/form [r.a.tutorial.servlet.FormServlet] Post Data: {"firstname":"Alexey","lastname":"Matveev","description":"No description","comments":"and no comments"}
This means that by clicking on the Submit button, our data was successfully transferred to the servlet that serves this form, and this servlet displayed the entered data in a log file.Now let's select the Dynamic Table menu. You will see the Atlaskit Dynamic Table element : That's all our plugin does. Now let's see how it all works!
Inside plugin
Here is the structure of our plugin: the backend contains the Atlassian Jira plugin that was created using the Atlassian SDK.frontend contains the UI elements that will be used by our plugin.pom.xml pom file in which two modules are defined:
 <modules>
<module>frontend</module>
<module>backend</module>
</modules>
Now let's look at the fronted folder.Frontend
The frontend folder contains the following files: I will describe the main files.package.json is a configuration file for npm that contains the following information:
- list of packages our project depends on.
- versions of the packages we use.
We will use packages such as typescript, atlaskit, babel and others..babel.rc - configuration file for Babel . Babel is used to translate ECMAScript 2015+ code into JavaScript code. We will write our Typescript code, so we need to translate it into JavaScript code so that the Jira plugin can work with it.webpack.config.js - configuration file for webpack . Webpack processes our application, builds a dependency graph and generates a bundle that contains all the necessary JavaScript for our application to work. In order for the Jira plugin to work with our JavaScript, we need one Javascript file for each entry point. In our case, the entry points are the menu items Form and Dynamic Table.Here is the contents of the webpack.config.js file:const WrmPlugin = require('atlassian-webresource-webpack-plugin');
var path = require('path');module.exports = {
module: {
rules: [
{
test: /\.(js|jsx)$/,
exclude: /node_modules/,
use: {
loader: "babel-loader"
}
}
]
},
entry: {
'form': './src/form.js',
'dynamictable': './src/dynamictable.js'
},
plugins: [
        new WrmPlugin({
            pluginKey: 'ru.matveev.alexey.atlas.jira.jira-react-atlaskit',
            locationPrefix: 'frontend/',
            xmlDescriptors: path.resolve('../backend/src/main/resources', 'META-INF', 'plugin-descriptors', 'wr-defs.xml')
        }),
    ],
output: {
filename: 'bundled.[name].js',
path: path.resolve("./dist")
}
};
As you can see, we use atlassian-webresource-webpack-plugin .It is needed so that after webpack has created a JavaScript file, this file would automatically be added as a web resource:plugins: [
new WrmPlugin({
pluginKey: 'ru.matveev.alexey.atlas.jira.jira-react-atlaskit',
locationPrefix: 'frontend/',
xmlDescriptors: path.resolve('../backend/src/main/resources', 'META-INF', 'plugin-descriptors', 'wr-defs.xml')
}),
],
As a result of this configuration, after building the frontend module, the wr-defs.xml file will be created in the backend / src / resources / META-INF / plugin-descriptors folder.The locationPrefix parameter allows us to specify the location of the JavaScript files in the Jira plugin. In our case, we indicate that the files will be located in the backend / src / resources / frontend folder. We will put the JavaScript files in this folder later in the backend module, but now this parameter allows us to get such a line in the file wr-defs.xml <resource type = "download" name = "bundled.dynamictable.js" location = "frontend / bundled.dynamictable.js » />.Here is the contents of the wr-defs.xml file that was created during the build process of the project:<bundles>
<web-resource key="entrypoint-form">
<transformation extension="js">
<transformer key="jsI18n"/>
</transformation>
<context>form</context>
<dependency>com.atlassian.plugins.atlassian-plugins-webresource-plugin:context-path</dependency>
<resource type="download" name="bundled.form.js" location="frontend/bundled.form.js"/>
</web-resource>
<web-resource key="entrypoint-dynamictable">
<transformation extension="js">
<transformer key="jsI18n"/>
</transformation>
<context>dynamictable</context>
<dependency>com.atlassian.plugins.atlassian-plugins-webresource-plugin:context-path</dependency>
<resource type="download" name="bundled.dynamictable.js" location="frontend/bundled.dynamictable.js"/>
</web-resource>
<web-resource key="assets-632cdd38-e80f-4a5a-ba4c-07ba7cb36e60">
<transformation extension="js">
<transformer key="jsI18n"/>
</transformation>
<transformation extension="soy">
<transformer key="soyTransformer"/>
<transformer key="jsI18n"/>
</transformation>
<transformation extension="less">
<transformer key="lessTransformer"/>
</transformation>
</web-resource>
</bundles>
As you can see, we have additional sections of web resources in which JavaScript files created by webpack are defined. All that remains for us is to tell Jira that when installing our plugin, we also use web resources from the backend / src / resources / META-INF / plugin-descriptor folder. To do this, we made the following changes to the backend / pom.xml file:<plugin>
<groupId>com.atlassian.maven.plugins</groupId>
<artifactId>jira-maven-plugin</artifactId>
<version>${amps.version}</version>
<extensions>true</extensions>
<configuration>
<productVersion>${jira.version}</productVersion>
<productDataVersion>${jira.version}</productDataVersion>
<compressResources>false</compressResources>
<enableQuickReload>true</enableQuickReload>
<instructions>
<Atlassian-Plugin-Key>${atlassian.plugin.key}</Atlassian-Plugin-Key>
<Export-Package></Export-Package>
<Import-Package>org.springframework.osgi.*;resolution:="optional", org.eclipse.gemini.blueprint.*;resolution:="optional", *</Import-Package>
<Spring-Context>*</Spring-Context>
<Atlassian-Scan-Folders>META-INF/plugin-descriptors</Atlassian-Scan-Folders>
</instructions>
</configuration>
</plugin>
We have added <Atlassian-Scan-Folders> META-INF / plugin-descriptors </Atlassian-Scan-Folders>. This parameter will tell Jira that it is necessary to search for additional web resources in the META-INF / plugin-descriptors folder.We also added <compressResources> false </compressResources> in order to disable the minification of our JavaScript files. They have already been minified.We also defined two entry points to our application in the webpack.config.js file: entry: {
'form': './src/form.js',
'dynamictable': './src/dynamictable.js'
},
This means that webpack will scan the ./src/form.js and ./src/dynamictable.js files and create two JavaScript files, each of which is a file for one of the entry points. These files will be created in the frontend / dist folder../src/form.js and ./src/dynamictable.js do not contain anything special. I took most of the code from examples in Atlaskit.Here is the contents of form.js file:import Form from "./js/components/Form";
Here is just one line that imports the class from the file ./js/components/Form.js.Here is the contents of the ./js/components/Form.js file:import React, { Component } from 'react';
import ReactDOM from "react-dom";
import Button from '@atlaskit/button';
import TextArea from '@atlaskit/textarea';
import TextField from '@atlaskit/textfield';
import axios from 'axios';
import Form, { Field, FormFooter } from '@atlaskit/form';
export default class MyForm extends Component {
render() {
return (
<div
style={{
display: 'flex',
width: '400px',
margin: '0 auto',
flexDirection: 'column',
}}
>
<Form onSubmit={data => axios.post(document.getElementById("contextPath").value + "/plugins/servlet/form", data)}>
{({ formProps }) => (
<form {...formProps} name="text-fields">
<Field name="firstname" defaultValue="" label="First name" isRequired>
{({ fieldProps }) => <TextField {...fieldProps} />}
</Field>
<Field name="lastname" defaultValue="" label="Last name" isRequired>
{({ fieldProps: { isRequired, isDisabled, ...others } }) => (
<TextField
disabled={isDisabled}
required={isRequired}
{...others}
/>
)}
</Field>
<Field
name="description"
defaultValue=""
label="Description"
>
{({ fieldProps }) => <TextArea {...fieldProps} />}
</Field>
<Field
name="comments"
defaultValue=""
label="Additional comments"
>
{({ fieldProps }) => <TextArea {...fieldProps} />}
</Field>
<FormFooter>
<Button type="submit" appearance="primary">
Submit
</Button>
</FormFooter>
</form>
)}
</Form>
</div>
);
}
}
window.addEventListener('load', function() {
const wrapper = document.getElementById("container");
wrapper ? ReactDOM.render(<MyForm />, wrapper) : false;
});</code></pre>
<!-- /wp:code --> :<!-- wp:code -->
<pre class="wp-block-code"><code>window.addEventListener('load', function() {
const wrapper = document.getElementById("container");
wrapper ? ReactDOM.render(<MyForm />, wrapper) : false;
});
Here I show the MyForm component in a div container. This container will be defined in the soy Jira plugin template.Also pay attention to this line:onSubmit={data => axios.post(document.getElementById("contextPath").value + "/plugins/servlet/form", data)}
document.getElementById ("contextPath"). value gets the value of the field with id contextPath. I define this field in the soy template in the Jira plugin. The value in this field comes from the servlet to which the Form menu item is bound. In my case, contextPath contains the value / jira, since when starting Jira from the Atlassian SDK, this context path is set.And it's all about frontend. As a result of assembling the frontend module, we get two JavaScript files in the frontend / dist and xml folder with additional web resources in the backend / src / resources / META-INF / plugin-descriptors folder.Now let's move on to the backend.Backend
I added these plugins to the backend / pom.xml file:<plugin>
<groupId>org.codehaus.mojo</groupId>
<artifactId>properties-maven-plugin</artifactId>
<version>1.0.0</version>
<executions>
<execution>
<phase>generate-resources</phase>
<goals>
<goal>write-project-properties</goal>
</goals>
<configuration>
<outputFile>${project.build.outputDirectory}/maven.properties</outputFile>
</configuration>
</execution>
</executions>
</plugin>
<plugin>
<artifactId>maven-resources-plugin</artifactId>
<version>3.1.0</version>
<executions>
<execution>
<id>copy frontend files to resources</id>
<phase>generate-resources</phase>
<goals>
<goal>copy-resources</goal>
</goals>
<configuration>
<outputDirectory>src/main/resources/frontend</outputDirectory>
<overwrite>true</overwrite>
<resources>
<resource>
<directory>../frontend/dist</directory>
<includes>
<include>*.*</include>
</includes>
</resource>
</resources>
</configuration>
</execution>
</executions>
</plugin>
properties-maven-plugin creates a maven.properties file that contains all Maven properties. I need the atlassian.plugin.key property in order to call web resources from servlets that are bound to the menu items of our plugin.maven-resources-plugin picks up JavaScript files from the frontend / dist folder and copies them to the backend / resources / frontend folder.Then I created menu items and made a call to servlets from these menu items.Here are the lines from the atlassian-plugin.xml file:<servlet name="Form Servlet" i18n-name-key="form-servlet.name" key="form-servlet" class="react.atlaskit.tutorial.servlet.FormServlet">
<description key="form-servlet.description">The Form Servlet Plugin</description>
<url-pattern>/form</url-pattern>
</servlet>
<servlet name="Dynamic Table Servlet" i18n-name-key="dynamic-table-servlet.name" key="dynamic-table-servlet" class="react.atlaskit.tutorial.servlet.DynamicTableServlet">
<description key="dynamic-table-servlet.description">The Dynamic Table Servlet Plugin</description>
<url-pattern>/dynamictable</url-pattern>
</servlet>
<web-section name="React Plugin" i18n-name-key="react.name" key="react" location="admin_plugins_menu" weight="1000">
<description key="react.description">React Plugin</description>
<label key="react.label"/>
</web-section>
<web-item name="from web item" i18n-name-key="form.name" key="form" section="admin_plugins_menu/react" weight="1000">
<description key="form.description">Form</description>
<label key="form.label"/>
<link linkId="configuration-link">/plugins/servlet/form</link>
</web-item>
<web-item name="dynamic table web item" i18n-name-key="dynamictable.name" key="dynamictable" section="admin_plugins_menu/react" weight="1000">
<description key="dynamictable.description">Dynamic Table</description>
<label key="dynamictable.label"/>
<link linkId="configuration-link">/plugins/servlet/dynamictable</link>
</web-item>
So, we have menus and servlets that are called from these menu items.Now let's look at servlets:FormServlet.java:public class FormServlet extends HttpServlet{
private static final Logger log = LoggerFactory.getLogger(FormServlet.class);
private final ResourceService resourceService;
private final SoyTemplateRenderer soyTemplateRenderer;
public FormServlet(@ComponentImport SoyTemplateRenderer soyTemplateRenderer, ResourceService resourceService) {
this.resourceService = resourceService;
this.soyTemplateRenderer = soyTemplateRenderer;
}
@Override
protected void doGet(HttpServletRequest req, HttpServletResponse resp) throws ServletException, IOException
{
String pluginKey = this.resourceService.getProperty("atlassian.plugin.key");
Map<String, Object> map = new HashMap<>();
map.put("contextPath", req.getContextPath());
String html = soyTemplateRenderer.render(pluginKey + ":jira-react-atlaskit-resources", "servlet.ui.form", map);
resp.setContentType("text/html");
resp.getWriter().write(html);
resp.getWriter().close(); }
@Override
protected void doPost(HttpServletRequest req, HttpServletResponse resp) throws ServletException, IOException {
StringBuffer jb = new StringBuffer();
String line = null;
try {
BufferedReader reader = req.getReader();
while ((line = reader.readLine()) != null)
jb.append(line);
} catch (Exception e) { }
log.info(String.format("Post Data: %s", jb.toString()));
String pluginKey = this.resourceService.getProperty("atlassian.plugin.key");
Map<String, Object> map = new HashMap<>();
map.put("contextPath", req.getContextPath());
String html = soyTemplateRenderer.render(pluginKey + ":jira-react-atlaskit-resources", "servlet.ui.form", map);
resp.setContentType("text/html");
resp.getWriter().write(html);
resp.getWriter().close();
}}
I define two variables resourceService and soyTemplateRenderer and initialize these variables in the class constructor. resourceService - a bean that reads properties from the maven.properties file. soyTemplateRenderer - Jira bean that can call soy templates.In the doGet method, I get the value of the atlassian.plugin.key property and the context path. Then I pass the context path as a parameter to the soy template and call the soy template under the name servlet.ui.form.Here are the contents of the soy file:{namespace servlet.ui}
/**
* This template is needed to draw the form page.
*/
{template .form}
{@param contextPath: string}
{webResourceManager_requireResourcesForContext('form')}
<html>
<head>
<meta charset="utf-8"/>
<meta name="decorator" content="atl.admin">
<meta name="admin.active.section" content="admin_plugins_menu/react">
<title>Form Page</title>
</head>
<body>
<div class="field-group hidden">
<input class="text" type="text" id="contextPath" name="contextPath" value="{$contextPath}">
</div>
<div id="maincontainer">
<div id="container">
</div>
</div>
</body>
</html>
{/template}
/**
* This template is needed to draw the dynamic table page.
*/
{template .dynamictable}
{webResourceManager_requireResourcesForContext('dynamictable')}
<html>
<head>
<meta charset="utf-8"/>
<meta name="decorator" content="atl.admin">
<meta name="admin.active.section" content="admin_plugins_menu/react">
<title>Dynamic Table Page</title>
</head>
<body>
<div id="maincontainer">
<div id="container">
</div>
</div>
</body>
</html>
{/template}
The code for the templates is quite simple. I call the web resource for the menu item and create a container div that will be used by React.I registered the soy file itself in atlassian-plugin.xml:<web-resource key="jira-react-atlaskit-resources" name="jira-react-atlaskit Web Resources">
...
<resource type="soy" name="soyui" location="/templates/servlets.soy"/>
...
<context>jira-react-atlaskit</context>
</web-resource>
That's all you need to do to use React and Atlaskit in Atlassian server and data center plugins.