This article discusses the process of creating a simulation model of the behavior of an ant colony (can be read on Wikipedia ) in the simulation environment "AnyLogic". This article is practical. It will consider the use of the ant algorithm to solve the traveling salesman problem (you can read here ).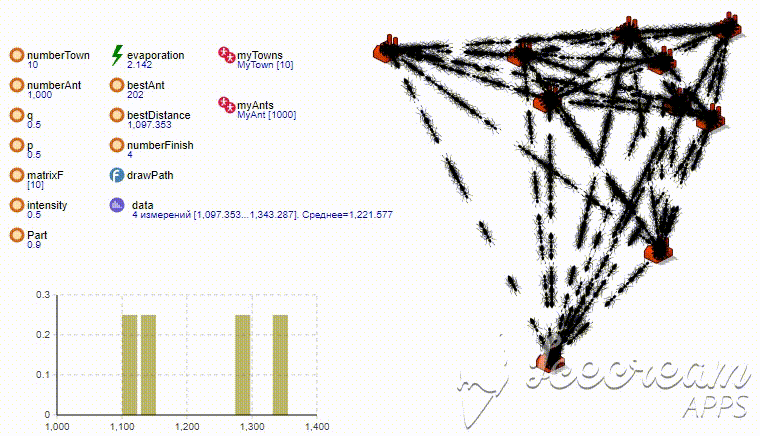
Briefly about the essence
The essence of the traveling salesman problem is that the traveling salesman (seller) must visit N cities after visiting each of them only once along the shortest route. Since this task is NP-complex and the number of options for all possible routes between N cities is calculated as “N!”, The shortest route search time will increase exponentially with an increase in N. Accordingly, the shortest route (solution) search time using the algorithm “Exhaustive search” (which gives an exact solution) with the number of cities N> 16 increases sharply (is exponential). Therefore, we will not search for the shortest route in length, but close (rational) to it in a finite time using the “ant algorithm”.A few words about AnyLogic is a powerful tool that allows you to create simulation models of varying complexity. It implements various approaches of simulation. We will be analyzing only one of the approaches, namely, “Agent” modeling. It is implemented in the Java programming language, which complements the existing tools. The main disadvantage of “AnyLogic” is the limitation of the free version on the number of created agents; their number cannot exceed 50,000. “Agent” is the basic unit of AnyLogic simulation system. More information can be found on the website www.anylogic.ruTools
1. Anylogic - download the free version from here www.anylogic.ru/downloadsAnyLogic initial introduction:AnyLogic interface is shown in Figure 1. It includes:- the green area is the space of the agent in which we will create;
- red area - properties of the object that is in focus;
- palette - tools that you can use when creating a model;
- projects - the structure of the developed model.
 Fig. 1- AnyLogic popup window
Project creation
Everything is simple here. Click on the “File” menu item next to “Create” and then “Model”, enter the model name and click on the “Finish” button (Fig. 2). Fig. 2- Creating a model
Create cities
Well, let's get started. The first thing we will do is create the so-called cities (tops of the graph) that the ant will visit. Why do we open the “Agent” tab in the palette and drag the red circle with the little man into the “Main” agent from there, as shown in Figure 3. Fig. 3- Creating citiesAfter you release the mouse button, a dialog box appears ("Step 1"), prompting you to create an agent. Where it will be necessary to select the "Agent Population" item and click on the "Next" button.
 Fig. 4- Creating citiesThe following dialog box appears (Step 2) where you will need to enter the name of the new agent type and the name of the agent population. Enter the type “MyTown” and the name of the population “myTowns” and click on the “Next” button.
 Fig. 4a - Enter the name of the new agentThen the following window will appear (Step 4.). Here we select “2D Agent Animation” and the icon with the inscription “Plant” and click on the “Finish” button (Fig. 5).
 Fig. 5- Add animation for the agentNow create a variable that will determine the initial number of cities in our model. Why, from the "Palette", drag the icon with the inscription "Variable" into the agent "Main" and enter its name "numberTown". Next, click on the icon of our variable and in the Properties tab, enter its initial value equal to, for example, 10 and select its type “int” (Fig. 6).
 Fig. 6- Creating a variableNow we set the initial value of our city population “myTowns”, for which we click on its icon and in the “Properties” tab in the field “Initial number of agents” write the name of the variable we created earlier (Fig. 7).
 Fig. 7 - Changing the properties of the “myTowns” population Next,we will draw the conclusion of our cities in the “Main” agent in a random place. The space is limited to a square of 400x400 pixels. Why, in the "Projects" tab, select the "Main" agent with the mouse and in the "Properties" tab, in the "At Startup" field, add the following Java code (Fig. 7a):
for (int i=0; i<myTowns.size(); i++) {
	myTowns.get(i).setXY(uniform(0,400), uniform(0,400));
}
Where:- myTowns.size () - the number of cities created;
- myTowns.get (i) .setXY (uniform (0.400), uniform (0.400)) - set the X and Y coordinates for the i-th city;
- uniform (0,400) - a function that returns a random number in the range from 0 to 400 according to the equally probable distribution law of a random variable. The AnyLogic environment has an extensive toolkit for working with various distributions of random variables. There is a built-in constructor of probability distributions, it is available in the toolbar.
Where:- myTowns.size () - the number of cities created;
- myTowns.get (i) .setXY (uniform (0.400), uniform (0.400)) - set the X and Y coordinates for the i-th city;
- uniform(0,400) – , 0 400 . AnyLogic . .
 Fig. 7a - We arrange the cities.Then we can already see what we did and start our model. To do this, use the "F5" key, click it and the window for launching the experiment is launched as shown in Figure 8.
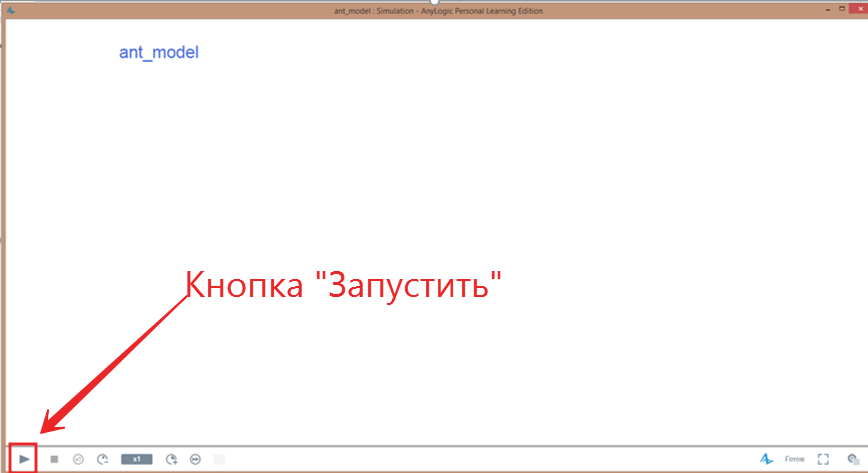 Fig. 8 - Start the experimentNext, click on the "Run" button in the lower left corner of the window and the experiment starts. You should get a window with the contents on the screen as shown in Figure 9.
 Fig. 9 - The result of the experimentSo, at this step we created 10 cities and placed them in a random (stochastic) place on our screen. Now let's move on to the creation of our "ants"
Create an ant
So, the main combat unit of our model will be an ant. We must, firstly, create it, and then model its behavior.Creating an ant is similar to creating a city. In the "Palette" select "Agent" and drag it to "Main". Select “Population of agents”, then “I want to create a new type of agent”, then enter “Name of the new type” and “Population name” “MyAnt” “myAnts” and click “Next”. After that we select “2D” animation and, for example, the icon with the inscription “Fighter” press “Finish” and it should turn out as shown in Figure 10. Fig. 10 - Create antsAgree, the airplane does not look like an ant, so we will fix it. We go into the search engine looking for a picture that depicts an ant and change the plane to an ant. Why do we double-click on the red circle near "myAnts". After that the “myAnt” tab will open where you need to remove the plane and place the ant in its place (Fig. 11).
 Fig. 11 - MyAnt tabSelect the plane with the mouse and press "Del". Next, go to the “Presentation” tab and drag the “Image” element from there. After that, a dialog will automatically open to select a file. Select the file with our ant (Fig. 12) and click OK.
 Fig. 12 - MyAnt tab with ant and already without an airplaneMove on. Scale the ant and move it to the place where the plane used to be. It should turn out as shown in Figure 12a. All these operations are performed using the mouse.
 Fig. 12a - MyAnt tab with ant
We revive the ant
Now we need to teach our freshly baked ant to crawl between cities. True, so far without taking into account the mathematical model, but still let it run. And so, open the “State diagram” diagram in the “Palette” and proceed. We transfer the following blocks and connect them together:- The beginning of the state diagram is the starting point of our ant's life cycle;
- State - this block will characterize the state of the life cycle of our ant. Such blocks are required in pieces.
- Transition - an arrow that will connect our “States” to each other and perform the transition from one “State” to another “State” under certain conditions.
As a result, it should turn out something like as shown in Figure 13. Fig. 13 - The logic of the ant's behavior Now let's write the initial logic of the ant diagram. We select with the mouse the arrow that exits the block under the name “Select City” and add the following code in the “Action” field in the “Properties” tab (Fig. 14):
for (int i=0; i<main.myTowns.size(); i++) {
	if (randomTrue(0.5)) {
		this.moveTo(main.myTowns.get(i));
		break;
	}
}
Here everything is very simple, we go through the cycle in all cities and toss a coin (we generate a random variable with probability. 0.5) if its value is true (eagle), then we send the ant to this city leaving the cycle. The expression "this.moveTo (main.myTowns.get (i))" is a function that sends one agent to another. Fig. 14 - Set the initial logic of the ant’s movement.Next, click on the arrow that leaves the “Motion” block and in the “Properties” tab, in the “Occurs” field, set the value “Upon receipt of a message” and select “Upon receipt of the specified message” in the “Occurs” field. »As shown in Figure 15.
 Fig. 15 - Set the logic for the transition between “Movement” and “Bypassed everything”Now configure the last arrow that comes out of the "Motion" block. We select it with the mouse and in the "Properties" tab, in the transition field, set "Upon arrival of the agent." The final view of the “State diagram” should be as shown in Figure 16.
 Fig. 16 - State diagram with configured transitions between blocksSo, let's look at how the "State diagram" of ant behavior works:
- The first state that the ant falls into is “Vybor_city”, so far no action has been spelled out.
- Then he goes to the next state upon transition. In this transition, we added a code that starts a cycle through all the mountains and makes ants run around the cities.
- The "Movement" block is where the ant is located until it arrives in the previously selected city.
- Further, he has two ways. First, he returns back to the block "City_Choice" and everything is repeated again. On the second path he will have to go when he has already visited all cities. So far, the second way is not set up with us. We will deal with them a little later.
 Fig. 17 - Operation of the state diagramNow we can press "F5" to see what happened (Fig. 18).
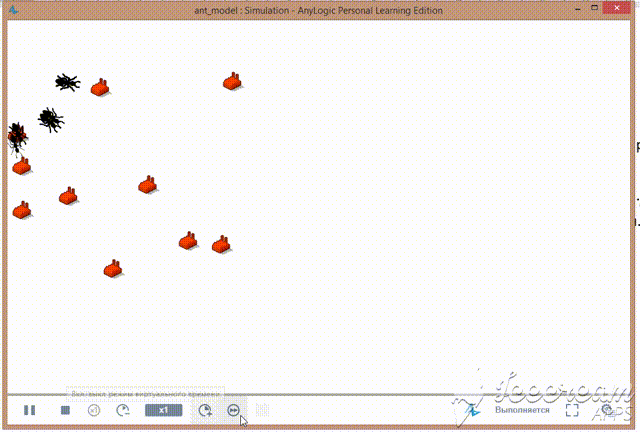 Fig. 18 - The revival of ants
Define the criteria
So, what are these criteria (rules):- An ant should visit each city only once.
- Ant, when he visited all the cities ends his movement in the last city.
These criteria are dictated to us by the condition of the traveling salesman problem. Each ant will be with us a kind of traveling salesman who travels through cities.Let's teach the ant to abide by these rules. Why, from the "Palette", the "Agent" tab, transfer the "Collection" and "Variable" to the "MyAnt" tab and name them first as "isVisited" and the second as "distance". The first will take into account the cities that we have already visited, and the second the distance traveled by the ant. Fig. 19 - Add VariablesSet up the isVisited collection. Why do we select it with the mouse and set the “Type” of the “int” elements in the “Properties” tab as shown in Figure 20.For the “distance” variable in its properties, in the “Initial value” field, set “0” and the variable type “double” ".
 Fig. 20 - Collection of type "int"Now select the arrow leaving the "City_block" block and change the code in the "Action" field to the one below:
for (int i=0; i<main.myTowns.size(); i++) {
	if (randomTrue(0.9) && isVisited.indexOf(i)==-1) {
		this.moveTo(main.myTowns.get(i));
		distance=distance+this.distanceTo(main.myTowns.get(i));
		isVisited.add(i);
		break;
	}
}
In the code above, we added a check for the cities in which we have already managed to visit, and taking into account the cities that we visited, and also consider the distance traveled. The code is quite simple, I think it will not be difficult for you to understand.You can try to launch “F5” our model and see what happened. Now the ants will pass through all the cities only once and complete their movement in the block.Change the initial placement of ants
At this step, we will determine for each ant we will randomly choose a city from which he will begin his journey. Why, on the “Projects” tab, select the “Main” agent with the mouse and then in the “Properties” tab add the following code to the “At Startup” field (Fig. 20a):for (int i=0; i<myAnts.size(); i++) {
int startTown = uniform_discr(0,myTowns-1);
myAnts.get(i).setPosition(myTowns.get(startTown));
myAnts.get(i).isVisited.add(startTown);
}
 Fig. 20a - Arranging ants by cityI applied a random selection of the initial city. You can initially identify all ants in only one city.
Making ants unpredictable
Let us introduce the following formula into our model: where Pi is the probability of transition along the path of the i-th path, li is the length of the i-th transition, fi is the amount of pheromone at the i-th transition, q is the value that determines the “greed” of the algorithm, p - the value that determines the "herd" of the algorithm, with q + p = 1.I borrowed this formula from the site .In simple terms, this formula allows you to calculate the probability with which the ant will have to make the transition to a particular city.Now we need to add several variables without which we can not do. Why go back to the “Main” tab, figure 21.
 Fig. 21 - Tab “Main”So, we add the variable “numberAnt”, in which we will store the size of the ant colony. We set its type to "int" and the initial value is 100.
 Fig. 21 - Variable “numberAnt”Next, select the population “myAnts” and set the field “Initial number of agents” to “numberAnt”.The variable "p", which will determine the herdness of the algorithm. Its type is double and the initial value is 0.5.The variable "q", which will determine the greed of the algorithm. Its type is double and the initial value is 0.5.
 Fig. 22 - Variables "q and p"So, now we will set a random pheromone value for each edge (road) between the cities. Why create a variable (two-dimensional array) "matrixF". Set it in the “Properties” tab in the “Type” field, select the value “Other” and write “double [] []” in the field the initial value “new double [numberTown] [numberTown]” (Fig. 23).
 Fig. 23 - Creating a two-dimensional array "matrixF". Pheromone MatrixNext, we need to initialize this matrix. In other words, fill it with random values. We take the pheromone value randomly in the range from 0.1 to1. For this, on the “Projects” tab, select the “Main” agent with the mouse and then in the “Properties” tab add the following code to the “At Startup” field (Fig. 23a):
for (int i=0; i<myTowns.size(); i++) {
	for (int j=0; j<myTowns.size(); j++) {
		matrixF[i][j]=uniform(0.1,1);
	}
}
 Fig. 23a - Initialization code of the pheromone matrixNow we return to the “MyAnt” tab and proceed to calculate the transition probability in accordance with the above formula. Select the transition between "City_Choice" and "Motion" and change the code in the Action field to the following (Fig. 24):
double denominator=0;
for (int i=0; i<main.myTowns.size(); i++) {
if (isVisited.indexOf(i)==-1) {
denominator=denominator+(Math.pow(this.distanceTo(main.myTowns.get(i)), main.q)*Math.pow(main.myTowns.get(i).f, main.p));
}
}
double Pi=0;
double probility=uniform(0,1);
for (int i=0; i<main.myTowns.size(); i++) {
if (isVisited.indexOf(i)==-1) {
Pi=Pi+(Math.pow(this.distanceTo(main.myTowns.get(i)), main.q)*Math.pow(main.myTowns.get(i).f, main.p))/denominator;
}
if (probility<Pi && isVisited.indexOf(i)==-1) {
this.moveTo(main.myTowns.get(i));
distance=distance+this.distanceTo(main.myTowns.get(i));
isVisited.add(i);
break;
}
}
 Fig. 24 - We set the behavior of the ant based on the analytical expression of the above.So now I will explain a little what’s what:
- li - this.distanceTo (main.myTowns.get (i)), the length value between the current position of the ant and the “i” city;
- fi - main.matrixF [currentPos] [i], the value of the pheromone level between the current city and the city “i”;
- denominator - denominator + (Math.pow (this.distanceTo (main.myTowns.get (i)), main.q) * Math.pow (main.matrixF [currentPos] [i], main.p)) ;, denominator Pi
- Pi - Pi + (Math.pow (this.distanceTo (main.myTowns.get (i)), main.q) * Math.pow (main.myTowns.get (i) .f, main.p)) / denominator, the probability of the ant moving from the current city to the city “i”.
Next, we select the transition between the “Motion” and “All-bypassed” blocks with the mouse and select “When the condition is met” in the “Occurs” field, and in the condition field we write the condition for the ant to stop “isVisited.size () == main.myTowns.size ()” (fig. 25).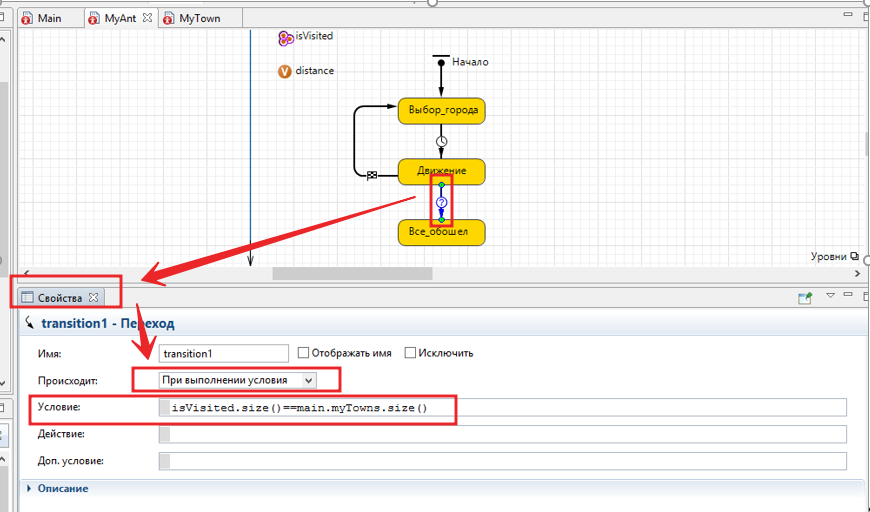 Fig. 25 - Determine the conditions for stopping the ant.Then you can run the “F5” model and see what happened. Ants will travel between cities with a probability calculated according to the above analytical expression.
Updating the value of pheromone
Now let's do two things. The first action is to increase the pheromone value on the edge between the cities along which the ant passed. The second is the evaporation of pheromone on the edges between cities, which consists in reducing the value of pheromones relative to the simulation time.So, to begin with the first action, we will update the value of the pheromone of the rib between the city in which the ant is located and in which he will go. The value by which we will increase the current value of the pheromone edges between cities will be calculated very, very simple. We take our maximum initial value of the pheromone value = 1 cu and divide it by the distance between the city in which the ant is located and the city where he is going to go. Accordingly, the smaller the distance, between the cities the greater will be the value by which the level of the pheromone of the rib will be increased. Why do we select the MyAnt agent in the Projects tab, use the mouse to select the transition between the "City_title" and "Movement" blocks and add the following code to the action field: "main.matrixF [currentPos] [i] = main.matrixF [currentPos] [i ] + 1 / this.distanceTo (main.myTowns.get (i); ”.The result should be as shown in Figure 26 Fig. 26 - Update the value of the level of pheromones of the ribs that the ant passed along.Now we proceed to step 2 and create an event that will simulate the evaporation of the pheromone on the ribs between cities. Why, in the projects tab, select the “Main” agent and create a couple more variables there. The first is “intensity” - it will determine the rate (intensity) of pheromone evaporation (Initial value “0.5”, type “double”). The second “Part” - will characterize the fraction by which the value of the pheromone on the edge will decrease (Initial value “0.9”, type “double”).
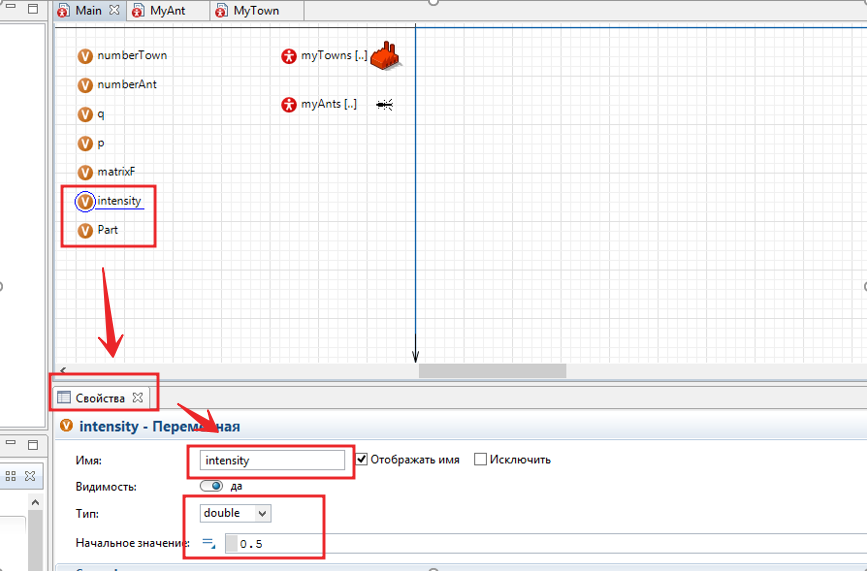 Fig. 27 - Create the variables "intensity" and "Part"Next, we take the "Event" element from the "Palette" of the "Agent" tab and transfer it to the "Main" agent and call it "evaporation" - this element will simulate the evaporation of pheromone on the edges. Click on it with the mouse and in the "Properties" in the "Event Type" field, select the value "With a given intensity" in the "Intensity" field, write the name of the variable that stores the "intensity" intensity value. The response time is seconds. Next, add the code below to the action:
for (int i=0; i<myTowns.size(); i++) {
	for (int j=0; j<myTowns.size(); j++) {
		matrixF[i][j]=matrixF[i][j]*Part;
		if (matrixF[i][j]<0.1) matrixF[i][j]=0.1;
	}
}
When the “evaporation” event is triggered, pheromone levels in the matrixF matrix will be updated. As a result, you should be able to do as shown in Figure 28. Fig. 28 - Create the “evaporation” event
Determine the winner
At this step, we will add a code that will determine the winner of our ant marathon. The winner will be the one of the ants who ran the shortest route. In addition to everything, after the end of the marathon, we draw this route on the screen. To achieve this, we will create three variables “bestAnt”, “bestDistance” and “numberFinish” in the “Main” agent. In the variable "bestAnt" we will store the index of the "fastest" ant, the type of the variable will be "int" and the initial value will be set to "-1". In the variable “bestDistance” we will store the current value of the best route length between cities, the type of the variable will be “double” and the initial value will be set to infinity “infinity”. In the variable "numberFinish" we will store the number of ants that have finished in our marathon,the type of the variable will be "int" and the initial value is "0" (Fig. 29). Fig. 29 - Create an event of variablesNext, we create a function that, after finishing all the ants, will draw the lines of the best route between the cities. Why from the "Palette" we drag into the agent "Main" an element with the name function. Set the function name to drawPath, and in the Properties tab, in the function body field, add the following code:
for (int i=0; i<myAnts.get(bestAnt).isVisited.size()-1; i++) {
ShapeLine myLine = new ShapeLine();
myLine.setX(myTowns.get(myAnts.get(bestAnt).isVisited.get(i)).getX());
myLine.setY(myTowns.get(myAnts.get(bestAnt).isVisited.get(i)).getY());
myLine.setEndX(myTowns.get(myAnts.get(bestAnt).isVisited.get(i+1)).getX());
myLine.setEndY(myTowns.get(myAnts.get(bestAnt).isVisited.get(i+1)).getY());
myLine.setColor(blue);
myLine.setLineStyle(LINE_STYLE_SOLID );
myLine.setLineWidth(1);
presentation.add(myLine);
}
ShapeLine myLine = new ShapeLine();
myLine.setX(myTowns.get(myAnts.get(bestAnt).isVisited.get(myAnts.get(bestAnt).isVisited.size()-1)).getX());
myLine.setY(myTowns.get(myAnts.get(bestAnt).isVisited.get(myAnts.get(bestAnt).isVisited.size()-1)).getY());
myLine.setEndX(myTowns.get(myAnts.get(bestAnt).isVisited.get(0)).getX());
myLine.setEndY(myTowns.get(myAnts.get(bestAnt).isVisited.get(0)).getY());
myLine.setColor(blue);
myLine.setLineStyle(LINE_STYLE_SOLID );
myLine.setLineWidth(1);
presentation.add(myLine);
As a result, you should be able to do as shown in Figure 29a. Fig. 29a - Create the “drawPath” functionNow we go back to our ants and add a code that will determine the winner's ant, the length of the best route and draw this route between cities. Why, in the “Projects” tab, select the “MyAnt” agent, then select the “All Bypassed” block and add the following code to the “Logon Action” field:
main.numberFinish++;
if (main.bestDistance>distance) {
main.bestDistance=distance;
main.bestAnt = this.getIndex();
}
if (main.numberFinish==main.myAnts.size()) main.drawPath();
It should turn out as shown in Figure 30. Fig. 30 - Adding logic to the “All Bypassed” block.Then you can press “F5” and run the model. Ants will run around looking for routes, and when the cities finish, the blue line will connect, which is the best route.
Add a histogram to the model
In order for the model to become more scientific, you must add a graph. Therefore, we will add not just a graph and a histogram that will show us the distribution of the length of the routes that the ants have overcome. Why in the tab "Projects" select the agent "Main" and go to its space. Further, in the "Palette" we go to the "Statistics" tab and from there to the "Main" agent we transfer the "Histogram data" element and directly the "Histogram" itself. Then we select the histograms with the mouse and in the “Properties” tab, in the “Data” field, specify the name of our “Histogram Data” i.e. "Data".It should turn out as shown in Figure 31 . 31 - Building a scheduleAfter which we will again have to return to our ant and make it fill the "Histogram" with the values of the length of the route. Why, in the projects tab, select the agent "MyAnt" and go to its space. Next, select the "All Bypass" block and add one line to it "main.data.add (distance);". It should turn out as shown in Figure 32.
 Fig. 32 - Building a graphNext, press "F5" and proceed to study the behavior of the ant algorithm. It should turn out something, something like shown in Figure 33.
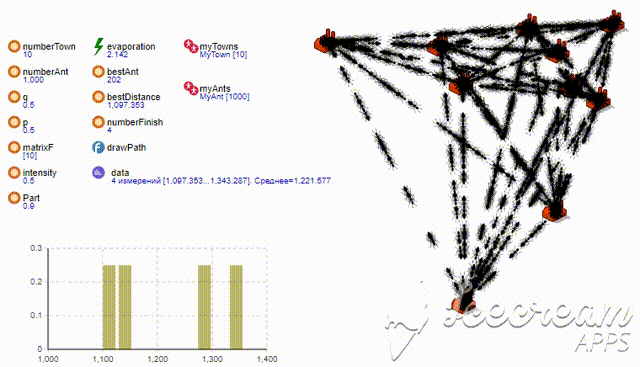 Fig. 33 - Modeling
Conclusion
And in the end, I recommend adding more unpredictability to the model. For this, in the “Projects” tab, select the “Simulation: Main” element with the mouse and set the “Randomness” parameter to “Random initial number (unique runs)” in the properties tab - this will make each model launch unique (Fig. 34). Fig. 34 - Making random runsThank you for your attention! Source code can be downloaded from GitHub