TL; DR In this article we will install single sign-on for SSH from Google. Behind the scenes, we use OpenID Connect (OICD), short-term certificates of SSH, several SSH configuration tricks and opensorsnymi packages step-caand stepby Smallstep. We will configure SSH Certificate Authority and use it to load a new user and a new host in our system. This method brings many advantages besides single sign-on, since there is no need to collect, transfer and control files authorized_keys, although it requires more preparatory work compared to setting up a typical public / private SSH key pair.How to not use SSH
Back in 2004, someone taught me how to copy the public key to a file authorized_keys. Since then, I continued innocently copying the same old public key to each server that I had to work with, and I constantly could not do it the first time, because I forgot to configure correctly chmod.Only once, when in 2015 OpenSSH declared my key type deprecated, I was reluctant to replace my key. Now, years ago, one can only guess at which servers my public key still lies. Maybe the old startups I used to work with? Do freelance customers have? At my niece's crypto farm?From an organizational point of view, files authorized_keyssuck. Perhaps at first someone wrote them manually, as I did, but with an increase in the number of hosts and users, such a task turns into a nightmare. And one morning you wake up in the middle of a swamp of public keys that has dragged on the infrastructure.Most organizations typically create a playbook to automate file management.authorized_keysHowever, their collection, unloading and maintenance remain a mess, regardless of the reasonableness of execution.Single Sign-On OpenID Connect SSH
Instead of using files, authorized_keyswe configure SSH Certificate Authority and access via SSH through short-term certificates, and to support single sign-on we add OpenID Connect (OICD) . As soon as we succeed, the result will be excellent, so I ask your patience, since we will need a little more preparatory settings than with a typical SSH configuration out of the box.What is an SSH certificate? SSH certificate is an alternative that surpasses a pair of public / secret SSH keys. The user and the host exchange certificates during an SSH connection (handshake), a kind of truncated version of the TLX X.509 certificate, in the same manner as a pair of SSH keys. For a deeper analysis, we recommend that you read the next article.Below you can see the decrypted SSH certificate:-:
Type: ecdsa-sha2-nistp256-cert-v01@openssh.com user certificate
Public key: ECDSA-CERT SHA256:N7ErGTPjhmruRS/4OiwyRi6Iyr59z0Ur1ifkHIHu4V8
Signing CA: ECDSA SHA256:E0GH/kZ/CGUIe8mMzzpujIiEYGC2IHDHafYBnye1WSU
Key ID: "carl@smallstep.com"
Serial: 16253962425132258867
Valid: from 2020-03-23T16:01:39 to 2020-03-24T08:01:39
Principals:
carl
carl@smallstep.com
Critical Options: (none)
Extensions:
permit-X11-forwarding
permit-agent-forwarding
permit-port-forwarding
permit-pty
permit-user-rc
User certificates , as in the example above, allow hosts to authenticate users, and host certificates help users identify hosts. The key difference is the field Principals.
By default, during an SSH connection, SSHD will allow you to enter the host under the username from the Principalsuser certificate field . Similarly, SSH expects to see the hostname in the Principalshost certificate
field . In addition, certificates can have extensions that allow privileged SSH functions (for example, agent forwarding and port forwarding) or force configuration directives.To make everything work for us, we will configure the SSH Certificate Authority (CA), namely -step-caserver from Smallstep. If they have the appropriate authority, users and hosts will receive SSH certificates from our CA.Below is a diagram of how Alice receives her user certificate and enters the host: We will configure CA through the OpenSSH configuration unit that works with our command line tool
 step .Benefits
- (, SCIM LDAP).
sudo.- (access control lists, ACLs) .
- CA.
- , .
- EC2.
- GSuite.
step
- macOS
brew install step. - Linux Debian.
Certificate Authority!
Perhaps you think it is difficult and scary. This reputation earned Certificate Authorities for the mysterious details TLS X.509 certificates, only one number of acronyms in the world of PKI (Public Key Infrastructure, PKI), and the complexity of instruments such as openssl.addition, large CA, for example for Let's Encrypt , there is a huge number of responsibilities for ensuring Internet security.We will not use Let's Encrypt.SSH certificates are simpler than TLS certificates. SSH CA simply allows us to delegate part of the responsibility for authenticating and authorizing multiple hosts to one centralized service.In this project, we will set up a CA with three providers — three methods for issuing certificates:- For user certificates, we will use the OAuth OIDC provider corresponding to our Google OAuth application. We trust Google to securely access people and to issue only valid, Google-signed OAuth authentication tokens to authenticated users. CA will verify the token with Google’s public key.
- For new EC2 hosts, we need an AWS provider that matches our AWS account. New hosts will request SSH host certificates through this provider. We trust AWS to provide signed Amazon IIDs, and CA will verify them with Amazon's public key.
- Finally, we use the SSHPOP provider for weekly host certificate updates .
Let's get started?1. Create a Google OAuth Credential
In this project, you’ll need the Google 2.0 OAuth credentials , it takes a couple of minutes to create themWrite down the Client ID and Client Secret , you will need them in the next step!Note: Your CA will only issue user certificates to users who are authorized in the GSuite Organization corresponding to your Google Cloud project account.2. Launch your Certificate Authority
We will install LTSstep-ca on Ubuntu 18.04 in an AWS instance. We should have enough of the free AWS instance level (t2.micro / t3.micro).Take this CA startup script and paste the required values on top:- Client OICD ID
- OICD client secret
- The domain name of your GSuite
- Your CA Name
- Root key password
- Your mail
Download it as an EC2 User Data script , and then use it in step 3 (setting up the instances) when you start your EC2 instance.For interconnectivity, your VPC will need an attached Internet gateway, and your instance should be in a security group that is accessible to all your hosts and users on ports 22 (SSH) and 443 (HTTPS).
It is useful to note that it step-caaccepts HTTPS connections only through mTLS - this way it is better protected from attacks compared to a typical web server.Use your PEM key to connect to your CA instance.The result of the User Data script is in /var/log/cloud-init-output.log. Check it and make sure everything is initialized correctly and step-caworks.CA must create the following keys and certificates:/etc/step-ca/certs/root_ca.crt - The root TLS certificate of your CA (self-signed)./etc/step-ca/certs/ssh_host_ca_key.pub - CA SSH host key allows users to verify host certificates./etc/step-ca/certs/ssh_user_ca_key.pub - CA SSH user key allows hosts to verify user certificates.- You will also have CA (s
/etc/step-ca/secrets) private key signing keys for the above certificates and keys. To decrypt these keys, CA reads their passwords from the file at boot /etc/step-ca/password.txt.
Under root, remove the User Data script with your root CA password:
You will need some information from your CA:- The public host name so that we can find it again.
- Fingerprint of the root certificate - to establish a common TLS connection with this host.
Run the following under root:
5bc2b4779ad1562f6ed0809857fbed7925d2432eb25083f41a468532495ca658
Remember to write it down. Your CA has earned!Download new host
Let's load the Ubuntu instance, which will be our first sshtarget host.Note: Your CA will only issue host certificates to instances on its AWS account.This time, to start a new instance, use the User Data host script and fill in the following values:- Your CA Address (
https://[CA hostname]). - The fingerprint of the root certificate of your CA.
Below you can see what the User Data script should do: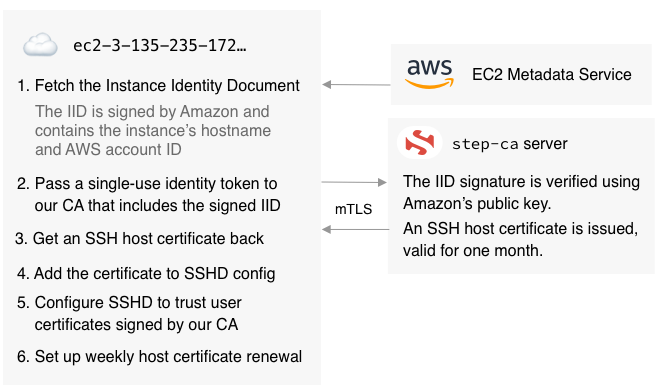 Thus, we get the host certificate in exchange for the Instance Identity Document (IID) and its signature.Speaking of IID ... If you have never worked with them before, this is how one of them looks:
$ TOKEN=`curl -X PUT "http://169.254.169.254/latest/api/token" -H "X-aws-ec2-metadata-token-ttl-seconds: 21600"` \
&& curl -H "X-aws-ec2-metadata-token: $TOKEN" –v http://169.254.169.254/latest/dynamic/instance-identity/document
{
  "accountId" : "8072125551212",
  "architecture" : "x86_64",
  "availabilityZone" : "us-east-2c",
  "billingProducts" : null,
  "devpayProductCodes" : null,
  "marketplaceProductCodes" : null,
  "imageId" : "ami-0fc20dd1da406780b",
  "instanceId" : "i-01bd292377d6d8fec",
  "instanceType" : "t2.micro",
  "kernelId" : null,
  "pendingTime" : "2020-03-11T23:18:12Z",
  "privateIp" : "172.31.46.150",
  "ramdiskId" : null,
  "region" : "us-east-2",
  "version" : "2017-09-30"
}
This JSON segment is signed by Amazon, it looks like this:$ TOKEN=`curl -X PUT "http://169.254.169.254/latest/api/token" -H "X-aws-ec2-metadata-token-ttl-seconds: 21600"` \
&& curl -H "X-aws-ec2-metadata-token: $TOKEN" –v http://169.254.169.254/latest/dynamic/instance-identity/signature
c0p6ygyFNFxyjs/73QGCQN+7khkZBr6H5cP/gefBgAwe80GmSTNlQy68LBSQQYrQczv2aHTXj3xa
CFkaGE4GPYiAogCkywcnt5VAp3t176GQwVxqfmawTliPMs31dY7ZeZvixN/1uoe8x1pt0EXAMPLE
Log in with your PEM key and verify that everything started correctly. The result of your User Data script should be in /var/log/cloud-init-output.log.Create a user on the host
The login of the new user that you create must be the same as the name of the mail through which you logged in to Google, for example:$ sudo adduser --quiet --disabled-password --gecos '' carl
So we finished the configuration on the host side!4. On board a new account
Let's set up your first user account. Run the following on your local device:$ CA_URL=https://[YOUR CA].compute.amazonaws.com
$ CA_FINGERPRINT=[CA FINGERPRINT]
$ step ca bootstrap \
--ca-url $CA_URL \
--fingerprint $CA_FINGERPRINT
This command installs and configures the root CA certificate on your device. You will have two new files: ~/.step/config/defaults.json(configuration file step) and ~/.step/certs/root_ca.crt(TSL certificate of your root CA).After that, we can issue ourselves a user certificate:$ step ssh login [your email address] --provisioner "Google"
What does this team do?- Launches your system browser and launches the Google OICD authorization process.
- After authorization, the token received from Google is sent to your CA.
- Your CA confirms the token and issues an SSH certificate corresponding to your mail.
- The certificate is added to your SSH agent. To look at it, use it
step ssh list, and to parse and study it step ssh list --raw | step ssh inspect.
Finally, let's configure SSH to use our CA:$ step ssh config
This command does the following:- First, she retrieves the CA host’s public key — it is used to verify host certificates — and installs this key in your SSH configuration with the following result (stored in
~/.step/known_hosts):
@cert-authority * ecdsa-sha2-nistp256 AAAAE2VjZHNhLXNoYTItbmlzdHAyNTYAAAAIbmlzdHAyNTYAAABBBHyWTo9TLDwhyLlHq2ANkjtSGLyJ3xPtfL+7faiV+YA0k4kLUc8cJ5rWFHdUShbwtkOsLhkqeDDXoFnH/C5BG+4=
- Then it imports into your SSH configuration (c
.step/ssh/config) this unobtrusive block:
Match exec "step ssh check-host %h"
		ForwardAgent yes
		User carl
		UserKnownHostsFile "/Users/carl/.step/ssh/known_hosts"
		ProxyCommand step ssh proxycommand %r %h %p --provisioner "Google"
A block Match execis only considered when the command above returns true.The command contacts your CA and asks if the host name you are trying to connect to through SSH has the appropriate certificate. If it is, the command returns true. We do not want CA-managed hosts to interfere with any other hosts in your sconfig.The directive ProxyCommandimplements all the magic of the Single Sign-On process. Before initiating the connection, it step ssh proxycommandwill verify your SSH certificate, and if it is missing or expired, it will guide you through the OAuth OIDC process and request a new certificate from your CA.Note: The configuration block of your CA is determined by the template, which is stored in < code> / etc / step-ca / templates / ssh, and if you want to change something, for example, remove the directive ForwardAgent, it is enough to refer to this template.Time to try it!
We are ready to connect via SSH to the host you configured. You can run SSH with a command -vto observe handshake. In particular, you should see something like this:debug1: Server host certificate: ecdsa-sha2-nistp256-cert-v01@openssh.com SHA256:KUwZbRewusotBbO4Wbrj1EpPexMqKEj0ZUr1Fvf41+g, serial 782
1790606781444805 ID "i-0fa7218db55ac0536" CA ecdsa-sha2-nistp256 SHA256:VIwnVtTJJwdUsjGaPyOS5yT1O/uxyxj0CQJd+Ce/w0M valid from 2020-03-2
3T16:23:32 to 2020-04-22T16:24:32
debug1: Host 'ec2-3-135-235-172.us-east-2.compute.amazonaws.com' is known and matches the ECDSA-CERT host certificate.
debug1: Found CA key in /Users/carl/.step/ssh/known_hosts:1
...
debug1: Offering public key: carl@smallstep.com ECDSA-CERT SHA256:mBQXA0znZvd+21hhvViUVEybzrO4x190xZftFXAYCFY agent
debug1: Server accepts key: carl@smallstep.com ECDSA-CERT SHA256:mBQXA0znZvd+21hhvViUVEybzrO4x190xZftFXAYCFY agent
Voila! You did it.Tip: You can ask CA for a list of all the hosts to which certificates have been issued through the command step ssh hosts.Q&A
How do I register an existing host in CA?
For Ubuntu 18.04 LTS hosts, this process is similar to loading a new host, just run the host start script under root. For other platforms, you will need to port the script to your needs.After you start and configure all your hosts, you may want to tweak instanceAgeyour AWS provider settings for CA. These settings are stored in /etc/step-ca/config/ca.json. An instance of any age can run itself by default. Setting the settings, for example, to 5m, will create an additional precaution, effectively forcing the CA to accept IID tokens only from instances younger than five minutes.The note:The token created by the Instance Identity script is a one-time token. You cannot re-register a host; you can only renew its certificate. Why? Because any user on the host can access the IID at any time, and we do not want users to be able to get the host certificate from the CA.Can I use another OAuth OIDC provider?
Of course! To do this, just change the network address of the OAuth configuration server and change the name of the OIDC provider in the User Data script for CA.Can I use GCP or Azure instead of AWS?
Yes! There step-caare providers for all three, you only need to make changes to the CA configuration and the host boot script. You can read more about this in the supplier documentation step-ca .Can I use the host bastion (installation server)?
You can. First, issue certificates to all your hosts, and then add the known_hostshost key to your CA bastion:$ CA_URL=https://[YOUR CA].compute.amazonaws.com
$ CA_FINGERPRINT=[CA FINGERPRINT]
$ step ca bootstrap \
--ca-url $CA_URL \
--fingerprint $CA_FINGERPRINT
$ mkdir -p ~/.ssh && echo "@cert-authority * $(step ssh config --host --roots)" > ~/.ssh/known_hosts
After that, it will be enough sshto the bastion, and then sshto the internal host.Can I change the expiration date of an SSH certificate?
Yes. By default, they are valid for 16 hours, and in the CA ( ca.json) configuration file under the object claims, at your OIDC provider, you can make changes in the corresponding lines, for example:"defaultUserSSHCertDuration": "720h",
"maxUserSSHCertDuration": "720h"
Will I be cut off from all my hosts when I disconnect my CA?
You will, although SSH and SHHD do not interact with the CA directly. CA issues certificates and maintains a host database. Your users rely on this base to figure out if you should try to connect to the host through certificate authentication.For system security, do not use SSH certificates to connect directly to CA: this is the only place you should continue to use key pairs.Can I use hosts on multiple AWS accounts?
Of course. To do this, just add the account ID to the CA ( /etc/step-ca/config/ca.json) configuration file and restart the CA server.How do I add support sudo?
Use agent forwarding and the authentication plug-in pam_ussh .What else can I do with my CA?
Much! Now that you have your personal CA, you can configure TSL certificates to encrypt all of your internal traffic through shared TLS . If you want to learn more about CA, vendors, configuration options, and more, read the Step Certificates Documentation .Summarizing
With our basic setup, any user of your Google organization will be able to get a certificate. He will also gain access only to those hosts on which he has accounts.