In a previous article, I promised to talk about how to connect CANNY 3 tiny using UART to bluetooth. And since you don’t really take a walk on these May holidays, it was decided to spend time with benefit and still keep the promise. But just to connect the controller to the Bluetooth adapter HC-06, it would be too easy for Habr.Therefore, we will not just connect everything, but also write for our scheme the most primitive Android application using C # and Xamarin.If you like to monitor the “limit switches” and the reed switches, as I love it, you are welcome under cat. Here's what we will talk about today:Part I: IntroductionPart II: Connecting the circuit and program for CANNY 3 tinyPart III: We write an application on Xamarin for AndroidPart IV: Conclusion
Part I: Introduction
I'll start with the good one, except for the insertions of the program code in C #, then this time the article will be relatively small, because we examined the basic methods of working with the controller earlier. In order not to repeat once again, here is a list of articles in which we have already examined the basic methods of working with the CANNY controller:- “One, two, three - burn the Christmas tree!” or my first look at the CANNY 3 tiny controller - in this article we analyzed what the controller is, as well as the basics of working in the CannyLab development environment.
- “The Destination has a lot of guises ...” or we automate the control of a lamp using CANNY 3 tiny and a photoresistor - in this article we looked at working with USB Virtual COM-port, connecting sensors to the ADC, as well as high-frequency PWM at the controller outputs.
- « ...» (CANNY Arduino) Raspberry PI — UART, .
In preparing this article, I used the following hardware: CANNY 3 tiny controller, HC-06 bluetooth adapter, limit switch (Trema module), reed switch, old wired headphones, breadboard, wires, crocodiles.We will build a system that, using a mobile application, monitors the status of two sensors and, if necessary, can manually sound an alarm.Everything that will be presented in this article is invented purely for educational and demonstration purposes. I just wanted to show some tricks of working with the controller, as well as for the pieces of iron purchased at one time to somehow work out their value.Despite the nature of the problem being solved, which is far from reality, we will imagine that we are making a monitoring system behind the sliding door of the compartment. When it starts moving, the reed switch will work, and at the end of the path it will give a signal to the trailer. If we need to attract attention, for example, so that the door is closed back, we will give a "squeaky" signal through the speaker. True, I do not have a speaker, but there are old headphones.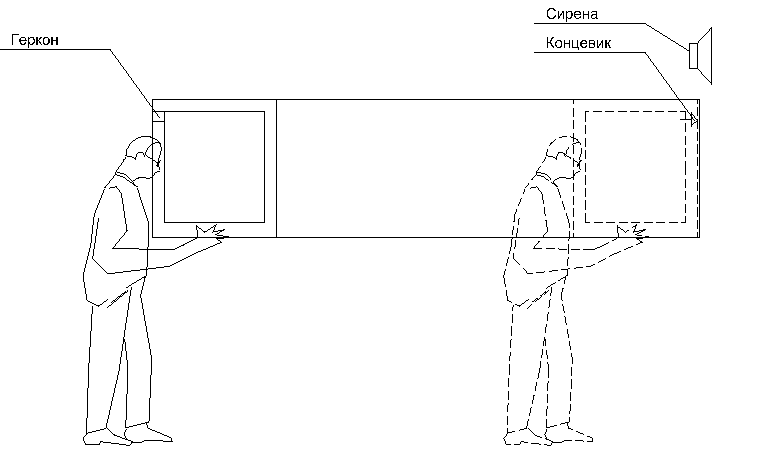 Well and, as always, a note. I strongly do not recommend using the materials in this article as the ultimate truth. I did many things for the first time myself, they can certainly be done better.
Part II: Connecting the circuit and program for CANNY 3 tiny
To get started, so as not to offend anyone in copyright, I borrowed from the forum , but by myself I adapted them for the idea of connecting the controller to the HC-06, by controlling it through the “Serial bluetooth terminal” application and some tricks when developing the diagram your task.The connection diagram is as follows: The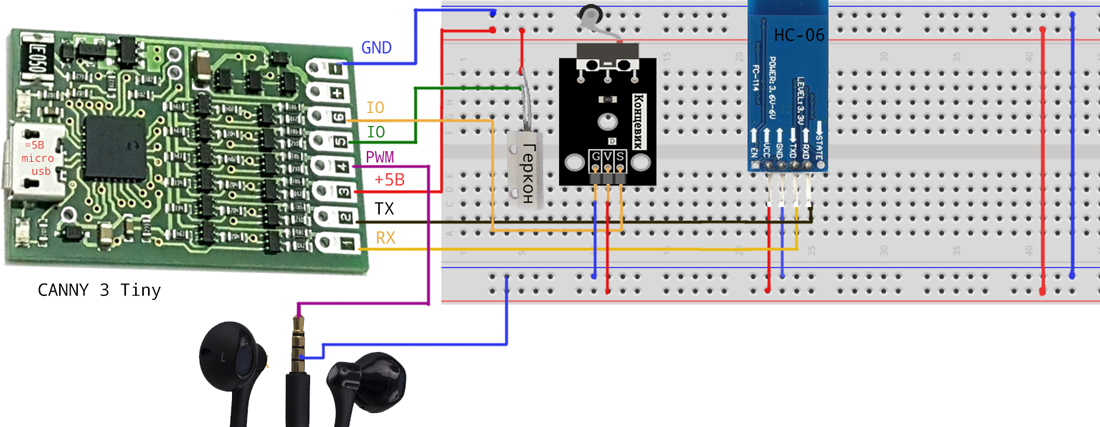 limit switch and the reed switch are connected to the terminals of controller No. 6 and No. 5, the headphones to terminal No. 4 (it has an RF PWM), UART RX is terminal No. 1, UART TX is terminal No. 2, terminal No. 3 It is used to supply “+ 5V”, the output “-” - for communication with the “ground”.Here's what it looks like in assembly:
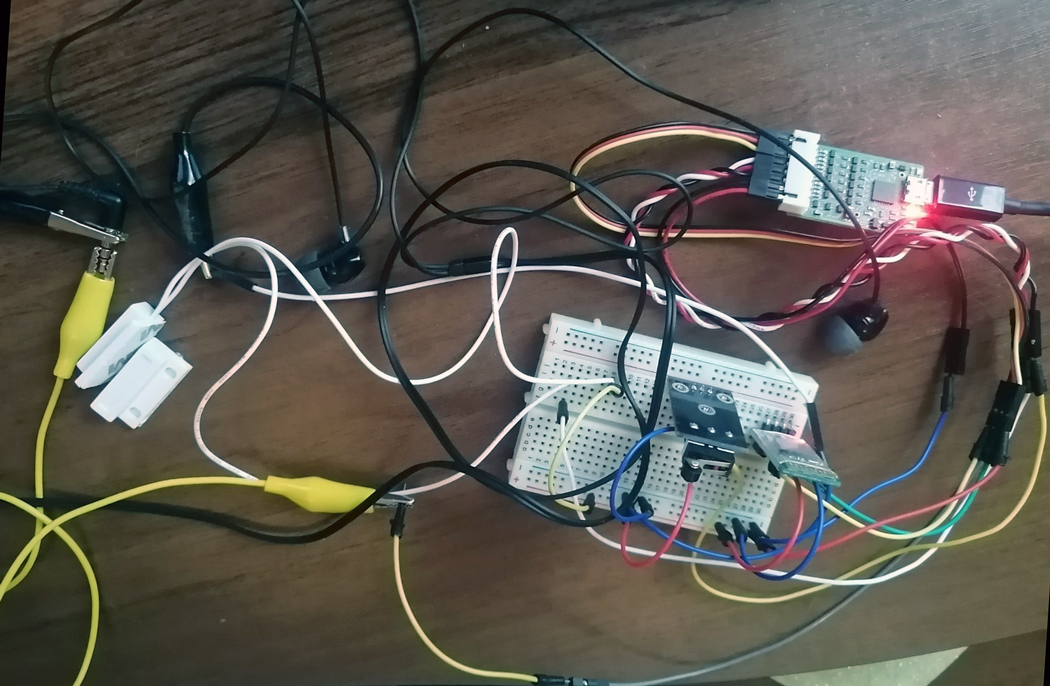 I developed the diagram (program) for CANNY 3 tiny in CannyLab version 1.42, perhaps in other versions of the development environment and with other controllers, it will be necessary to make changes to the diagram.Here's what happened: The
 blocks associated with setting up the controller and sending messages via UART were disassembled in a previous article .Let us examine in more detail the two remaining.The “ Receive UART message ” block is responsible for turning on the siren (headphones). In principle, it is needed to parse an example of receiving a message via UART.First, we check whether the received data is in the UART, if so, then we send one to the D-trigger input “E”, in which case the trigger copies the value from the “D” input into which we will write the first two characters from the message received via UART. I did not want to complicate everything, so we will use a simple scheme further. We assume that any number from 00 to 99 will come to us by UART, we will translate this number from a symbolic form to a numeric one (I recommend reading how the converter block works , I had a little "plug" with it). Further, any value "> 0" at the input of the leading edge detector causes a single signal, which turns on output 5 for 5 seconds, operating in the RF PWM mode.You can play in the settings with the filling period of the RF PWM, the sound in the headphones will depend on this.Let's move on to the block"Formation of the message . " Its implementation at first glance may seem unusual. This is explained by the fact that I did not really figure out how to work with the Serial bluetooth terminal program and with the same bluetooth protocol in Xamarin.I’ll run a little ahead and say that I have not learned how to receive messages sent from the controller on my smartphone. If everything was obvious with the wired UART in the last article, then with Bluetooth, in practice, instead of the sent message, only its part can be read and the meaning of the transmitted command is violated.I decided that the simplest solution is to transmit a single number, which is guaranteed to reach the recipient without loss.In our case, we monitor the discrete state of the reed switch and the limit switch. That is, we have only 4 possible combinations: the reed switch and the limit switch are off, only one is on, both are on.Since the reed switch and the limit switch give a discrete signal (0/1), you need to somehow distinguish them. To do this, we multiply the value of the reed signal by 2. Now it turns out that the sum of the signals will give us values from 0 to 3.Now we will analyze a non-obvious option with fifty added to this value. The fact is that CannyLab sends a couple of characters to UART, that is, instead of 3, let's say 03, but as I said there is a risk of losing some of the information. For example, from the value 01, the program on the smartphone can read only the first “0”, and this will already be an error.It would be possible to get confused and transform the data, replacing, for example, the “D1” character of the register with some letter or space, but I decided to make it easier. I converted the value 01 to 51 (02 to 52, etc.). The five does not carry a signal and I cut it out at the program level for a smartphone. Thus, we always guarantee that the useful part of the message remains.We load the program into the controller, click “run”, if everything works as planned, then the HC-06 will periodically flash a red LED.Next, we pair the smartphone with the adapter. Now you can check the performance in the application “Serial Bluetooth terminal” or any other with similar functionality.Write down the address of the Bluetooth adapter, it will be useful to us in the next chapter.
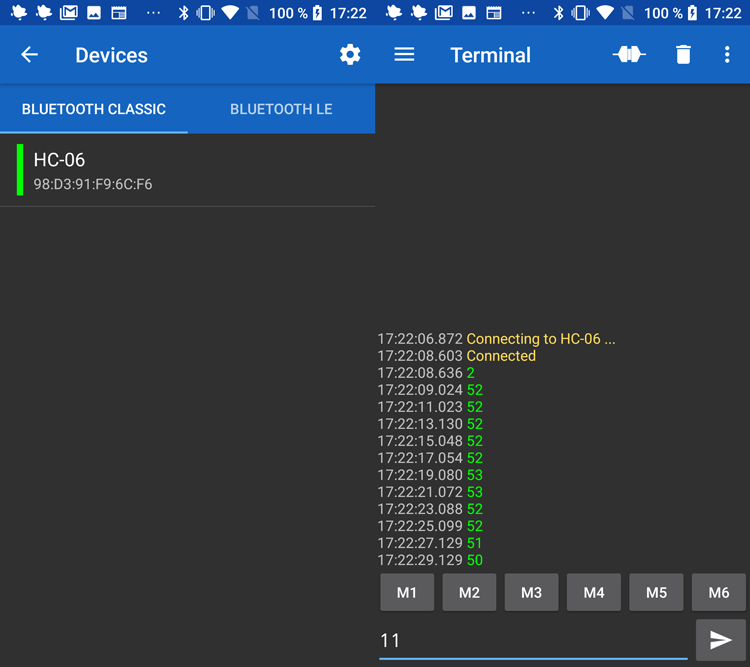 As you can see, the data comes, depending on the state of the sensors, and if you send "11", then a nasty squeak is heard in the headphones. We could stop here, but let's sketch a primitive application.The program for the controller and the source code of the program for the smartphone can be downloaded from GitHubI would like to note that you do not have to implement everything in hardware specifically on CANNY controllers, you can write a program for Arduino or another controller you like. Initially, I myself also planned to write an additional version of the sketch for Arduino, but since I killed almost all the May holidays, I simply did not have the strength to connect CANNY and the smartphone application.
Part III: Writing an Xamarin Android Application
I know that Xamarin, to put it mildly, is not the most popular solution for mobile development. And maybe you already have a question: “Why did I choose it?” . I would like to answer him with words from the song of the same name by Psoya Korolenko: Honestly, there are no objective reasons. Just a couple of years ago I learned the basics of C # and everyone wanted to see what Xamarin is. And now, due to "self-isolation", hands have finally reached.Well, let me remind you again. This is my first time meeting Xamarin and this is my first Android app. Do not blindly copy my curve code, if suddenly you can find a more beautiful solution, use it.When developing my program, I relied on this material. The article is not particularly chewed, and even in Spanish, so I still found it appropriate to share with you my variation on this topic.I built the program in the Visual studio 2019 community edition.First of all, create a new empty Android project (Xamarin), as in the picture.
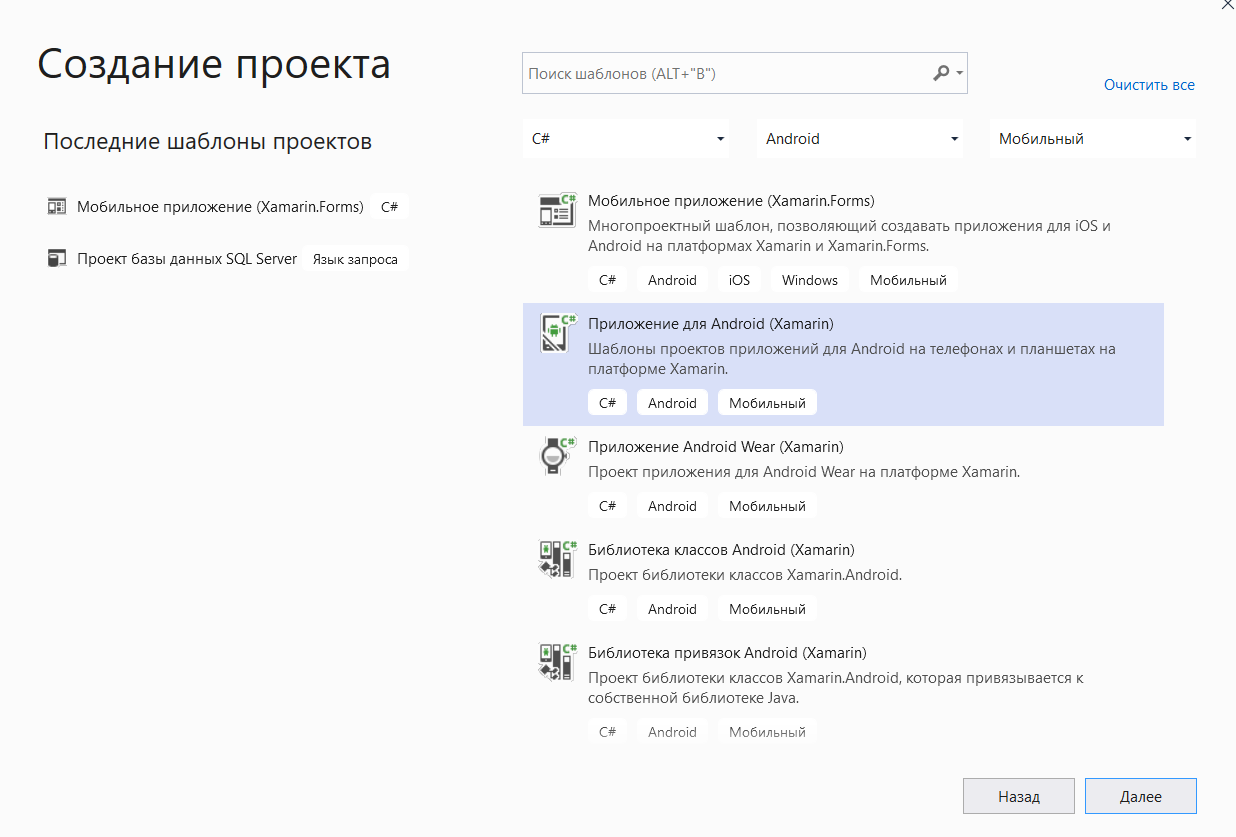 I made changes only in three files, they can be viewed entirely on GitHub , and here we will analyze only the important parts:AndroidManifest.xml2 permissions are added to the standard template:
 <uses-permission android:name="android.permission.BLUETOOTH"/>
<uses-permission android:name="android.permission.BLUETOOTH_ADMIN"/>
activity_main.xml Thedefault container (RelativeLayout) has been removed. Instead, the LinearLayout container was added simply because it is simpler. In this container, all elements are aligned vertically, stretching across the entire width of the screen.<LinearLayout
xmlns:android="http://schemas.android.com/apk/res/android"
android:orientation="vertical"
android:minWidth="25px"
android:minHeight="25px"
android:layout_width="match_parent"
android:layout_height="match_parent"
android:id="@+id/linearLayout1">
<TextView
android:text="Reed switch status - undefined"
android:layout_width="match_parent"
android:layout_height="wrap_content"
android:id="@+id/rSwitch"
android:textSize="12pt" />
<TextView
android:text="End sensor status - undefined"
android:layout_width="match_parent"
android:layout_height="wrap_content"
android:id="@+id/EndSensor"
android:textSize="12pt" />
<Button
android:layout_width="match_parent"
android:layout_height="wrap_content"
android:id="@+id/startSiren"
android:text="Send signal to siren" />
<Switch
android:layout_width="match_parent"
android:layout_height="wrap_content"
android:id="@+id/bltSwitch"
android:checked="false"
android:showText="true"
android:text="Connect bluetooth" />
<TextView
android:text="status"
android:textAppearance="?android:attr/textAppearanceSmall"
android:layout_width="match_parent"
android:layout_height="wrap_content"
android:id="@+id/status" />
</LinearLayout>
Anyone who is a little familiar with HTML layout or XML can easily understand the structure of the user interface. We have three read-only text fields (TextView), one switch (Switch), which basically works like a checkbox and one ordinary button (Button). Elements can be placed on the form by dragging and dropping from the constructor, and in the properties window or in the code to set them more convenient Id, text stubs and other parameters.It remains to describe the logic of the program.MainActivity.csBelow, under the spoiler, the entire code is for convenienceFull MainActivity.cs Code
using Android.App;
using Android.OS;
using Android.Support.V7.App;
using Android.Runtime;
using Android.Widget;
using System.Linq;
using System;
using System.IO;
using Java.Util;
using Android.Bluetooth;
using System.Threading.Tasks;
namespace _6.Canny_Xanarin_Bluetooth_Android
{
[Activity(Label = "Control Canny 3 tiny via bluetooth", Theme = "@style/AppTheme", MainLauncher = true)]
public class MainActivity : AppCompatActivity
{
   Button startSiren;
   TextView rSwitch;
   TextView EndSensor;
   Switch bltSwitch;
   TextView status;
private Java.Lang.String dataToSend;
private BluetoothAdapter mBluetoothAdapter = null;
private BluetoothSocket btSocket = null;
private Stream outStream = null;
private static string address = "98:D3:91:F9:6C:F6";
private static UUID MY_UUID = UUID.FromString("00001101-0000-1000-8000-00805F9B34FB");
private Stream inStream = null;
protected override void OnCreate(Bundle savedInstanceState)
{
base.OnCreate(savedInstanceState);
Xamarin.Essentials.Platform.Init(this, savedInstanceState);
SetContentView(Resource.Layout.activity_main);
startSiren = FindViewById<Button>(Resource.Id.startSiren);
rSwitch = FindViewById<TextView>(Resource.Id.rSwitch);
EndSensor = FindViewById<TextView>(Resource.Id.EndSensor);
status = FindViewById<TextView>(Resource.Id.status);
bltSwitch = FindViewById<Switch>(Resource.Id.bltSwitch);
startSiren.Click += startSiren_ClickOnButtonClicked;
bltSwitch.CheckedChange += bltSwitch_HandleCheckedChange;
CheckBt();
}
        private void CheckBt()
        {
            mBluetoothAdapter = BluetoothAdapter.DefaultAdapter;

            if (!mBluetoothAdapter.Enable())
            {
                Toast.MakeText(this, "Bluetooth Off",
                    ToastLength.Short).Show();
            }

            if (mBluetoothAdapter == null)
            {
                Toast.MakeText(this,
                    "Bluetooth does not exist or is busy", ToastLength.Short)
                    .Show();
            }
        }
   void startSiren_ClickOnButtonClicked(object sender, EventArgs e)
        {
            if (bltSwitch.Checked)
            {
                try
                {
                    dataToSend = new Java.Lang.String("11");
                    writeData(dataToSend);
                    System.Console.WriteLine("Send signal to siren");
                }
                catch (System.Exception execept)
                {
                    System.Console.WriteLine("Error when send data" + execept.Message);
                }

            }
            else status.Text = "bluetooth not connected";
        }
void bltSwitch_HandleCheckedChange(object sender, CompoundButton.CheckedChangeEventArgs e)
{
if (e.IsChecked)
{
Connect();
}
else
{
status.Text = "bluetooth not connected";
if (btSocket.IsConnected)
{
try
{
btSocket.Close();
System.Console.WriteLine("Connection closed");
}
catch (System.Exception ex)
{
Console.WriteLine(ex.Message);
}
}
}
}
   public void Connect()
        {
            BluetoothDevice device = mBluetoothAdapter.GetRemoteDevice(address);
            System.Console.WriteLine("Connection in progress" + device);
            mBluetoothAdapter.CancelDiscovery();
            try
            {
                btSocket = device.CreateRfcommSocketToServiceRecord(MY_UUID);
                btSocket.Connect();
                System.Console.WriteLine("Correct Connection");
                status.Text = "Correct Connection to bluetooth";
            }
            catch (System.Exception e)
            {
                Console.WriteLine(e.Message);
                try
                {
                    btSocket.Close();
                    System.Console.WriteLine("Connection closed");
                }
                catch (System.Exception)
                {
                    System.Console.WriteLine("Impossible to connect");
                    status.Text = "Impossible to connect";
                }
                System.Console.WriteLine("Socket Created");

            }
            beginListenForData();

        }
public void beginListenForData()
{
try
{
inStream = btSocket.InputStream;
}
catch (System.IO.IOException ex)
{
Console.WriteLine(ex.Message);
}
Task.Factory.StartNew(() => {
byte[] buffer = new byte[1024];
int bytes;
while (true)
{
try
{
bytes = inStream.Read(buffer, 0, 1024);
System.Console.WriteLine("bytes " + bytes.ToString());
if (bytes > 0)
{
RunOnUiThread(() => {
string valor = System.Text.Encoding.ASCII.GetString(buffer).Replace("5",String.Empty);
string command = new string(valor.Where(char.IsDigit).ToArray());
if (command.Length > 0)
{
status.Text="data successfully readed";
System.Console.WriteLine("command " + command);
switch (Int32.Parse(command))
{
case 0:
rSwitch.Text = "reed switch - disconnected ";
EndSensor.Text = "end sensor - not pressed ";
break;
case 1:
rSwitch.Text = "reed switch - disconnected ";
EndSensor.Text = "end sensor - pressed ";
break;
case 2:
rSwitch.Text = "reed switch - connected ";
EndSensor.Text = "end sensor - not pressed ";
break;
case 3:
rSwitch.Text = "reed switch - connected ";
EndSensor.Text = "end sensor - pressed ";
break;
}
}
});
}
}
catch (Java.IO.IOException)
{
RunOnUiThread(() => {
EndSensor.Text = "End sensor status - undefined";
rSwitch.Text = "Reed switch status - undefined ";
});
break;
}
}
});
}
  private void writeData(Java.Lang.String data)
        {
            try
            {
                outStream = btSocket.OutputStream;
            }
            catch (System.Exception e)
            {
                System.Console.WriteLine("Error with OutputStream when write to Serial port" + e.Message);
            }

            Java.Lang.String message = data;

            byte[] msgBuffer = message.GetBytes();

            try
            {
                outStream.Write(msgBuffer, 0, msgBuffer.Length);
                System.Console.WriteLine("Message sent");
            }
            catch (System.Exception e)
            {
                System.Console.WriteLine("Error with  when write message to Serial port" + e.Message);
                status.Text = "Error with  when write message to Serial port";
            }
        }


    public override void OnRequestPermissionsResult(int requestCode, string[] permissions, [GeneratedEnum] Android.Content.PM.Permission[] grantResults)
        {
            Xamarin.Essentials.Platform.OnRequestPermissionsResult(requestCode, permissions, grantResults);

            base.OnRequestPermissionsResult(requestCode, permissions, grantResults);
        }
    }
 }
Now in parts.Blocks with connection of namespaces, class declaration, etc. I'll miss. We create variables with which we will later bind the user interface elements: Button startSiren;
TextView rSwitch;
TextView EndSensor;
Switch bltSwitch;
TextView status;
Next comes the code from the example on which I relied. Variables (fields) necessary for the operation of certain methods. private Java.Lang.String dataToSend;
private BluetoothAdapter mBluetoothAdapter = null;
private BluetoothSocket btSocket = null;
private Stream outStream = null;
private static string address = "98:D3:91:F9:6C:F6";
private static UUID MY_UUID = UUID.FromString("00001101-0000-1000-8000-00805F9B34FB");
private Stream inStream = null;
It is important for us here to drive the address of your HC-06 module into the address field.Since this is my first development experience for smartphones, including working with Xamarin, I decided not to complicate anything, so the device address, as in the original example, is fixed. If you want, you can see this article , it seems there is implemented an enumeration of available Bluetooth devices.Move on.
protected override void OnCreate(Bundle savedInstanceState)
{
base.OnCreate(savedInstanceState);
Xamarin.Essentials.Platform.Init(this, savedInstanceState);
SetContentView(Resource.Layout.activity_main);
startSiren = FindViewById<Button>(Resource.Id.startSiren);
rSwitch = FindViewById<TextView>(Resource.Id.rSwitch);
EndSensor = FindViewById<TextView>(Resource.Id.EndSensor);
status = FindViewById<TextView>(Resource.Id.status);
bltSwitch = FindViewById<Switch>(Resource.Id.bltSwitch);
startSiren.Click += startSiren_ClickOnButtonClicked;
bltSwitch.CheckedChange += bltSwitch_HandleCheckedChange;
CheckBt();
}
This method is created automatically, our task is to associate UI objects in it with the fields of the class, and also attach handlers for reactions to events ( startSiren.Click bltSwitch.CheckedChange).Checking the connection via Bluetooth:
private void CheckBt()
{
mBluetoothAdapter = BluetoothAdapter.DefaultAdapter;
if (!mBluetoothAdapter.Enable())
{
Toast.MakeText(this, "Bluetooth Off",
ToastLength.Short).Show();
}
if (mBluetoothAdapter == null)
{
Toast.MakeText(this,
"Bluetooth does not exist or is busy", ToastLength.Short)
.Show();
}
}
Turn on the siren. Essentially just sending the characters “11” to the controller:
void startSiren_ClickOnButtonClicked(object sender, EventArgs e)
{
if (bltSwitch.Checked)
{
try
{
dataToSend = new Java.Lang.String("11");
writeData(dataToSend);
System.Console.WriteLine("Send signal to siren");
}
catch (System.Exception execept)
{
System.Console.WriteLine("Error when send data" + execept.Message);
}
}
else status.Text = "bluetooth not connected";
}
Checking the status of the switch (if shifted to the right, it means it is turned on): void bltSwitch_HandleCheckedChange(object sender, CompoundButton.CheckedChangeEventArgs e)
{
if (e.IsChecked)
{
Connect();
}
else
{
if (btSocket.IsConnected)
{
try
{
btSocket.Close();
System.Console.WriteLine("Connection closed");
}
catch (System.Exception ex)
{
Console.WriteLine(ex.Message);
}
}
}
}
When you turn on, we begin the connection with Bluetooth.The implementation of the connection itself: public void Connect()
{
BluetoothDevice device = mBluetoothAdapter.GetRemoteDevice(address);
System.Console.WriteLine("Connection in progress" + device);
mBluetoothAdapter.CancelDiscovery();
try
{
btSocket = device.CreateRfcommSocketToServiceRecord(MY_UUID);
btSocket.Connect();
System.Console.WriteLine("Correct Connection");
status.Text = "Correct Connection to bluetooth";
}
catch (System.Exception e)
{
Console.WriteLine(e.Message);
try
{
btSocket.Close();
System.Console.WriteLine("Connection closed");
}
catch (System.Exception)
{
System.Console.WriteLine("Impossible to connect");
status.Text = "Impossible to connect";
}
System.Console.WriteLine("Socket Created");
}
beginListenForData();
}
And here is one of the most important methods - directly reading data:
public void beginListenForData()
{
try
{
inStream = btSocket.InputStream;
}
catch (System.IO.IOException ex)
{
Console.WriteLine(ex.Message);
}
Task.Factory.StartNew(() => {
byte[] buffer = new byte[1024];
int bytes;
while (true)
{
try
{
bytes = inStream.Read(buffer, 0, 1024);
System.Console.WriteLine("bytes " + bytes.ToString());
if (bytes > 0)
{
RunOnUiThread(() => {
string valor = System.Text.Encoding.ASCII.GetString(buffer).Replace("5",String.Empty);
string command = new string(valor.Where(char.IsDigit).ToArray());
if (command.Length > 0)
{
status.Text="data successfully readed";
System.Console.WriteLine("command " + command);
switch (Int32.Parse(command))
{
case 0:
rSwitch.Text = "reed switch - disconnected ";
EndSensor.Text = "end sensor - not pressed ";
break;
case 1:
rSwitch.Text = "reed switch - disconnected ";
EndSensor.Text = "end sensor - pressed ";
break;
case 2:
rSwitch.Text = "reed switch - connected ";
EndSensor.Text = "end sensor - not pressed ";
break;
case 3:
rSwitch.Text = "reed switch - connected ";
EndSensor.Text = "end sensor - pressed ";
break;
}
}
});
}
}
catch (Java.IO.IOException)
{
RunOnUiThread(() => {
EndSensor.Text = "End sensor status - undefined";
rSwitch.Text = "Reed switch status - undefined ";
});
break;
}
}
});
}
I left many elements of the method as in the example, as I understand it, at first a connection to the data stream is created, if there is something in the buffer with the read data, then it is read into a variable valor. Moreover, as I promised, we simply delete the number “5”.Next, we remove all characters except the numbers from the read message. string command = new string(valor.Where(char.IsDigit).ToArray());Well, after that everything is simple, depending on what number has come to us, we display this or that status in the UI.I did not fundamentally change these two methods: private void writeData(Java.Lang.String data)
{
try
{
outStream = btSocket.OutputStream;
}
catch (System.Exception e)
{
System.Console.WriteLine("Error with OutputStream when write to Serial port" + e.Message);
}
Java.Lang.String message = data;
byte[] msgBuffer = message.GetBytes();
try
{
outStream.Write(msgBuffer, 0, msgBuffer.Length);
System.Console.WriteLine("Message sent");
}
catch (System.Exception e)
{
System.Console.WriteLine("Error with when write message to Serial port" + e.Message);
status.Text = "Error with when write message to Serial port";
}
}
public override void OnRequestPermissionsResult(int requestCode, string[] permissions, [GeneratedEnum] Android.Content.PM.Permission[] grantResults)
{
Xamarin.Essentials.Platform.OnRequestPermissionsResult(requestCode, permissions, grantResults);
base.OnRequestPermissionsResult(requestCode, permissions, grantResults);
}
}
}
As I understand it, this block of code implements the sending of a message and an event handler to overgrow access permission to Bluetooth.Well, that’s all it’s left to set up a smartphone connection for debugging the application .Oddly enough, but it works: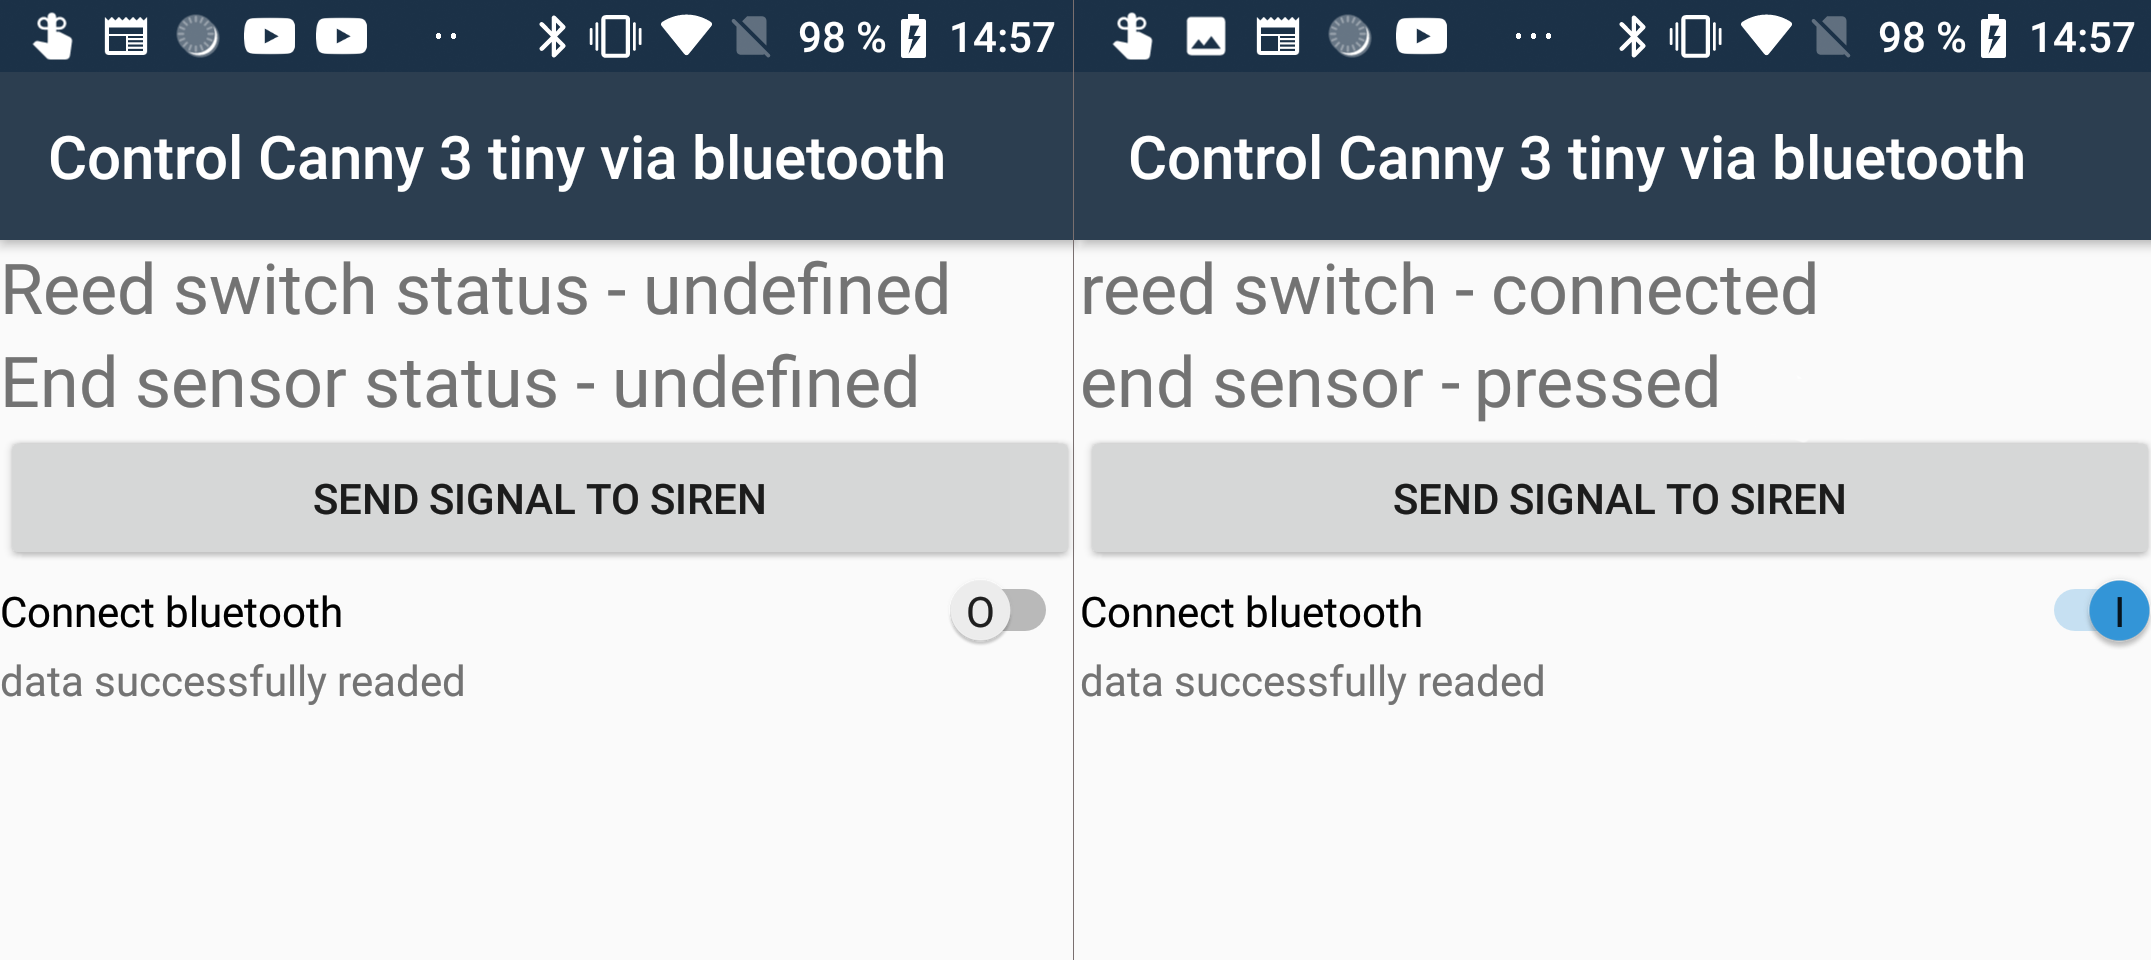
Part IV: Conclusion
Here's how the program works in kind: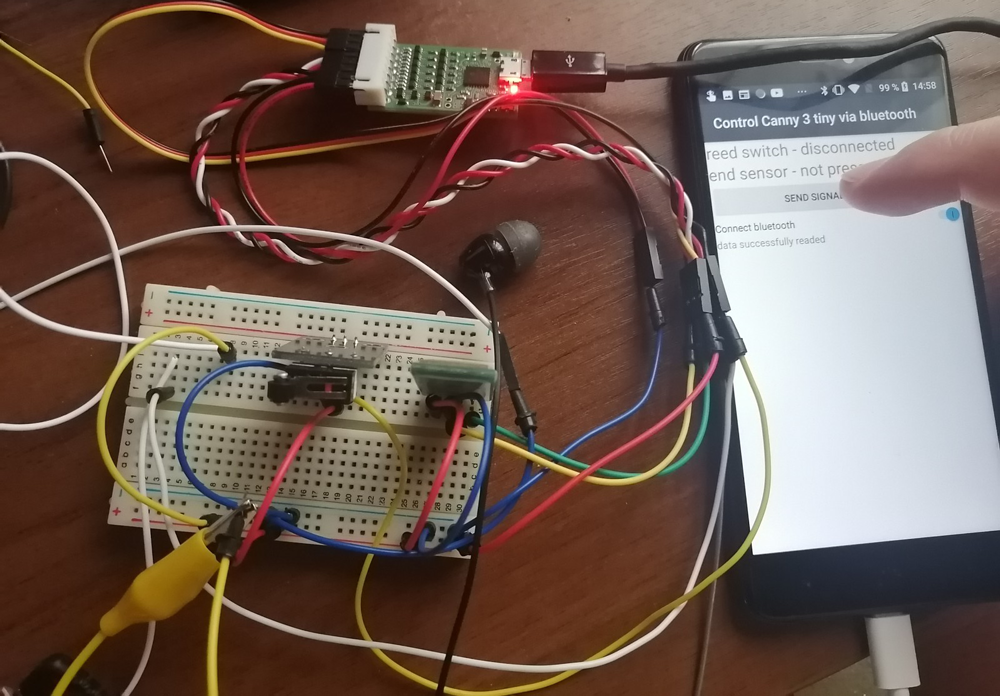 That was my first experience in developing applications for a smartphone on Android.I would like to note that VS 2019 and Xamarin on my old computer work very slowly.At the first assembly of the project, I really managed to eat these soft French rolls and drink tea. Also, the application itself turned out to be frankly miserable, the on / off switch does not work very conveniently, but on the other hand, given that I am only a little familiar with the basic development techniques for .NET, as well as the fact that I'm not a programmer at all, I could even without going through a single tutorial or a single lesson, outline your first application in a day. Therefore, the entry threshold for creating an elementary application is quite low.As I understand it, CANNY controllers can be used when tuning cars, especially domestic ones, so that it is quite possible to make some kind of “feature” and write an application for a smartphone to it. The main thing to remember is that when powered from the vehicle’s on-board network, the controller outputs will also have the same voltage as the input (for example, 12 V instead of 5 V). Do not forget to protect the Bluetooth adapter so that it does not inadvertently fail.The article turned out to be very laborious for me, I hope that everything was not in vain and you will like it.