Good day to all. My name is Anna Zharkova, I’m a leading mobile developer of UsetechAbout the SwiftUI technology, which Apple announced last year WWDC 2019, much has been said. In principle, there is already enough material about its features, what is under its hood and how to use it for a fast and beautiful UI. I offer you a short series of articles on how to use this framework in real life and real applications, and not in avocado sandwich constructors. And to make everything serious and mature, we’ll look at how to make our SwiftUI application comply with the principles of clean architecture and clean code.But let's start with the basics. This part will be just an introduction and basic information. So if you are already familiar with these features of SwiftUI, proceed to the following parts:part 2 (how to work with ready-made libraries under UIKit)part 3 (here about architecture)part 4 (here about navigation)If you haven’t got to know each other yet, then stop by a few minutes)The main features of declarative development in the new framework is a departure from the direct use of UIViewController, UIView and replacement with structures that implement the View protocol. All components of the visual part are also described using declarative syntax and are located inside the main body property of each View. Settings, stylization and customization of components, navigation between on-screen View is also set using declarative syntax.For example, this code describes a view for a news list, by clicking on which a screen opens with a separate news view:
struct NewsListView: View{
    @State var data: [NewsItemMock]

    var body: some View {
        NavigationView{
        List(data) { item in
            NavigationLink(destination:NewsItemView(item:item)) {
            NewsItemRow(data: item)
            }
        }
    }
}
SwiftUI uses ViewBuilder, a declarative interface designer based on Functional Builder. This mechanism appeared in Swift 5.1 and allows you to group elements into a certain array inside a closure-block, for example, a parent object. An example of using ViewBuilder is presented on the slide. We simply place the View controls in the order we need, for example, inside a vertical or horizontal Stack, without using addSubview, and when compiling SwiftUI itself adds and groups elements into a more complex parent container.And here is the code:
          VStack {
            HStack {
                VStack(alignment: .leading,spacing: 10) {
                    HeaderText(text: data.title ?? "")
                    SubheaderText(text: data.description ?? "")
                    SmallText(text: data.publishedAt?
                                   .formatToString("dd.MM.yyyy") ?? "")
                }
               ThumbImage(withURL: data.urlToImage ?? "")
             }
converted to a list item of 3 text fields and one image:Although SwiftUI denies the concept of a UIViewController, the entry point to the application is the UIHostingController, into which the displayed View is passed and embedded. That is, in fact, the new technology is an add-on over UIKit:
@available(iOS 13.0, tvOS 13.0, *)
open class UIHostingController<Content> : UIViewController where Content : View {

    public var rootView: Content

    public init(rootView: Content)
By the way, all SwiftUI controls are declarative analogues of UIKit controls.For example, VStack, HStack are analogues of the usual vertical and horizontal UIStackView, respectively. List is UITableView, Text is UILabel, Button is UIButton, Image is UIImage, etc.Connecting and configuring controls is done declaratively using the available modifiers. Elements are grouped inside UIStackView analogues with some predefined properties.In addition to changing the way the visual part is described, the data flow control and the mechanism of the UI reaction to it are changing. Swift UI is a non-event dependent framework. Those. View in it is the result of a function of certain states, and not a sequence of events. The action performed by the user does not change the UI directly, you cannot directly change this or that View, add or remove controls. First, the properties or state variables that are connected to the View through one or another Property wrappers (property wrappers) change .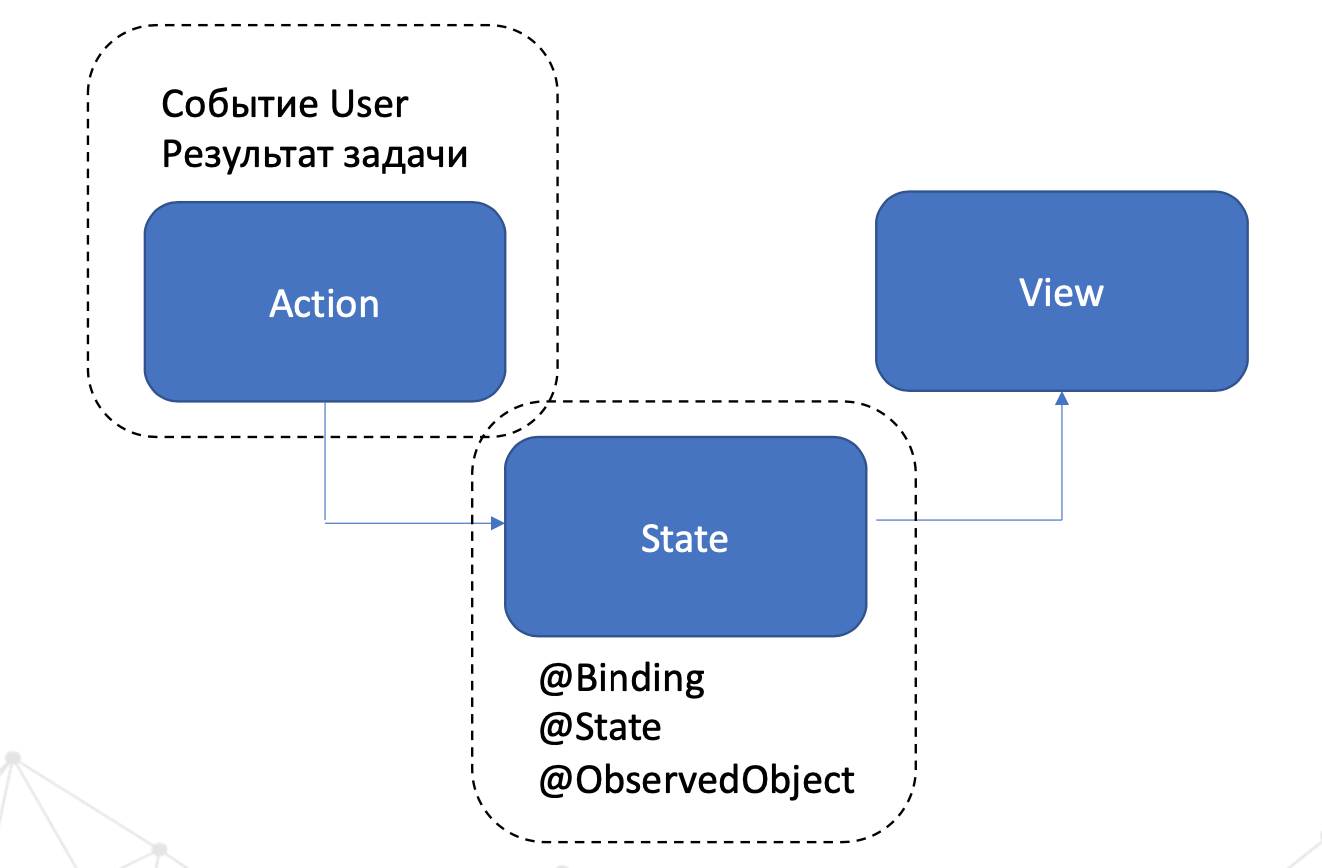 The main used Property Wrappers are:1.State - used for local variables.
struct NewsItemRow: View {
    @State var title: String
    @State var  description: String
    @State var dateFormatted: String
    @State var imageUrl: String

    var body: some View {
        VStack {
            HStack {
                VStack(alignment: .leading,spacing: 10) {
                    HeaderText(text: title)
                    SubheaderText(text: description)
                    SmallText(text: dateFormatted)
                }
              ThumbImage(withURL: imageUrl)
            }
         }
     }
2. @Binding - an analogue of weak, used when passing a reference to a value.We use it when more than one View depends on any property. For example, if we want to pass a value to the original View from the second level View.
struct FirstView: View {
    @State var isPresented: Bool = true

    var body: some View {
        NavigationView {
            NavigationLink(destination:
            SecondView(isPresented: self.$isPresented)) {
                Text("Some")
            }
        }
    }
}

struct SecondView: View {
    @Binding var isPresented: Bool

    var body: some View {
        Button("Dismiss") {
            self.$isPresented = false
        }
    }
}
3. @EnvironmentObject - transferring objects between View4. @ObjectBinding, @ObservableObject - used to track changes in model properties using the Combine framework tools.
class NewsItemModel: ObservableObject,IModel {
   @Published var title: String
   @Published var  description: String
   @Published var dateFormatted: String
   @Published var imageUrl: String
}
We will talk about him later.So. If we want to change our View, we change the property, an ad with one of the Property Wrappers. Then the declarative View is rebuilt with all the internal controls.When any of the state variables changes, the View is rebuilt as a whole.Consider a small example. We have some kind of screen, in the navigation bar of which there is a button for adding content to favorites. In order for us to change the indicator image on this button, we will use PropertyWrappers. For example, in this case, create a local variable and declare it asState:
struct NewsItemView: View {
@State var isFavorite: Bool
....
We will assign the property value change to the trigger event that occurs when the button is pressed:struct NewsItemView: View{
@State var isFavorite: Bool
var body: some View {
NavigationView {
VStack {
Text("Some content")
}
}
.navigationBarItems(trailing: Button(action: {
self.isFavorite = !self.isFavorite
}){
Image(self.isFavorite ? "favorite" : "unfavorite")
.frame(width: 20, height: 20, alignment: .topTrailing)
})
}
Thus, our View will change: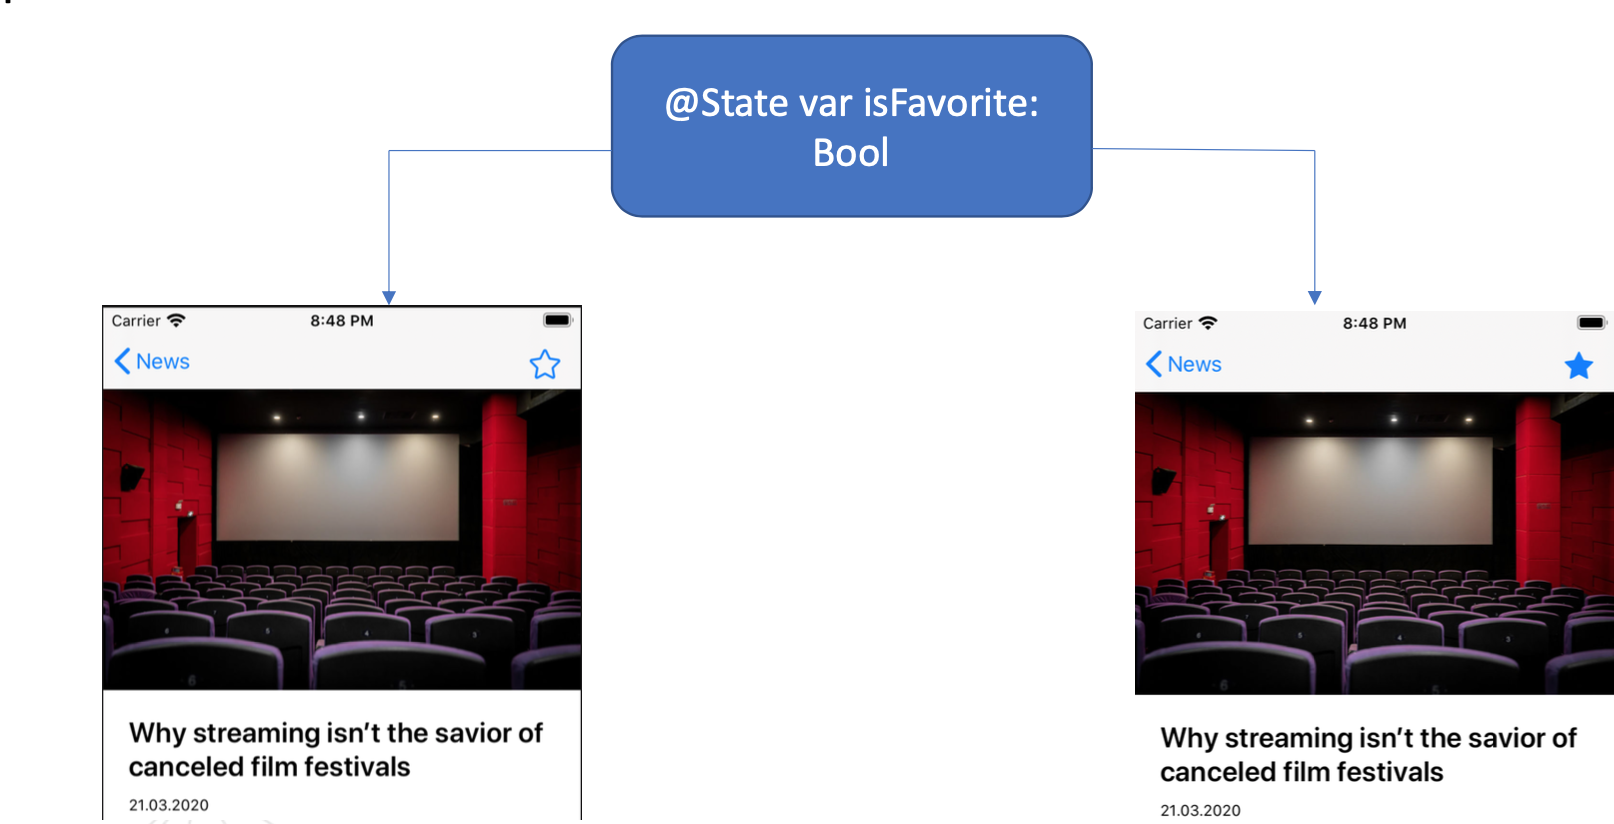 And in principle, this is all the basic things you need to know about SwiftUI to get started.But is this enough to work?To create uncomplicated UIs from simple controls without being tied to Xib and storyboards, completely.And for something more, no.Firstly, not all controls have analogues in SwiftUI. This applies both to standard UIKit UISearchView, UICollectionView, and for which elements from third-part libraries.Secondly, there are no (or almost none, maybe someone is doing it right now) third-party solutions for working with Data Flow SwiftUI.So, you have to adapt existing solutions for standard iOS applications.Please click on the link.