Once, in one product team, they wanted to develop a mobile application in order to test the hypothesis of the demand for the product and its convenience for users. And the fact that the team did not have mobile developers did not hurt. Two front-end developers took React Native and wrote an application in three months. Hypothesis testing was successful, the application continues to evolve and arouses the interest of other teams in the company.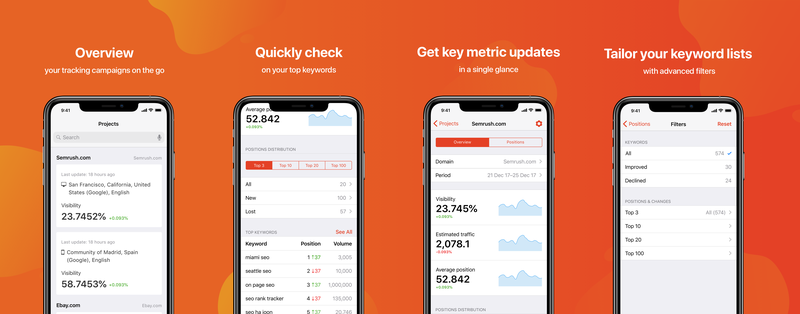 Image from tool description: www.semrush.com/news/position-tracking-on-the-go .This is a brief description of the history of the team of Artyom Lashevsky, which for three months from the front-end developer has become mobile. For more details on how this happened, read the decoding of Artyom’s report on FrontendConf 2019: what is React Native, why is it, a step-by-step instruction for creating an application and choosing the right libraries and components.Artyom Lashevsky is a leading front-end developer at SEMrush and a specialist in the field of information security of automated systems.
Why do we need an application
SEMrush is an international IT company that develops a large online platform for marketers. Included in the TOP 3 platforms for marketing and SEO. The company has 5 million users, 7 offices on two continents, 800 employees and 30 development teams.Each development team deals with its own tool within the platform. I work in one of these teams of 8 people: two on the frontend, three on the backend, QA, DevOps engineer and PO. The tool our team is working on allows users to check the position of their site’s pages for specific Google searches. The tool helps to check the position on the keywords of not only your site, but also competitors and to analyze and compare.The platform works in a browser. Running a mobile application will allow you to getcompetitive advantage , because the application helps to retain old users longer and increases the conversion from free to paid.For users, the application improves the usability of the platform. Through the phone, the client can use SEMrush where a computer was previously needed. Go into the application, see if his site has fallen in Google’s SERP or has risen - key metrics are always at hand . If they dipped, then in the web version you can see the details and understand how to fix the situation.Our team saw the potential of the mobile application and decided to try to develop it, but there were no mobile developers among us. We began to study tools and technologies for application development ourselves.Native apps- the first thing you noticed. After studying, we realized that for us it is long, expensive and inconvenient: you need to study two technology stacks, duplicate functionality and test it twice.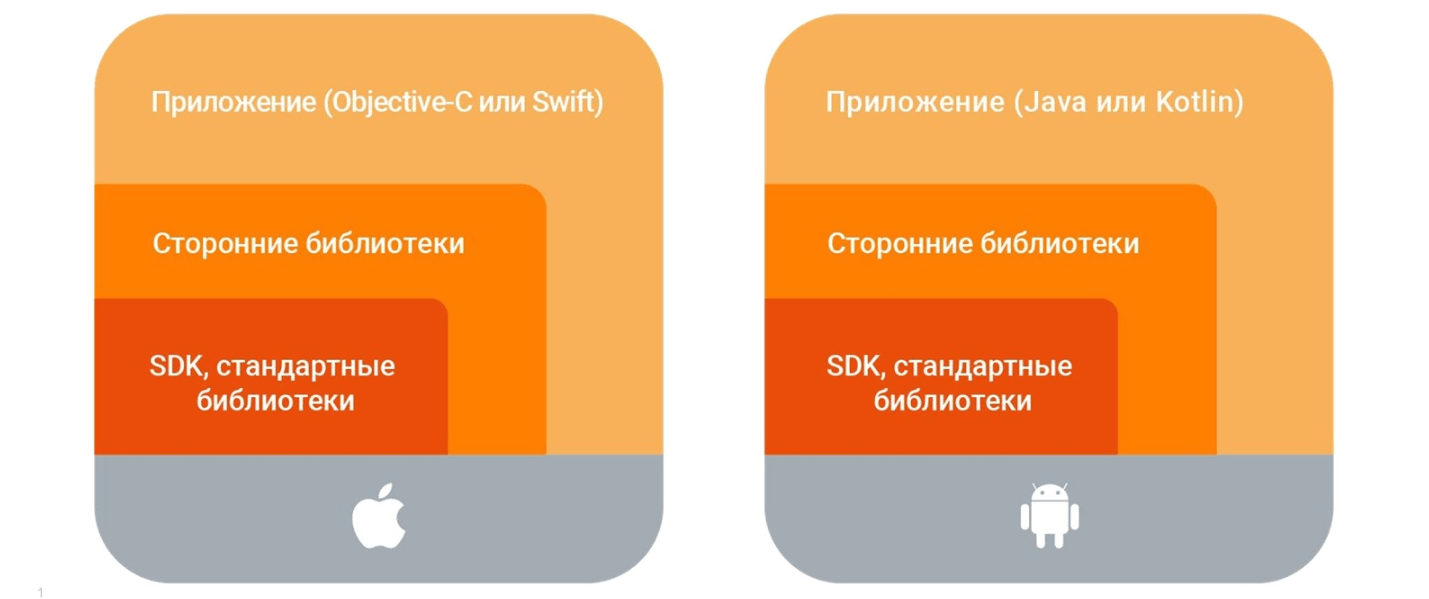 We moved from native development to the study of WebView (Apache Cordova). A frontend colleague had experience in developing on Cordova, so in the first sprint for studying technologies and solutions, one of the prototypes was developed on Cordova.
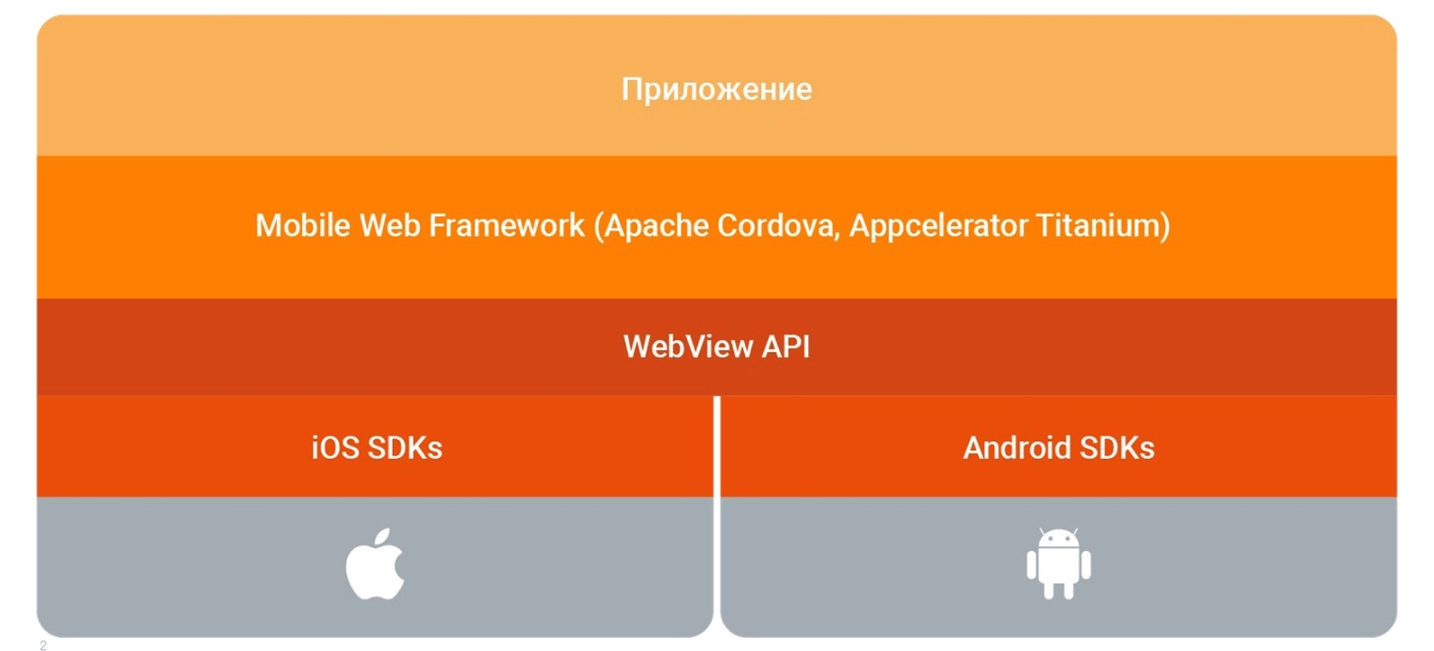 But we wanted something more modern - “fashionable youth”, so we moved on to cross-platform solutions.Cross-platform development. Several options were considered: Flutter, Xamarin, Native Script, and React Native. For us, each of the options had its own minus, because we wanted to start as soon as possible:
- Flutter requires knowledge of Dart (an alternative to JavaScript). There was no time to study related technologies - I wanted to quickly “fly up” to test the hypothesis.
- Xamarin requires knowledge of C #. We have backend developers, but iOS and Android require different interfaces. Anyway, you have to duplicate the code and implementations.
- Native Script is designed to be bundled with Angular. Our project uses ReactJS and Redux, so no.
- React Native seemed cool, and they chose him. In addition, we just wanted to try it, despite the minuses and advantages of other solutions.
During the selection, we did not encounter Ionic. Perhaps they would have considered it too, but they would have chosen React Native anyway.React native
This is a Facebook framework for developing cross-platform native applications. Built on the basis of ReactJS, under the hood does not use WebView, so there is no DOM API. React Native does not have HTML and CSS, but there are some platform components in JSX and CSS-like polyfiles.React Native contains some JavaScript API over native components. This means that native components have some kind of “binding” to JavaScript components on ReactJS. The relationship between the native and JavaScript bundles is done through the bridge using the JavaScript API. Superficially, this is all architecture.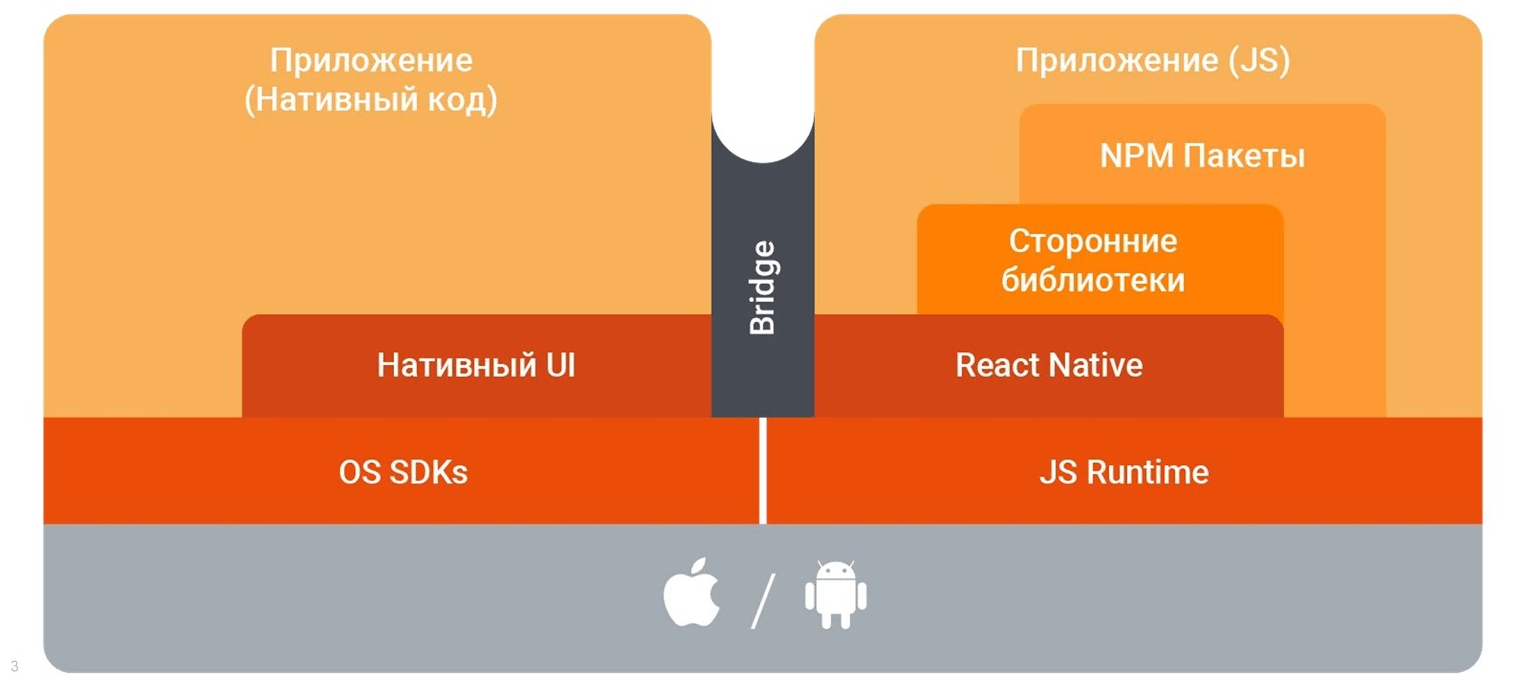 React Native Pros:
- Cross-platform . We wanted to write the application initially under iOS, but the additional launch under Android is a huge plus.
- . , . React Native , 80% .
- . Telegram React Native 3000 . , , , .
- . — , . , ReactJS React Native.
With React Native, there are two ways to develop an application: use the Expo or React Native CLI.Expo This is an abstraction layer - a set of tools, libraries and services for quick launch. This is some API that out of the box gives access to the device’s capabilities : to the camera, geolocation, push messages.Expo has application debugging and testing tools. The algorithm is simple: we install the Expo Client application on the phone, connect the phone with the computer to the same local network, go to Expo on the phone, open the application under development. All changes in the code are displayed instantly. This helps to test and share on the team.Take off at Expo is fast and swift. With Expo, Xcode and Android Studio are not needed. We write in our development environment, collect the application using the Expo service, sign and update on the fly.But there are also disadvantages.- You cannot add custom native modules.
- Expo is an abstraction layer over React Native. You cannot upgrade to a new version of the framework until Expo is updated.
React Native CLI . Its advantage is the possibility of customization , adding native modules.But to sign and build the application (and publish) you need Xcode or Android Studio. To test the application, you need to build and download it to your phone, for example, using TestFlight for iOS or direct installation from PC to phone. Standard scheme, but inconvenient and long.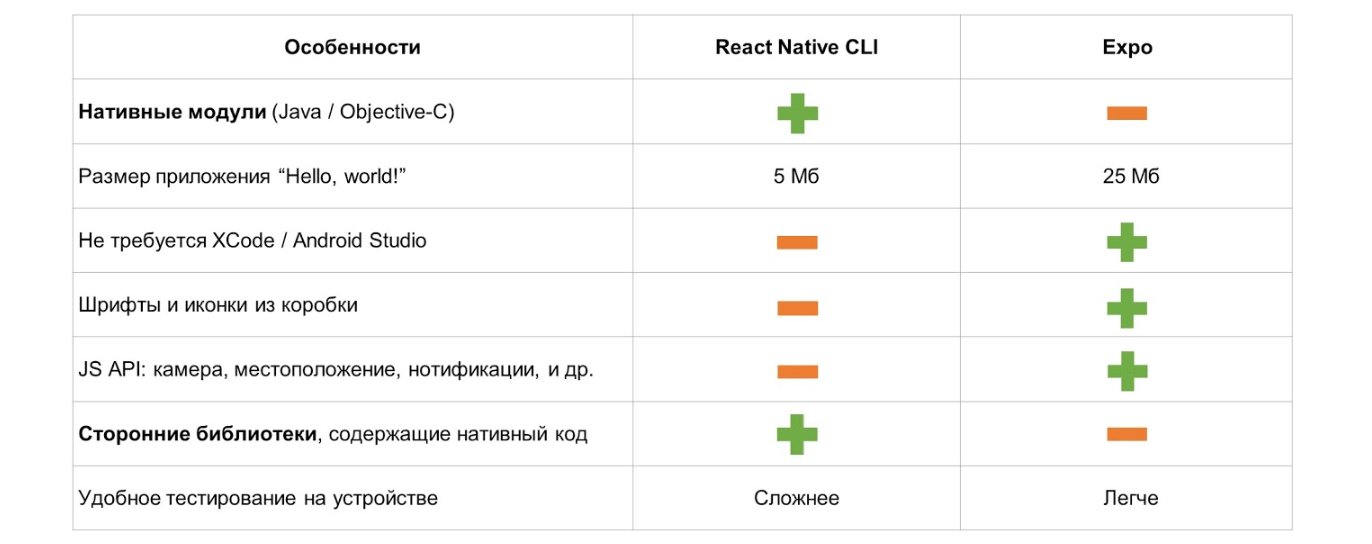
In general, the choice is simple: we want to develop a prototype - we select Expo, we want an application with the prospect - React Native CLI.
We chose the React Native CLI. In SEMrush, we will probably want to write our custom native parts, so the point with native modules and third-party libraries with modules became a decisive factor. With the React Native CLI, the start is slower due to a lot of training, but in the future there will be more opportunities.Many colleagues, using React Native, were faced with the need for customization, and they had special teams to do Eject with Expo on the React Native CLI. The directory structure of files of a simple application is transferred from the usual set of JavaScript files to folders for Android, iOS and JavaScript. But with a complex application there will be difficulties.We are writing an application
In no usual React Native CSS, DOM and web elements: div, span, li, button. But there are two types of platform components in React Native.- Cross Platform :
View, Text, Imageand others. - Specific to each platform , for example,
DatePickerIOSor DatePickerAndroid.
The transition from React to React Native is simple: it blocks divit View, it blocks spanit Text, and lists it lior ul- FlatList. For each element there is a correspondence.Note. To transfer ready-made web components to non-web, you can write a transporter, but it is usually easier to rewrite it again.You can start writing React Native quite quickly.import React, {Component} from 'react';
import {Text, View, StyleSheet} from 'react-native';
export default class App extends Component {
render() {
return (
<View style={styles.container}>
<Image style={styles.image} source={require('./img/main.png')}/>
<Text style={styles.welcome}>Hello, SEMrush!</Text>
</View>
);
}
}
There is some class App(application container). It contains a method renderin which the visual part is drawn. It contains the container Viewinside which goes Imageand Text.Each of the elements, for example, Viewcontains an attribute stylewhose value is specified through the object styles.An object stylesis created using the module of StyleSheetthe createReact Native method . This object is a CSS object notation, a simplified CSS model that is enough. Flexbox is also used for layout of the interface, also simplified, but it is enough to align it horizontally and vertically.const styles = StyleSheet.create({
container: {
flex: 1,
justifyContent: 'center',
alignItems: 'center',
backgroundColor: '#F5FCFF',
},
welcome: {
fontSize: 20,
textAlign: 'center',
margin: 10,
},
image: {
marginBottom: 20,
},
});
Done - we wrote an application for iOS. Looking ahead, I’ll clarify that it also works for Android. The first application is "Hello, World!".
Cross-platform
We wanted our application to work on both Android and iOS. At the same time, we wanted to be able to do various implementations depending on the platform. There are two ways to do this in React Native.The first way is to use the Platform module . For example, we create an application and set the height depending on the platform. For iOS, the height is 200; for Android, it is 100. Using the method, we Platform.OSdetermine which platform the user is using.import {Platform, StyleSheet} from 'react-native';
const styles = StyleSheet.create({
height: Platform.OS === 'ios' & 200 : 100,
});
If we have 40 such attributes, there is no need to duplicate the code. There is a method Platform.selectfrom the same module for this. It returns a set of properties by the platform key: under iOS returns backgroundColor = 'red', under Android - backgroundColor = 'blue'. As a result, we can return our set of attributes for iOS (there can be at least 20, at least 40 of them), for Android - a completely different set.import {Platform, StyleSheet} from 'react-native';
const styles = StyleSheet.create({
container: {
flex: 1,
...Platform.select({
ios: {
backgroundColor: 'red',
},
android: {
backgroundColor: 'blue',
},
}),
},
});
The method Platform.selectallows you to write cross-platform components.const Component = Platform.select({
ios: () => require('ComponentIOS'),
android: () => require('ComponentAndroid'),
})();
<Component />;
Some components use a method Platform.selectthat, depending on the platform key, returns its implementation. Everything is fine, we take and write a cross-platform library.If there are any custom solutions or restrictions on the operating system, we can determine the OS version.import {Platform} from 'react-native';
if (Platform.Version ===25) {
console.log('Running on Nougat!');
}
import {Platform} from 'react-native';
const majorVersionIOS = parceInt(platform.Version, 10);
if (majorVersionIOS <= 9) {
console.log('Work around a change in behavior');
}
The second method - use platform-specific file extension ( *.android.jsand *.ios.js). This allows you to develop cross-platform implementations for more bulky code and complex logic. Then we divide all the code into two files, for example, BigButton.ios.jsand BigButton.android.js. In the code where we want to use it, we use the interface and import it BigButton. React Native will take care of the necessary imports depending on the platform.Components
We can implement cross-platform solutions, but speed is important. Therefore, we moved towards ready-made solutions - component libraries. Researched, highlighted a lot of great solutions (UI kit) and chose NativeBase . This is a huge library with a dozen components, 12,000 stars on GitHub, which allows you to solve most problems.
 Example UI for iOS on the left, for Android on the right.In our project, we partially use this library, customize elements and set our own styles. For example, we have
 Buttonor components Headerthat we import from the NativeBase library.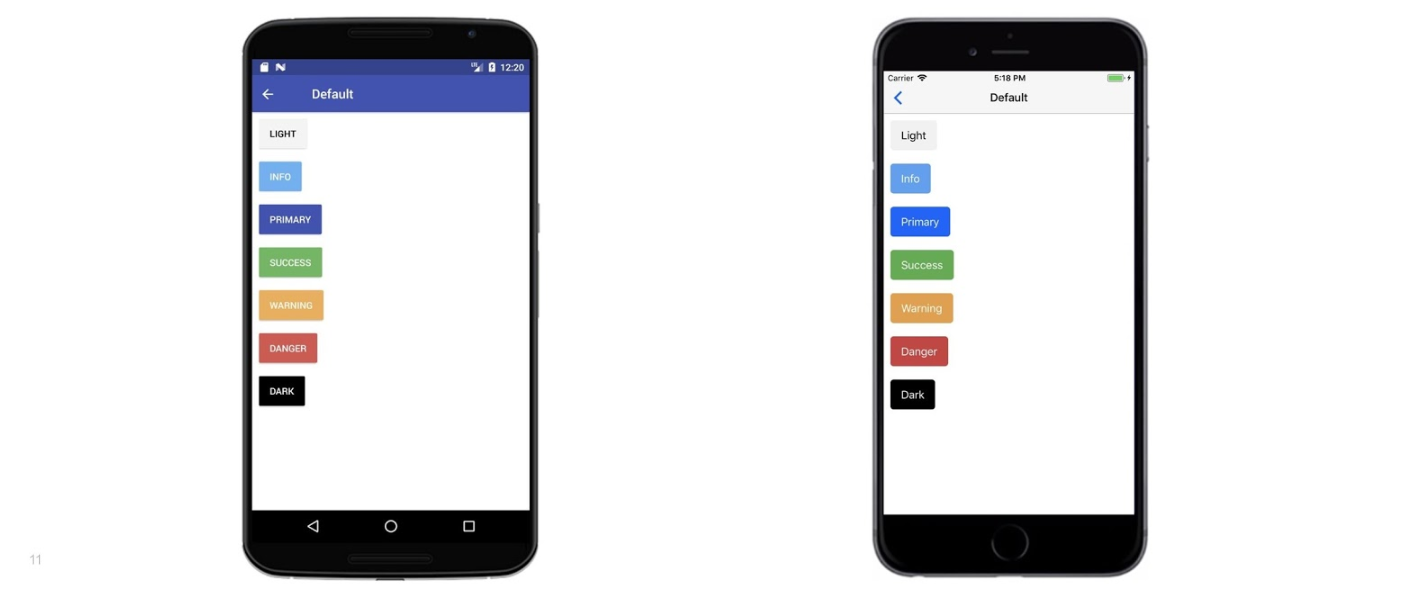 We write the code once, while on each platform it looks different.
import React, { Component } from 'react';
import { Container, Header, Content, Button, Text } from 'native-base';
export default class ButtonThemeExample extends Component {
    render() {
        return (
            <Container>
                <Header />
                <Content>
                    <Button light><Text> Light </Text></Button>
                    <Button primary><Text> Primary </Text></Button>
                    <Button success><Text> Success </Text></Button>
                    <Button info><Text> Info </Text></Button>
                    <Button warning><Text> Warning </Text></Button>
                    <Button danger><Text> Danger </Text></Button>
                    <Button dark><Text> Dark </Text></Button>
                </Content>
            </Container>
        );
    }
}
Navigation
For navigation, we also compared several possible solutions.- react-navigation Facebook React Native.
- wix/react-native-navigation — Wix. , , -, — .
- react-router — react-router ReactJS . , .
- airbnb/native-navigation — - Airbnb. , .
We chose the first solution - react-navigation . It is fully JavaScript, so we don’t have to worry about native files. But on the other hand, performance is in question.We discussed with colleagues from the React Native community, studied the articles, and realized that the performance of react-navigation and wix / react-native-navigation is about the same. Therefore, we chose the first solution, and the experience of use only confirmed the correct choice.
 Pros of react-navigation:
- Flexible cross-platform solution.
- Native UI for each platform and native transitions between screens. We did not want to create an application that on Android looks like on iOS.
- It provides all the basic types of transitions: the lower tabs, swipe between screens, modal windows
SwitchNavigator.
An example application structure using react-navigation. The code is more convenient to read from the bottom up.const HomeStack = createStackNavigator({
Home: { screen: HomeScreen },
Details: {screen: DetailsScreen },
});
const SettingsStack = createStackNavigator({
Settings: { screen: SettingsScreen },
Details: { screen: DetailsScreen },
});
const TabNavigator = createBottomTabNavigator({
Home: { screen: HomeStack },
Settings: { screen: SettingsStack },
});
export default createAppContainer(TabNavigator);
Some createAppContainercontains createBottomTabNavigatortwo stacks. Each stack has its own set of screens.We have two buttons - Homeand Settings. These are two stacks - HomeStackand SettingsStack. Inside each stack are two screens: HomeScreenand DetailsScreen, SettingsScreenand, DetailsScreenrespectively. Both stacks use a common component DetailsScreen. We write a component (screen) and reuse it on different stacks.The code for the three screens looks as simple as possible.class HomeScreen extends React.Component {
static navigationOptions = { title: 'Home' };
render() {
return (
<View style={styles.container}>
<Text>Home!</Text>
<Button title="Go to Details" onPress={() => this.props.navigate('Details')}/>
</View>
);
}
}
class SettingsScreen extends React.Component {
static navigationOptions = { title: 'Settings' };
render() {
return (
<View style={styles.container}>
<Text>Settings!</Text>
<Button title="Go to Details" onPress={() => this.props.navigate('Details')}/>
</View>
);
}
}
class DetailsScreen extends React.Component {
static navigationOptions = { title: 'Details' };
render() {
return (
<View style={styles.container}>
<Text>Details!</Text>
<Button title="Go to Details" onPress={() => this.props.navigate('Details')}/>
</View>
);
}
}
This is the same “Hello, World!” That we started with - nothing more.Add Redux . We wrap the root navigator in Provider, roll it store. Next, write reducer, actions, actionTypesand the rest - everything is familiar.const Navigation = createAppContainer(TabNavigator);
export default class App extends React.Component {
render() {
return (
<Provider store={store}>
<Navigation />
</Provider>
);
}
}
Need more components
Choosing the final UI kit, we considered many possible solutions: React Native Elements, UI Kitten, React Native Material UI, React Native Material Kit, React Native UI Library, React Native Paper, Shoutem UI Toolkit, Nachos UI, Teaset. As a result, we use some components of these libraries. React Native also has platform-oriented components. A striking example is
 DatePickerAndroidand DatePickerIOS. They differ visually and in interface, so you have to duplicate the code to solve one problem for both platforms.
 On the left is DatePickerAndroid, on the right is DatePickerIOS.For example, in our application, you can request a report or graph for a certain period of time. The user provides two dates to select a period. But on iOS, native date picking is inconvenient, especially compared to the web version of our tool.
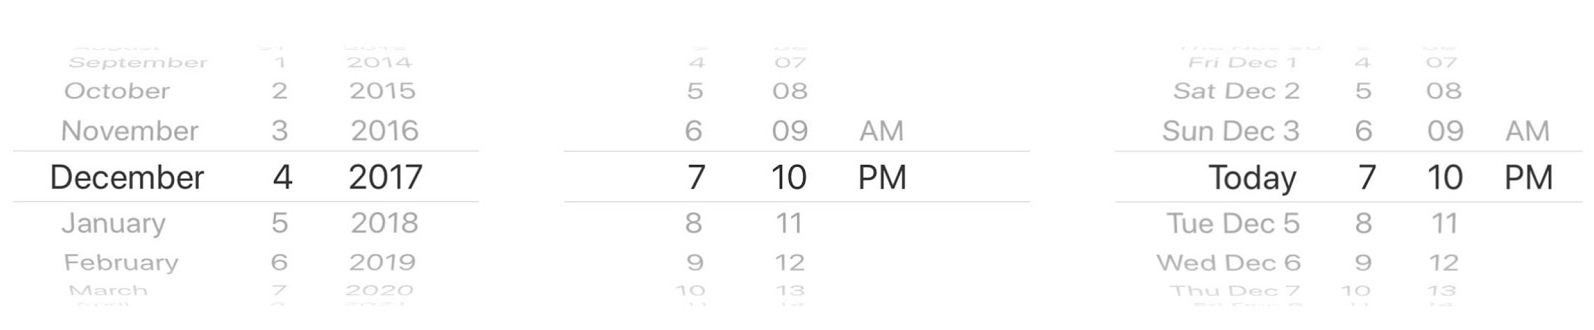 We would have to do two fields: for the start and end dates. It’s more convenient to select dates in one field as on Android, but we won’t be able to set everything up as well - customization is minimal .We found a solution - wix / react-native-calendars .


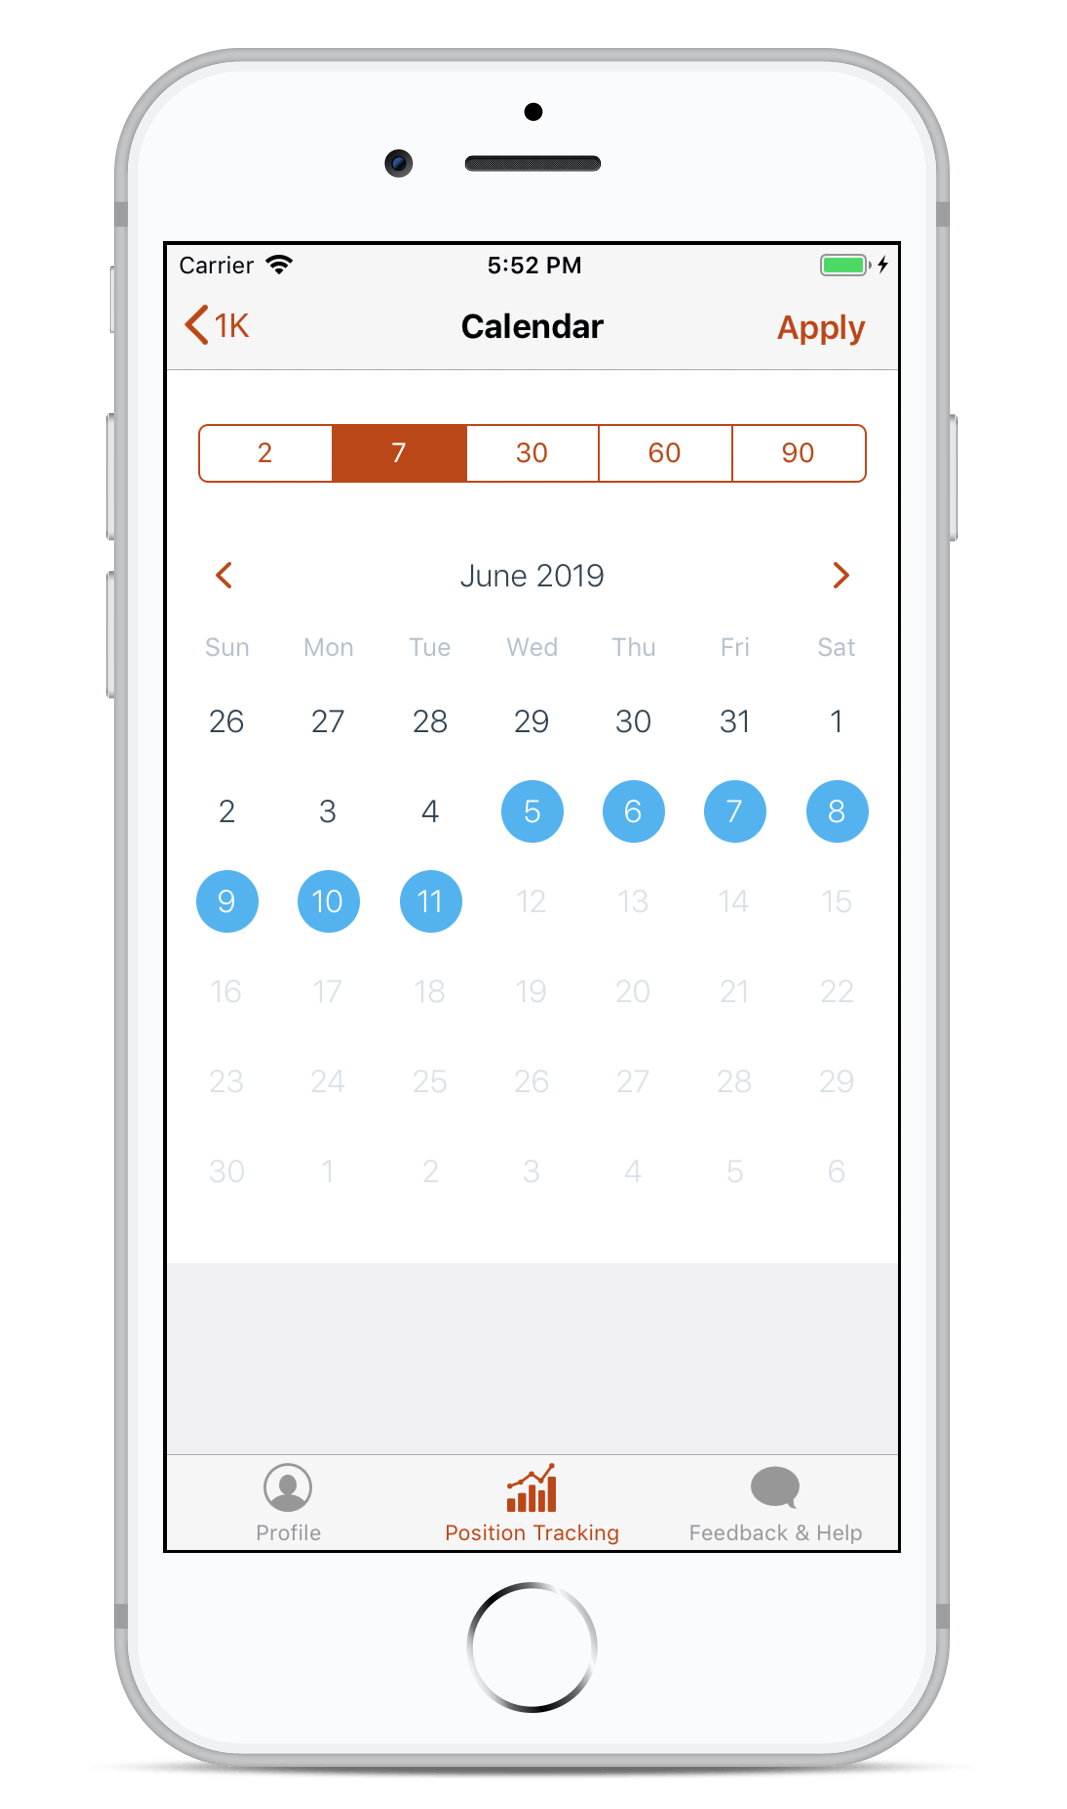 On the right is an example of a calendar from our app with company colors.It has horizontal and vertical calendars, detailing by date, the ability to display the company’s style, choosing a date range, blocking the selection of certain dates and supporting Android and iOS. It’s convenient that the solution has one interface - we write the code once, without duplication and rewriting.
Storage
At some point, we needed to store data in order to display it offline or when resuming work. To do this, use the Async Storage library (key-value storage). It works with keys and multi-keys (write, read and delete), and provides a JavaScript API for interacting with the native part.IOS data is stored in serialized form. Under Android - for example, in SQLite. As developers, we do not need to worry about this: there is an API, we store data, everything is fine.Animations
React Native does not use HTML-based WebView technologies, so we don’t have animations. Here the Animated component helps us . It supports some wrappers basic elements: View, Image, Text, ScrollView. It goes in a separate thread and does not slow down the application, but there is a minus - the "inhuman" kind of code.Below is an example of the screen of our application with a list of user projects.Above Headerwith the name "Projects", which is SearchBarto filter projects. It looks like it SearchBar’s under Header, but in reality it’s in the general stream of blocks that go below with a list of projects. Thanks to the Animated component, such animation is implemented that it SearchBar“disappears”.A shortened version of the implementation.export default class ProjectsScreen extends Component {
state = {
scrollY: new Animated.Value(
Platform.OS === 'ios' ? -HEADER_MAX_HEIGHT : 0,
),
};
render() {
const scrollY = Animated.add(
this.state.scrollY,
Platform.OS === 'ios' & HEADER_MAX_HEIGHT : 0,
);
const headerTranslate = scrollY.interpolate({
inputRange: [0, HEADER_SCROLL_DISTANCE],
outputRange: [0, -HEADER_SCROLL_DISTANCE],
extrapolate: 'clamp',
});
return (
<View>
<Animated.View style={{ translform: [{ translatY: headerTranslate }] }}>
<SearchBar/>
</Animated.View>
<Animated.ScrollView
onScroll={Animated.event(
[{ nativeEvent: { contentOffset: { y: this.state.scrollY } } }],
{ useNativeDriver: true },
)} contentInset={{
top: HEADER_MAX_HEIGHT,
}}
contentOffset={{
y: -HEADER_MAX_HEIGHT,
}}
>
{this._renderScrollViewContent()}
</Animated.ScrollView>
</View>
);
}
}
It looks easy, but you have to “crutch”: move all content higher or lower on iOS. On Android, this is not necessary. There is also interpolation and different methods from the Animated module.The problem of "flickering" of the screen at first start
We wrote the application and decided to add the application icon and Splash Screen (or Launch Screen) - the application screen that appears when you first start it if it is unloaded from memory. We have a screen in orange and with the SEMrush logo in the center.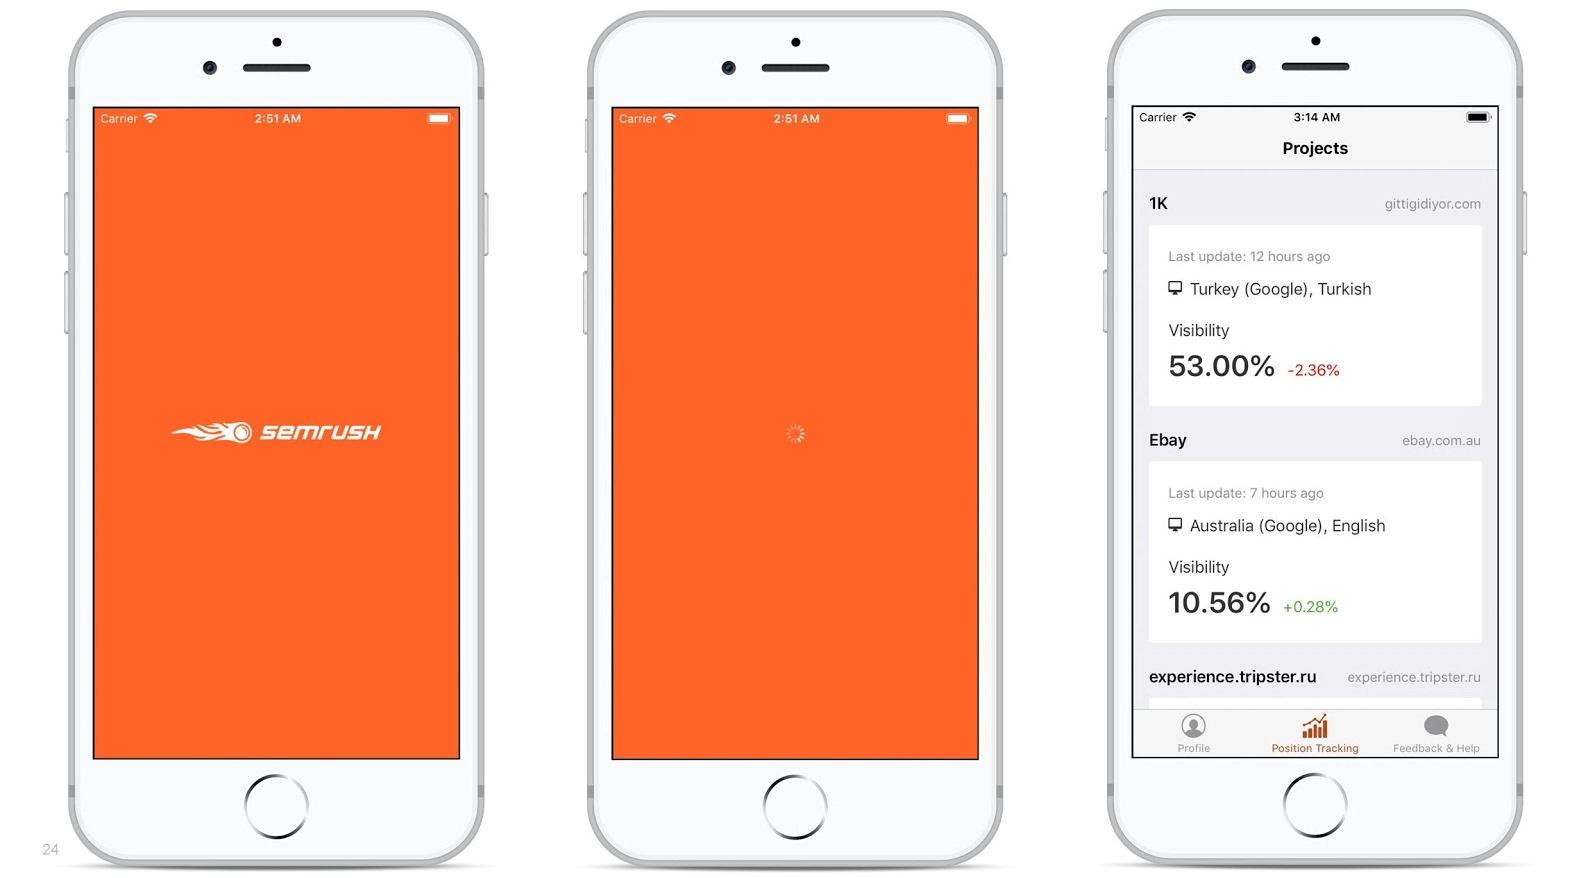 In the React Native architecture, the native part interacts with some JavaScript bridge bundles. We encountered a problem that at the time of launch, the native part is working, and the scripting bundle has not yet been loaded. Between the orange Splash Screen and the appearance of the list of projects, a white void (fractions of a millisecond) shone on the screen.The flicker problem was solved using the react-native-splash-screen library. It provides a JavaScript API to programmatically show or hide the application launch screen. Through this API, we removed the native Splash Screen in the component with the list of projects in the method
 componentDidMount(). They put a spinner between the two screens as a bonus to make them look prettier.Loss of connection
We wanted to develop a friendly and beautiful interface, take care of UX and UI. But when the user rode the subway, lost contact and updated the list of projects, the application showed only a blank screen. It is better for the user to see information that has already been loaded, and a message about a problem with the Internet connection.The Netinfo library helped with offline work . It is now in a separate package, as Facebook unloads React Native to make it lighter.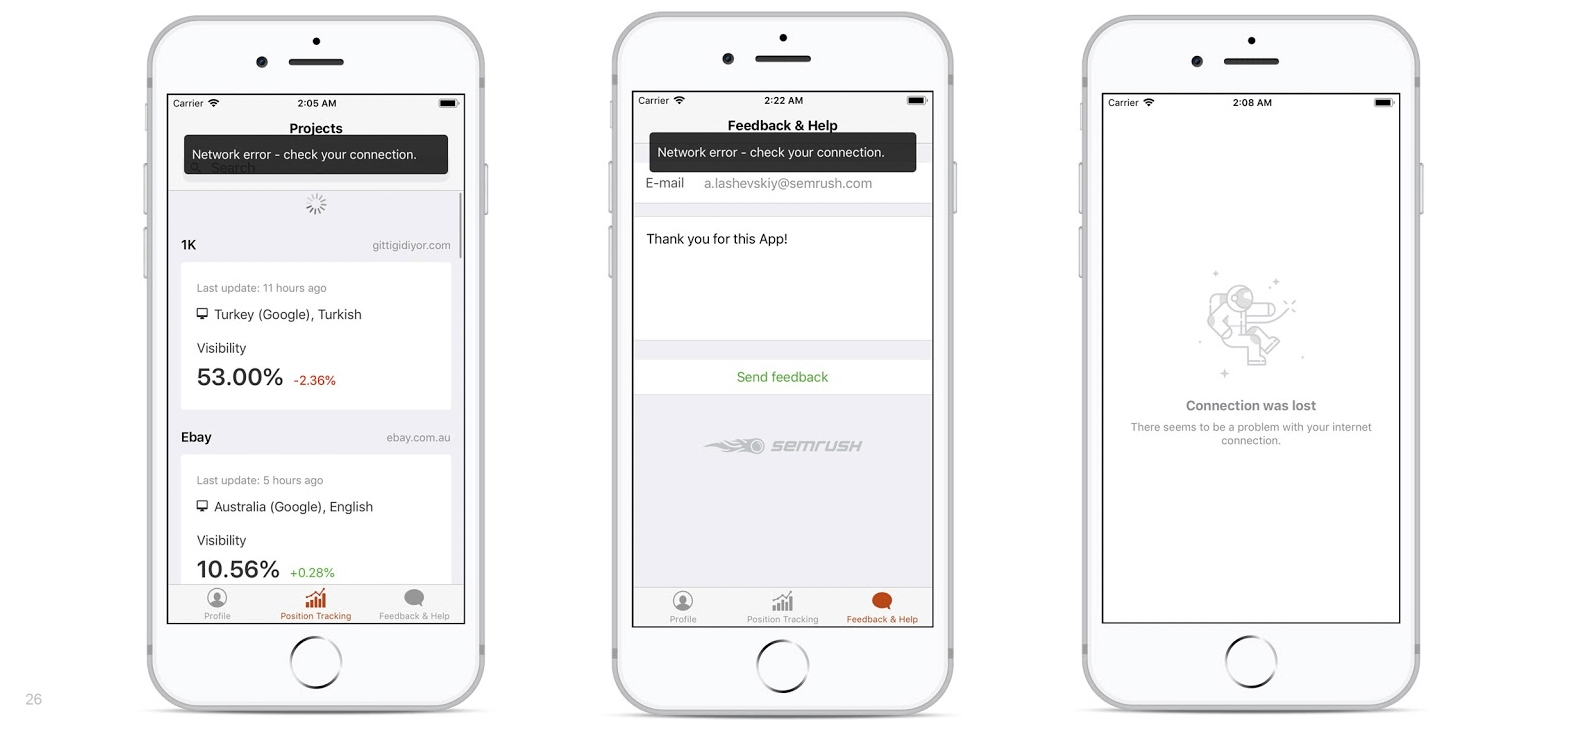 Netinfo allows you to:
- Subscribe to events and, when changing the Internet connection, display messages to the user;
- check the quality of the connection;
- Check the type of connection (LTE, WiFi, 3G) for complex applications;
- Use a request to check your internet connection.
Application debugging
In order not to get errors after adding new dependencies, especially those that use native code, you need a debugger. In React Native it is - shown in the image of the iPhone simulator.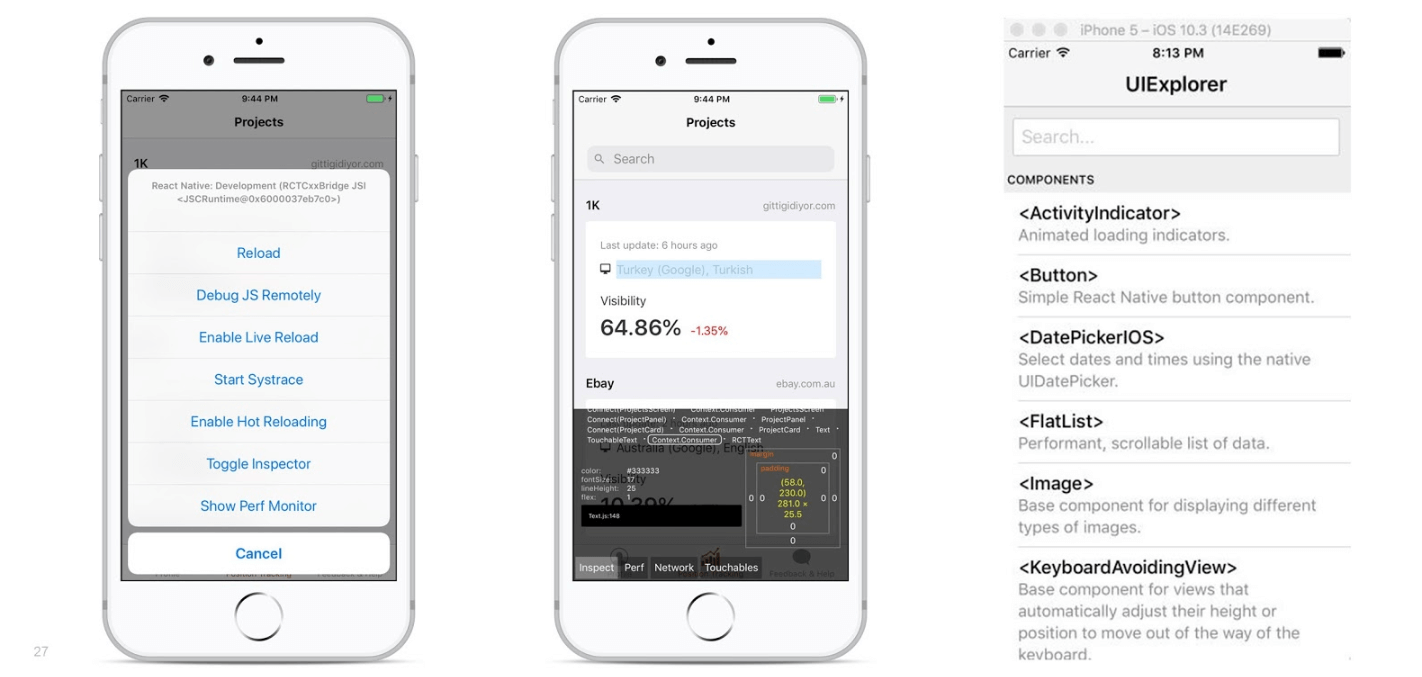 For iOS, we used an emulator from Xcode, in which you can choose the version of the OS and device. Simulator for Android - Android Studio.The emulator’s dialog menu has Debug JS Remotely and Live Reload modes. Allows you to see the properties of components, for example, CSS-like styles and view nesting.In native development, you need to write code, send it to the assembly, run - it's a long time. In the debugger, everything is the same as in ReactJS on the web: we turn on Live Reloading and see real-time rebuilding in the simulator without rebooting.In addition, we also use React Developer Tools to inspect components, view hierarchies, and change their properties and styles.
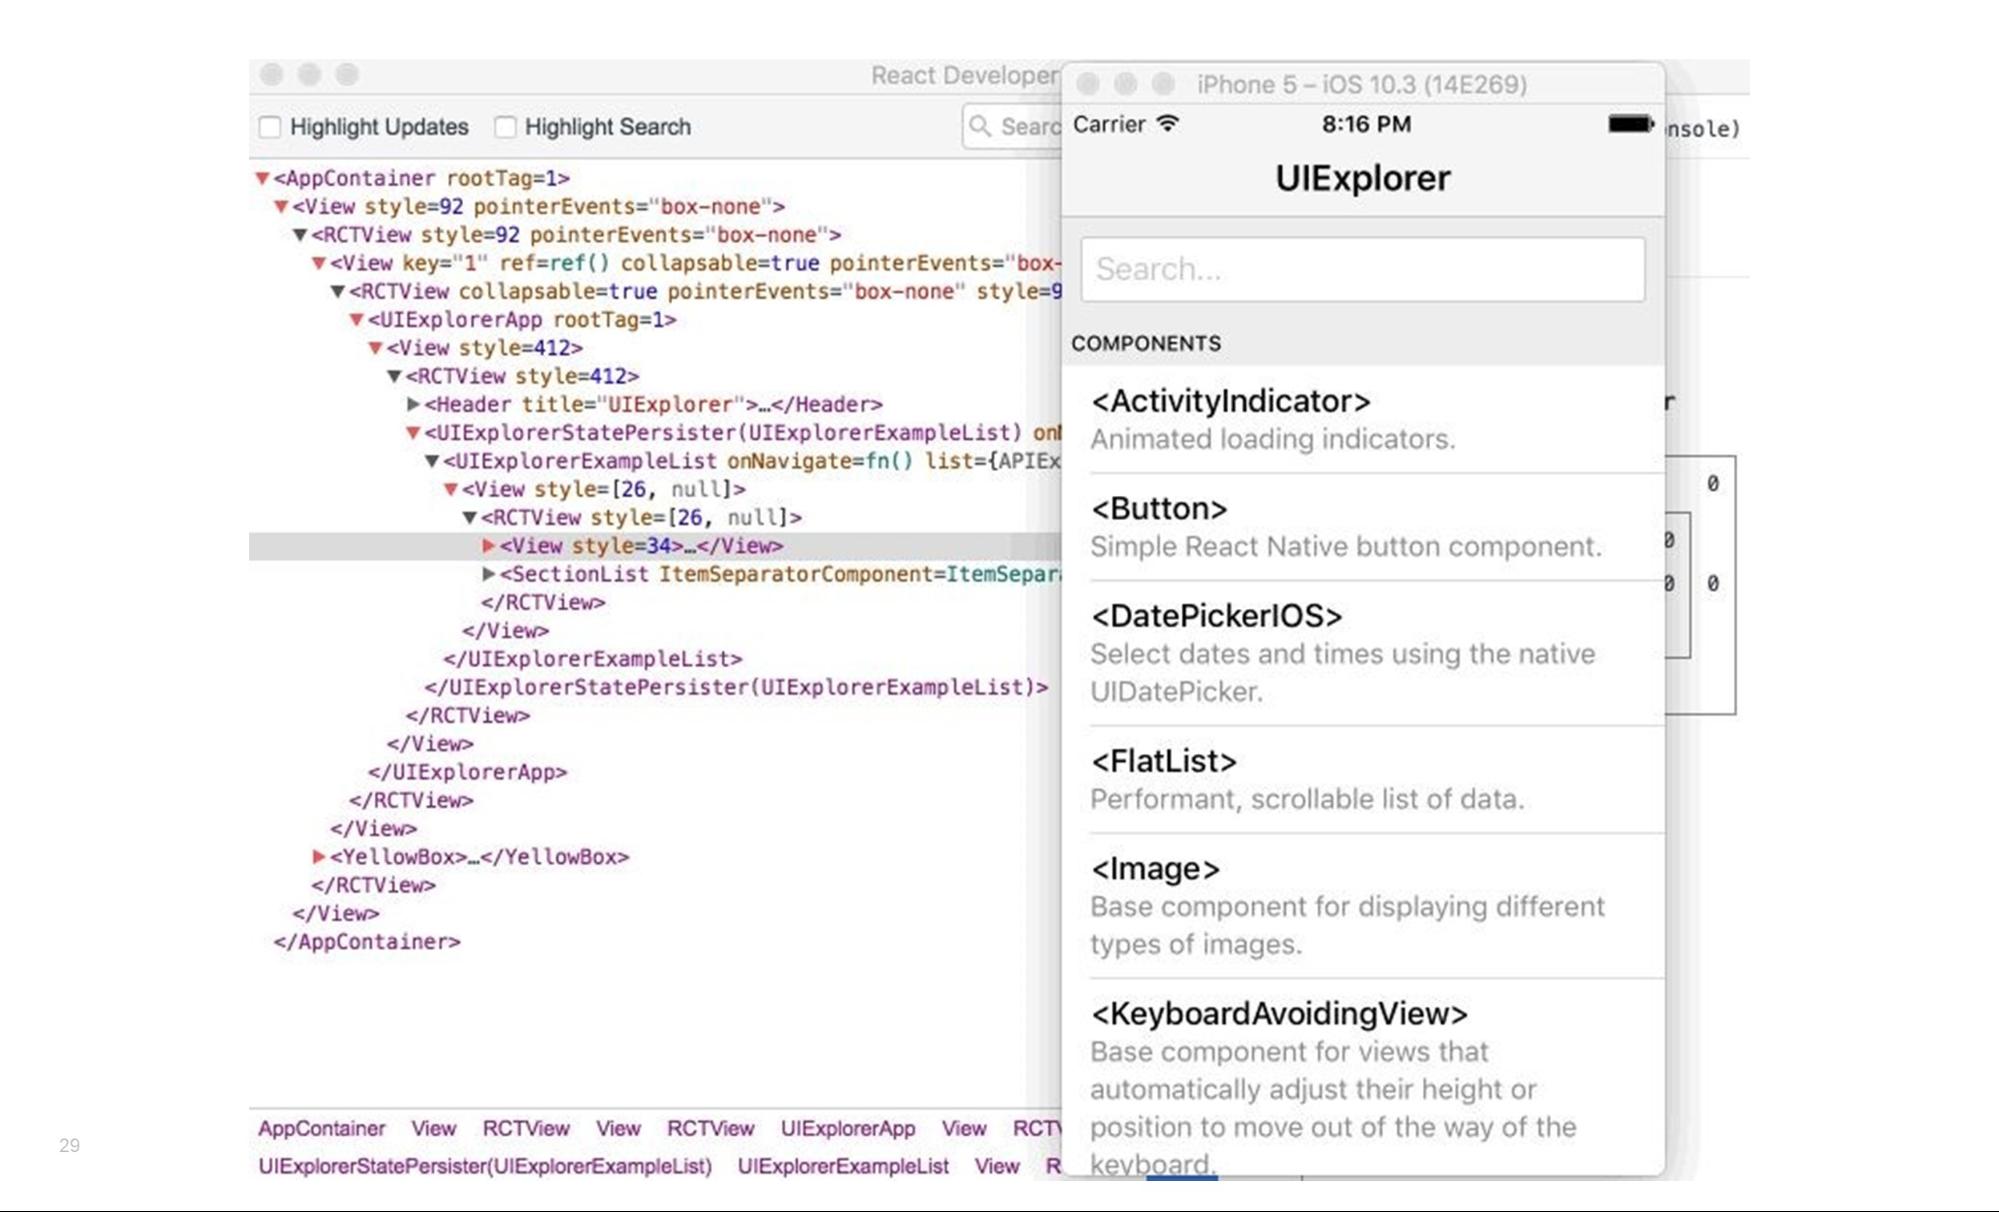 But even this is not enough, there is a better solution - React Native Debugger .
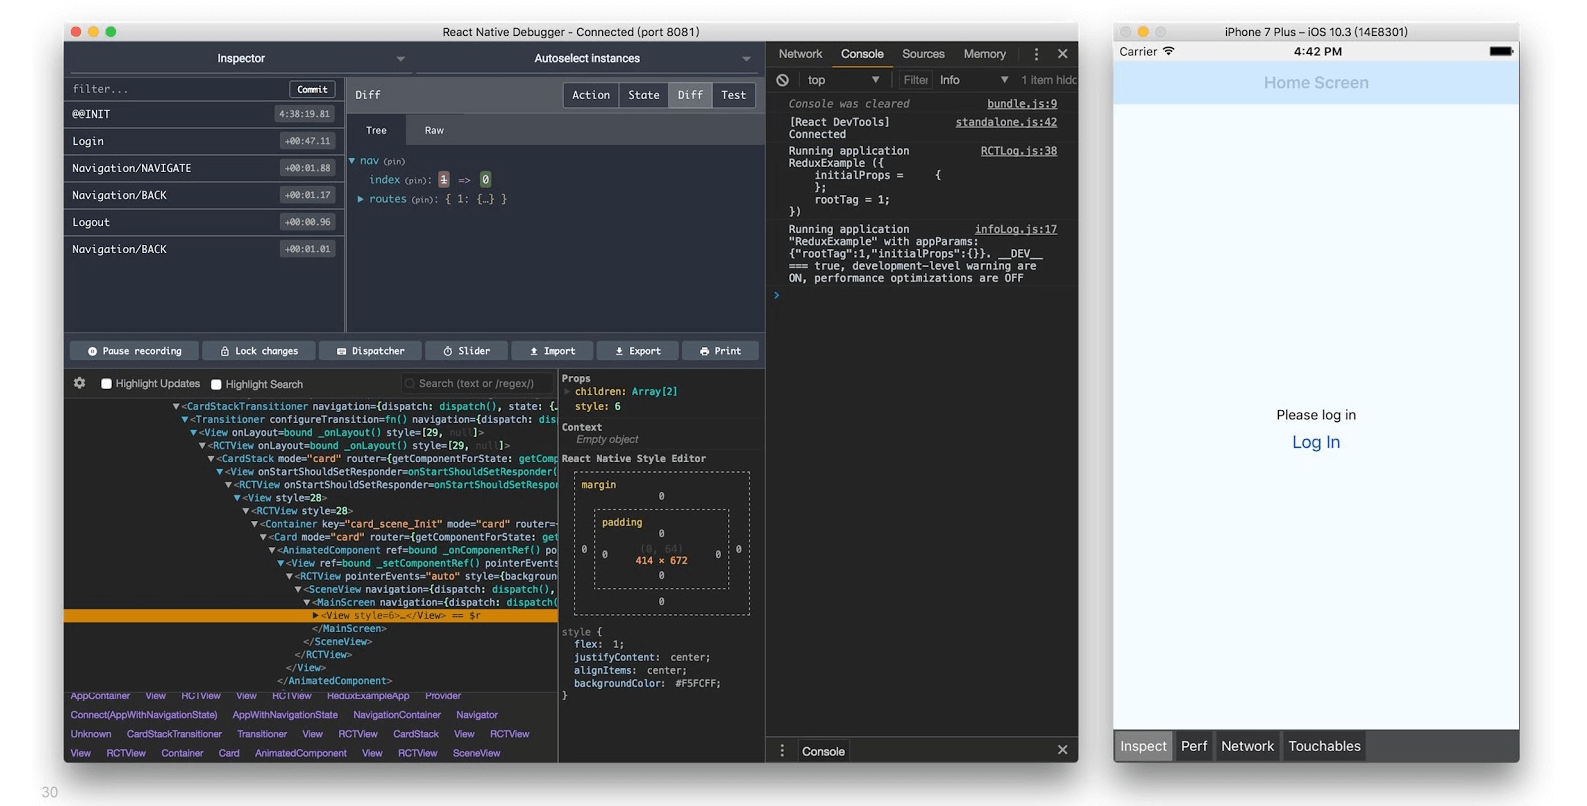 It has a React Inspector, Redux DevTools, Internet interaction, console logging, memory and application profiling, viewing all actions. Unlike the first two two solutions, you can change the style in the React Native Debugger itself.
Connecting native modules
Until now, everything was easy and transparent: we take some kind of solution, connect, it works. But there is a nuance - a consequence of the architecture of React Native. In addition to the JavaScript part, all libraries use the native one, which must be associated with React Native. To do this, there is a react-native link command that automatically makes all the necessary changes and links to the native code in the project.But automatic connection does not always work, so sometimes you have to manually modify native files. If the manual installation is not described in the instructions for the library, then think about whether it is worth using it, and if possible avoid manual linking - a couple of times we stepped on such a rake.Result
Initially, we wanted to write an application for iOS, but we did it for Android, and they look differently, as everyone should on their platform. Transitions between screens look cool, and we have about 30 screens (transitions and states). We managed to avoid the implementation of custom native modules and use third-party solutions.Timing: the development of the application took three months of two people. Since April 2019, they have released several updates with new functionality, the application is developing, and teams of other projects want to implement their tools in it. We are completely happy with theperformance of React Native because we did not need complex logic and we do not have a lot of work.Feedback:It's nice to receive user feedback for the app.React Native is suitable for quickly developing mobile applications and testing hypotheses , even if you are not a mobile developer. It is constantly evolving, new functions and libraries appear. For example, a year ago there was no support for 32 and 64-bit architectures - now there are no problems with this., , -, . , , « », . ++ 2020 — .
, , , , , — - , 5900.