 Good afternoon, dear readers. In this article, we will talk about software architecture in web development. For quite some time, my colleagues and I have used a variation of The Clean Architecture to build architecture in their Frontend projects. Initially, I adopted it with the transition to TypeScript, because I did not find other suitable generally accepted architectural approaches in the React development world (and I came from Android development, where a long time ago, before Kotlin, I made a fuss about an article from Fernando Cejas , to which I still sometimes refer).In this article, I want to tell you about our experience with The Clean Architecture in React applications using TypeScript. Why am I telling this? - Sometimes I have to clarify and justify its use to developers who are not yet familiar with this approach. Therefore, here I will make a detailed analysis with visual explanations to which I can refer in the future.Content
- Introduction
- Theoretical part
- What is architecture for?
- Original definition of The Clean Architecture
- The Clean Architecture for Frontend
- Practical part
- Description of web authorization application
- Source Code Structure
- UML project diagram
- Code parsing
- Conclusion
- Resources and Sources
1. IntroductionArchitecture is, first of all, a global thing. Its understanding is not necessary in the context of a specific programming language. You need an understanding of key ideas in general, so that means whereby the benefits of using one or another architecture are achieved. The principle is the same as with design patterns or SOLID - they were not invented for a specific language, but for entire programming methodologies (such as OOP).Understanding architecture is easiest when you see the whole picture. Therefore, in this article I will not only talk about how it should be “in theory” - I will also give a concrete example of the project. First, we’ll deal with the theoretical part of using The Clean Architecture in the frontend, and then consider a web application with a UML diagram and description of each class.Important clarification: The Clean Architecture does not establish strict rules for organizing applications, it only gives recommendations. Each platform and language will have its own nuances. This article presents the approach that I have used with my colleagues and am using now - it is not a panacea.I would also like to note that the use of such architectural approaches may be redundant for small projects. The primary goal of any architecture is to make code understandable, supported, and testable. But if your application is faster to write in JS without architectures, testing and other things - this is quite normal. Do not overengineering where it is not needed. Remember that the main strength of architecture / testing is acquired in large projects with several developers, where you need to understand and change other people's code.UPD_0UPD_0: . , —
, , . - , . , , .
, , :
— ( ) .
— , «Computer Programming as an Art» (1974)
, « — ». - , ( , ).
2. Theoretical part2.1. What is architecture for?Answer: architecture is necessary to save time in the development process, to maintain testability and extensibility of the system over a long development period.In more detail about what happens if you don’t lay the architecture for large applications, you can read, for example, in the book of The Clean Architecture by Bob Martin. For a brief explanation, I will give the following chart from this book: On this chart we see that with each new version (let's say they are released at regular intervals), an ever smaller number of lines are added to the system, as well as an increase in the cost of one line. This is due to the complexity of the system, and making changes begins to require an unreasonably large amount of effort.In The Clean Architecture, this graph is an example of poor architecture. Such an approach will sooner or later lead to the fact that the cost of expanding the system will cost more than the benefits of the system itself.
Once again about the ratio of development time( ):
« 90 10 , . 10 90 »
— , Bell Labs
: , , .
And now my “ideal” option, which we (developers, PMs, customers) would like to see in our projects: The graph clearly shows that the growth rate of the number of lines does not change depending on the version. The cost of a line of code (depending on the version) increases, but not significantly considering that we are talking about millions of lines. Unfortunately, this option is unlikely if we are talking about a large Enterprise system, as the product expands, the complexity of the system increases, developers change, so development costs will inevitably increase.However, I can please you too - we are talking about Frontend applications! Let's face it - as a rule, such applications do not grow to millions of lines, otherwise browsers would corny download such applications. In extreme cases, they are divided into different products, and the main logic lies on the backend side. Therefore, to some extent, we can strive for the above trend of increasing the cost of code (with varying degrees of success, depending on the size of the application). If our project is even 50% cheaper to maintain than it could without a good architecture - this is already saving developers time and customer funds.Having initially built a good and clear architecture, as a result we get the following advantages :I think the question “why is this necessary ?!” I answered. Next, we move on to the technical part of the question.2.2. The original definitionI will not go into a detailed description of The Clean Architecture, since this topic is disclosed in many articles, but only briefly state the essence of the issue.In the original article of Bob Martin in 2012, the following diagram is shown: The
 key idea of this diagram is that the application is divided into layers (there can be any number of layers). The inner layers do not know about the outer ones, the dependencies are turned to the center . The farther the layer from the center, the more it knows about the “non-weighted” details of the application (for example, what kind of framework is used and how many buttons are on the screen).
- Entities. Entities (). - . Entities - . , Cart () — , .. , React, , — .
, React\Angular\Express\Nest.js\DI .. , , , Web- React’e — NodeJS . - Use cases. Use Cases ( — , — Interactors). , . , , — , (. ).
- Gateways, Presenters, etc. (Gateways = Repositories, Presenters = View Models) — , - . , , API , View Model React- -.
: Use Cases Repositories, , , frontend API. - External interfaces. Platform dependent layer. Here are direct calls to the API, React components, etc. This layer is the most difficult to test and abstract (a button in React'e - there is a React'e button).
2.3. Definition in the context of frontendNow let's move on to our frontend area. In the context of Frontend, the diagram above can be represented like this: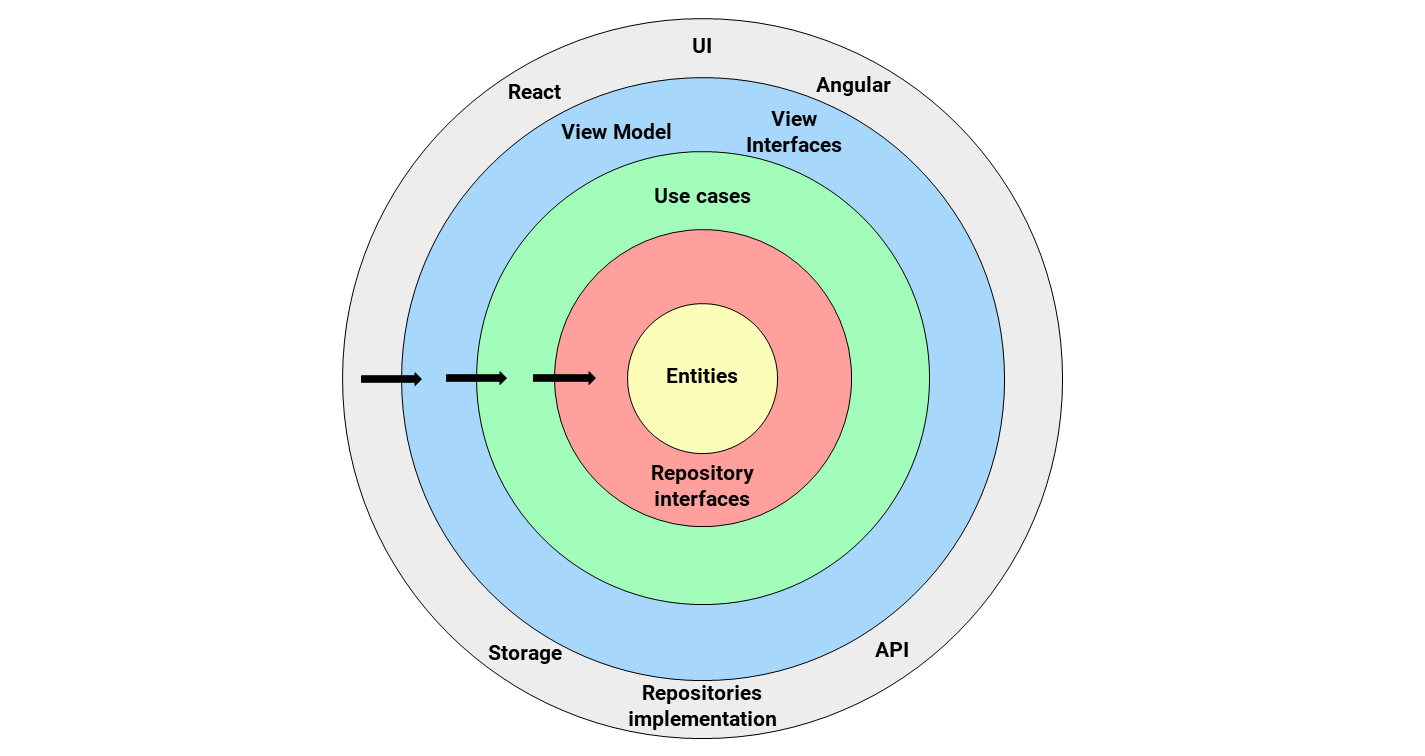
- Entities. Business entities are the same as in the original architecture. Note that entities can store state and are often used for this purpose. For example, the entity “basket” can store the orders of the current session in order to provide methods for working with them (obtaining the total price, total quantity of goods, etc.).
- Repository interfaces. API, , . . , “” . , , . , . SOLID’a ( , ). (, , API ).
- Use Cases. . , - (. . , — , , , ).
- View Models View Interfaces.
ViewModel — Presenters . MVVP MVP\MVC\MV*. , MVP : Presenter View , ViewModel View, . View “” View Model. MVVP (View → ViewModel), MVP — (View ︎ Presenter). — .
View Interfaces — , View, View Model View . onViewModelChanged(): void. . - 5. External interfaces. , . — React’a API. (AngularJS, React Native) (IndexDB, local storage ..). The Clean Architecutre , , - .
If you present the diagram above in the form of a three-layer application, it takes the following form: Red arrows indicate the flow of data flow (but not dependencies, the dependency diagram is displayed on the pie diagram above). An image in the form of a rectangular diagram allows you to better understand how the data flow moves inside the application. I saw the idea of a description in the form of such a diagram in THIS article.Keep in mind that in more complex applications, the layer structure can change. For example, it is a common practice when each of the layers is higher than the domain - it can have its own mappers for data conversion.3. Sample application3.1. Description of web authorization applicationTo make the application of architecture more visual and understandable, I created a web application built on its basis. You can see the source code of the application in the GitHub repository . The application looks like this: The
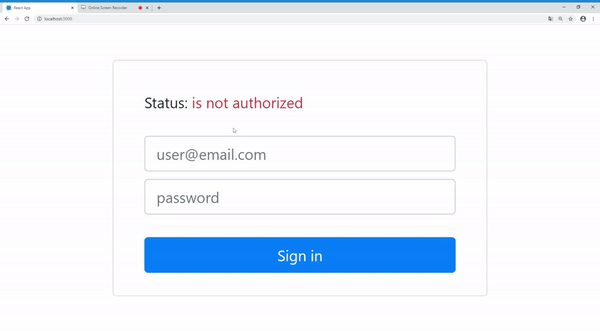 application is a simple login window. To complicate the application itself (so that the architecture is appropriate), we do the following introduction:
- Fields must not be empty (validation).
- The entered mail must have the correct format (validation).
- Access data must be validated on the server (API stub) and receive a validation key.
- For authorization, the API method needs to provide validation data and a validation key.
- After authorization, the access key must be saved inside the application (entity layer).
- Upon exit, the authorization key must be erased from memory.
3.2. Source Code StructureIn our example, the structure of the src folder is as follows:
- data - contains classes for working with data. This directory is the last circle in the pie chart, as it contains classes for implementing repository interfaces. Therefore, these classes are aware of the API and platform-specific things (local storage, cookie, etc.).
- domain — . Entities, Use Cases Repository Interfaces. entities : models structures. , models — , structures — ( POJO Java). , models , () , structures — , JSON- (json2ts, «») .
- presentation — View Models, View Interfaces View ( ), util — , ..
Of course, the structure can vary from project to project. For example, at the root of presentation in one of my projects are classes for monitoring the status of the sidebar and a class for navigating between pages.3.3. URM project diagram Sources for increasing - GitHub .Separation of classes by layers is clearly shown by rectangles. Please note that the dependencies are directed towards the Domain layer (in accordance with the diagram).3.4. Analysis of the codeEntities layerIn this section we will go through all the classes with a description of their logic of work. Let's start with the most distant circle - Entities, since the rest of the classes are based on it.AuthListener.tsx
export default interface AuthListener {
onAuthChanged(): void;
}
AuthHolder.tsximport AuthListener from './AuthListener';
export default class AuthHolder {
private authListeners: AuthListener[];
private isAuthorized: boolean;
private authToken: string;
public constructor() {
this.isAuthorized = false;
this.authListeners = [];
this.authToken = '';
}
public onSignedIn(authToken: string): void {
this.isAuthorized = true;
this.authToken = authToken;
this.notifyListeners();
}
public onSignedOut(): void {
this.isAuthorized = false;
this.authToken = '';
this.notifyListeners();
}
public isUserAuthorized(): boolean {
return this.isAuthorized;
}
public getAuthToken(): string {
if (!this.isAuthorized) {
throw new Error('User is not authorized');
}
return this.authToken;
}
public addAuthListener(authListener: AuthListener): void {
this.authListeners.push(authListener);
}
public removeAuthListener(authListener: AuthListener): void {
this.authListeners.splice(this.authListeners.indexOf(authListener), 1);
}
private notifyListeners(): void {
this.authListeners.forEach((listener) => listener.onAuthChanged());
}
}
AuthorizationResult.tsx
export default interface AuthorizationResult {
authorizationToken: string;
}
ValidationResult.tsx
export default interface ValidationResult {
validationKey: string;
}
This ends the entity layer. Please note that this layer deals exclusively with business logic (state storage) and is used to transfer data throughout the rest of the application.Often state does not need to be stored in business logic classes. For this purpose, a repository bundle with a usage scenario (for data conversion) is well suited.Repository interfacesAuthRepository.tsximport ValidationResult from '../../entity/auth/stuctures/ValidationResult';
import AuthorizationResult from '../../entity/auth/stuctures/AuthorizationResult';
export default interface AuthRepository {
validateCredentials(email: string, password: string): Promise<ValidationResult>;
login(email: string, password: string, validationKey: string): Promise<AuthorizationResult>;
}
Use CasesLoginUseCase.tsximport AuthRepository from '../../repository/auth/AuthRepository';
import AuthHolder from '../../entity/auth/models/AuthHolder';
export default class LoginUseCase {
private authRepository: AuthRepository;
private authHolder: AuthHolder;
public constructor(authRepository: AuthRepository, authHolder: AuthHolder) {
this.authRepository = authRepository;
this.authHolder = authHolder;
}
public async loginUser(email: string, password: string): Promise<void> {
const validationResult = await this.authRepository.validateCredentials(email, password);
const authResult = await this.authRepository.login(
email,
password,
validationResult.validationKey,
);
this.authHolder.onSignedIn(authResult.authorizationToken);
}
}
In this case, Use Case has only one method. Usually, use cases have only one public method, which implements complex logic for one action. In this case, you must first validate, and then send the validation data to the authorization API method.However, an approach is often used when several scenarios are combined into one if they have common logic.Carefully ensure that use cases do not contain logic that must reside in entities. Too many methods or storing state in a Use Case often serves as an indicator that the code should be in another layer.Repository implemetationAuthFakeApi.tsximport AuthRepository from '../../domain/repository/auth/AuthRepository';
import ValidationResult from '../../domain/entity/auth/stuctures/ValidationResult';
import AuthorizationResult from '../../domain/entity/auth/stuctures/AuthorizationResult';
export default class AuthFakeApi implements AuthRepository {
validateCredentials(email: string, password: string): Promise<ValidationResult> {
return new Promise((resolve, reject) => {
if (password.length < 5) {
reject(new Error('Password length should be more than 5 characters'));
return;
}
resolve({
validationKey: 'A34dZ7',
});
});
}
login(email: string, password: string, validationKey: string): Promise<AuthorizationResult> {
return new Promise((resolve, reject) => {
if (validationKey === 'A34dZ7') {
if (email === 'user@email.com' && password === 'password') {
resolve({
authorizationToken: 'Bearer ASKJdsfjdijosd93wiesf93isef',
});
}
} else {
reject(new Error('Validation key is not correct. Please try later'));
return;
}
reject(new Error('Email or password is not correct'));
});
}
}
In this class, we have simulated access to the API. We are returning a Promise that would return a real fetch request. If we want to replace the implementation with a real API, just change the AuthFakeApi class to AuthApi in the App.tsx file or the dependency injection tool, if one is used.Please note that we annotate error description methods so that other programmers understand the need for error handling. Unfortunately, TypeScript does not currently have instructions on the type of throws in Java, so we use a simple annotation.util (presentation layer)In this directory we put classes that implement the logic of “preventive” data validation, as well as other classes for working with the UI layer.FormValidator.tsxexport default class FormValidator {
static isValidEmail(email: string): boolean {
const emailRegex = /^\S+@\S+\.\S+$/;
return emailRegex.test(email);
}
}
View interfacesBaseView.tsx Aclass that allows the View Model to notify View of changes. Implemented by all View components.export default interface BaseView {
onViewModelChanged(): void;
}
View ModelsBaseViewModel.tsx Aclass that provides basic methods for linking a View Model and a View. Implemented by all View Models.import BaseView from '../view/BaseView';
export default interface BaseViewModel {
attachView(baseView: BaseView): void;
detachView(): void;
}
AuthViewModel.tsximport BaseViewModel from '../BaseViewModel';
export default interface AuthViewModel extends BaseViewModel {
emailQuery: string;
passwordQuery: string;
isSignInButtonVisible: boolean;
isSignOutButtonVisible: boolean;
isShowError: boolean;
errorMessage: string;
authStatus: string;
isAuthStatusPositive: boolean;
onEmailQueryChanged(loginQuery: string): void;
onPasswordQueryChanged(passwordQuery: string): void;
onClickSignIn(): void;
onClickSignOut(): void;
}
AuthViewModelImpl.tsx
import AuthViewModel from './AuthViewModel';
import BaseView from '../../view/BaseView';
import LoginUseCase from '../../../domain/interactors/auth/LoginUseCase';
import AuthHolder from '../../../domain/entity/auth/models/AuthHolder';
import AuthListener from '../../../domain/entity/auth/models/AuthListener';
import FormValidator from '../../util/FormValidator';
export default class AuthViewModelImpl implements AuthViewModel, AuthListener {
public emailQuery: string;
public passwordQuery: string;
public isSignInButtonVisible: boolean;
public isSignOutButtonVisible: boolean;
public isShowError: boolean;
public errorMessage: string;
public authStatus: string;
public isAuthStatusPositive: boolean;
private baseView?: BaseView;
private loginUseCase: LoginUseCase;
private authHolder: AuthHolder;
public constructor(loginUseCase: LoginUseCase, authHolder: AuthHolder) {
this.emailQuery = '';
this.passwordQuery = '';
this.isSignInButtonVisible = true;
this.isSignOutButtonVisible = false;
this.isShowError = false;
this.errorMessage = '';
this.authStatus = 'is not authorized';
this.isAuthStatusPositive = false;
this.loginUseCase = loginUseCase;
this.authHolder = authHolder;
this.authHolder.addAuthListener(this);
}
public attachView = (baseView: BaseView): void => {
this.baseView = baseView;
};
public detachView = (): void => {
this.baseView = undefined;
};
public onAuthChanged = (): void => {
if (this.authHolder.isUserAuthorized()) {
this.isSignInButtonVisible = false;
this.isSignOutButtonVisible = true;
this.authStatus = 'authorized';
this.isAuthStatusPositive = true;
} else {
this.isSignInButtonVisible = true;
this.isSignOutButtonVisible = false;
this.authStatus = 'is not autorized';
this.isAuthStatusPositive = false;
}
this.notifyViewAboutChanges();
};
public onEmailQueryChanged = (loginQuery: string): void => {
this.emailQuery = loginQuery;
this.notifyViewAboutChanges();
};
public onPasswordQueryChanged = (passwordQuery: string): void => {
this.passwordQuery = passwordQuery;
this.notifyViewAboutChanges();
};
public onClickSignIn = async (): Promise<void> => {
if (!this.validateLoginForm()) {
this.notifyViewAboutChanges();
return;
}
try {
await this.loginUseCase.loginUser(this.emailQuery, this.passwordQuery);
this.isShowError = false;
this.errorMessage = '';
} catch (e) {
this.errorMessage = e.message;
this.isShowError = true;
}
this.notifyViewAboutChanges();
};
public onClickSignOut = (): void => {
this.authHolder.onSignedOut();
};
private validateLoginForm = (): boolean => {
if (!this.emailQuery) {
this.isShowError = true;
this.errorMessage = 'Email cannot be empty';
return false;
}
if (this.errorMessage === 'Email cannot be empty') {
this.isShowError = false;
this.errorMessage = '';
}
if (!FormValidator.isValidEmail(this.emailQuery)) {
this.isShowError = true;
this.errorMessage = 'Email format is not valid';
return false;
}
if (this.errorMessage === 'Email format is not valid') {
this.isShowError = false;
this.errorMessage = '';
}
if (!this.passwordQuery) {
this.isShowError = true;
this.errorMessage = 'Password cannot be empty';
return false;
}
if (this.errorMessage === 'Password cannot be empty') {
this.isShowError = false;
this.errorMessage = '';
}
return true;
}
private notifyViewAboutChanges = (): void => {
if (this.baseView) {
this.baseView.onViewModelChanged();
}
};
}
Pay attention to the method onClickSignOut- in it we directly refer to the AuthHolder class. This is one of those cases where an intermediary in the form of a usage scenario would be superfluous, because the logic of the method is quite trivial. Similarly, you can access the repository interface directly.However, if the code is complicated, in order to exit, it is necessary to place it in a separate use case.UI (views)AuthComponent.tsx
import React from 'react';
import './auth-component.css';
import BaseView from '../BaseView';
import AuthViewModel from '../../view-model/auth/AuthViewModel';
export interface AuthComponentProps {
authViewModel: AuthViewModel;
}
export interface AuthComponentState {
emailQuery: string;
passwordQuery: string;
isSignInButtonVisible: boolean;
isSignOutButtonVisible: boolean;
isShowError: boolean;
errorMessage: string;
authStatus: string;
isAuthStatusPositive: boolean;
}
export default class AuthComponent
extends React.Component<AuthComponentProps, AuthComponentState>
implements BaseView {
private authViewModel: AuthViewModel;
public constructor(props: AuthComponentProps) {
super(props);
const { authViewModel } = this.props;
this.authViewModel = authViewModel;
this.state = {
emailQuery: authViewModel.emailQuery,
passwordQuery: authViewModel.passwordQuery,
isSignInButtonVisible: authViewModel.isSignInButtonVisible,
isSignOutButtonVisible: authViewModel.isSignOutButtonVisible,
isShowError: authViewModel.isShowError,
errorMessage: authViewModel.errorMessage,
authStatus: authViewModel.authStatus,
isAuthStatusPositive: authViewModel.isAuthStatusPositive,
};
}
public componentDidMount(): void {
this.authViewModel.attachView(this);
}
public componentWillUnmount(): void {
this.authViewModel.detachView();
}
public onViewModelChanged(): void {
this.setState({
emailQuery: this.authViewModel.emailQuery,
passwordQuery: this.authViewModel.passwordQuery,
isSignInButtonVisible: this.authViewModel.isSignInButtonVisible,
isSignOutButtonVisible: this.authViewModel.isSignOutButtonVisible,
isShowError: this.authViewModel.isShowError,
errorMessage: this.authViewModel.errorMessage,
authStatus: this.authViewModel.authStatus,
isAuthStatusPositive: this.authViewModel.isAuthStatusPositive,
});
}
public render(): JSX.Element {
const {
emailQuery,
passwordQuery,
isSignInButtonVisible,
isSignOutButtonVisible,
isShowError,
errorMessage,
authStatus,
isAuthStatusPositive,
} = this.state;
return (
<div className="row flex-grow-1 d-flex justify-content-center align-items-center">
<div className="auth-container col bg-white border rounded-lg py-4 px-5">
<div className="row mt-2 mb-4">
Status:
<span className={`${isAuthStatusPositive ? 'text-success' : 'text-danger'}`}>
{authStatus}
</span>
</div>
<div className="row mt-2">
<input
type="text"
placeholder="user@email.com"
onChange={(e: React.FormEvent<HTMLInputElement>): void => {
this.authViewModel.onEmailQueryChanged(e.currentTarget.value);
}}
value={emailQuery}
className="form-control"
/>
</div>
<div className="row mt-2">
<input
type="password"
placeholder="password"
onChange={(e: React.FormEvent<HTMLInputElement>): void => {
this.authViewModel.onPasswordQueryChanged(e.currentTarget.value);
}}
value={passwordQuery}
className="form-control"
/>
</div>
{isShowError && (
<div className="row my-3 text-danger justify-content-center">{errorMessage}</div>
)}
{isSignInButtonVisible && (
<div className="row mt-4">
<button
type="button"
className="col btn btn-primary"
onClick={(): void => this.authViewModel.onClickSignIn()}
>
Sign in
</button>
</div>
)}
{isSignOutButtonVisible && (
  <div className="row mt-4">
    <button
      type="button"
      className="col btn btn-primary"
      onClick={(): void => this.authViewModel.onClickSignOut()}
    >
      Sign out
    </button>
  </div>
)}
</div>
</div>
);
}
}
This component is dependent on the framework and, therefore, is located in the very extreme layer of the diagram. When mounting ( ),AuthComponentcomponentDidMount attaches to the AuthViewModel and detaches when ( componentWillUnmount) disappears . Each time the ViewModel changes , AuthComponent updates its state to further update the markup.Pay attention to conditional rendering depending on state:
{isSignOutButtonVisible && (
<div className="row mt-4">
<button
type="button"
className="col btn btn-primary"
onClick={(): void => this.authViewModel.onClickSignOut()}
>
Sign out
</button>
</div>
)}
As well as invoking ViewModel methods to pass values:onClick={(): void => this.authViewModel.onClickSignOut()}
Entry pointTo enter the application, we use the index.tsx and App.tsx files .index.tsx
import React from 'react';
import ReactDOM from 'react-dom';
import 'bootstrap/dist/css/bootstrap.css';

import App from './App';
import * as serviceWorker from './serviceWorker';

ReactDOM.render(
  <React.StrictMode>
    <App />
  </React.StrictMode>,
  document.getElementById('root'),
);

serviceWorker.unregister();
App.tsx
import React from 'react';
import './app.css';
import AuthComponent from './presentation/view/auth/AuthComponent';
import AuthViewModelImpl from './presentation/view-model/auth/AuthViewModelImpl';
import AuthFakeApi from './data/auth/AuthFakeApi';
import LoginUseCase from './domain/interactors/auth/LoginUseCase';
import AuthHolder from './domain/entity/auth/models/AuthHolder';
function App(): JSX.Element {
const authRepository = new AuthFakeApi();
const authHolder = new AuthHolder();
const loginUseCase = new LoginUseCase(authRepository, authHolder);
const authViewModel = new AuthViewModelImpl(loginUseCase, authHolder);
return (
<div className="app-container d-flex container-fluid">
<AuthComponent authViewModel={authViewModel} />
</div>
);
}
export default App;
It is in the App.tsx file that all the dependencies are initialized. In this application, we do not use dependency injection tools so as not to unnecessarily complicate the code.If we need to change some dependency, we will replace it in this file. For example, instead of the line:const authRepository = new AuthFakeApi();
Write:const authRepository = new AuthApi();
Also note that we use only interfaces, not specific implementations (everything is based on abstraction). When declaring variables, we mean the following:const authRepository: AuthRepository = new AuthFakeApi();
This allows you to hide implementation details (in order to replace it later without changing the interface).4. ConclusionI hope that during reading the article you have an understanding of how The Clean Architecture can be applied in React (and not only projects), and our experience will help to make your applications better.This article described the theoretical and practical basics of using The Clean Architecture in frontend projects. As mentioned earlier, The Clean Architecture gives only recommendations on how to build your architecture.The above was an example of a simple application that uses this architecture. Keep in mind that as the application grows, the architecture may change, so the above code is not a panacea (as mentioned at the beginning), this article is only a transfer of part of our experience.5. ResourcesSource CodeUML Diagram