 Windows operating systems support a variety of object infrastructures. You can use application programming interfaces (APIs) to access them, but developing full-fledged applications is not always justified. PowerShell has special cmdlets that allow you to access .NET, COM, WMI (CIM), and ADSI objects interactively. In the fourth part of the series, we learned the basics with a focus on .NET Core classes, and now we want to deepen the topic and understand the features of PowerShell interaction with external objects.
Table of contents:
Work with JSON, XML and CSVWork with WMI and CIMWork with COM objectsWork with ADSI directory serviceFormatting outputWork with JSON, XML and CSV
In PowerShell scripts, you often have to parse JSON, XML, and CSV data. Usually this need arises when working with Internet services or with configuration files. Some administrators try to parse data using regular expressions, but it is not necessary to make such sacrifices: PowerShell has special cmdlets for conversion, moreover, in both directions. The JSON format allows you to describe a variety of objects and, in essence, is a hashtable that can be nested. Converting a JSON object to a .NET object accordingly using PowerShell is easy. Since Internet services usually give a very long line instead of a beautifully formatted file, this conversion can also be useful for working in interactive mode. In the example below, we used a multiline text variable to describe the JSON object:
$user = @"
{
   "firstName": "Ivan",
   "lastName": "Danko",
   "address": {
       "streetAddress": "Kremlin",
       "city": "Moscow"
   },
   "phoneNumbers": [
       "+7 495 1234567",
       "+7 499 1234567"
   ]
}
"@ | ConvertFrom-Json
 The inverse problem is solved in a similar way:
$file = Get-ChildItem C:\Windows\System32\notepad.exe
$file.VersionInfo | ConvertTo-Json
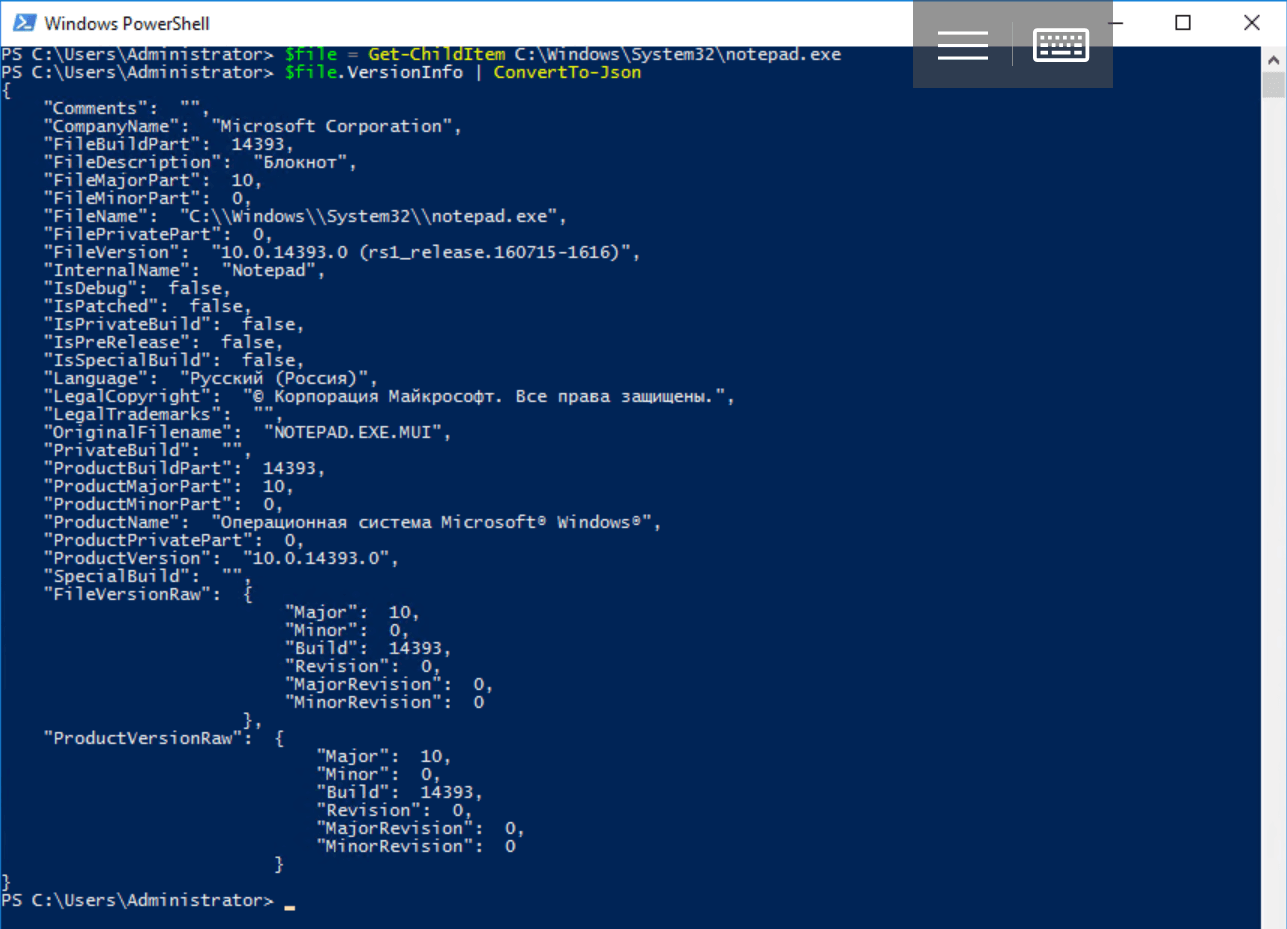 The resulting JSON format string is easy to send to another application over the network. It can be, for example, some RESTful service. Work with the ConvertFrom-Csv, ConvertTo-Csv and ConvertTo-Xml cmdlets is built in approximately the same way, we suggest readers to study it themselves.To work with XML and CSV, we will need other cmdlets:
 Using these tools, you need to understand that converting a binary object to a text format saves only the value of its properties, but not the methods. Converting JSON, XML, or CSV data to a .NET object using PowerShell is only possible if it is valid.
Work with WMI and CIM
Windows Management Instrumentation (WMI) is a Microsoft-developed and Windows-adapted implementation of the WBEM (Web-Based Enterprise Management) standard. It is based on the idea of creating a universal solution for monitoring the distributed information environment of an enterprise and managing its components. The WBEM data structure, in turn, is based on the Common Information Model (CIM), which implements an object-oriented approach to the representation of computer systems. Further development and support of WMI in Windows has been discontinued; Microsoft recommends using a similar mechanism for managing infrastructure - CIM objects. To work with them, special cmdlets appeared in PowerShell 3.0, which we will consider in parallel with WMI counterparts. If the code contains cmdlet calls for working with WMI, it should be rewritten if possible. Within the framework of the CIM model (it is also used in WMI), the operating system data is presented in the form of classes with properties and methods. Classes are grouped in hierarchically ordered and logically related by namespace technology or management area. There is a root Root namespace that has subspaces: CIMv2, Default, Secutiry, and WMI. For unambiguous identification of an instance of a class (object) and description of the state of the corresponding resource, class properties are used, which are usually read-only. Methods are used to manage the resource.The class instance can be accessed by the full path, which has the following form:
[\\ComputerName\NameSpace][:ClassName][.KeyProperty1=Value1][,KeyProperty2=Value2]…]
whereComputerName is the name of the computer;NameSpace - namespace;ClassName - the name of the class;KeyProperty1 = Value1, KeyProperty2 = Value2 - the properties of the object and the values by which it is identified.Before PowerShell, a simple WMI tool did not exist. To access the objects, you had to write rather complex programs in high-level languages (C ++, Visual Basic, Java Script) or study the WMIC shell (WMI Command Line, which is also discontinued) with its own language. Through PowerShell, WMI objects are accessible to the average user from the command line or in scripts. First, connect to the WMI subsystem and get a list of available classes using the Get-WmiObject cmdlet (alias gwmi). To get a list of CIM classes, use the Get-CimClass cmdlet.Get-CimClass
Get-WmiObject -List
 We have listed the classes on the local computer, but you can connect to the remote:
Get-CimClass -ComputerName IP-
Get-CimClass -ComputerName _
orGet-WmiObject -ComputerName IP- -List
Get-WmiObject -ComputerName _ -List
By default, the Get-CimClass and Get-WmiObject cmdlets connect to the Root \ CIMV2 namespace, which stores a large number of classes for managing the system. To change the namespace, use the -Namespace parameter:Get-CimClass -Namespace Root
Get-WmiObject -Namespace Root -List
Knowing the name of the class, it is not difficult to get instances of it. The following command returns all instances of Win32_Service, i.e. services registered on the local machine:Get-WmiObject Win32_Service
As with other types of objects, a list of properties and methods is displayed using Get-Member. WMI object methods can be accessed directly or using the Invoke-WmiMethod cmdlet. You can also use cmdlets for WMI objects to sort, filter, group, etc.Get-WmiObject Win32_Service | Get-Member
 To get CIM objects (instances of classes), use the Get-CimInstance cmdlet. Unlike WMI, the resulting CIM objects (resultant object or class instances) do not contain class methods. Because you cannot directly extract a method, you must invoke the Invoke-CimMethod cmdlet. Consider the Win32_Service class - services running on the system) and its instance for the spooler service on the local machine:
Get-CimInstance Win32_service -filter "Name='spooler'"
 Let's look at the structure of the resulting object:
Get-CimInstance Win32_service -filter "Name='spooler'" | Get-Member
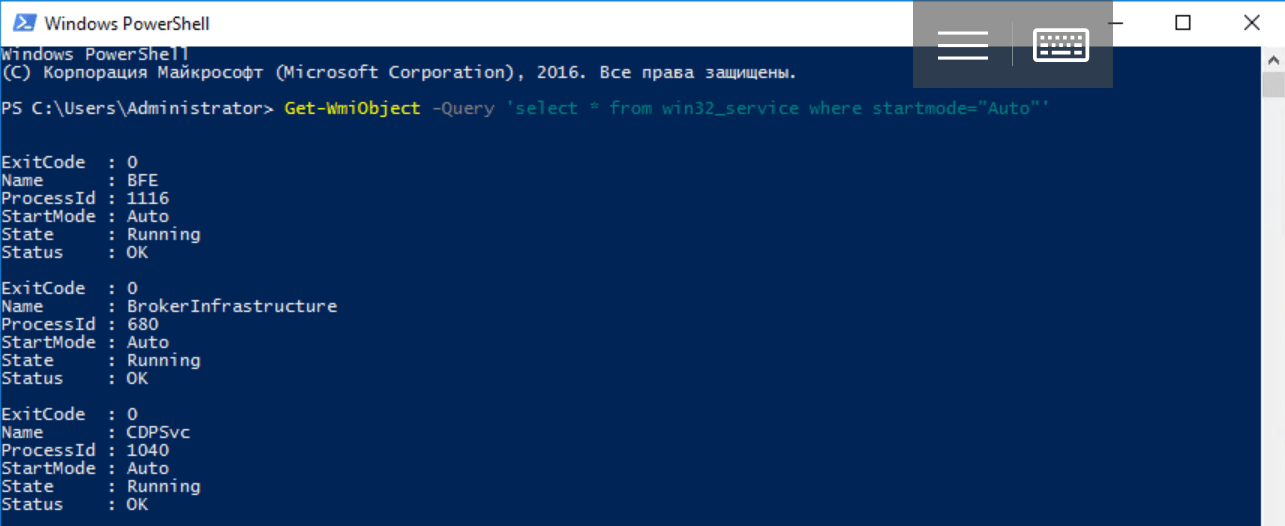
 At this point, the benefits of cmdlets for working with CIM objects are not obvious. They primarily relate to remote work in a distributed environment and will be discussed in detail in the last article in the series devoted to solving practical problems of administration.There is also a WMI-specific toolkit: the WMI Query Language (WQL), a SQL-like query language. A WQL query to search for all start-ups when starting a service system looks like this:
select * from win32_service where startmode="Auto"
From PowerShell, they are executed as follows:Get-WmiObject -Query 'select * from win32_service where startmode="Auto"'
Work with COM objects
To ensure the interaction between applications in Windows, a technology for linking and embedding objects (Object Linking and Embedding or OLE) was developed. Later, OLE Automation technology appeared, with the help of which automation client applications could call functions of other applications - automation servers. OLE and OLE Automation were based on the core technology of the Component Object Model (COM), which offers a single binary standard for software components. Objects created using it and registered in the operating system can be used in other applications using executable files or dynamic libraries.Around the mid-nineties, instead of OLE, another term began to be used - ActiveX. Prior to the advent of the .NET platform, ActiveX technology was considered key, and COM objects are still actively used to integrate applications into Windows - many Microsoft and third-party products are automation servers and provide access to their services through them. To access objects, ProgID is used - a symbolic identifier that is assigned to them when registering in the Windows registry. It has the following form:_..
The version is usually not indicated:_.
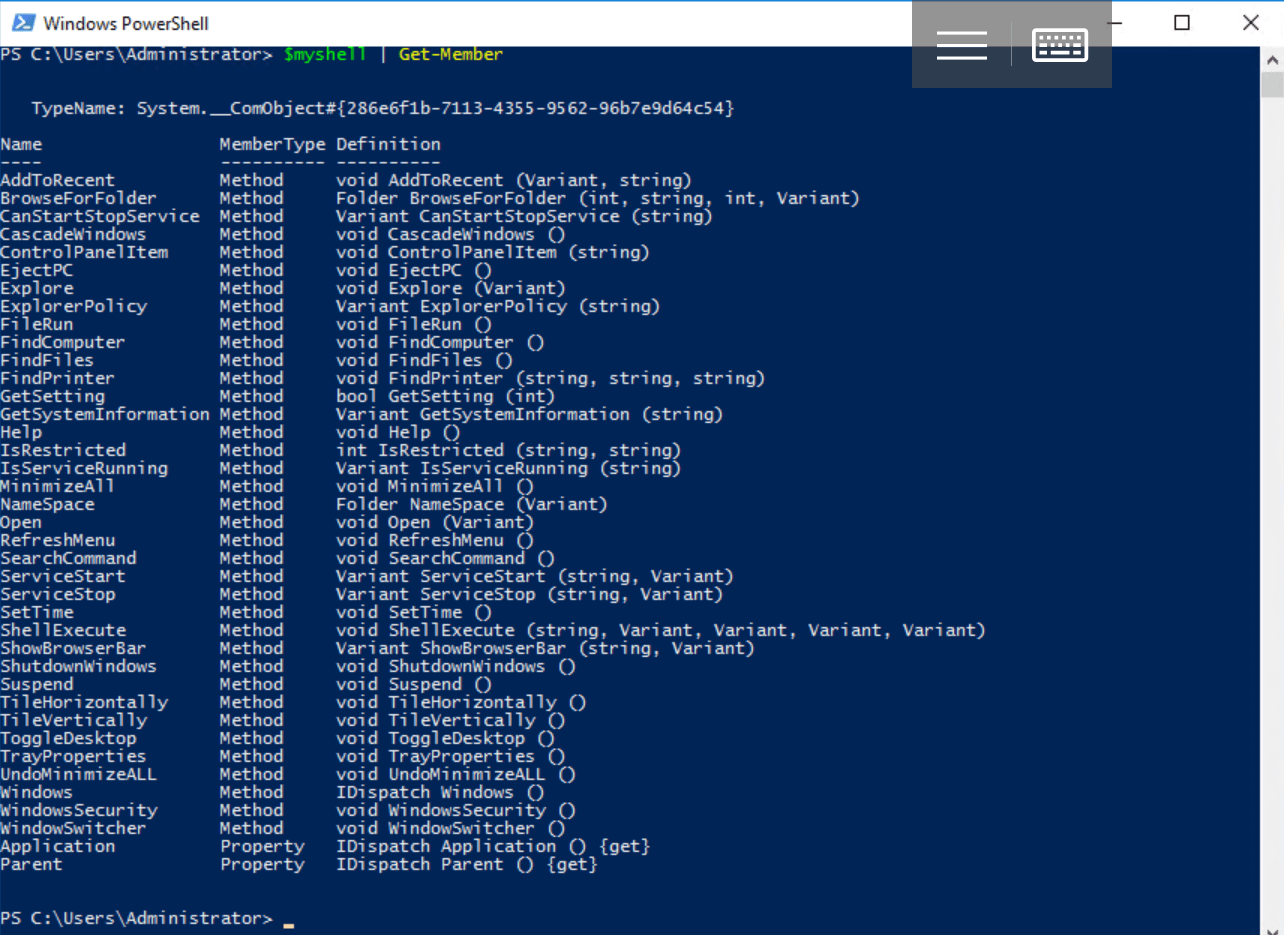
Some examples of available ProgIDs are: InternetExplorer.Application (Internet Explorer application), Word.Application (Microsoft Word application), WScript.Shell (Shell class from the Windows Script Host or WSH script server object model).You can create an instance of the object using the New-Object cmdlet discussed in the previous article , and see its structure using Get-Member:$myshell = New-Object -ComObject WScript.Shell
$myshell | Get-Member
 To work with objects, properties and methods are used. Say, to create a shortcut on the user's desktop, you need to call the CreateShortcut () method:
$link = $myshell.CreateShortcut("$Home\Desktop\Home.lnk")
Note that the shortcut is also a COM object:$link | Get-Member
 It remains for us to fill out its properties and save:
$link.TargetPath = $Home
$link.Save()
In this way, we created a shortcut on the desktop of the active user, and now we will analyze working with external automation services using the example of the Shell.Application COM object. With it, you can automate some actions in Windows Explorer:$myshell=New-Object -ComObject Shell.Application
or for short:$myshell=New-Object -com Shell.Application
$myshell | Get-Member
 The Shell.Application object has quite a few different window management methods. For example, to display the contents of a given directory, Explore () is used:
$myshell.Explore("c:\")
The help system is called using the Help () method:$myshell.Help()
There are also three methods for invoking search dialogs: FindFiles (), FindComputer (), and FindPrinter ().$myshell.FindFiles()
$myshell.FindComputer()
$myshell.FindPrinter()
You can open the program launch dialog using the FileRun () method, and to call the date / time setting window, you need the SetTime () method. There are, for example, methods for calling up the taskbar settings window, control panel elements indicating one of the available cpl files, for managing open windows:$myshell.MinimizeAll()
$myshell.UndoMinimizeAll()
$myshell.TileHorizontally()
$myshell.TileVertically()
The Windows () method allows you to access the collection of open windows in Explorer or in Internet Explorer. Let's see the properties and methods available for this collection:$myshell.Windows() | Get-Member
 There are other useful COM objects, the number of which depends on the software installed in the system. Once upon a time, the main automation tool in Windows was the WSH script server, the object model of which also includes COM objects: designed to work with the network functions of WScript.Network and the WScript.Shell that we already mentioned. The latter not only creates shortcuts on the desktop, with its help you can, for example, display information windows with messages and buttons, switch between applications, launch programs or simulate keystrokes.
Working with the ADSI Directory Service
In general, a catalog refers to a source of information in which data about some objects is stored. By directory service, we mean part of a distributed computer system that allows you to access and manipulate stored objects. A directory service can combine data about network objects and the services that manipulate them — it represents a single entry point for interacting with network resources. There can be many such services in a heterogeneous computer network: a local SAM (Security Account Manager) for non-domain computers, Active Directory, etc.Interaction with different directory services requires different tools, which creates certain inconveniences. Beginning in Windows 2000, Microsoft has introduced the unified Active Directory Service Interface (ADSI) technology for operating systems that does not depend on a specific network access protocol. To find objects, a namespace is defined for the directory. Because different directory services use different naming methods, ADSI defines a convention that uniquely identifies any object. The concept of two-part binding strings or ADsPath is introduced. The first part of the name defines the directory service (ADSI provider), and the second - the location of the object in the directory. Here are examples of designating different ADSI providers:LDAP: //used for LDAP-based directory services, including for Active Directory;WinNT: // used for local computers.There are no special cmdlets for working with ADSI in PowerShell. Instead, the cast operator [ADSI] is used followed by a binding string. For example, to connect to the user Ivanov from the domain test.ru, the following construction is needed:$user = [ADSI]"LDAP://CN=Ivanov,DC=TEST,DC=RU"
To work with local accounts, you will have to connect to the computer with the corresponding name (to connect to the local computer, just use the dot instead of the name):$computer = [ADSI]"WinNT://."
For example, create a new user, Ivanov, on the local machine:$user = $computer.Create("user","Ivanov")
$user.Put("Description"," PowerShell")
$user.SetInfo()
Now connect to it:$user1 = [ADSI]"WinNT://./Ivanov,user"
$user1.Description

Output formatting
Interactive work often requires displaying data. In other shells, the commands and utilities themselves are engaged in formatting the output, but binary objects returned by functions and cmdlets usually do not know how to do this. In PowerShell, the output is formatted by four special cmdlets that feed objects through the pipeline. More detailed information can be obtained using Get-Help:Format-Table formats the output in the form of a table whose columns contain the values of the object's properties or calculated values. The ability to group data is supported;Format-List displays the object as a list of properties, each of which is displayed on a new line. The ability to group data is supported;Format-customformats output using a custom view;Format-Wide formats objects in the form of a wide table in which only one property of each object is displayed.If none of the listed cmdlets is called, the formatting module appropriate to the type of data displayed is used. Display rules are stored in configuration files in XML format with the extension .ps1xml, which are located in the $ PSHome directory. A list of them can be obtained using the following command:dir $pshome\*format*.ps1xm
Manually editing configuration files is not recommended; it is better to create your own and include them in the list of downloaded files using the Update-FormatData cmdlet. If the default formatter for the type you want is not defined, PowerShell displays the properties of the object on the screen in a list.This concludes the description of working with objects in PowerShell, and the final article in the series will be devoted to solving practical problems of managing a distributed information environment of an enterprise. In it, all the described tools are useful to us. The main focus will be on CIM objects and their comparison with WMI. Past parts can be found at the links below.
1: Windows PowerShell2: Windows PowerShell3: ,4: ,