Let's get acquainted with one of the attacks on the neural network, which leads to classification errors with minimal external influences. Imagine for a moment that the neural network is you. And at the moment, while drinking a cup of aromatic coffee, you classify the images of cats with an accuracy of more than 90 percent without even suspecting that the “one-pixel attack” turned all your “cats” into trucks.And now we will pause, move the coffee aside, import all the libraries we need and analyze how such one pixel attacks work.The purpose of this attack is to make the algorithm (neural network) give an incorrect answer. Below we will see this with several different models of convolutional neural networks. Using one of the methods of multidimensional mathematical optimization - differential evolution, we find a special pixel that can change the image so that the neural network begins to incorrectly classify this image (despite the fact that earlier the algorithm “recognized” the same image correctly and with high accuracy).Import the libraries:
%matplotlib inline
import pickle
import numpy as np
import pandas as pd
import matplotlib
from keras.datasets import cifar10
from keras import backend as K
from networks.lenet import LeNet
from networks.pure_cnn import PureCnn
from networks.network_in_network import NetworkInNetwork
from networks.resnet import ResNet
from networks.densenet import DenseNet
from networks.wide_resnet import WideResNet
from networks.capsnet import CapsNet
from differential_evolution import differential_evolution
import helper
matplotlib.style.use('ggplot')
For our experiment, we will load the CIFAR-10 dataset containing real-world images divided into 10 classes.(x_train, y_train), (x_test, y_test) = cifar10.load_data()
class_names = ['airplane', 'automobile', 'bird', 'cat', 'deer', 'dog', 'frog', 'horse', 'ship', 'truck']
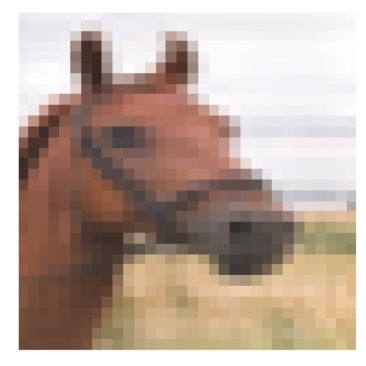
Let's look at any image by its index. For example, here on this horse.image_id = 99
helper.plot_image(x_test[image_id])
 We will have to look for the very powerful pixel that can change the response of the neural network, which means it's time to write a function to change one or more pixels of the image.
def perturb_image(xs, img):
if xs.ndim < 2:
xs = np.array([xs])
tile = [len(xs)] + [1]*(xs.ndim+1)
imgs = np.tile(img, tile)
xs = xs.astype(int)
for x,img in zip(xs, imgs):
pixels = np.split(x, len(x) // 5)
for pixel in pixels:
x_pos, y_pos, *rgb = pixel
img[x_pos, y_pos] = rgb
return imgs
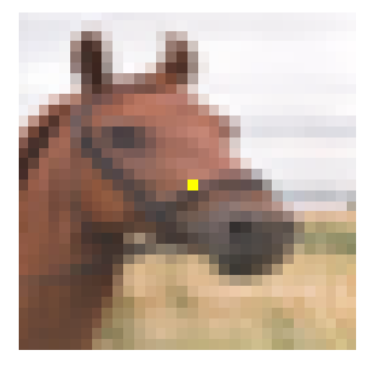
Check it out ?! Change one pixel of our horse with coordinates (16, 16) to yellow.image_id = 99
pixel = np.array([16, 16, 255, 255, 0])
image_perturbed = perturb_image(pixel, x_test[image_id])[0]
helper.plot_image(image_perturbed)
 To demonstrate the attack, you need to download pre-trained models of neural networks on our CIFAR-10 dataset. We will use two models lenet and resnet, but you can use others for your experiments by uncommenting the corresponding lines of code.
lenet = LeNet()
resnet = ResNet()

models = [lenet, resnet]
After loading the models, it is necessary to evaluate the test images of each model to make sure that we attack only images that are correctly classified. The code below displays the accuracy and number of parameters for each model.network_stats, correct_imgs = helper.evaluate_models(models, x_test, y_test)
correct_imgs = pd.DataFrame(correct_imgs, columns=['name', 'img', 'label', 'confidence', 'pred'])
network_stats = pd.DataFrame(network_stats, columns=['name', 'accuracy', 'param_count'])
network_stats
Evaluating lenet
Evaluating resnet
Out[11]:
name accuracy param_count
0 lenet 0.748 62006
1 resnet 0.9231 470218
All such attacks can be divided into two classes: WhiteBox and BlackBox. The difference between them is that in the first case, we all reliably know about the algorithm, the model with which we are dealing. In the case of the BlackBox, all we need is input (image) and output (probabilities of being assigned to one of the classes). One pixel attack refers to the BlackBox.In this article, we consider two options for attacking a single pixel: untargeted and targeted. In the first case, it will absolutely not matter to which class the neural network of our cat will belong to, most importantly, not to the class of cats. Targeted attack is applicable when we want our cat to become a truck and only a truck.But how to find the very pixels whose change will lead to a change in the class of the image? How to find a pixel by changing which one pixel attack becomes possible and successful? Let's try to formulate this problem as an optimization problem, but only in very simple words: with an untargeted attack, we must minimize trust in the desired class, and with targeted, maximize the trust in the target class.When carrying out such attacks, it is difficult to optimize the function using a gradient. An optimization algorithm must be used that does not rely on the smoothness of the function.Recall that for our experiment we use the CIFAR-10 dataset, which contains real-world images, 32 x 32 pixels in size, divided into 10 classes. And this means that we have integer discrete values from 0 to 31 and color intensities from 0 to 255, and the function is not expected to be smooth, but rather jagged, as shown below: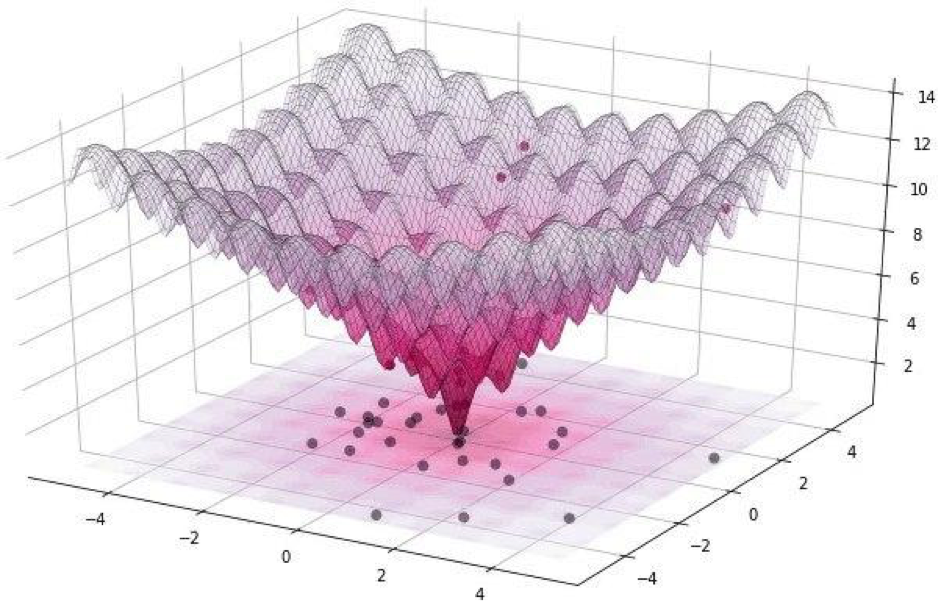 That is why we use the differential evolution algorithm.But back to the code and write a function that returns the probability of the reliability of the model. If the target class is correct, then we want to minimize this function so that the model is sure of another class (which is not true).
def predict_classes(xs, img, target_class, model, minimize=True):
imgs_perturbed = perturb_image(xs, img)
predictions = model.predict(imgs_perturbed)[:,target_class]
return predictions if minimize else 1 - predictions
image_id = 384
pixel = np.array([16, 13, 25, 48, 156])
model = resnet
true_class = y_test[image_id, 0]
prior_confidence = model.predict_one(x_test[image_id])[true_class]
confidence = predict_classes(pixel, x_test[image_id], true_class, model)[0]
print('Confidence in true class', class_names[true_class], 'is', confidence)
print('Prior confidence was', prior_confidence)
helper.plot_image(perturb_image(pixel, x_test[image_id])[0])
Confidence in true class bird is 0.00018887444
Prior confidence was 0.70661753
 We will need the next function to confirm the criterion for the success of the attack, it will return True when the change was enough to trick the model.
def attack_success(x, img, target_class, model, targeted_attack=False, verbose=False):
attack_image = perturb_image(x, img)
confidence = model.predict(attack_image)[0]
predicted_class = np.argmax(confidence)
if verbose:
print('Confidence:', confidence[target_class])
if ((targeted_attack and predicted_class == target_class) or
(not targeted_attack and predicted_class != target_class)):
return True
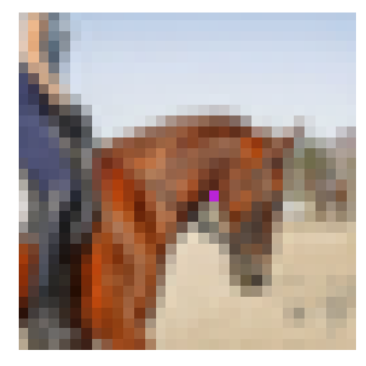
Let's look at the work of the success criterion function. In order to demonstrate, we assume a non-target attack.image_id = 541
pixel = np.array([17, 18, 185, 36, 215])
model = resnet
true_class = y_test[image_id, 0]
prior_confidence = model.predict_one(x_test[image_id])[true_class]
success = attack_success(pixel, x_test[image_id], true_class, model, verbose=True)
print('Prior confidence', prior_confidence)
print('Attack success:', success == True)
helper.plot_image(perturb_image(pixel, x_test[image_id])[0])
Confidence: 0.07460087
Prior confidence 0.50054216
Attack success: True
 It's time to collect all the puzzles into one picture. We will use a small modification of the implementation of differential evolution in Scipy.
def attack(img_id, model, target=None, pixel_count=1,
maxiter=75, popsize=400, verbose=False):
targeted_attack = target is not None
target_class = target if targeted_attack else y_test[img_id, 0]
bounds = [(0,32), (0,32), (0,256), (0,256), (0,256)] * pixel_count
popmul = max(1, popsize // len(bounds))
def predict_fn(xs):
return predict_classes(xs, x_test[img_id], target_class,
model, target is None)
def callback_fn(x, convergence):
return attack_success(x, x_test[img_id], target_class,
model, targeted_attack, verbose)
attack_result = differential_evolution(
predict_fn, bounds, maxiter=maxiter, popsize=popmul,
recombination=1, atol=-1, callback=callback_fn, polish=False)
attack_image = perturb_image(attack_result.x, x_test[img_id])[0]
prior_probs = model.predict_one(x_test[img_id])
predicted_probs = model.predict_one(attack_image)
predicted_class = np.argmax(predicted_probs)
actual_class = y_test[img_id, 0]
success = predicted_class != actual_class
cdiff = prior_probs[actual_class] - predicted_probs[actual_class]
helper.plot_image(attack_image, actual_class, class_names, predicted_class)
return [model.name, pixel_count, img_id, actual_class, predicted_class, success, cdiff, prior_probs, predicted_probs, attack_result.x]
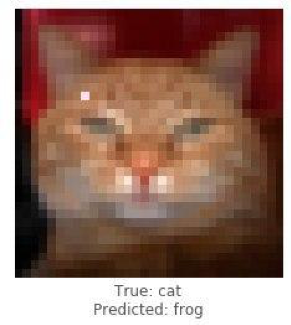
It's time to share the results of the study (the attack) and see how changing only one pixel will turn a frog into a dog, a cat into a frog, and a car into an airplane. But the more image points are allowed to change, the higher the likelihood of a successful attack on any image.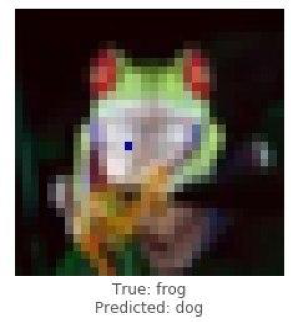
 Demonstrate a successful attack on a frog image using the resnet model. We should see confidence in the true decline in class after several iterations.
image_id = 102
pixels = 1
model = resnet
_ = attack(image_id, model, pixel_count=pixels, verbose=True)
Confidence: 0.9938618
Confidence: 0.77454716
Confidence: 0.77454716
Confidence: 0.77454716
Confidence: 0.77454716
Confidence: 0.77454716
Confidence: 0.53226393
Confidence: 0.53226393
Confidence: 0.53226393
Confidence: 0.53226393
Confidence: 0.4211318
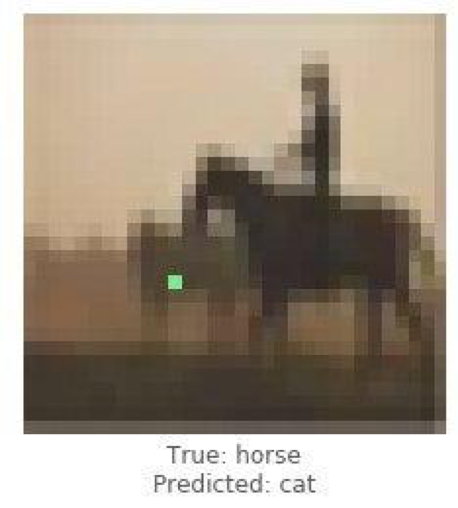
 These were examples of an untargeted attack, and now we will conduct a targeted attack and choose to which class we would like the model to classify the image. The task is much more complicated than the previous one, because we will make the neural network classify the image of a ship as a car, and a horse as a cat.
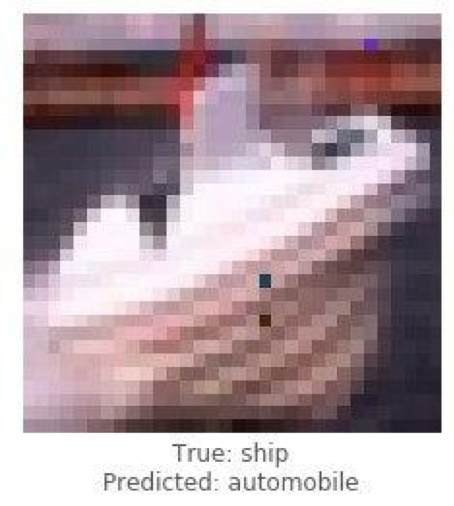
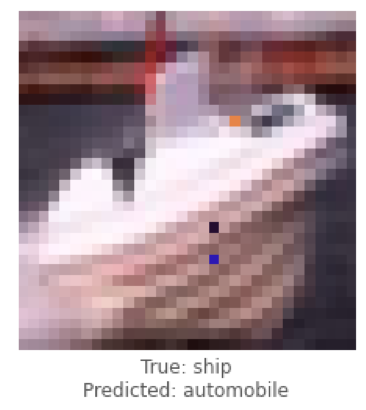
 Below we will try to get lenet to classify the image of the ship as a car.
image_id = 108
target_class = 1
pixels = 3
model = lenet
print('Attacking with target', class_names[target_class])
_ = attack(image_id, model, target_class, pixel_count=pixels, verbose=True)
Attacking with target automobile
Confidence: 0.044409167
Confidence: 0.044409167
Confidence: 0.044409167
Confidence: 0.054611664
Confidence: 0.054611664
Confidence: 0.054611664
Confidence: 0.054611664
Confidence: 0.054611664
Confidence: 0.054611664
Confidence: 0.054611664
Confidence: 0.054611664
Confidence: 0.054611664
Confidence: 0.054611664
Confidence: 0.054611664
Confidence: 0.054611664
Confidence: 0.081972085
Confidence: 0.081972085
Confidence: 0.081972085
Confidence: 0.081972085
Confidence: 0.1537778
Confidence: 0.1537778
Confidence: 0.1537778
Confidence: 0.22246778
Confidence: 0.23916133
Confidence: 0.25238588
Confidence: 0.25238588
Confidence: 0.25238588
Confidence: 0.44560355
Confidence: 0.44560355
Confidence: 0.44560355
Confidence: 0.5711696
 Having dealt with single cases of attacks, we will collect statistics using the architecture of convolutional neural networks ResNet, going through each model, changing 1, 3 or 5 pixels of each image. In this article, we show the final conclusions without bothering the reader to familiarize themselves with each iteration, since it takes a lot of time and computational resources.
def attack_all(models, samples=500, pixels=(1,3,5), targeted=False,
               maxiter=75, popsize=400, verbose=False):
    results = []
    for model in models:
        model_results = []
        valid_imgs = correct_imgs[correct_imgs.name == model.name].img
        img_samples = np.random.choice(valid_imgs, samples, replace=False)

        for pixel_count in pixels:
            for i, img_id in enumerate(img_samples):
                print('\n', model.name, '- image', img_id, '-', i+1, '/', len(img_samples))
                targets = [None] if not targeted else range(10)

                for target in targets:
                    if targeted:
                        print('Attacking with target', class_names[target])
                        if target == y_test[img, 0]:
                            continue
                    result = attack(img_id, model, target, pixel_count,
                                    maxiter=maxiter, popsize=popsize,
                                    verbose=verbose)
                    model_results.append(result)

        results += model_results
        helper.checkpoint(results, targeted)
    return results

untargeted = attack_all(models, samples=100, targeted=False)

targeted = attack_all(models, samples=10, targeted=False)
To test the possibility of network discredit, an algorithm was developed and its effect on the forecast quality of the pattern recognition solution was measured.Let's see the final results.untargeted, targeted = helper.load_results()
columns = ['model', 'pixels', 'image', 'true', 'predicted', 'success', 'cdiff', 'prior_probs', 'predicted_probs', 'perturbation']
untargeted_results = pd.DataFrame(untargeted, columns=columns)
targeted_results = pd.DataFrame(targeted, columns=columns)
The table below shows that using the ResNet neural network with an accuracy of 0.9231, changing several pixels of the image, we got a very good percentage of successfully attacked images (attack_success_rate).helper.attack_stats(targeted_results, models, network_stats)
Out[26]:
model accuracy pixels attack_success_rate
0 resnet 0.9231 1 0.144444
1 resnet 0.9231 3 0.211111
2 resnet 0.9231 5 0.222222
helper.attack_stats(untargeted_results, models, network_stats)
Out[27]:
model accuracy pixels attack_success_rate
0 resnet 0.9231 1 0.34
1 resnet 0.9231 3 0.79
2 resnet 0.9231 5 0.79
In your experiments, you are free to use other architectures of artificial neural networks, as there are currently a great many of them.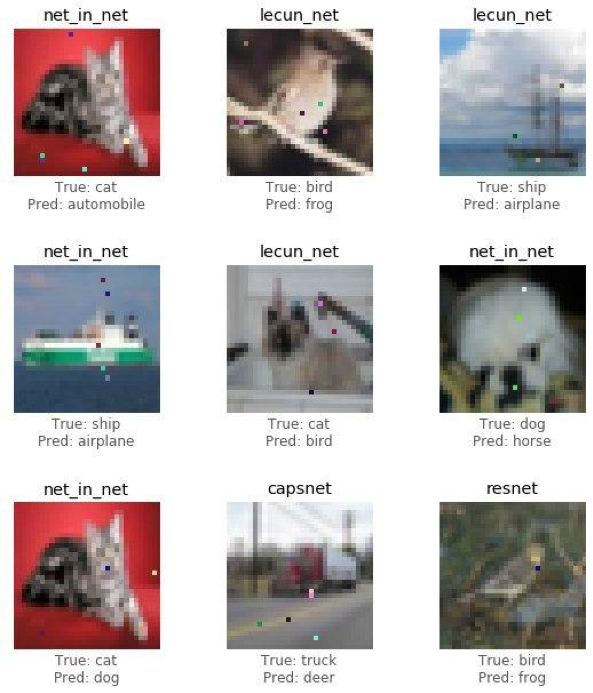 Neural networks have enveloped the modern world with invisible threads. For a long time, services have been invented where, using AI (artificial intelligence), users receive processed photos stylistically similar to the work of great artists, and today the algorithms themselves can draw pictures, create musical masterpieces, write books and even scripts for films.Areas such as computer vision, face recognition, unmanned vehicles, diagnosis of diseases - make important decisions and do not have the right to make mistakes, and interference with the operation of the algorithms will lead to disastrous consequences.One pixel attack is one way to spoof attacks. To test the possibility of network discredit, an algorithm was developed and its effect on the forecast quality of the pattern recognition solution was measured. The result showed that the applied convolutional architectures of neural networks are vulnerable to the specially trained One pixel attack algorithm, which replaces one pixel, in order to discredit the recognition algorithm.The article was prepared by Alexander Andronic and Adrey Cherny-Tkach as part of an internship at Data4 .