Disclaimer:
The author loves short and straight crutches, and also gently adores free open software for the flexibility and scalability that it gives. The purpose of this article is the desire to promote, as well as talk about the OPSI (Open PC Server Integration) software management system, undeservedly unknown on the Russian Internet.I was sitting in the office and drinking coffee when Ilon Mask called me and in pure Russian told me that it’s enough to endure it already, it’s time to collect the best minds to fight a certain virus, and for that right now, five minutes later I’m in 100 computers will be brought to the office, I urgently need to deploy windows 10, and tomorrow morning, scientists from all over the world will come to the office to start work on the antivirus. Well, isn't that what I have been waiting for all my life? A worthy challenge for a good tool.To implement the plan, I will use the OPSI system - Open PC Server Integration.OPSI is written in python in Germany and, apparently, crutches, free of charge and scalability are also very fond of it.Basic system features:- Automatic software deployment
It works like this: you analyze the installer and make the opsi package out of it, which installs the program in the right way. It works best with msi packages, it knows a few more formats that it also copes with. It can run a bat file or powershell script, but in principle, any interpreter. There are built-in registry systems, in general, full stuffing, probably the best part of the system. - Automatic installation of operating systems
I use only installation from an image, as the fastest, but there are options with offline installation of the system from scratch.
, , , , windows. , , windows, , .- Several convenient management interfaces with the possibility of flexible integration
There is a program with a graphical interface, there is an http interface to which you can send commands, from the server console you can control OPSI, embed commands in your scripts, you can access the backend from python, but I, unfortunately , while I do not own such magic. - Support for multiple depot servers (servers containing directly the software from which the deployment is ongoing).
You can add many servers to each subnet or group of computers, each of which will serve its own network.
System features implemented by modules (there are free and paid modules):- LDAP connector (paid) A
connector connecting a domain and opsi into a single whole - ()
: , ... - MySQL ()
OPSI mysql , 300 - Nagios ()
- ()
, opsi , , . - ()
. - ()
, , , . , ansible puppet, . linux windows . - WAN ()
, . - ()
- OTRS::ITSM ()
- ()
, , , « », , .
You can learn more in detail here.Themonetization model they have is as follows: they sell modules until they collect the amount to make them free.While computers are brought into my office and assembled, I install the AD server on the Windows server, raise the domain domain.local on it, as well as DNS and DHCP.You can install OPSI in the workgroup and in the domain, we will install in the domain, but without binding to the AD (LDAP connector).We will deploy windows 10 to a network of computers according to the following scheme: we will prepare a deployable windows 10 image with all the programs, boot over the network via opsi, use clonezilla to automatically save it to a file, then set all computers to automatically install via opsi, boot over the network and automatically we’ll spill this file on all computers in the broadcast network segment via tftp.To do this, on the DHCP server area, set parameter 66 in the ip of our future opsi 192.168.1.229 server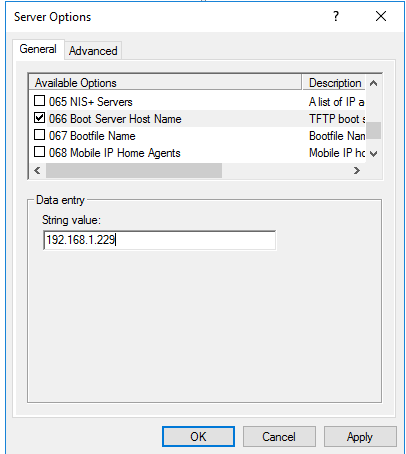 and set parameter 67 to linux / pxelinux.0.In DNS, add opsiserver.domain.local under its static address 192.168.1.229Then we will create a virtual machine for our opsi server on iron, which will withstand your loads and will suit you in terms of speed. Ssd and several network cards are welcome.Opsi does not support all systems; the compatibility list can be found here .We install immediately in the English locale, I strongly advise you not to use the Cyrillic alphabet anywhere on this server.My favorite debian 10 distribution I install in a minimal configuration with the name opsiserver.After installation and reboot, just in case, we configure the locales:
dpkg-reconfigure locales
I select everything where there is de_ en_ and ru_ system leave en_US.UTF8.Further installation is a retelling of this tutorial adapted to the task .Change the server name if it is different from what we need:hostname opsiserver.domain.local
Verification:hostname -f
Let's bring / etc / hosts to the following form:127.0.0.1 localhost
127.1.1.1 localhost.localdomain
192.168.1.229 opsiserver.domain.local opsiserver
And we will forget about its existence forever, since opsi is demanding on the contents of this file, and when it is changed, it sometimes starts to rebel and sprinkle with errors.Install the required packages:apt install wget host pigz mc -y
apt install samba samba-common smbclient cifs-utils -y
We install the mysql server by default, maria-db gets up for me, it will work too.apt install default-mysql-server -y
sudo mysql_secure_installation
We answer the questions in the affirmative, changing the root password and remembering it.Add OPSI repositories to the system:echo "deb http://download.opensuse.org/repositories/home:/uibmz:/opsi:/4.1:/stable/Debian_10/ /" > /etc/apt/sources.list.d/opsi.list
wget -nv https://download.opensuse.org/repositories/home:uibmz:opsi:4.1:stable/Debian_10/Release.key -O Release.key
apt-key add - < Release.key
Updated:apt update
We remove tftpd if it is, since OPSI will conflict with it:apt remove tftpd
We remove tftp support from inetd, because if it is, OPSI will conflict with it:update-inetd --remove tftp
apt install opsi-tftpd-hpa
And directly install opsi server:apt install opsi-server
in the process they will ask for the data that is needed to create a self-signed certificate, which in turn is needed for encrypted connection of clients with the server.Install windows support:apt install opsi-windows-support
configure mysql backend:opsi-setup --configure-mysql
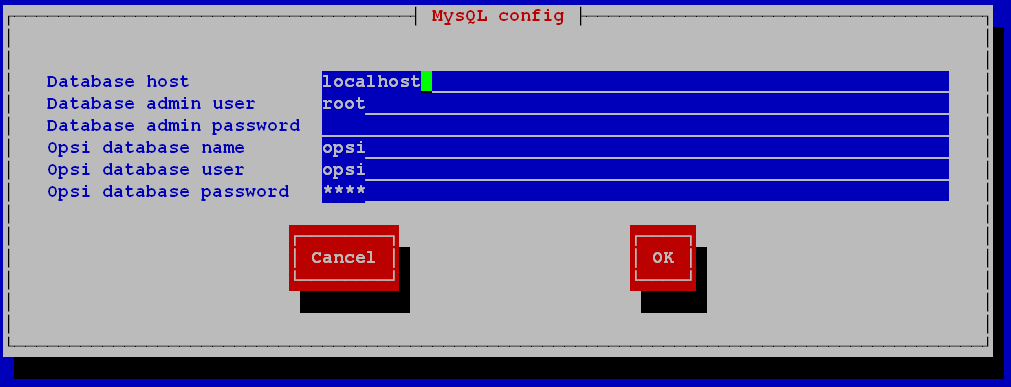 We set the server address (localhost), the user from whom we are acting (root), the root password in mysql (which we remembered earlier), the name of the database for opsi (opsi), the name of the user who will work in this database (opsi), the password for this user (we invent new).Next, for debian 10 you need to add / usr / sbin to PATH:
PATH=$PATH:/usr/sbin
and the same line should be added to .bashrc in your home directory. If this is not done, in the next step you will get the error "chpasswd not found".We initialize the system and set the necessary rights to the files and directories of the system:opsi-setup --init-current-config
opsi-set-rights
Service restart:systemctl restart opsiconfd.service
systemctl restart opsipxeconfd.service
Configure samba:opsi-setup --auto-configure-samba
OPSI clients connect to the main server via https on port 4447, and if you need to call some kind of installation, the clients will mount the samba ball from the opsi server and install software from it. To make this possible, we allow OPSI to reconfigure samba.Samba restart:systemctl restart smbd.service
systemctl restart nmbd.service
Set the administrator password for the pcpatch system user:opsi-admin -d task setPcpatchPassword
Now create a user to administer the system:useradd -m -s /bin/bash adminuser
Create a password for him:passwd adminuser
Now the password for samba, I create the same as in the system:smbpasswd -a adminuser
Add to the group:usermod -aG pcpatch adminuser
If we will do something with OPSI under the root, then we need to add the root to the group:usermod -aG pcpatch root
A few more crutches:opsi-setup --patch-sudoers-file
Now you can download packages to the system, and while they are loading, drink coffee.opsi-package-updater -v install
Subsequently, the packages can be updated with the command:opsi-package-updater -v update
Now go tohttps://download.uib.de/opsi4.1/misc/helper/ , download and install the opsi-configed management interface from there toopsi-configed-setup.exeenter the server, enter the server address, our adminuser user and his password,https://opsiserver.domain.local:4447/and we are in the system.At this point, the server is installed!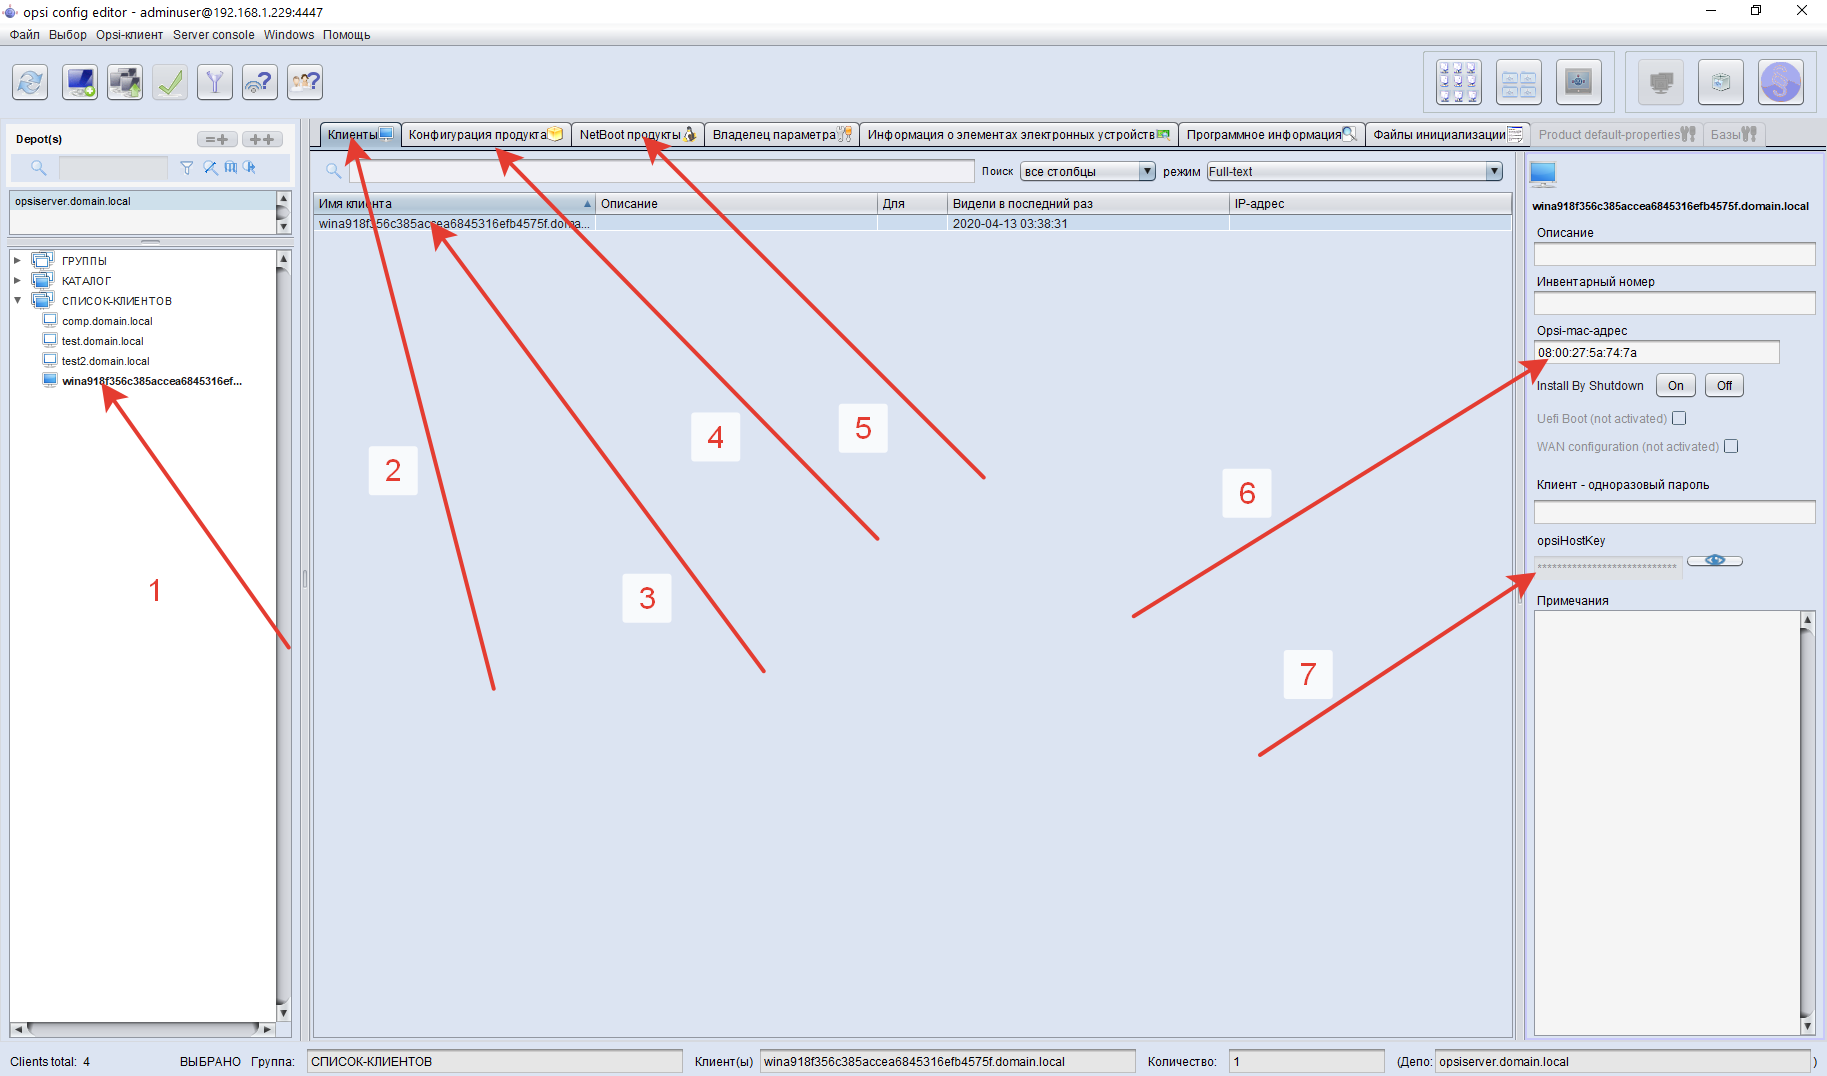 1 - all clients connected to this server, they can be disassembled into groups, including nested ones, apply the assignment to the entire group at once.2 - a tab with clients, this is a list of those computers that are controlled by opsi3 - clients are a list, here you can select them in any order to apply the purpose4 - “product configuration” - a victim of translation. In fact, there are packages that can be installed in Windows, in the terminology opsi - localboot products5 - Netboot products - this is all that is downloaded over the network6 - opsi-mac-address - the computer’s poppy is what it is determined during network boot7 - opsiHostKey is the “password” of the client in the opsi system, if you delete it from computer opsi client, and then reinstall it, it will not work, since the password will remain old and will not be suitable. This is both a bug and a feature. And how would you do?Now we will prepare windows 10 image which we will spill. Clonezilla, which we will use, is not as good as the acronis, but it still knows how to spill the image from a smaller disk to the same or larger.We put in the system all the programs we need, as well as Remote Server Administration Tools for Windows 10. I have windows 10 1903, I installed for 1803 and everything that needs to be started up. You can download it from here:https://www.microsoft.com/en-us/download/details.aspx?id=45520We need it for the netdom utility, which allows you to automatically enter the computer into the domain.To do this, we download files from here https://github.com/valmont2k/renamejoin to the c: \ renamejoin directory. We create a domain administrator on the domain controller with the ability to only enter computers into the domain with the Joinadmin login with password password1234QWE. If an attacker intercepts this password, then he can only bring computers into our domain.Run the line from createtesk.txt in the admin console of the fully prepared Windows, which will create a task to start at boot.The whole scheme will work as follows:When we split the image into all the computers, at the first boot, windows will launch a task
 C:\renamejoin\step1.cmdthat renames the computer to win-%random%, reboot the computer, deleting C:\renamejoin\step1.cmdand renaming C:\renamejoin\step2.cmdto C:\renamejoin\step1.cmd. On the next boot, windows will start C:\renamejoin\step1.cmd, which will enter this computer into the domain, reboot it and delete it C:\renamejoin\step1.cmd. We can remove the potentially dangerous task from the domain computers later. Through OPSI of course!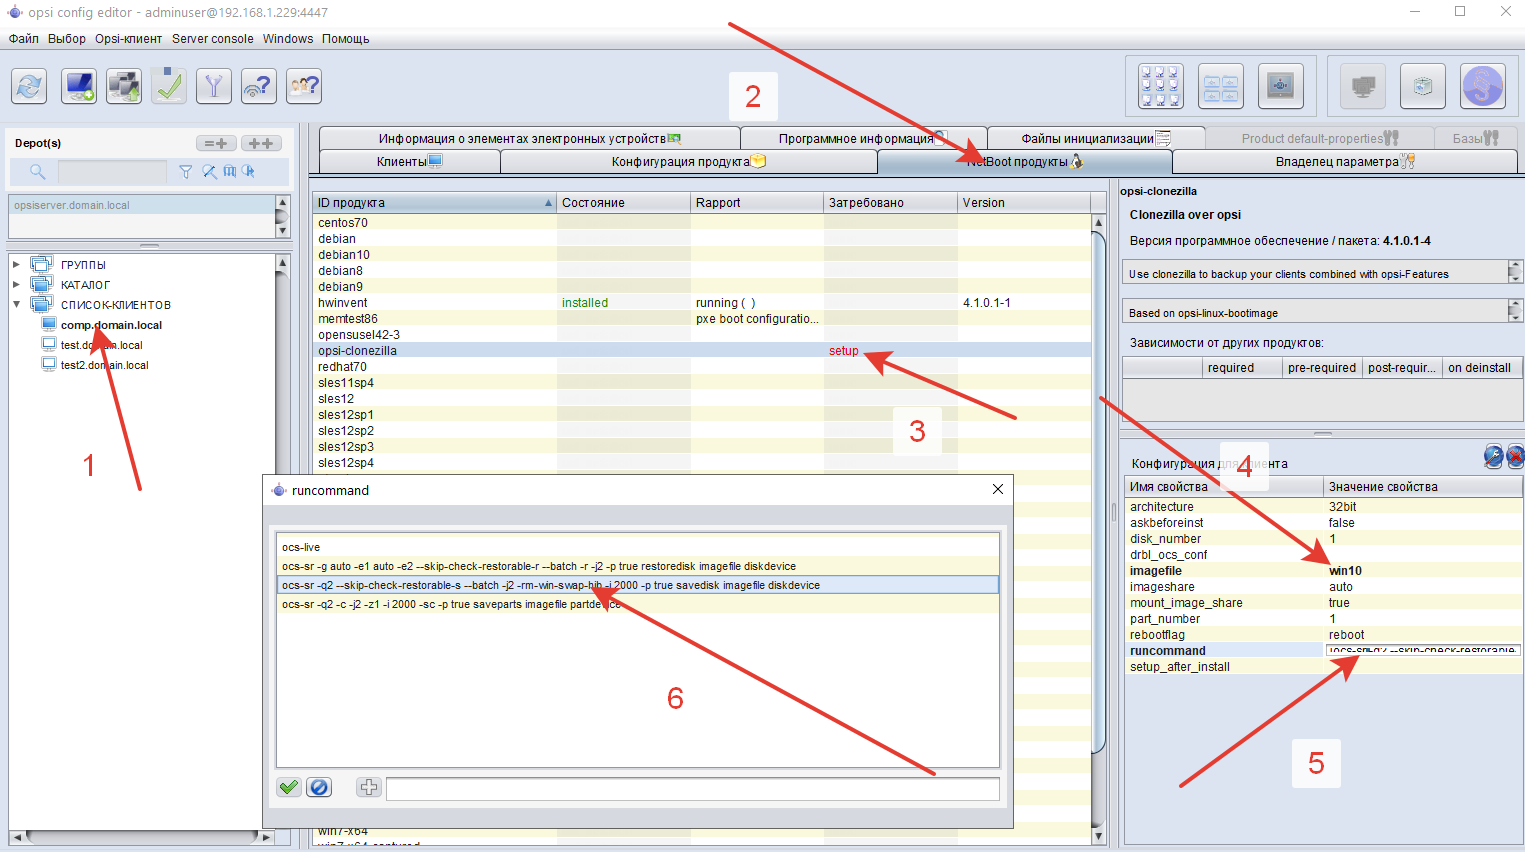 It's time to convert the prepared Windows into an image.Through the computer icon with a plus sign, add our computer to the opsi opsi-configed management interface, set its poppy address. Save. We pass to Netboot products, opposite clonezilla we put "setup". In the configuration for the client, we expose everything as in the screenshot: the name of the file and the command by which we fill the entire disk into the image. In the BIOS of the computer with Windows, we set the download from the network. Reboot the comp. If you did everything correctly, you will see how Windows flows into the image without the help of hands.
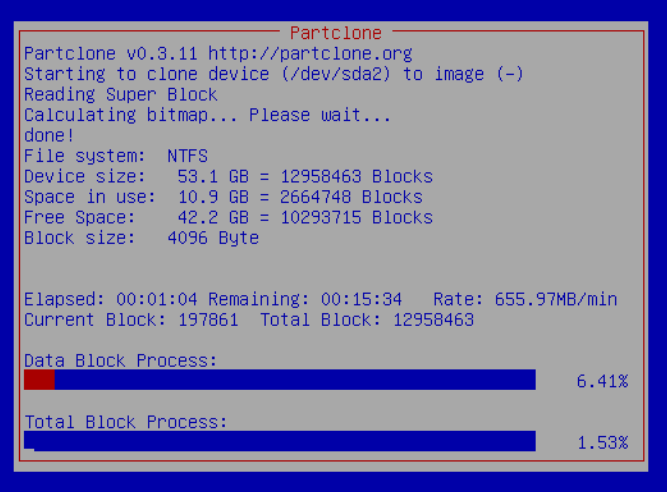 Meanwhile, computers are assembled, but they need to be added as clients in opsi together with their poppy addresses, adding them with pens is not at all a boyar affair, right?The solution is:
apt install tcpdump
Run on opsiserver:tcpdump -n udp -vvvvv -e port 69 > /var/log/tftp
And, setting the BIOS settings for all computers to boot over the network (and at the same time wake up from PCI-E devices, over the network, you will understand why later), load them. If the blue window of the opsi boot menu appears during boot,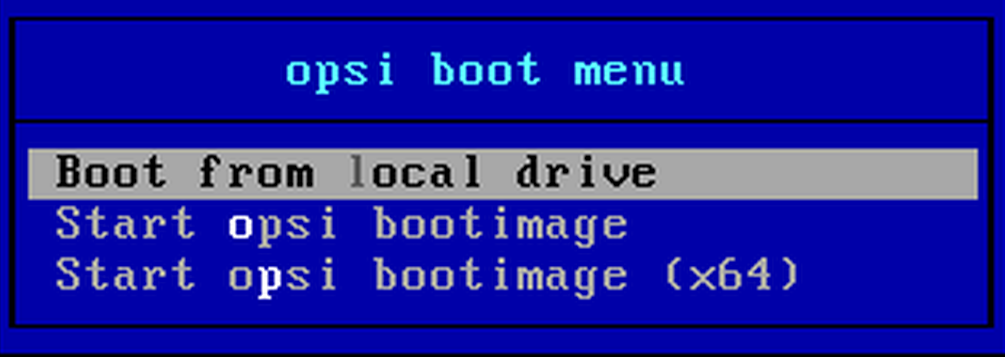 then you are doing everything right.When booting, computers access our server, tcpdump writes their poppy addresses to a file
 /var/log/tftp, and using a repo script https://github.com/valmont2k/opsi-hosts-importerto run on opsiserver after all computers are marked in opsi and leave their poppy addresses there. This script uses the opsi API from here https://download.uib.de/opsi4.1/experimental/documentation/html/opsi-api-documentation/opsi_API.html and a bit of magic. After starting it, you will have clients on opsiserver of the form win% random32% .domain.localThe next step is to cast the windows image (which should have already been done) to all computers.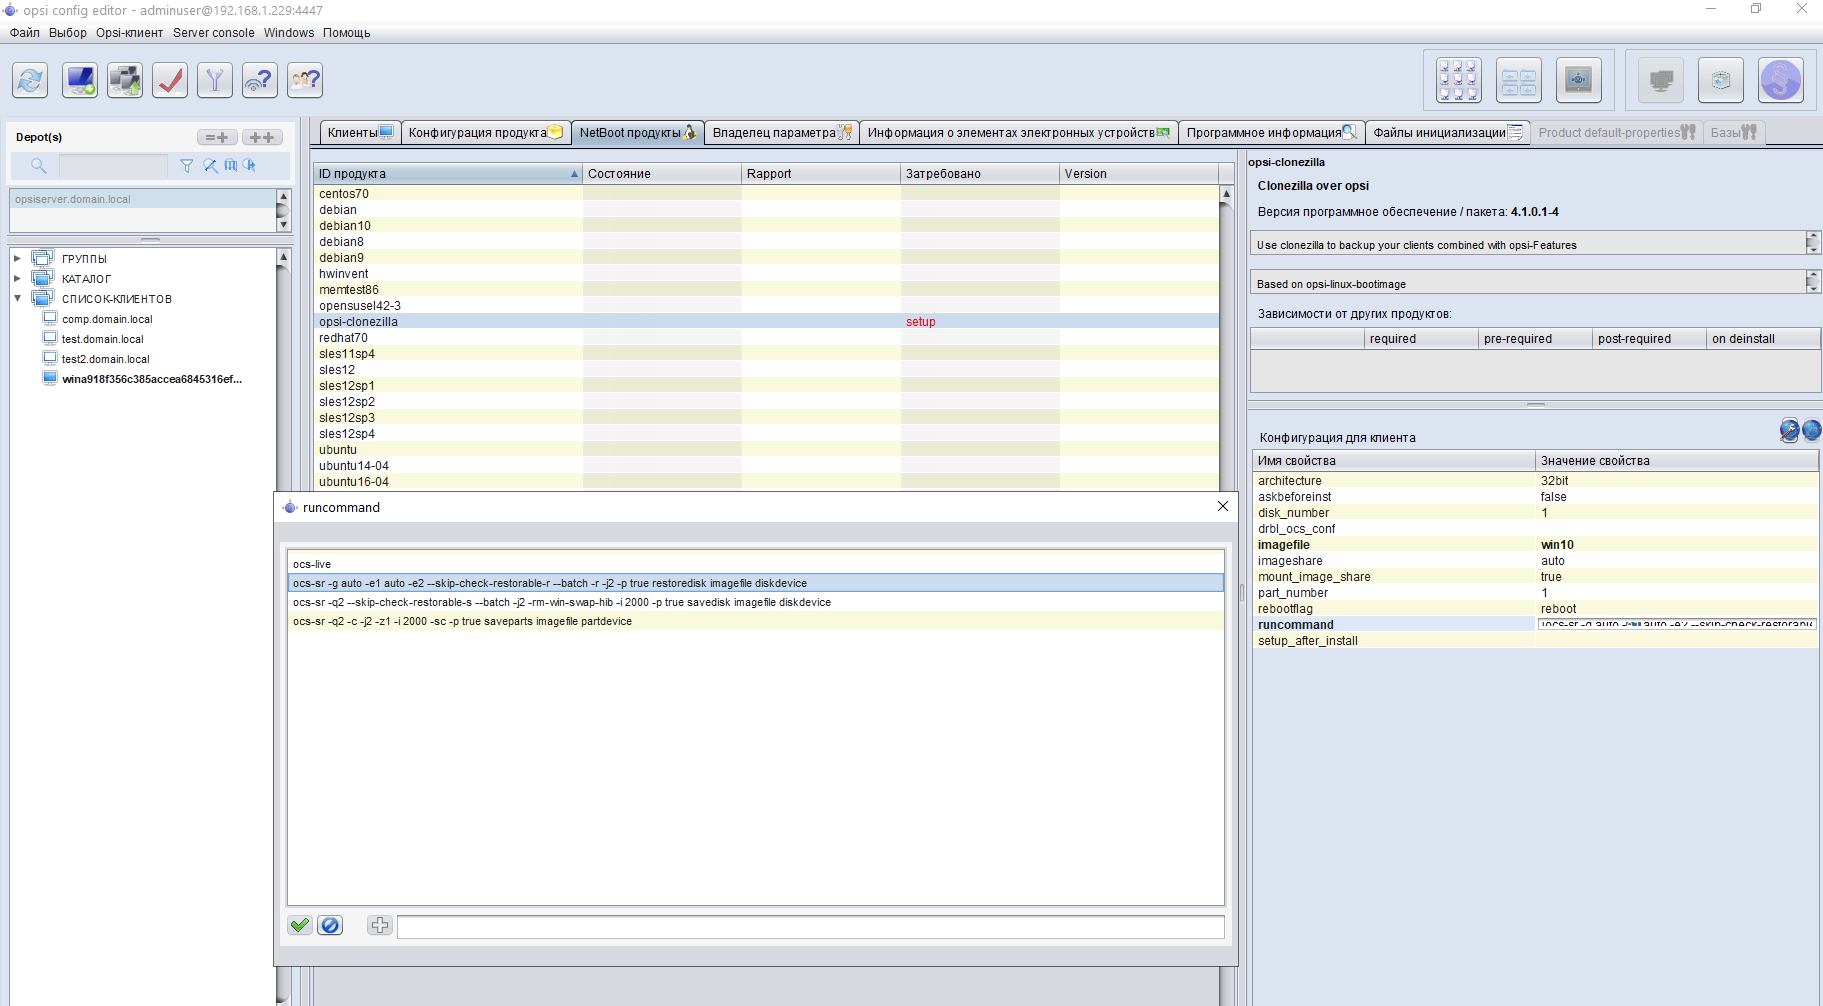 To do this, select all the computers on which you need to install Windows and opposite clonezilla we set the values as in the screenshot. You turn off the computers, then turn on several of them in turn and watch how Windows automatically rolls onto them, they themselves are renamed and entered into the domain.If you want to automate this too, put etherwake and write a script that with a specified delay takes the mac-addresses from the / tmp / newmacs file and wakes up their hosts so that they take turns rolling Windows. See update 1 .I made a gesture of Ronaldo from an advertisement for shampoo and was already packing for coffee when Ilon Mask again called on my phone and added:- Yes, I forgot to say, it is necessary that the
 %program%latest version be on all computers tomorrow , can you handle it?- Of course, everything will be tomorrow!I can’t upset the idol of technocrats, so you need to put your brains back in your hands.It would be nice if at startup the computers set themselves an opsi client called opsi-client-agent. This can be done through domain group policies.For this to happen without entering a password during installation, you need to add the password of your user in the file/var/lib/opsi/depot/opsi-client-agent/files/opsi/cfg/config.inion opsiserveras the value of service_hidden_passwordadminuserbase64[installation]
service_user=adminuser
service_password=none
service_hidden_password=base64HERE
Next, add the group policy in the setupOPSI domain and take the script for it from here. https://github.com/valmont2k/opsi-install-opsi-client-agent-over-active-directory-domain-policyRemember to insert your values in the script.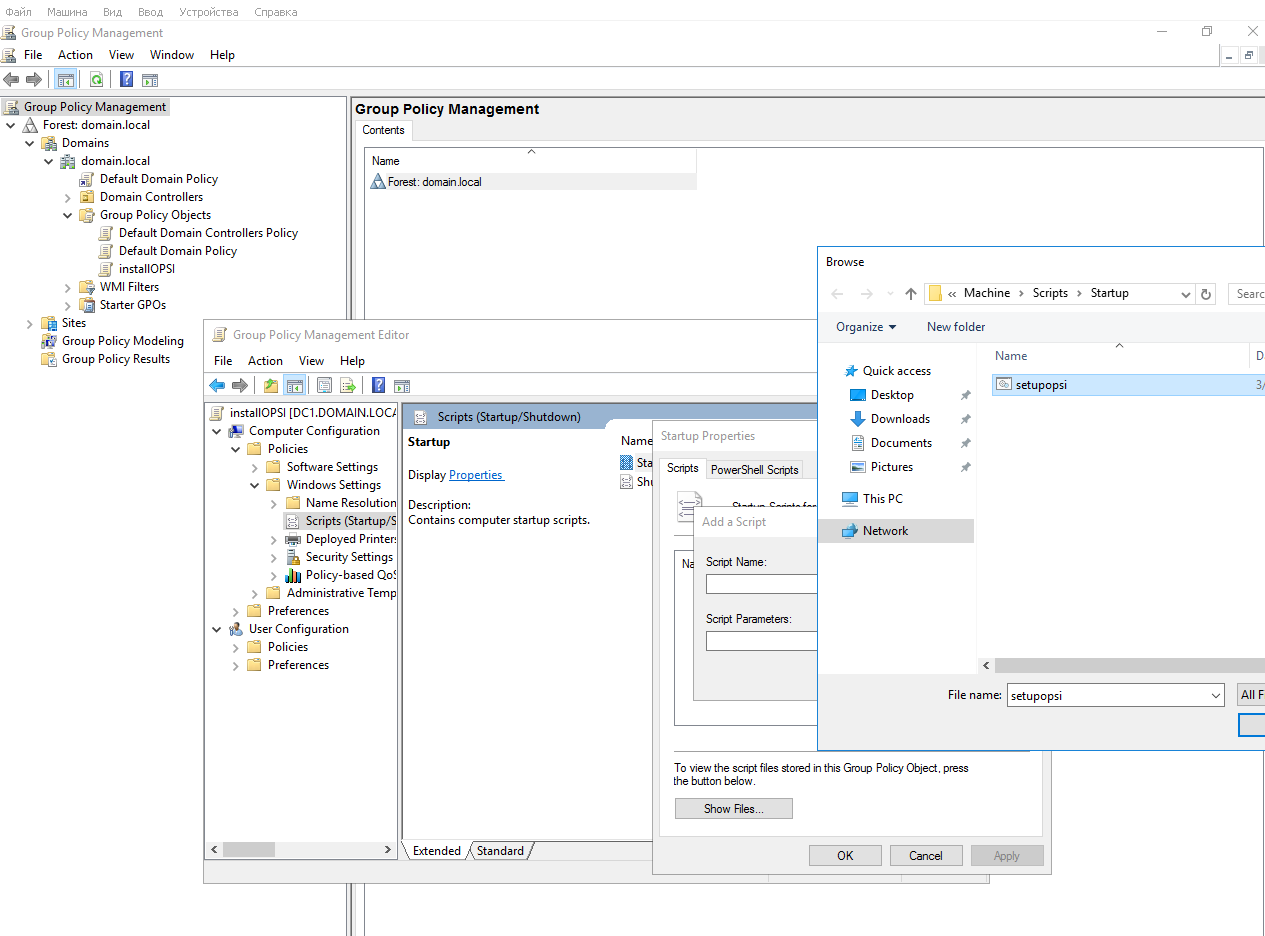 If you did everything correctly, then at the first reboot in the domain, clients will install
 opsi-client-agent, reboot and appear under their names win-%random%in the OPSI management interface. Old customers with the same poppy addresses can be deleted.Now you can proceed to the installation %program%.We go here https://forum.opsi.org/viewtopic.php?f=22&t=7573 and find a link to the package *.opsiwith the name packagebuilder, something like "opsi PackageBuilder Windows (opsi Paket)".Download the package to the directory /var/lib/opsi/workbenchon opsiservercd /var/lib/opsi/workbench
wget https://opsipackagebuilder.s3.amazonaws.com/opsiPackageBuilder/python/opsipackagebuilder_8.4.4-1.opsi
and install it:opsi-package-manager -d ALL -i opsipackagebuilder_8.4.4-1.opsi
Now, in the opsi management interface, click on the update button and see that we have new packages opsipackagebuilderand opsi-setup-detector.We put them through the control interface on a test machine under Windows.When the program opsipackagebuilderand opsi-setup-detectorestablished, run opsi-setup-detectorand play off it on the installer program windirstat, downloaded from the official website pre-program.Before installing, you need to configure the program settings. We mount the ball on the test machine \\ opsiserver.domain.local \ opsi_workbench as drive z: write your name and your mail in the specified fields: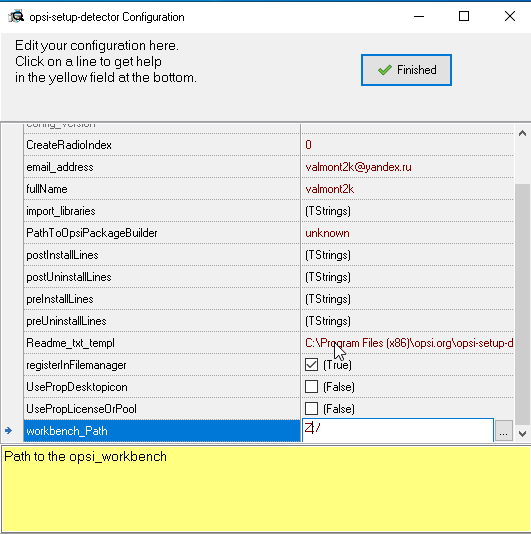 OPSI can make one package using 32 and 64 installers at the same time and setting them based on the capacity of the system, we have 64 bits everywhere, so click "Analyze single file ...":
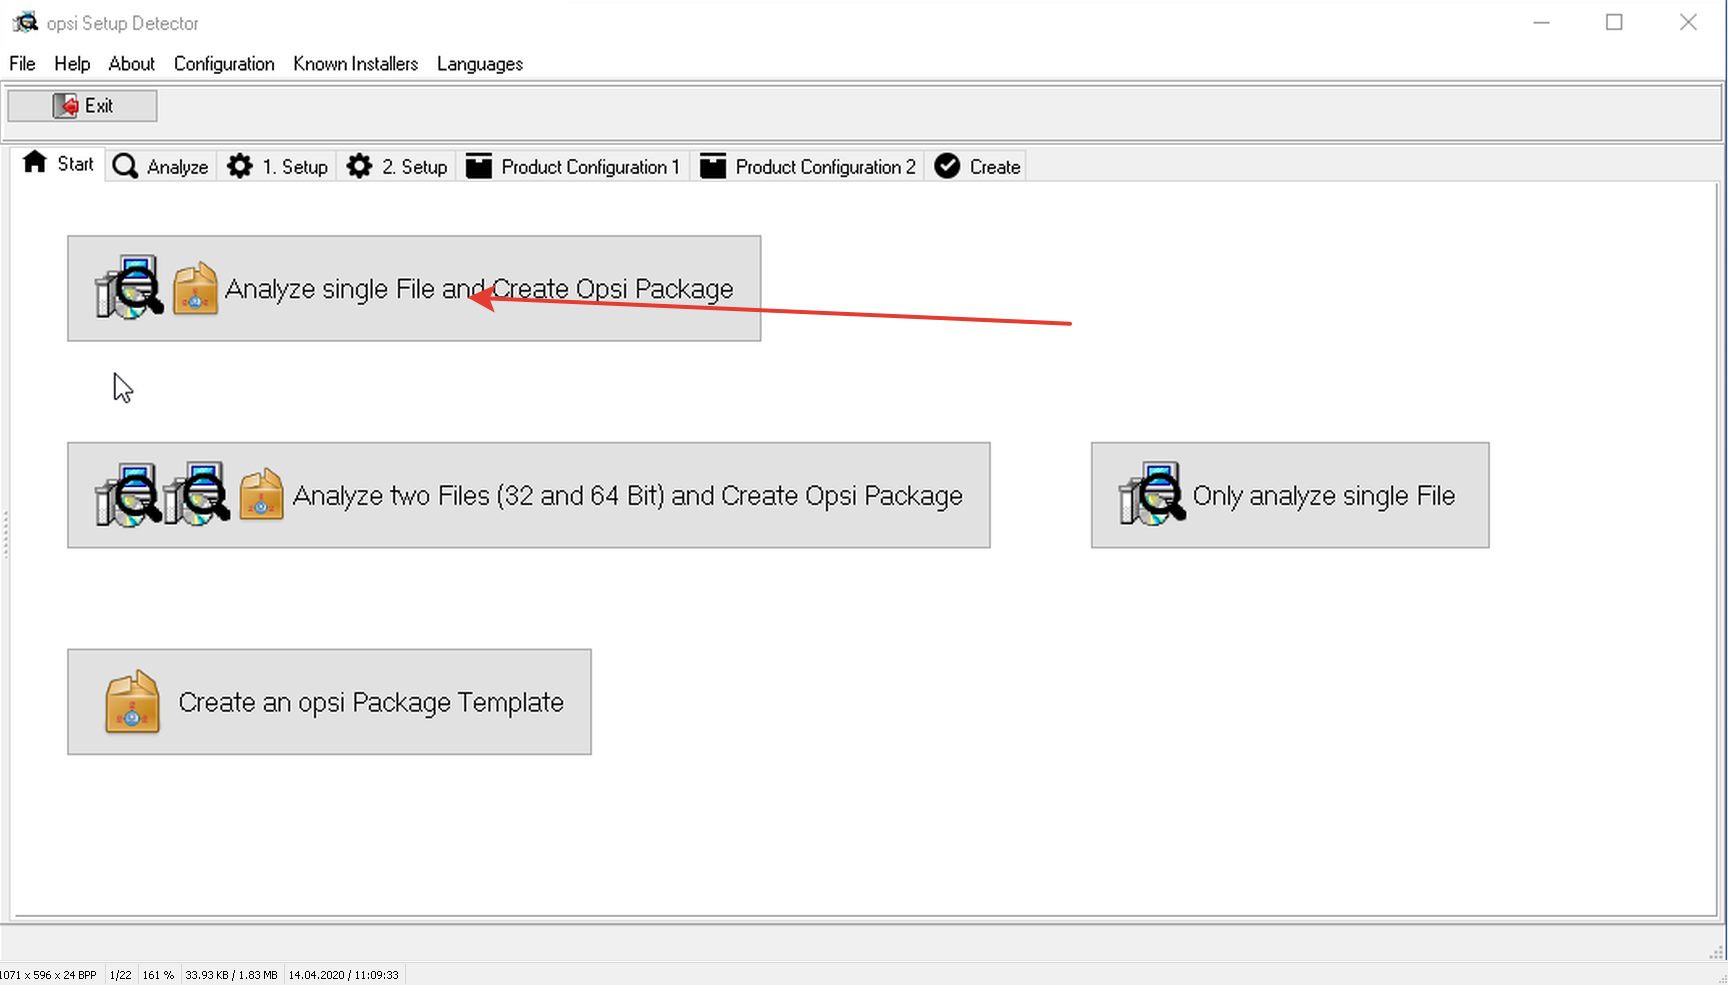 We see that the detector did not understand the installation directory, we can find out for ourselves by trying to install the program through the installer. But he detected the type of installer, the version of the program, the size of the application in assembled and deployed form, the offline installation key, the offline removal key and the name uninstaller.
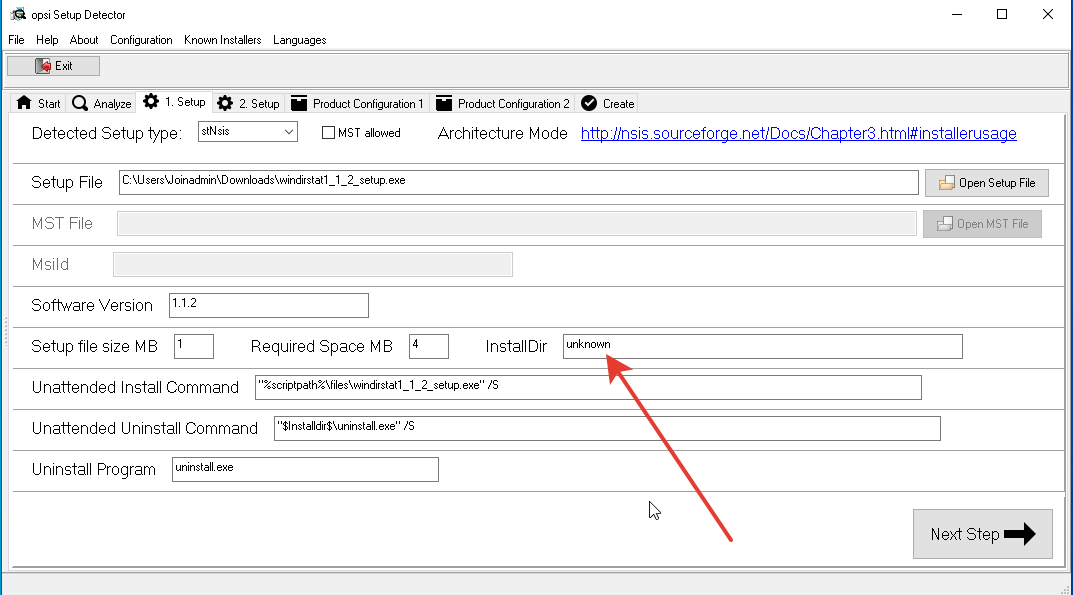 We enter the installation directory ourselves and click Next Step:
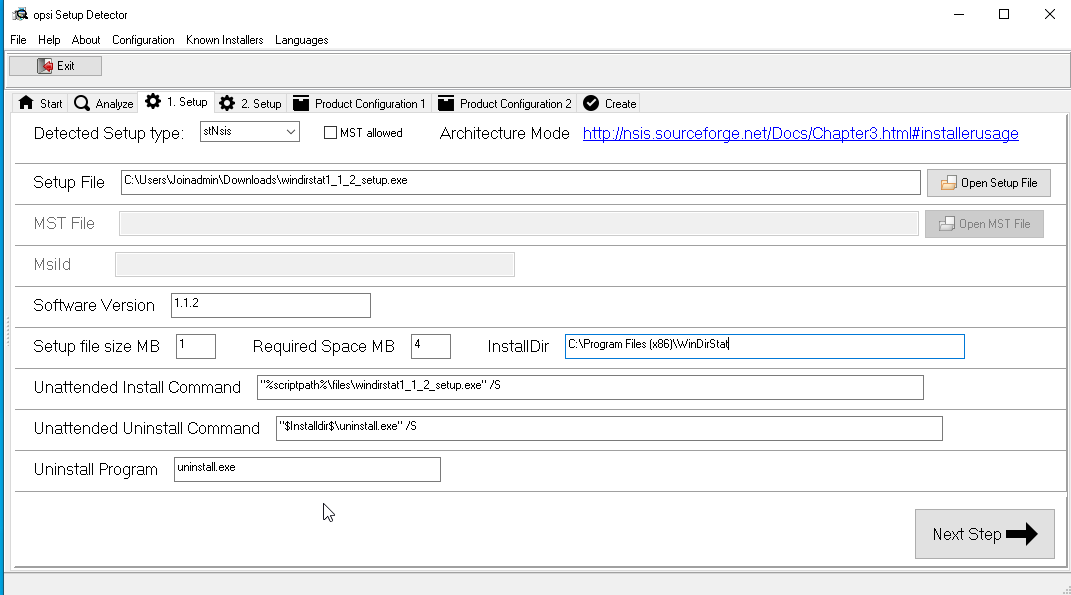 Here you can add the product name, its ID, description and set the version of the package, that is, put in the attempt that we make to assemble the package (in our case, the first attempt):
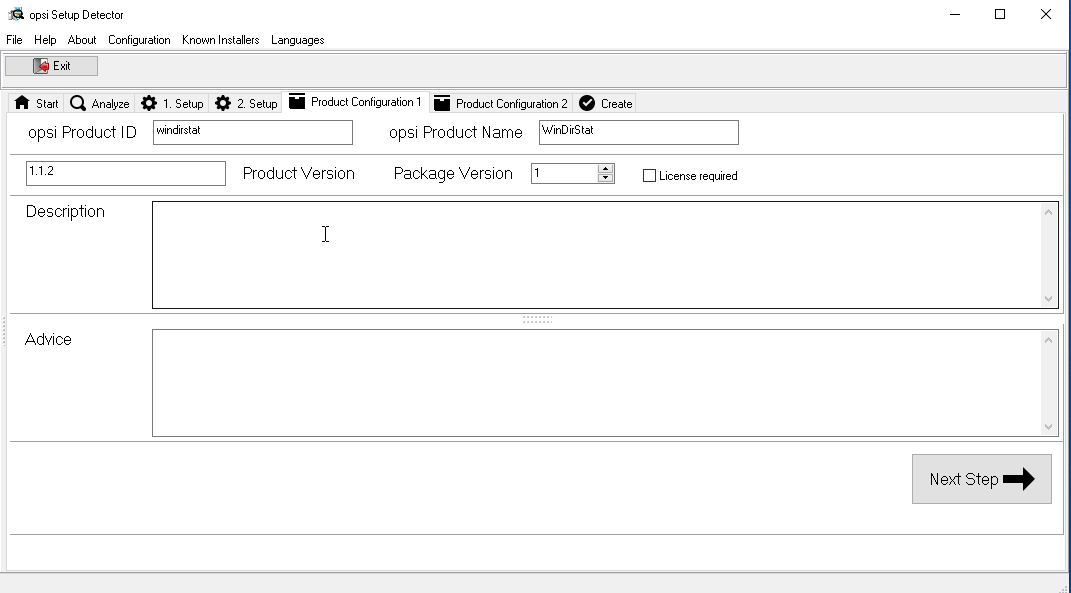 You can put down the dependencies, this means that to install the current package, the packages themselves put up for installation are those that are stated in the requirements for ours:
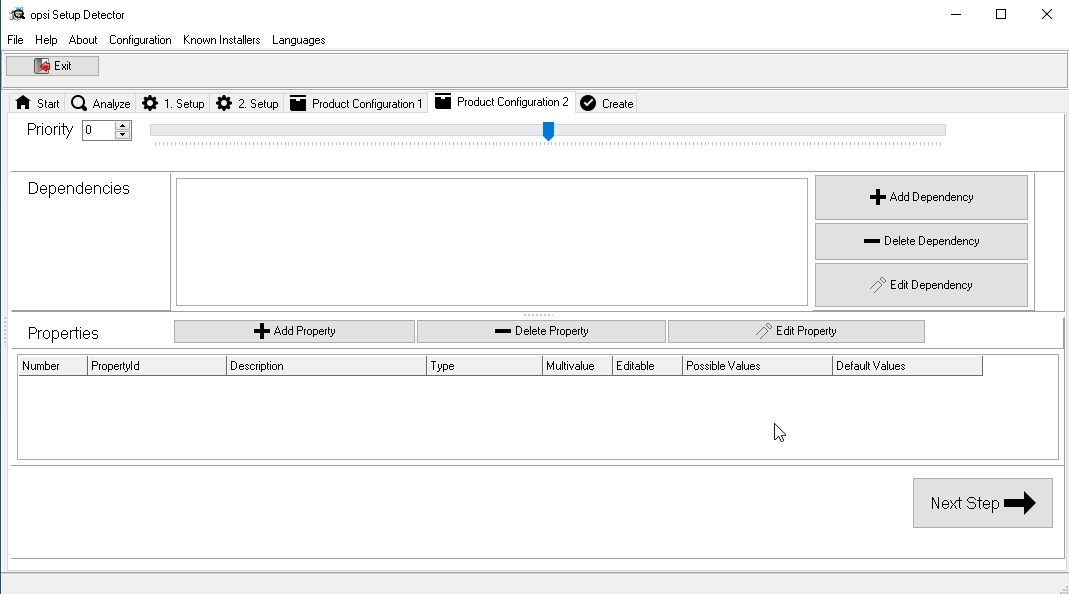 Create OPSI package:
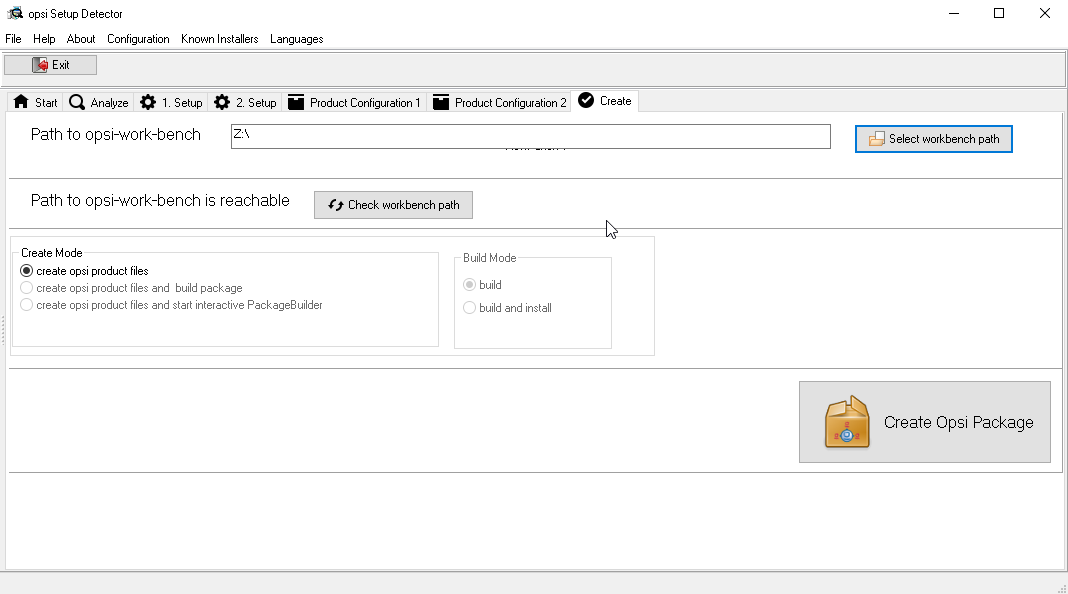 We created the package, now we need to go to opsiserver in
/var/lib/opsi/workbench/windirstat.Collect package:opsi-makepackage
Install it:opsi-package-manager -d ALL -i windirstat-1.1.2-1.opsi
If everything went well, then in the opsi-configed management interface, click on the “update” button and see that we have a new package windirstatthat can be installed on selected computers on our network.Bingo! The first package is assembled!To complicate our task, using powershell we will create a rule in the Windows firewall that gives access to the client to port 4441 and 4447 and make this application autoload for the user through the registry tweak, as if it would be, for example, a messenger.Open opsi package builder: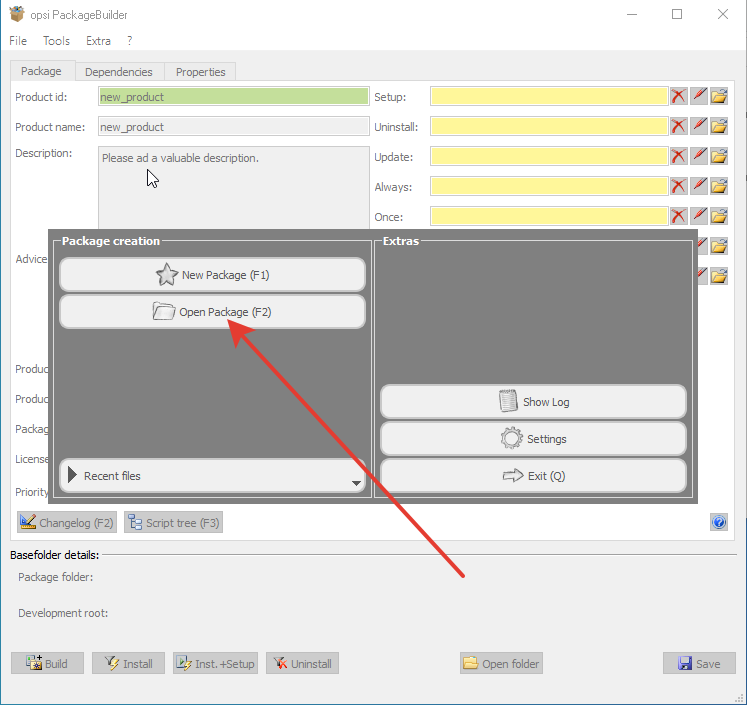 Choose to open the package and open our package with windirstat:
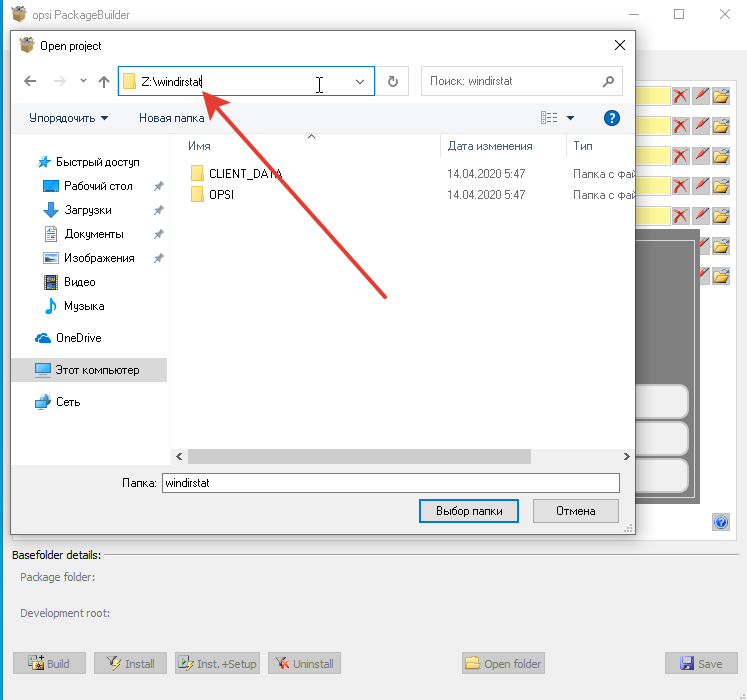 OPSI by default acts as follows: when you remove a program from uninstall.opsiscript, delsub.opsiscript is called, which removes the program. When installing a program from setup.opsiscript, delsub.opsiscript is called, which removes the program, and then setup.opsiscript installs it. Therefore, we make edits to create something in setup.opsiscript, and edits to delete something in delsub.opsiscript.All the magic of these scripts is reflected in the documentation https://download.uib.de/opsi4.1/documentation/html/en/opsi-winst-manual/opsi-winst-manual.htmlsetup.opsiscript can be opened through the pencil icon, and delsub.opsiscript via Script Tree.
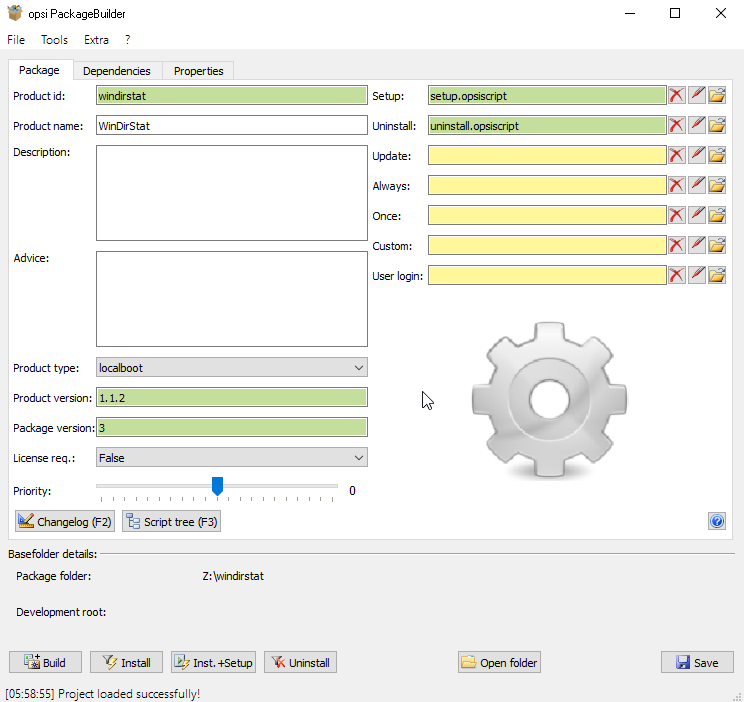 Here is the complete file menu.
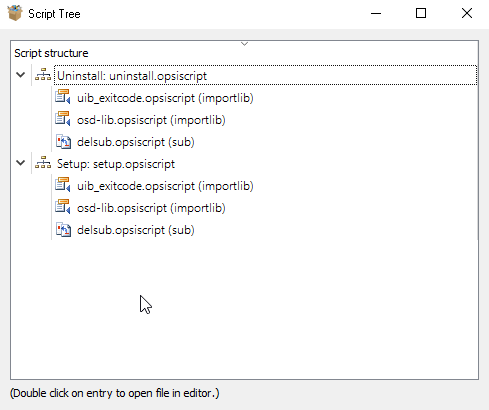 Each attempt to build a package should be increased by one.
 We add the program to autoload via opsi, for this, insert the lines in setup.opsiscript:
Registry_changes  /AllNTUserdats /64bit
[Registry_changes]
OpenKey [Software\Microsoft\Windows\CurrentVersion\Run]
Set "WinDirStat" = "C:\Program Files (x86)\WinDirStat\windirstat.exe"
And in delsub.opsiscript, insert the lines:Registry_changes /AllNTUserdats /64bit
[Registry_changes]
OpenKey [HKEY_CURRENT_USER\Software\Microsoft\Windows\CurrentVersion\Run]
;Set "WinDirStat" = "C:\Program Files (x86)\WinDirStat\windirstat.exe"
DeleteVar "WinDirStat"
We add the rule to the firewall by running the powershell script, for this, insert the lines in setup.opsiscript:DosInAnIcon_PowerShell_ExecutionPolicy
ExecWith_PowerShell_NichtPDCAktionen powershell.exe winst /sysnative
[DosInAnIcon_PowerShell_ExecutionPolicy]
echo "powershell set-executionpolicy RemoteSigned ..."
powershell.exe set-executionpolicy RemoteSigned
exit %ERRORLEVEL%
[ExecWith_PowerShell_NichtPDCAktionen]
; hier Dein PS-Code
New-NetFirewallRule -DisplayName 'OPSI-Inbound' -Profile @('Domain', 'Private', 'Public') -Direction Inbound -Action Allow -Protocol TCP -LocalPort @('4441', '4447')
And in delsub.opsiscript, insert the lines:DosInAnIcon_PowerShell_ExecutionPolicy
ExecWith_PowerShell_NichtPDCAktionen powershell.exe winst /sysnative
[DosInAnIcon_PowerShell_ExecutionPolicy]
echo "powershell set-executionpolicy RemoteSigned ..."
powershell.exe set-executionpolicy RemoteSigned
exit %ERRORLEVEL%
[ExecWith_PowerShell_NichtPDCAktionen]
; hier Dein PS-Code
Remove-NetFirewallRule -DisplayName 'OPSI-Inbound'
The full code can be viewed here:https://github.com/valmont2k/WinDirStatOpsiPackageTestI have already relaxed, watching as opsi rolls the %program%latest version to the entire network, as Ilon again interrupted my thoughts on high.- Next week another 500 people will come, offices have already been rented, computers are being imported, there is a networker, you need to deploy a windows network in six branches around the city, can you handle it?- Well, of course, this is not rocket science - I joked tiredly in response.We clone our opsiserver server using the hypervisor and deploy it in the branch.We assume that the central office is connected to branches through a VPN with a speed of at least 10 Mbps.Now we will make a depot server, that is, a server for storing packages in the branch. Clients in the branch will knock on https to the main server, and if you need to install software, they will mount the depot server in your branch and be installed from it, this is done in particular to save the Internet channel between the office and the branch.We configure on the branch server opsiserver-2 a static address from the local network changing the file /etc/network/interfacesaccording to the new network.Change hostname and hosts:sed -i 's/opsiserver/opsiserver-2/' /etc/hostname
sed -i 's/opsiserver/opsiserver-2/g' /etc/hosts
in / etc / hosts we update the data by driving in a new ip addressreboot
Rename the opsi server using opsi:opsi-admin --no-depot -d method host_renameOpsiDepotserver opsiserver.domain.local opsiserver-2.domain.local
From the server opsiserver-2.domain.local we connect it to opsiserver.domain.local as depot:opsi-setup --register-depot
Specify the name of the main server, to which we connect the new depot, administrator and password: You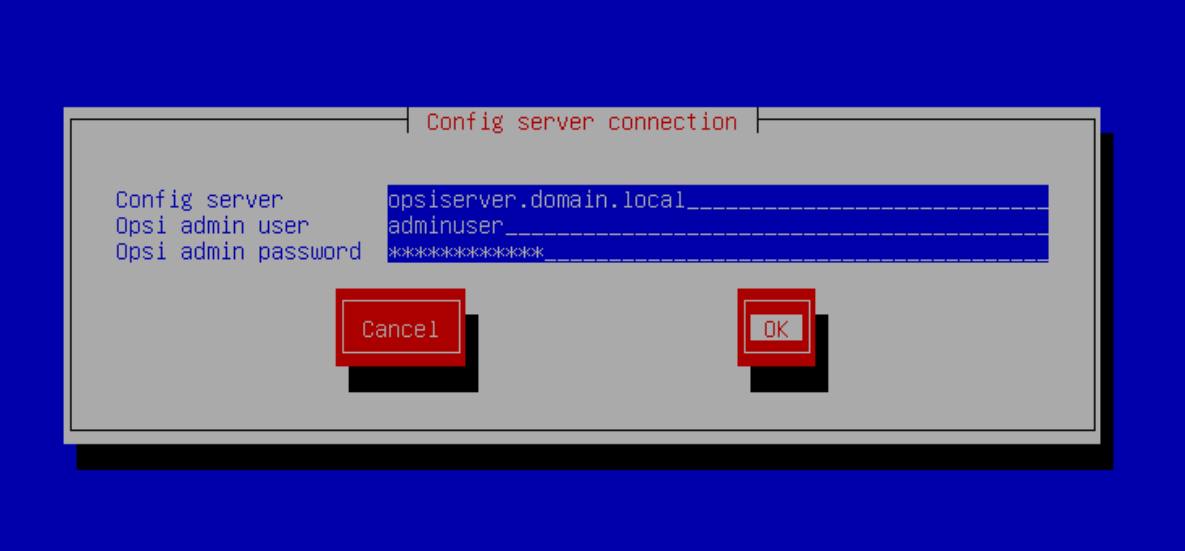 do not need to change anything here : You
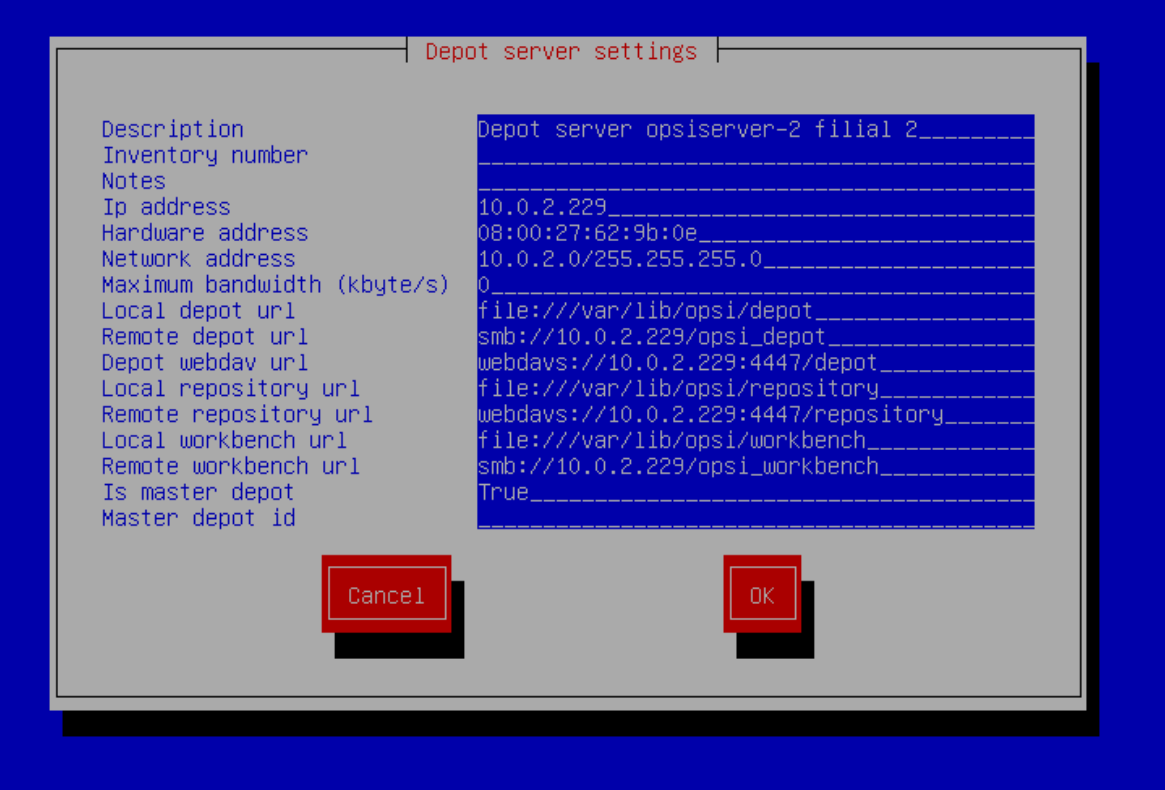 can verify that everything is done correctly in opsi-configed:
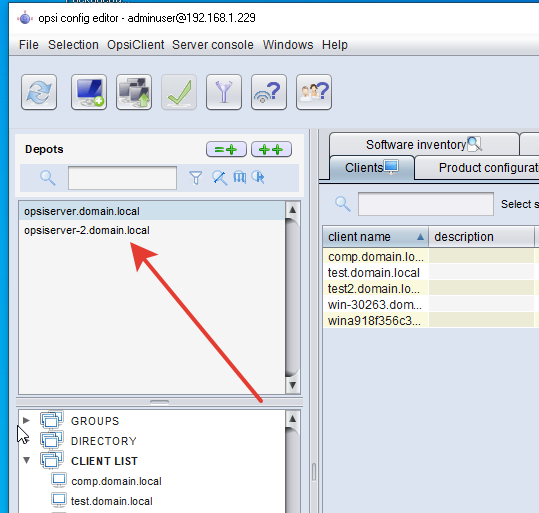 Next, you need to configure the system so that clients choose their own depot server. We select all customers and set them dynamic depot. By default, the client looks at its ip address and selects depot from its network.
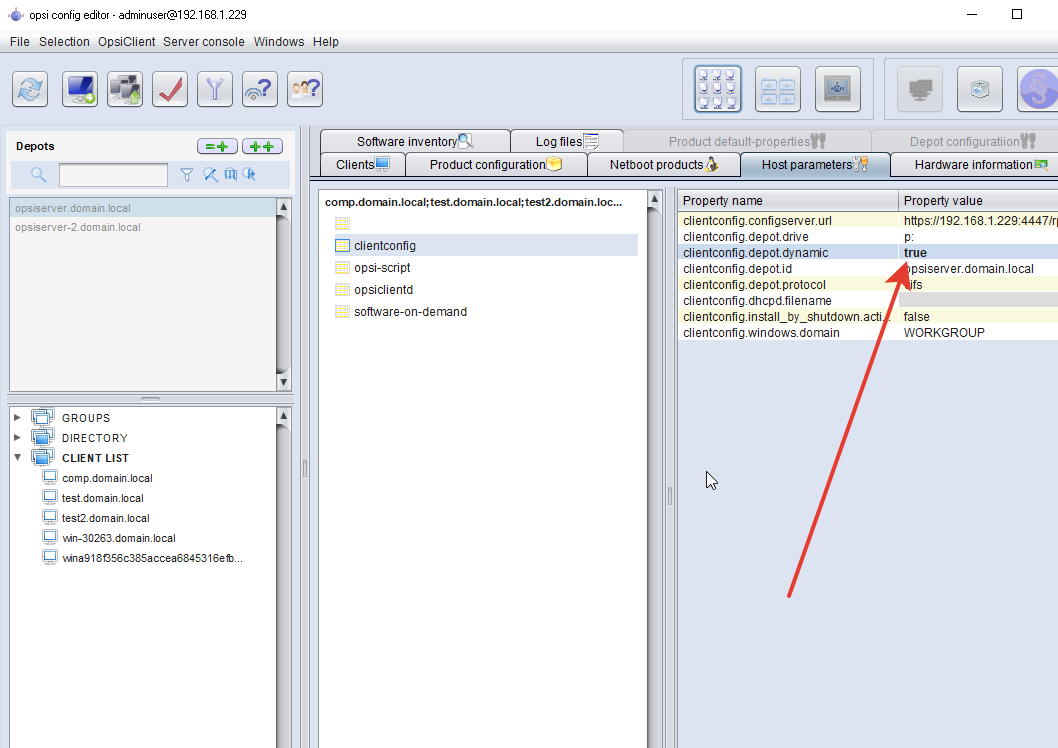 Now we configure that all future clients immediately choose depot dynamically:
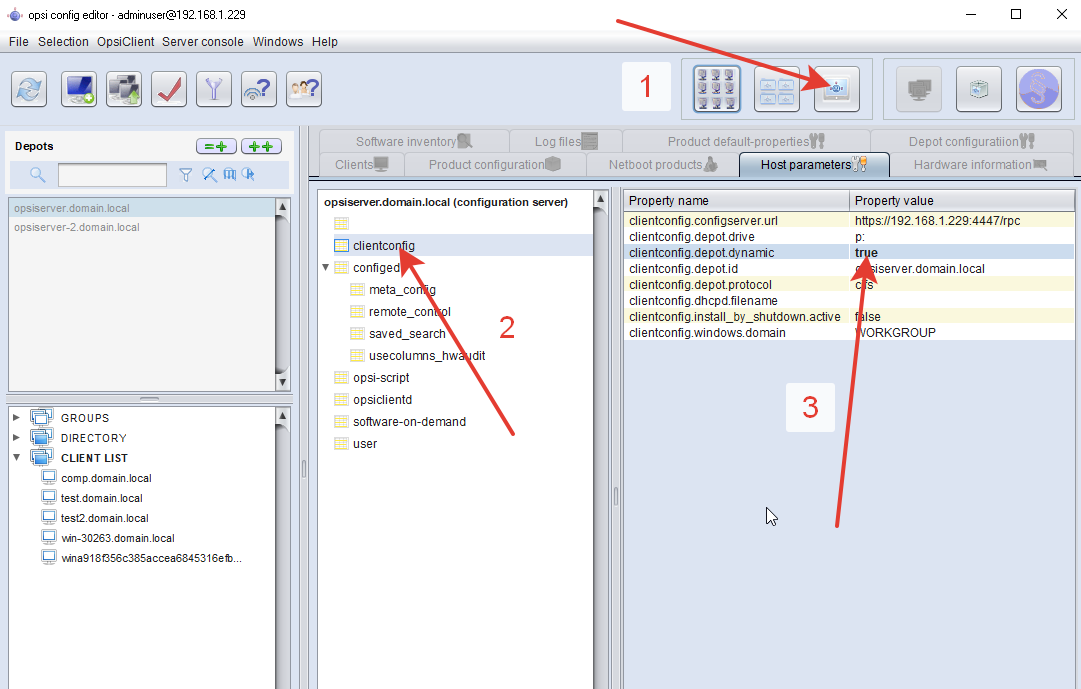 That's all, the setup of the new depot server is done, you can install opsi-client-agent for computers on the local network with the same script that we installed in the main office earlier, not forgetting to change the ip address inside the script.In each branch we set a domain controller (you can Readonly), do our own network addressing, divide the default-site inside the windows domain into sub-sites, each of which we make our subnet, our group policy with its opsi-client-agent installation script.Then we repeat in the new branch.I finished my coffee and went home, and the LED on the network card signaled that new and new systems were rolling out to the noise of coolers ...Update 1:As it turned out, it is not necessary to script, opsi-configed allows you to click on the awakening of clients with the mouse on the sheduler.