Hello everyone. Ahead of the start of the Python Neural Networks course , we have prepared for you a translation of another interesting material.
We are pleased to introduce PyCaret , an open source Python machine learning library for learning and deploying models with and without a teacher in a low-code environment. PyCaret allows you to go from data preparation to model deployment in a few seconds in the notebook environment you choose.Compared to other open machine learning libraries, PyCaret is a low-code alternative that can replace hundreds of lines of code with just a few words. The speed of more efficient experiments will increase exponentially. PyCaret is essentially a Python shell over several machine learning libraries such as scikit-learn , XGBoost , Microsoft LightGBM , spaCyand many others.PyCaret is simple and easy to use. All operations performed by PyCaret are sequentially stored in a pipeline fully ready for deployment. Whether it’s adding missing values, converting categorical data, engineering features or optimizing hyperparameters, PyCaret can automate all this. To learn a little more about PyCaret, check out this short video .Getting Started with PyCaret
The first stable release of PyCaret version 1.0.0 can be installed using pip. Use the command line interface or the notebook environment and run the command below to install PyCaret.pip install pycaret
If you are using Azure Notebooks or Google Colab , run the following command:!pip install pycaret
When you install PyCaret, all dependencies will be installed automatically. You can view the list of dependencies here .It couldn't be easier
Walkthrough
1. Data AcquisitionIn this walkthrough, we will use a diabetic dataset, our goal is to predict the patient’s result (in binary 0 or 1) based on several factors such as pressure, blood insulin level, age, etc. . This dataset is available on the PyCaret GitHub repository . The easiest way to import the dataset directly from the repository is to use the function get_datafrom the modules pycaret.datasets.from pycaret.datasets import get_data
diabetes = get_data('diabetes')
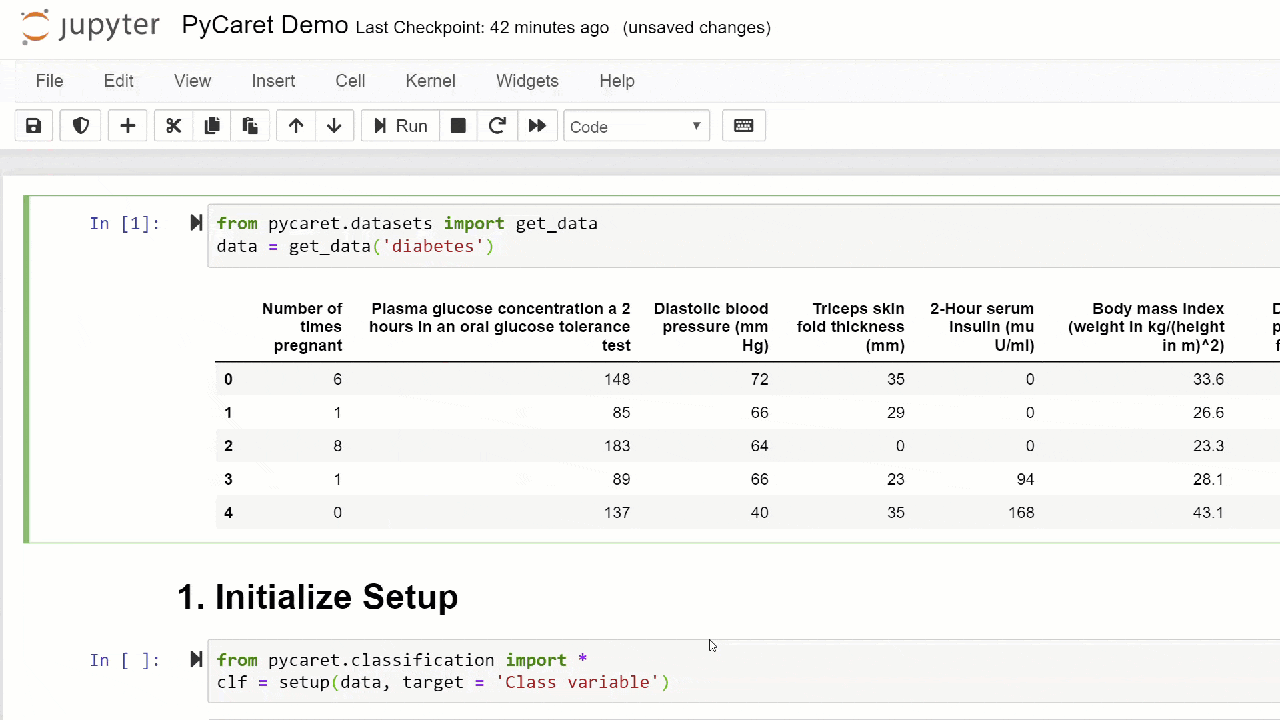
 PyCaret can work directly with pandas2 data frames . Setting up the environmentAny experiment with machine learning in PyCaret starts with setting up the environment by importing the necessary module and initializing
 setup(). The module that will be used in this example is pycaret.classification .After importing the module, it is setup()initialized by defining a data frame ( 'diabetes' ) and a target variable ( 'Class variable' ).from pycaret.classification import *
exp1 = setup(diabetes, target = 'Class variable')
 All preprocessing takes place in
 setup(). Using more than 20 functions to prepare data before machine learning, PyCaret creates a pipeline of transformations based on the parameters defined in the function setup(). It automatically builds all the dependencies in the pipeline, so you do not need to manually control the sequential execution of transformations on a test or new (invisible) dataset.PyCaret pipeline can be easily transferred from one environment to another or deployed to production. Below you can familiarize yourself with the preprocessing features that have been available in PyCaret since the first release.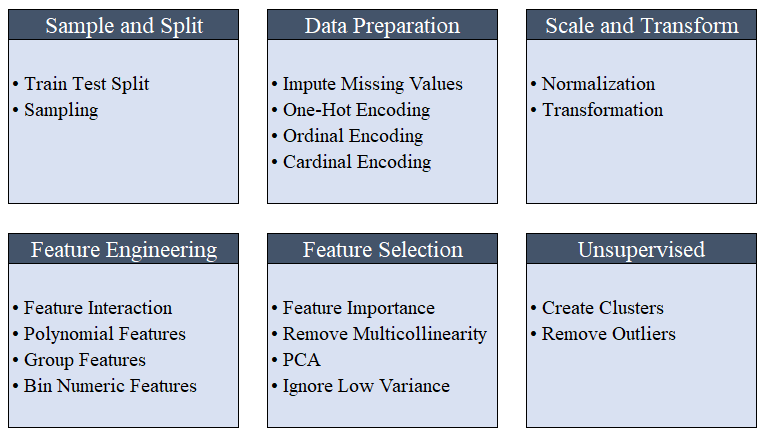 Data preprocessing steps are mandatory for machine learning, such as adding missing values, coding quality variables, coding labels (yes or no to 1 or 0) and train-test-split, are performed automatically during initialization
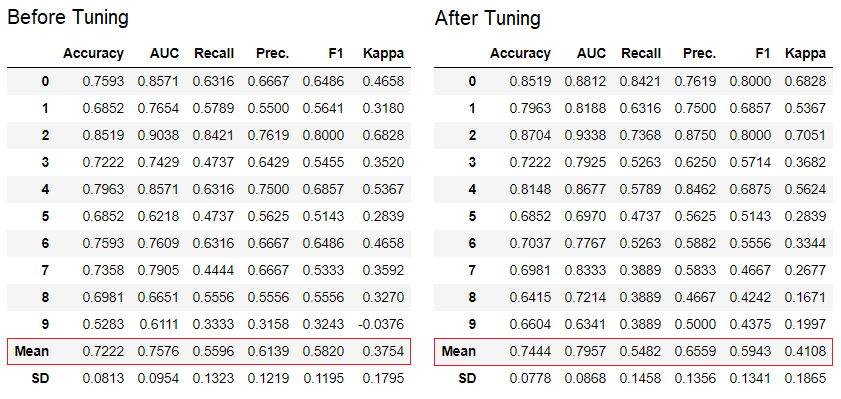
 setup(). You can learn more about preprocessing features in PyCaret here .3. Comparison of modelsThis is the first step that is recommended to be performed when working with teacher training ( classification or regression ). This function trains all models in the model library and compares the estimated indicator with each other using cross-validation for K-blocks (10 blocks by default). Estimated indicators are used as follows:- For classification: Accuracy, AUC, Recall, Precision, F1, Kappa
- For regression: MAE, MSE, RMSE, R2, RMSLE, MAPE
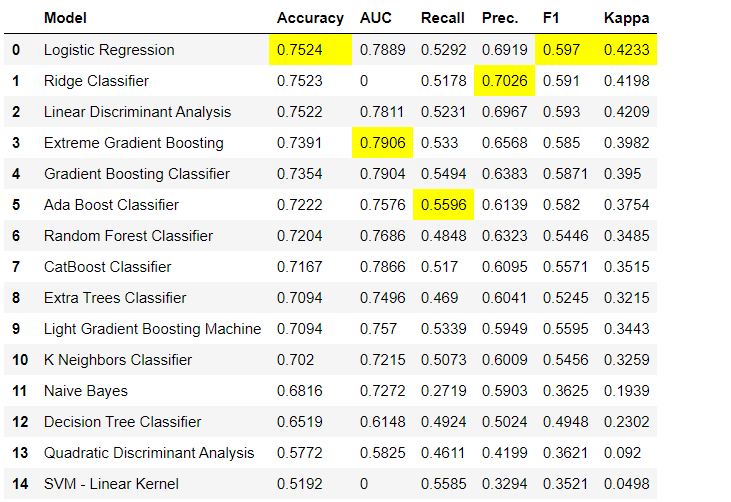 By default, metrics are evaluated using cross-validation over 10 blocks. The number of blocks can be changed by changing the value of the parameter
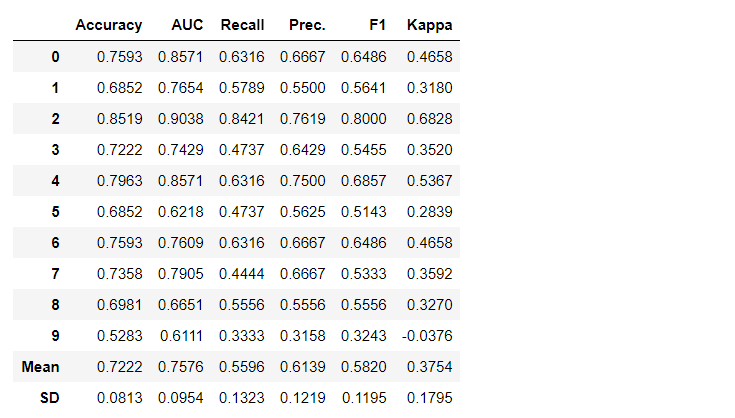
 fold.The default table is sorted by “Accuracy” from the highest value to the lowest. Sorting order can also be changed using the option sort.4. Creating a modelCreating a model in any PyCaret module is so simple that you just need to write it create_model. The function takes one parameter at the input, i.e. model name passed as a string. This function returns a table with cross-validated scores and a trained model object.adaboost = create_model('ada')
 The variable "adaboost" stores the object of the trained model, which returns a function
 create_modelthat, under the hood, is a scikit-learn evaluator. Access to the source attributes of the trained object can be obtained using the function period ( . )after the variable. You can find an example of use below. PyCaret has over 60 open source ready-to-use algorithms. A complete list of evaluators / models available in PyCaret can be found here .5. Model setupThe function is
 tune_modelused to automatically configure machine learning model hyperparameters. PyCaret usesrandom grid searchin a specific search space. The function returns a table with cross-validated estimates and an object of a trained model.tuned_adaboost = tune_model('ada')
 The function
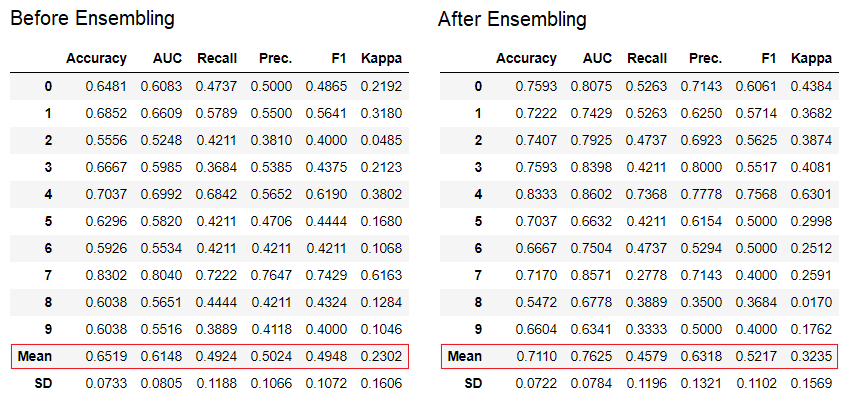
 tune_modelin non-teacher learning modules such as pycaret.nlp , pycaret.clustering and pycaret.anomaly can be used in conjunction with teacher learning modules. For example, the NLP module in PyCaret can be used to adjust a parameter number of topicsby evaluating an objective function or loss function from a model with a teacher, such as “Accuracy” or “R2”.6. Ensemble of modelsThe function is ensemble_modelused to create an ensemble of trained models. At the input, it takes one parameter - the object of the trained model. The function returns a table with cross-validated estimates and an object of a trained model.
dt = create_model('dt')
dt_bagged = ensemble_model(dt)
 The "bagging" method is used when creating the ensemble by default, it can be changed to "boosting" using the parameter
 methodin the function ensemble_model.PyCaret also provides functions blend_modelsand stack_models for combining several trained models.7. Model visualization.You can evaluate the performance and diagnose a trained machine learning model using the function plot_model. It takes the object of the trained model and the type of graph in the form of a string.
adaboost = create_model('ada')
plot_model(adaboost, plot = 'auc')
plot_model(adaboost, plot = 'boundary')
plot_model(adaboost, plot = 'pr')
plot_model(adaboost, plot = 'vc')
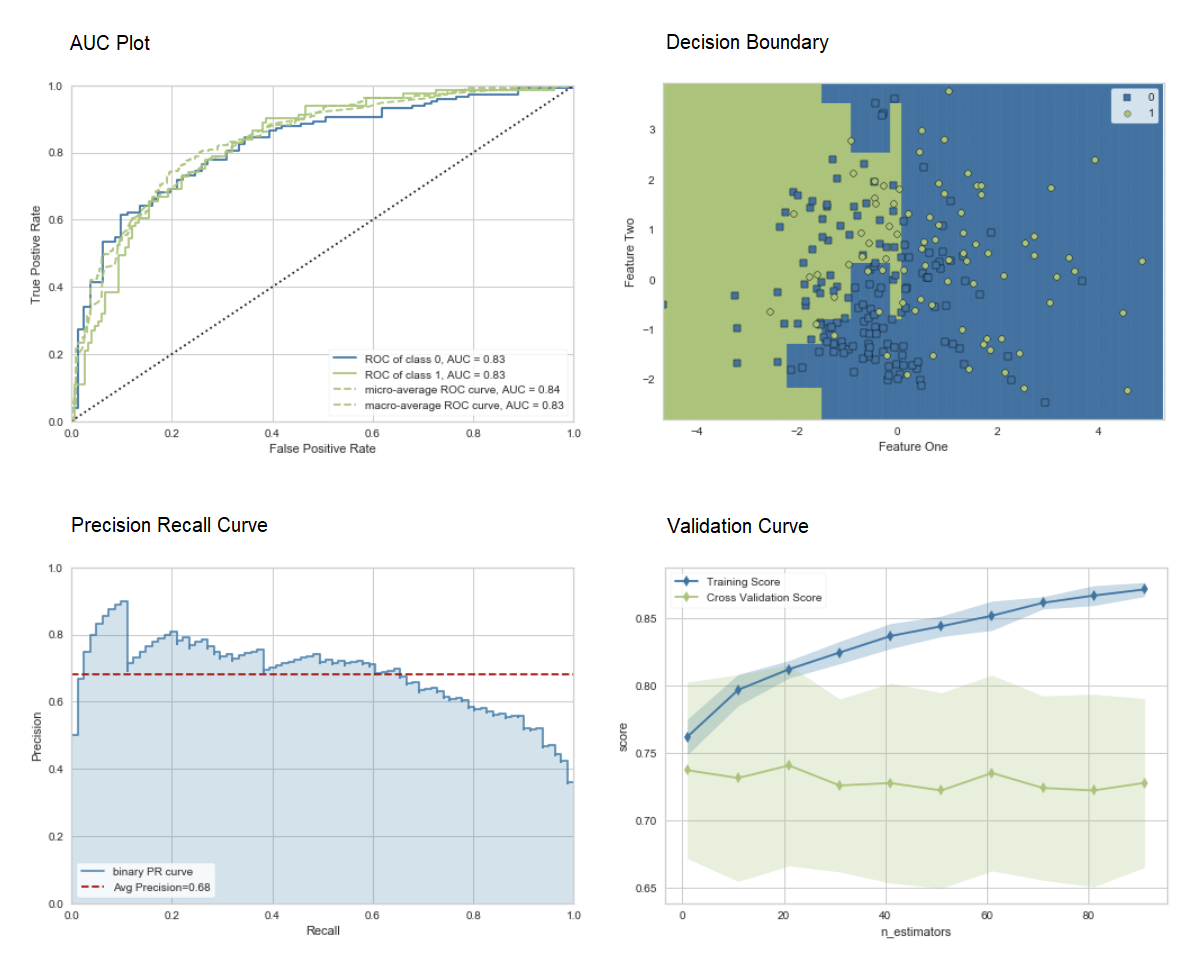 Here you can learn more about visualization in PyCaret.You can also use the function
 evaluate_modelto see graphs using the notebook user interface. The function
 plot_modelin the module pycaret.nlpcan be used to visualize the body of texts and semantic thematic models. Here you can learn more about them.8. Interpretation of the modelWhen the data is non-linear, which happens in real life quite often, we invariably see that tree-like models work much better than simple Gaussian models. However, this is due to a loss of interpretability, since tree models do not provide simple coefficients, like linear models. PyCaret implements SHAP (SHapley Additive exPlanations ) using a function interpret_model.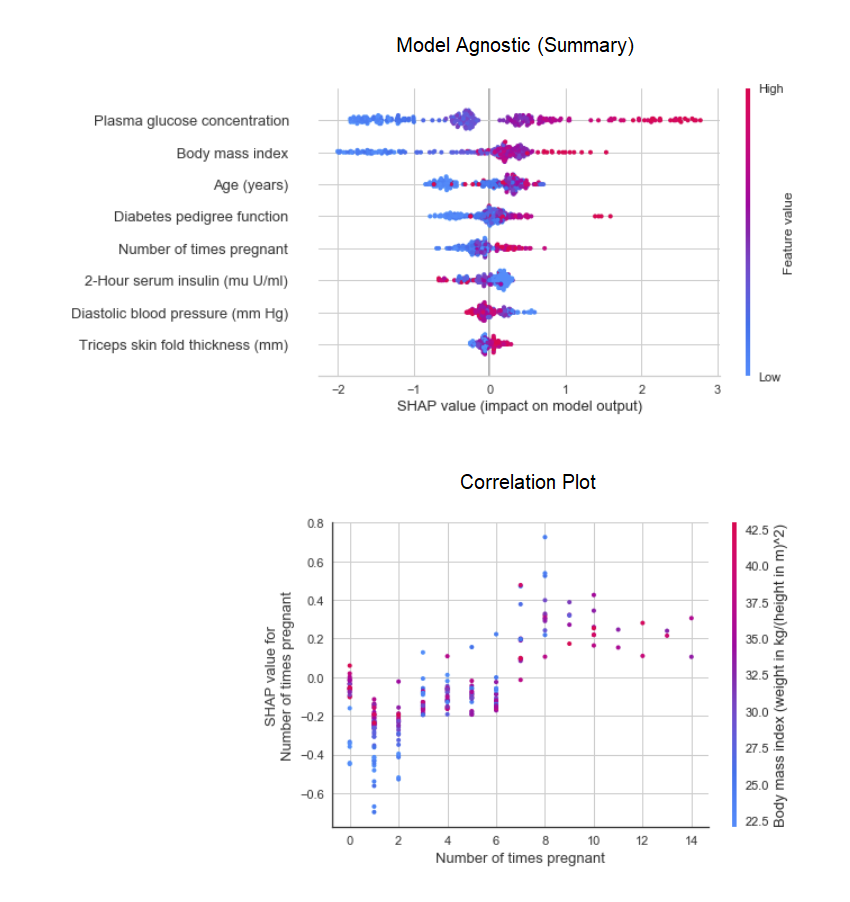 The interpretation of a particular data point in a test dataset can be estimated using the “reason” graph. In the example below, we test the first instance in the test dataset.
 9. Predictive modelUp to this point, the results we obtained were based on cross-validation by K-blocks on a training dataset (70% by default). In order to see the forecasts and model performance on the test / hold-out dataset, a function is used
 predict_model.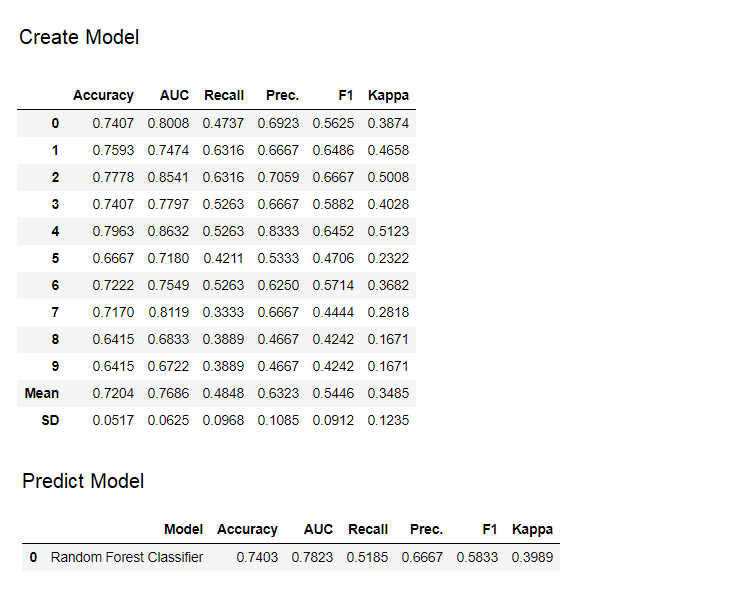 The function is
 predict_modelused to forecast an invisible dataset. Now we will use the same dataset that we used for training, as a proxy for the new invisible dataset. In practice, the functionpredict_modelwill be used iteratively, each time on a new invisible dataset.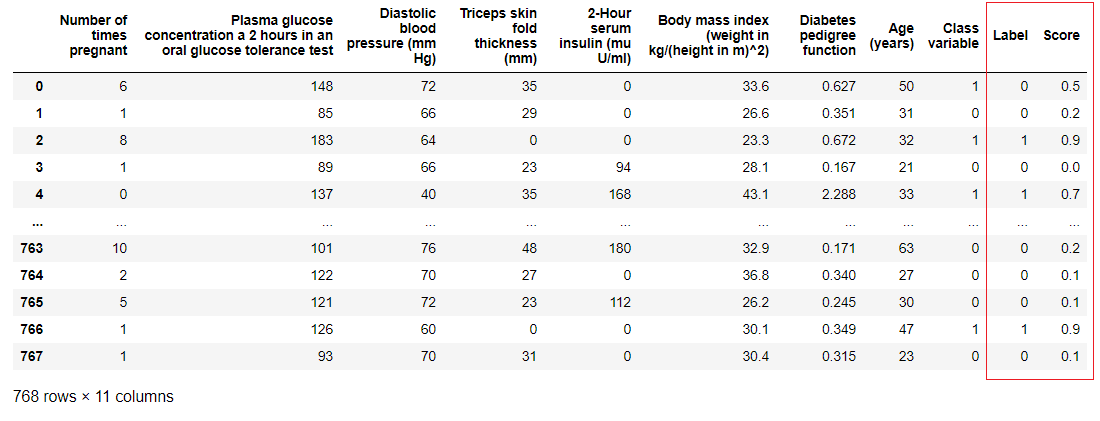 The function
 predict_modelcan also make predictions for a sequential chain of models that can be created using the stack_models and create_stacknet functions .The function predict_modelcan also make predictions directly for models hosted on AWS S3 using the deploy_model function .10. Deploying a modelOne of the ways to use trained models to create forecasts for a new dataset is to use the functionpredict_modelin the same notebook / IDE where the model was trained. However, generating a forecast for a new (invisible) dataset is an iterative process. Depending on the use case, the frequency of the forecasts can vary from real-time forecasts to batch predictions. The function deploy_modelin PyCaret allows you to deploy the entire pipeline, including the trained model in the cloud from the notebook environment.deploy_model(model = rf, model_name = 'rf_aws', platform = 'aws',
authentication = {'bucket' : 'pycaret-test'})
11. Save the model / save the experiment
After training, the entire pipeline containing all the preprocessing transformations and the object of the trained model can be saved in a binary pickle-file.
adaboost = create_model('ada')
save_model(adaboost, model_name = 'ada_for_deployment')
 You can also save the entire experiment, containing all the intermediate output, as a single binary file.save_experiment (experiment_name = 'my_first_experiment')
 You can load saved models and experiments using the functions
 load_modeland load_experimentavailable from all PyCaret modules.12. Next GuideIn the next guide, we will show how to use the trained machine learning model in Power BI to generate batch predictions in a real production environment.You can also read notepads for beginners in the following modules:What is a development pipeline?
We are actively working to improve PyCaret. Our upcoming development pipeline includes a new time series forecasting module, TensorFlow integration and major PyCaret scalability improvements. If you want to share your feedback and help us improve, you can fill out a form on the site or leave a comment on our page on GitHub or LinkedIn .Want to know more about a particular module?
Starting with the first release, PyCaret 1.0.0 has the following modules available for use. Follow the links below to familiarize yourself with the documentation and examples of work.ClassificationRegressionClusteringAnomaly SearchNatural Text Processing (NLP)Associative Rules TrainingImportant links
If you liked PyCaret, put us ️ on GitHub.To hear more about PyCaret, you can follow us on LinkedIn and Youtube .
Learn more about the course.