 Part 1. Select and install the server.
Part 2. Install the map for the server lobby.See what I ended up with: mc.piratebayserver.netFor any questions, write to Discord .And so, the lobby is ready, now we need to start the server with mini-games and a proxy server.To do this, we need the following plugins:And so, download all the plugins.We also create three new folders in the server root folder:~ / BungeeCord~ / MurderMystery~ / SkyBlockCopy the downloaded BungeeCord.jar file to the BungeeCord folder, copy paper-1.15.2.jar to MurderMystery and SkyBlock. Also, in all new folders, copy the start.sh file from PirateBay.We edit the start.sh file so that for each server we had our own process name for the screen program. Also for BungeeCord there will be another jar file that we downloaded earlier. I did it as follows.BungeeCord:#!/bin/sh
screen -S BungeeCord java -Xms512M -Xmx512M -jar BungeeCord.jar
MurderMystery:#!/bin/sh
screen -S MurderMystery java -Xms1G -Xmx1G -XX:+UseConcMarkSweepGC -jar Paper-1.15.2.jar
SkyBlock:#!/bin/sh
screen -S SkyBlock java -Xms1G -Xmx1G -XX:+UseConcMarkSweepGC -jar Paper-1.15.2.jar
Please note that in total now 4 servers will consume 3.5Gb of RAM, so I had to increase the configuration of the droplet on the hosting to 4Gb.According to the already completed scenario, we launch 3 new servers, not forgetting to edit the eula.txt file.After the first launch of the BungeeCord server, we need to register 3 future servers in its configuration: PirateBay, MurderMystery, SkyBlock. To do this, add the following servers to the ~ / BungeeCord / config.yml file, deleting the one that was created by default:servers:
lobby:
motd: '&1JWelcome to Lobby'
address: localhost:25565
restricted: false
murdermystery:
motd: '&1JWelcome to Murder Mystery'
address: localhost:25566
restricted: false
skyblock:
motd: '&1Welcome to Sky Block'
address: localhost:25567
restricted: false
also set ip_forward: true and do not forget to change online_mode: true to false if you do not have Minecraft licensed.After the first launch of the MurderMystery and SkyBlock servers, as well as for PirateBay, we edit their server.properties by setting the corresponding ports from bungeecord. You also need to set online-mode = false so that bungeecord can proxy our servers:for PirateBay:server-port = 25565query.port = 25565online-mode = falsefor MurderMystery:server-port = 25566query.port = 25566online -mode = falsefor SkyBlock:server-port = 25567query.port = 25567online-mode = falseAlso, in order for Citizens Server Selector to work, we need to set the bungeecord parameter in the spigot.yml file for the PirateBay server: trueRestart all servers.Please note that now we have changed the port for connecting in the game client, according to the bungeecord configuration it is now 25577.Now it's time to set up our lobby server. To do this, copy the downloaded plugins SuperLobbyDeluxe, Citizens, Citizens Server Selector, LuckPerms, ItemJoin and Chest Commands to the plugins folder of our PirateBay server ~ / PirateBay / plugins. We restart the server and connect to it from the game.First of all, we will choose a place on the map where players should appear and execute the command:/superlobby setspawn @a
Now we select a place for npc, which will redirect us to the mini-game server and execute the commands:/css create &a&lMurderMystery
/css setCmd css join murdermystery
/css setDesc &eOnline: &1{players}
Our npc was created and if we right-click on it, we will be redirected to the MurderMystery server. To switch between servers, you can also use the / server command:/server murdermystery
/server skyblock
/server lobby
We do the same for SkyBlock:/css create &5&lSkyBlock
/css setCmd css join skyblock
/css setDesc &eOnline: &1{players}
We should have the following: Now we’ll configure the player’s menu. To do this, we need to tweak the ItemJoin plugin configuration.Open ~ / PirateBay / plugins / ItemJoin / items.yml and replace the contents with ours:
items.yml
items-Version: 6
items-Delay: 2
items-Overwrite: false
items-Spamming: false
items-RestrictCount: false
items:
compass:
id: COMPASS
slot: 0
name: '&1Lobby menu'
commands:
- 'menu'
triggers: join, respawn, world-change
permission-node: itemjoin.compass
enabled-worlds: Void
itemflags: death-drops, self-drops, inventory-modify
We also do with ~ / PirateBay / plugins / ChestCommands / menu / example.yml:example.yml
menu-settings:
name: '&1Menu'
rows: 3
command: 'menu'
auto-refresh: 5
open-action: 'tell: &eYou opened the example menu.'
open-with-item:
id: compass
left-click: false
right-click: true
lobbycmd:
COMMAND: 'server lobby'
NAME: '&eReturn to the Main Lobby'
LORE:
- 'Returns to the Main Lobby'
ID: enderpearl
POSITION-X: 1
POSITION-Y: 1
spawn:
COMMAND: 'spawn'
NAME: '&eBack to Spawn'
LORE:
- 'Left click to move to Spawn Point'
ID: turtleegg
POSITION-X: 1
POSITION-Y: 2
skyblock:
COMMAND: 'server skyblock'
NAME: '&ePlay SkyBlock'
LORE:
- 'Left click to play SkyBlock'
ID: grassblock
POSITION-X: 4
POSITION-Y: 1
murdermystery:
COMMAND: 'server murdermystery'
NAME: '&ePlay Murder Mystery'
LORE:
- 'Left click to play Murder Mystery'
ID: bow
POSITION-X: 5
POSITION-Y: 1
Restarting the PirateBay server. We should have a menu in the form of a compass: And when you right-click here is the game menu:
 But if we take away the operator’s role from our player by running the command
/deop Dinikin
then when we try to open the compass menu, we get a message that we do not have permission to open the example.yml file. And here the LuckPerms plugin comes to our aid. It allows you to configure the rights to execute certain commands for certain user groups or even specific players.We return to our user the role of the operator in the server console:op Dinikin
and enter there:lp user Dinikin permission set luckperms.*
give us admin rights to all LuckPerms plugin commands.Go to the game and execute the command:/lp editor
which will generate a link to the plugin website, on which we need to go to further edit the rights: Follow the link and on the opened page add the default user group chestcommands.open.example.yml:
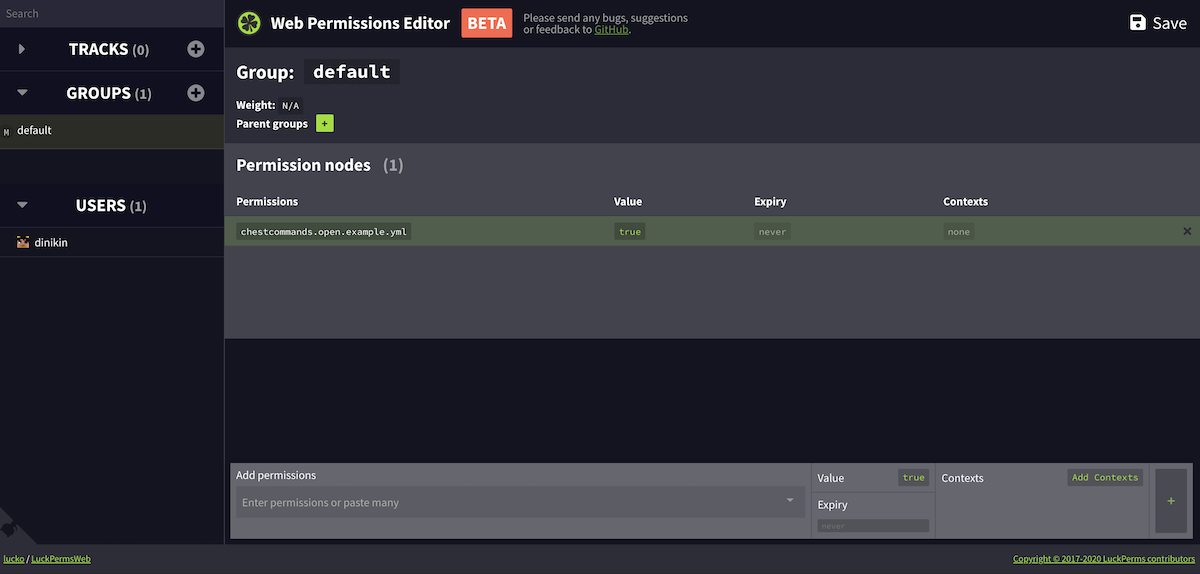 Click Save in the upper right corner, copy the generated command and execute it in Game. The result will be the following message:
 Again we take away the operator’s rights and try to open the game menu. Now this should work for a simple user:
 Now you can transfer ItemJoin and Command Chest plugins with the contents of their folders to the SkyBlock and MurderMystery mini-game servers, so that you do not do the same again.We also copy the corresponding plugins of mini-games. For Murder Mystery, we also copy the Holographic Displays plugin and SuperLobbyDelux. Restart the mini-game server.For the LuckPerms plugin on both servers, we repeat the steps to give players access to the menu.And so, the SkyBlock game is ready for us, you can go to it through npc or the menu. To start survival, simply type the command / is or / island and select the type of island.If you want the island to be created automatically for all new players, put the enable: true property in the ~ / SkyBlock / plugins / BentoBox / addons / BSkyBlock / config.yml file for the create-island-on-first-login parameter and restart the server .It remains for little: to select and import a map for the Murder Mystery mini-game, as well as to configure it.I downloaded this map, unpacked the archive, and uploaded the ~ / MurderMystery folder to the server. Do not forget to change the value of the level-name = world property to the name of your map folder in the ~ / MurderMystery / server.properties file. We reboot the server and go to the MurderMystery card:
 How to configure the game Murder Mystery, you can in this videoCongratulations, we are done with installing the game server. We still have to make some cosmetic adjustments, such as welcome and information labels. However, these changes are already beyond the scope of this tutorial, but I think you can easily figure out the configuration files for the SuperLobbyDelux plugin.