A little about myself: At the moment I am a Skillbox student and take the course “Java-developer”. In no case not advertising, I tell a little about myself. He began to learn Java in May 2019, before that he studied HTML, CSS and JS a little on his own.Actually, it pushed me to write this article with an awareness of how the frontend works with the backend together and a lack of understanding of the PUT request. Everywhere where I “google” the Rest API was implemented with POST and GET requests, sometimes with DELETE and there were no examples of the frontend. I would like to convey, first of all, the same as I implement the REST API along with the frontend, so that understanding will come. But the article is intended not only for beginners whom I am, but also for experienced users of Spring technologies, because in the comments I want to see the righteous teachings of older comrades. After all, I will describe my decision based on my experience (read the lack of experience).I ran into the problem of understanding Spring, and specifically with the PUT request, that is, changing the data of an element in the database. I will also describe POST and GET requests. In general, standard CRUD (correct if I'm wrong). And also a little frontend, that is, as there, a request is sent to the server and the response is processed.I used:I also want to make a reservation that the frontend was partially in the training project, I implemented PUT and DELETE queries.The whole project can be viewed on GitHub .A small live hack: When creating a project with maven, the java version jumps to the fifth, to fix this in pom.xml we write the following, where the number is the version.Open Life Hack<properties>
<maven.compiler.target>11</maven.compiler.target>
<maven.compiler.source>11</maven.compiler.source>
</properties>
Spring Connection
For starters, in pom.xml we connect Spring boot as parent, this is explained by the fact that further connection of dependencies does not conflict by version:<parent>
<groupId>org.springframework.boot</groupId>
<artifactId>spring-boot-starter-parent</artifactId>
<version>2.2.4.RELEASE</version>
</parent>
Now we connect Spring web is responsible for launching the application:<dependency>
<groupId>org.springframework.boot</groupId>
<artifactId>spring-boot-starter-web</artifactId>
</dependency>
We create and run the application
You need to start writing the application in the correct directory, namely src / main / java / main , yes, that’s right, I haven’t yet found an explanatory explanation for this, I think I will find out with time.And immediately lay out the entire structure of the application.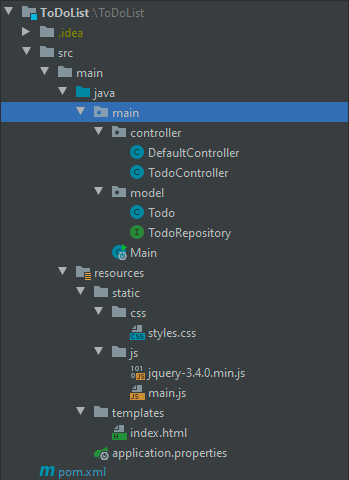 The first thing I did was create a Main.java class to run the application with annotation
 @SpringBootApplication:@SpringBootApplication
public class Main {
public static void main(String[] args) {
SpringApplication.run(Main.class, args);
}
}
And you can already click run and even My server will start!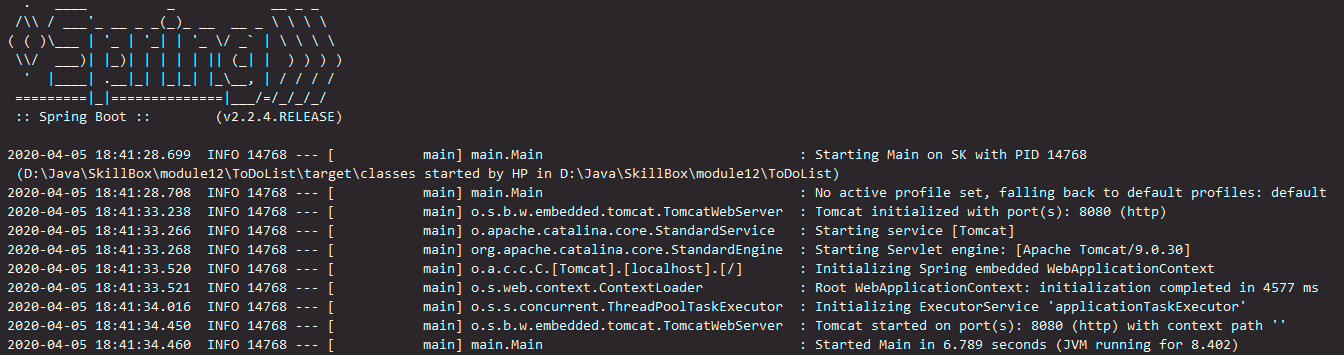 Launched on port 8080. You can go to the address
 http://localhost:8080/and we will see error 404 because there are no pages yet.In fairness, you need to implement a frontend.You need to include the dependency in pom.xml to template HTML.<dependency>
<groupId>org.springframework.boot</groupId>
<artifactId>spring-boot-starter-thymeleaf</artifactId>
</dependency>
To get started, the index.html start page in the src / main / resources / templates directory .Here with such plain markup<!DOCTYPE html>
<html lang="en">
<head>
<meta charset="UTF-8">
<title>ToDo List</title>
<script src="/js/jquery-3.4.0.min.js"></script>
<script src="/js/main.js"></script>
<link rel="stylesheet" type="text/css" href="/css/styles.css">
</head>
<body>
<div id="todo-form">
<form>
<label> :
</label>
<input id="todo-form-name" type="text" name="name" value="">
<label>:
</label>
<input id="todo-form-description" type="text" name="description" value="">
<label> :
</label>
<input id="todo-form-date" type="date" name="date" value="">
<hr>
</form>
</div>
<h1> </h1>
<button id="show-add-todo-list"> </button>
<br><br>
<div id="todo-list">
</div>
</body>
</html>
We also write styles in the src / main / resources / static / css directory, create styles.cssView styles* {
font-family: Arial, serif;
}
#todo-form {
display: none;
align-items: center;
justify-content: center;
position: absolute;
top: 0;
left: 0;
width: 100%;
height: 100%;
z-index: 10;
background-color: #88888878;
}
#todo-form form {
background-color: white;
border: 1px solid #333;
width: 300px;
padding: 20px;
}
#todo-form h2 {
margin-top: 0;
}
#todo-form label {
display: block;
}
#todo-form form > * {
margin-bottom: 5px;
}
h4 {
margin-bottom: 0;
}
You can try to start the application and go http://localhost:8080/and you can admire the start page, though so far without an action.And of course js with jQuery plugin in the src / main / resources / static / js directory , once again I’ll make a reservation, there was already jQuery and a part of main.js written in the training project .All the same hub about Java and Spring, so links to the full code js think will be enough:Link to jquery-3.4.0.min.js
Link to main.js .Below will be a special attention to the request of GET and PUT. Both from the server side, and from the frontend.Now you can try to start the project and make sure that the frontend works and the action too (the add button launches the form).DB interaction
The next step is the entity for interacting with the database, for this we connect the Spring data jpa dependency:<dependency>
<groupId>org.springframework.boot</groupId>
<artifactId>spring-boot-starter-data-jpa</artifactId>
</dependency>
And in the src / main / java / main / model directory I create a POJO class Todo attach an annotation @Entity.We declare fields, I will have: id, name, description, date.Special attention setDate(), I did just that, at the input of String and then conversion to java.util.Date, and even with atStartOfDay().atZone(ZoneId.of("UTC"), I also pay attention to the annotation of the date field:package main.model;
import javax.persistence.*;
import java.time.LocalDate;
import java.time.ZoneId;
import java.util.Date;
@Entity
public class Todo {
@Id
@GeneratedValue(strategy = GenerationType.AUTO)
private int id;
private String name;
private String description;
@Temporal(TemporalType.DATE)
private Date date;
public void setDate(String date) {
this.date = Date.from(LocalDate.parse(date).atStartOfDay().atZone(ZoneId.of("UTC")).toInstant());
}
}
Add a dependency in pom.xml to establish a connection to MySQL:<dependency>
<groupId>mysql</groupId>
<artifactId>mysql-connector-java</artifactId>
<version>8.0.19</version>
</dependency>
In the src / main / resources directory, create application.properties and write data to connect to the database:spring.datasource.url=jdbc:mysql://localhost:3306/todolist?useSSL=false&allowPublicKeyRetrieval=true&serverTimezone=UTC
spring.datasource.username=root
spring.datasource.password=password
spring.jpa.hibernate.ddl-auto=none
Now let's move on to creating the repository. In the src / main / java / main / model directory, create the TodoRepository interface with annotation @Repositoryand inherit CrudRepository <Todo, Integer>. Lyrical digression - as I understand it, this is a gasket between the database and the controller, Spring is good in this, you do not need to create sockets, you do not need to worry about interacting with the database, it does everything for you.package main.model;
import org.springframework.data.repository.CrudRepository;
import org.springframework.stereotype.Repository;
@Repository
public interface TodoRepository extends CrudRepository<Todo, Integer> {
}
Actually, communication with the database will occur through this repository.Now it's time to create a controller where requests from the front-end, interaction with the database and front-end responses will be processed.In the src / main / java / main / controller directory, create the TodoController class with annotation @RestController, declare the TodoRepository variable and initialize through the constructor.Let's start with the POST request. We create the add () method accepting Todo and returning int (id), mark with annotation @PostMapping(“/todo-list/”)and the path where we will add. We take the repository and save()save the Todo object that came with the request to the database in the method . Just magic.@PostMapping("/todo-list/")
public int add(Todo todo) {
Todo newTodo = todoRepository.save(todo);
return newTodo.getId();
}
In general, similar to GET and DELETE, but using id and returning Todo in the ResponseEntity shell. Also note the parameter of the method is get()marked with an annotation, below is a bit more detailed. Then a response is generated ResponseEntity.ok(todoOptional.get());, that is, code 200, or if it is not found by this id, returns code 404 with body null.@GetMapping("/todo-list/{id}")
public ResponseEntity<Todo> get(@PathVariable int id){
Optional<Todo> todoOptional = todoRepository.findById(id);
if(todoOptional.isEmpty()){
return ResponseEntity.status(HttpStatus.NOT_FOUND).body(null);
}
return ResponseEntity.ok(todoOptional.get());
}
What is happening on the frontend side?Using the GET example:clicking on a link in the todo => list we pull out id todo => a request is formed (note that the id itself is not passed to the method. Id in the get () method is extracted from (value = "/ todo-list / {id} ") for this, we need an annotation @PathVariablein the method parameter) => the answer comes in the form of a Todo object => the front-end does what it sees fit, in this case, Todo has a description and a date.Piece of code main.js, GET implementation$(document).on('click', '.todo-link', function(){
var link = $(this);
var todoId = link.data('id');
$.ajax({
method: "GET",
url: '/todo-list/' + todoId,
success: function(response)
{
if($('.todo-div > span').is('#' + todoId)){
return;
}
link.parent().append(codeDataTodo(response, todoId));
},
error: function(response)
{
if(response.status == 404) {
alert(' !');
}
}
});
return false;
});
Let's create another controller that will immediately display the todo-list on the start page. We also work with the repository and get the Todo list, and then the todoList is magically passed to the front-end:@Controller
public class DefaultController {
@Autowired
TodoRepository todoRepository;
@RequestMapping("/")
public String index(Model model){
Iterable<Todo> todoIterable = todoRepository.findAll();
ArrayList<Todo> todoList = new ArrayList<>();
for(Todo todo : todoIterable){
todoList.add(todo);
}
model.addAttribute("todoList", todoList);
return "index";
}
}
Here with such corrections in index.html the dynamic loading of todoList occurs:<html lang="en" xmlns:th="http://www.thymeleaf.org">
<div id="todo-list">
    <div class="todo-div" th:each="todo : ${todoList}" th:attr="id=${todo.id}">
        <a href="#" class="todo-link" th:attr="data-id=${todo.id}" th:text="${todo.name}"></a>
        <br>
    </div>
</div>
PUT request
In TodoController, we create a method put()with an annotation @PutMappingat the input Map <String, String> with an annotation @RequestParamand an int, which is extracted from value, wrapped in ResponseEntity at the output of Todo. And also the repository does not have the update () method, so everything happens as follows:Todo is extracted from the database via todoRepository by id => new parameters are assigned Todo => it is saved in the database through the repository => the frontend response is sent@PutMapping(value = "todo-list/{id}")
public ResponseEntity<Todo> put(@RequestParam Map<String, String> mapParam, @PathVariable int id){
Optional<Todo> todoOptional = todoRepository.findById(id);
if(todoOptional.isEmpty()){
return ResponseEntity.status(HttpStatus.NOT_FOUND).body(null);
}
todoOptional.get().setName(mapParam.get("name"));
todoOptional.get().setDescription(mapParam.get("description"));
todoOptional.get().setDate(mapParam.get("date"));
todoRepository.save(todoOptional.get());
return ResponseEntity.ok(todoOptional.get());
}
At the front end at this time:click on the “Change” button => Todo data is collected from the element => the form is edited for changing the case (the name of the form is renamed and the button is substituted in the input value Todo data) => the form is opened => the data for change is driven in => click on the “Change” button in the form => data collection => a PUT request is generated (path, data) => receiving a response from the modified Todo object, but with the same id => the frontend does what it wants, in this case data replacement Todo.Piece of code main.js, implementation of PUT
$(document).on('click', '#show-update-todo-list', function(){
var buttonUpdate = $(this);
var todoId = buttonUpdate.data('id');
var todoName = buttonUpdate.data('name');
var todoDescription = buttonUpdate.data('description');
var todoDate = buttonUpdate.data('date');
todoFormNameAndButton(' ', '', 'update-todo');
todoInputValue(todoName, todoDescription, todoDate);
$('#todo-form').css('display', 'flex');
$('#update-todo').click(function() {
var data = $('#todo-form form').serialize();
$.ajax({
method: "PUT",
url: '/todo-list/' + todoId,
data: data,
success: function(response) {
$('#todo-form').css('display', 'none');
response.date = response.date.slice(0,10);
$('.todo-div#' + todoId + ' > a').text(response.name);
$('.todo-div#' + todoId +' > span').replaceWith(codeDataTodo(response, todoId));
}
});
return false;
});
});
You can familiarize yourself with the project in more detail on the github .It’s written for beginners from a beginner, but I would like to hear constructive criticism from experienced users, it’s just as cool if you explain in the comments why Map <String, String> comes on the controller side when asking for PUT, why I can’t submit Todo there.Resources: