MacBooks were stolen from me several times, and Apple’s anti-theft tools like Find My Mac never helped me get my computer back. Are they really worthless? Can I trust FileVault's built-in encryption? How to increase the chances of getting the computer back? This article is the result of my suffering in futile attempts to return stolen computers.The article describes in detail the mechanisms of protection through the eyes of an attacker, in our case a thief. This gives you a better idea of how they work. The narrative in the article is on behalf of the thief - this is only an artistic device for a better understanding of the material.Attention!
The materials in the article are presented for informational purposes only. All descriptions of fraudulent activities are staged and executed with the consent of laptop owners. The author does not call for fraudulent actions, and the sole purpose of the article is to show how best to configure the system to protect your data.Foreword
In the screenshot below, one of several of my stolen laptops that remained buried in the iCloud panel. The interface of the Find My Mac function in the iCloud control panel says that the lock functions will become available when the laptop connects to the Internet. But that will never happen.Every time I stole a MacBook, or I lost it with my bag, I realized the futility of Find My Mac. After all, the laptop does not have a modem, and I can neither track its location nor delete data remotely. For anti-theft functions to work, the thief must connect my laptop to the Internet. But how will he do it if the account is locked with a password? It turns out that even a person who wants to return a computer to me will not be able to do this if I do not write my contacts somewhere on the case in advance. I am absolutely sure that in all cases of theft, my laptops were completely cleaned and sold to new owners who now use them without any problems without even suspecting that they were stolen.
IPhones are better protected
 An iPhone with up-to-date iOS cannot just be untied from iCloud. (Image by Alexander Varakin)Modern iPhones are quite well protected, they can’t just be untied from your iCloud account and sold on the radio market. Therefore, there are whole fraudulent schemes for untying devices through phishing. Good research by AntonBo0oMabout this phenomenon: iCloud phishers and where they live . Thieves are trying to log in to the victim’s iCloud account and unlock the phone. Even if the thief managed to remove the SIM card and turn off WiFi before the owner could lock the phone, he still could not unlock it if authorization by fingerprint, face or PIN code was enabled. And this is awesome.There is a lot of information about blocking iPhones, these mechanisms have been well studied. But nobody discusses the same functions in macbooks; it seems as if they are not there. Unfortunately, all MacBook models until 2018 (without the T2 chip ) are defenseless against thieves, and in any case they will be sold completely cleaned. But at the same time, you can complicate the life of a thief as much as possible and protect your data.
Step 1: Stealing MacBook
For a realistic test of all hypotheses, we need to steal a real MacBook. Further narration I will lead on behalf of the thief. In order to understand how the protection mechanisms work, you need to reproduce the real threat model ( intruder model ).According to the script from the video, I stole the included MacBook from the victim in a cafe. At the time of the theft, I closed the lid, so that the laptop went into sleep mode and disconnected from WiFi. This is an important point, as it reproduces the most popular scenario in which a laptop falls into the hands of a thief. Most often, MacBook owners simply close the lid and put the laptop in the bag without turning off the computer. All the times, when I lost my computer, he was in this state - he was sleeping in a backpack.Find My - tracking devices without the Internet
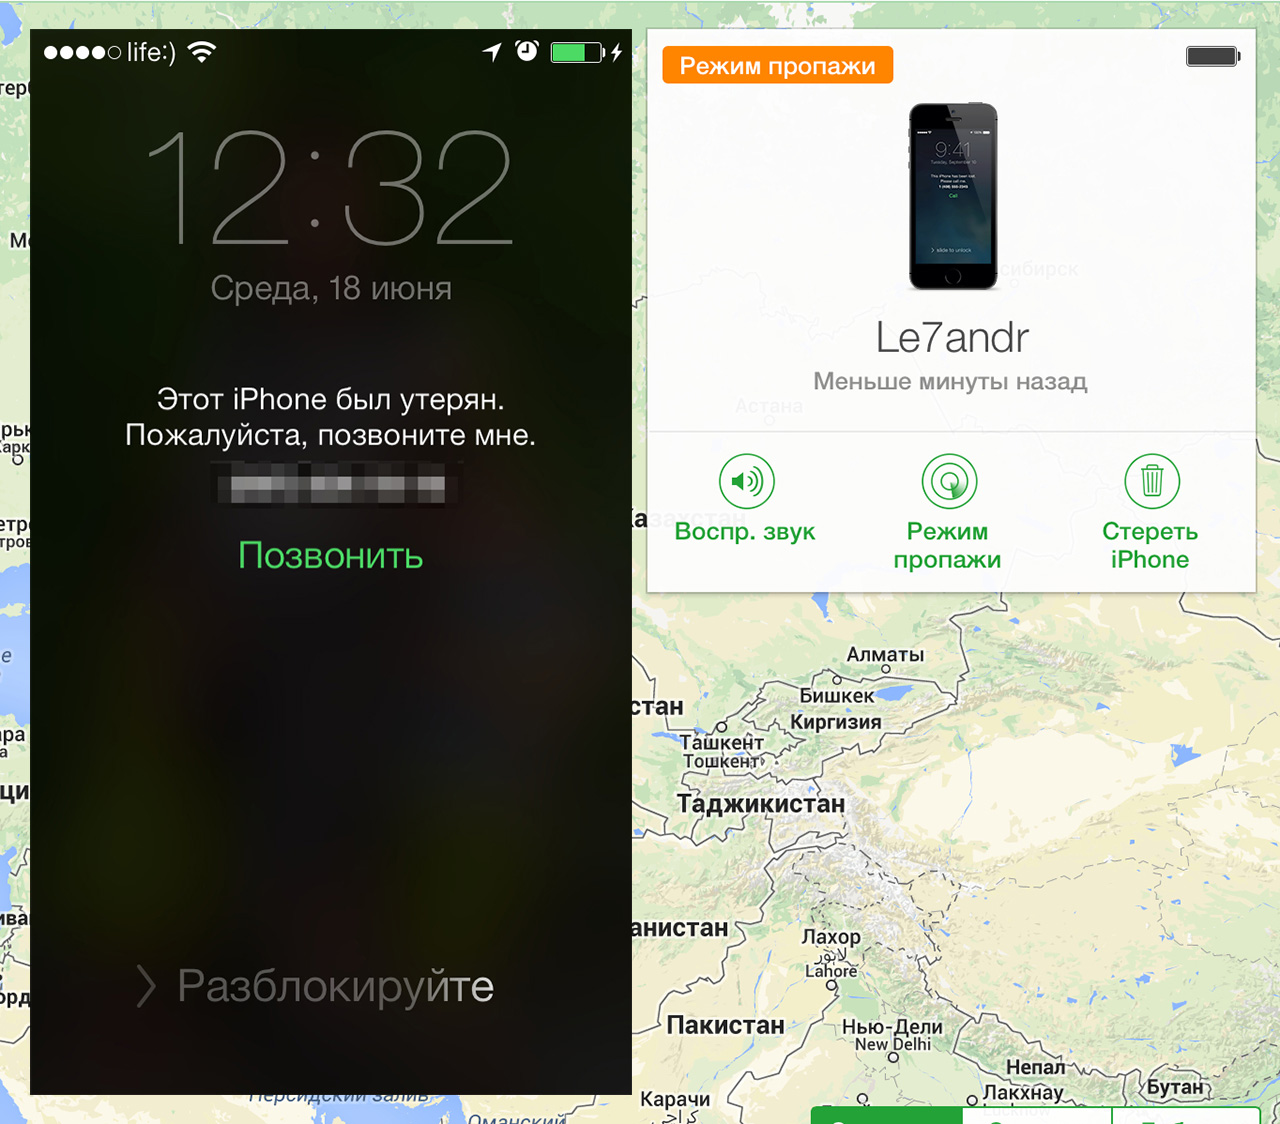
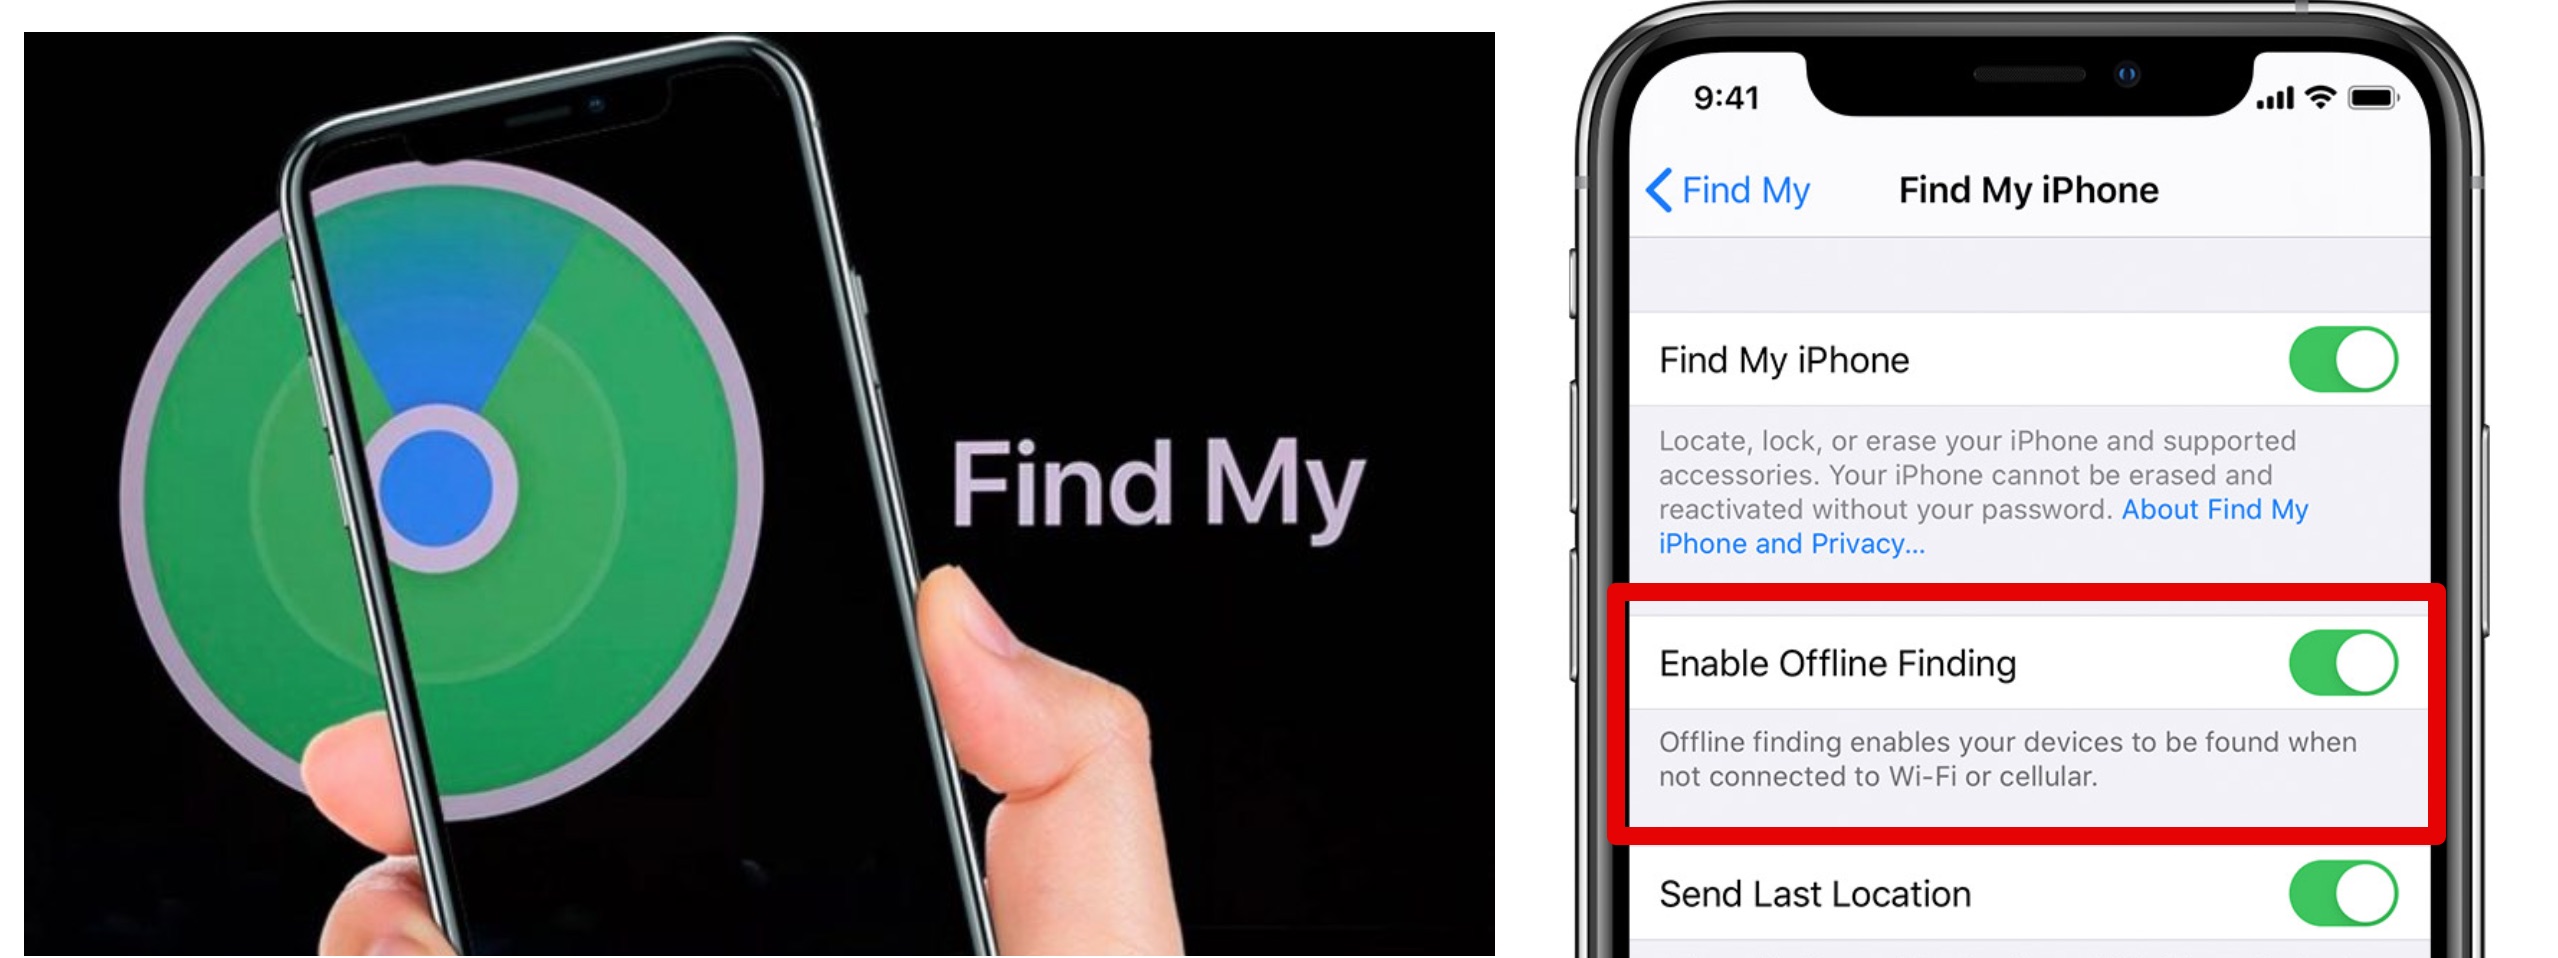 Apple's New Geotracking Technology Without InternetRight after the theft, I run with my stolen MacBook armpit to my lab. Imagine that I am running faster than the victim and was able to hide. At the same time, actions take place in the city, and I run along a crowded street. What will the victim do at this moment? In a panic, he enters the FindMy application and will try to track the computer or block it. But you won’t be able to block or erase the data, because the laptop has no Internet connection. But it turns out to see the real coordinates of the laptop on the map, and this is amazing!In 2019, Apple announced an updated FindMy application and a new way to track devices, in the settings it is called Offline Finding. Most Apple technology users are unaware of this feature.The principle of operation is as follows: first you need to have at least two Apple devices tied to the same iCloud account. Both devices must have the current operating system, at least iOS 13 and macOS 10.15 (Catalina). If all conditions are met, both devices generate keys and exchange private parts (private key) with each other, so that each device can decrypt the messages of the other.
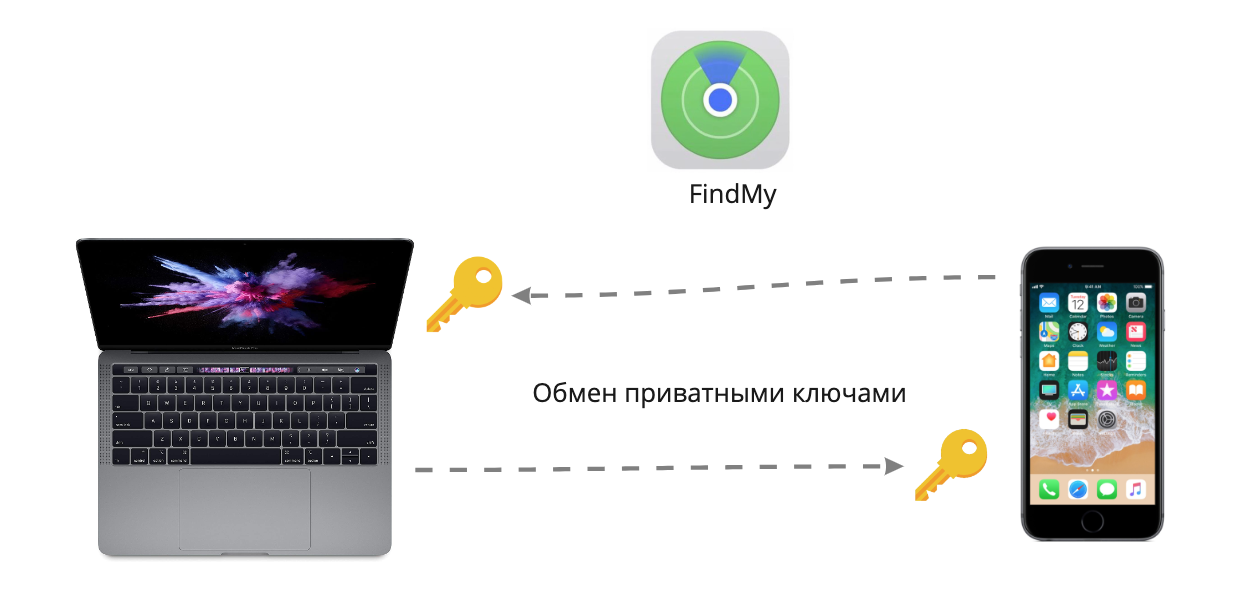 According to Apple, these keys are stored only on devices and are not stored on the server. That is, you can use the function only from another device and not from icloud.com. This means that having lost both devices, on icloud.com you can only see online geolocation, which works only if the device has Internet access, but not offline finding.
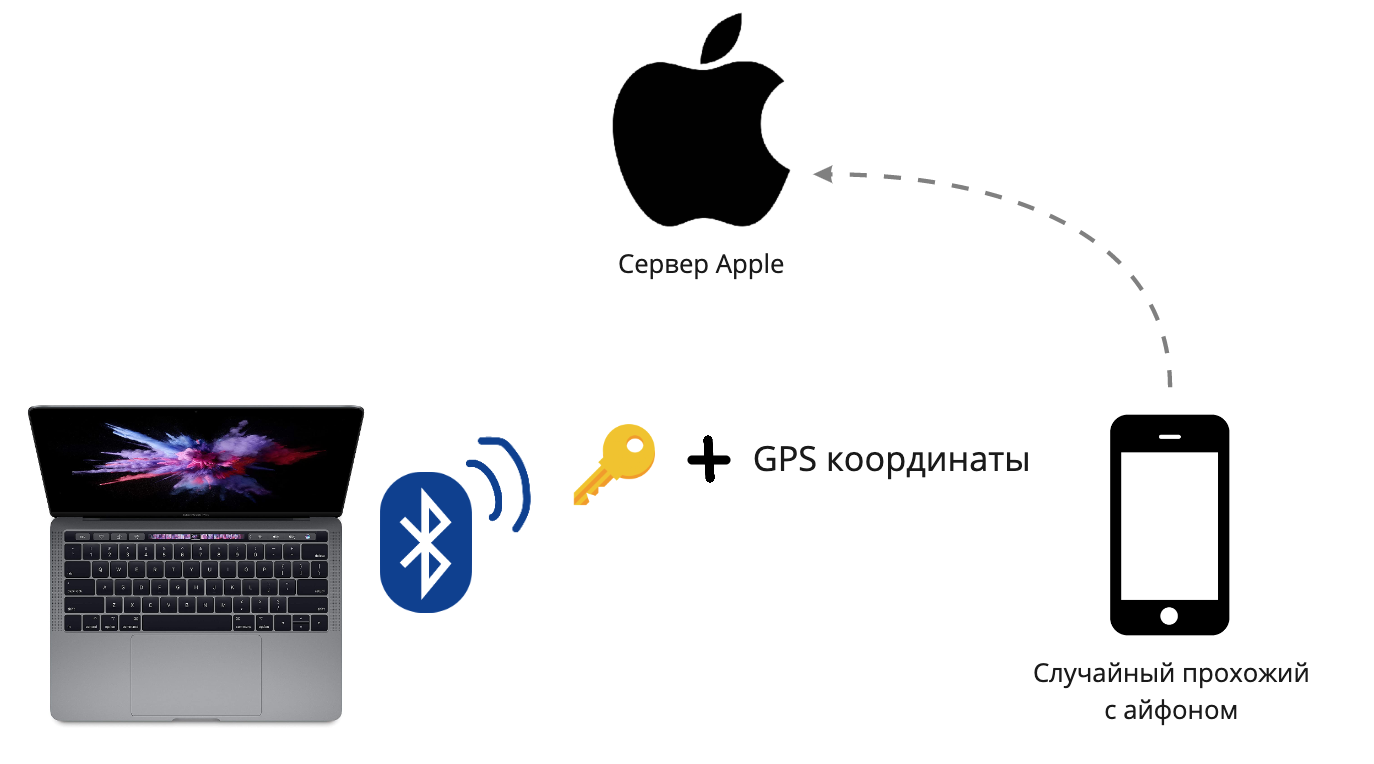 When the device is without the Internet, for example, a phone without a SIM card or a MacBook without WiFi, it starts sending special packages via Bluetooth Low Energy with its public key. And any Apple device that is nearby, for example, a random passerby with an iPhone, having heard such a signal, will automatically take this key, encrypt it with its current coordinates and send them to the server. This does not require any action from the user, everything happens in the background while the phone is in a pocket with a locked screen. A kind of proprietary botnet with light notes of mesh-networks.On macOS, the / usr / libexec / searchpartyuseragent daemon is responsible for this function . The keys are supposedly stored in the key holder under the name LocalBeaconStore → LocalBeaconStoreKey. It’s upsetting that BLE beacons are only sent when the system is on or in sleep mode, that is, to turn off such tracking, the thief just needs to hold down the shutdown button. It would be great if this functionality worked directly on the Bluetooth / WiFi chip when there is standby power on the motherboard.
Step 2: Hiding - spoofing geotracking via a Bluetooth proxy
Is it possible to trick the system and show the victim a fake address of his laptop? If the lost MacBook itself does not know its coordinates, but only sends a public key, then the device that received the signal adds the coordinates. So this scheme is vulnerable to spoofing!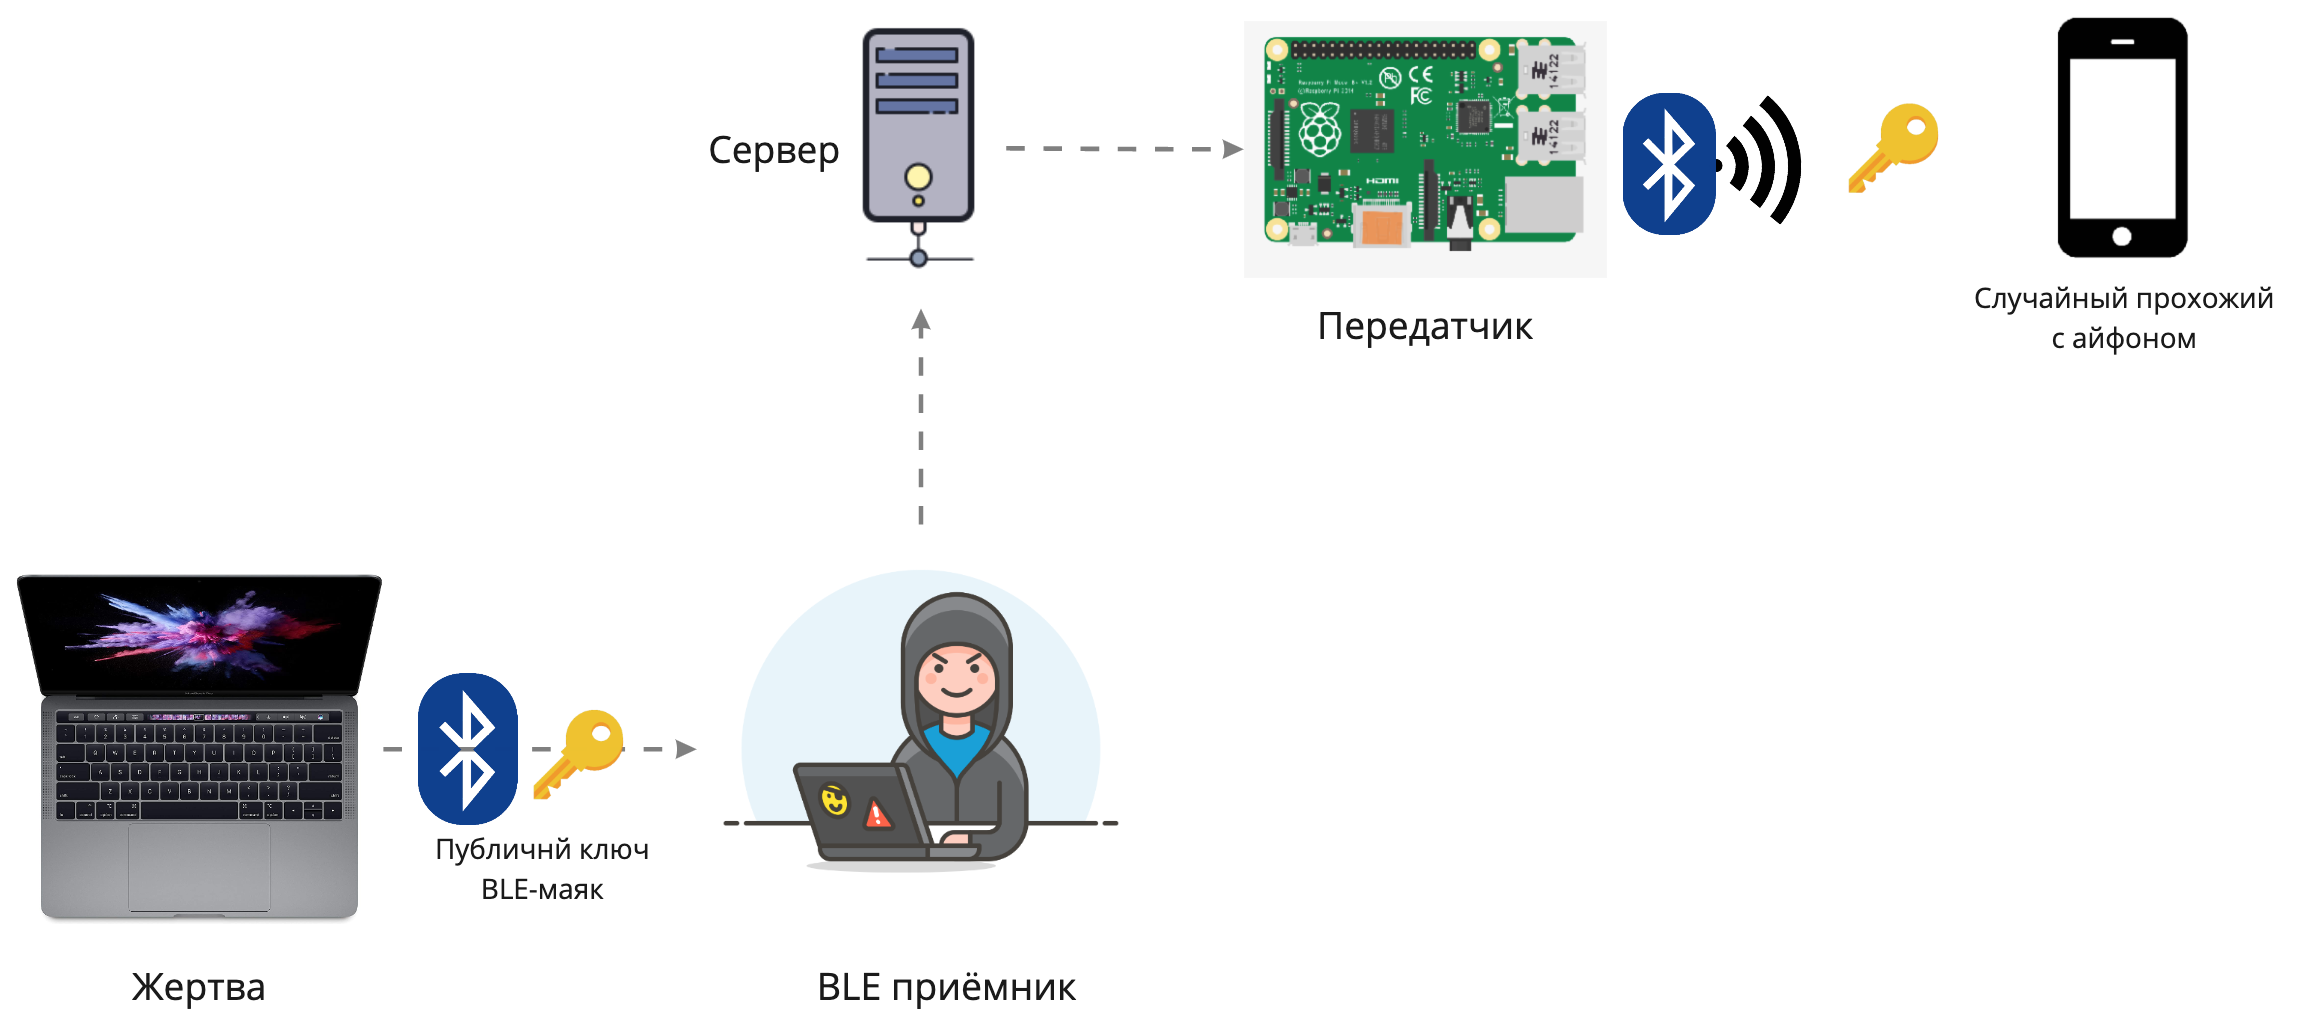 The BLE packet relay transmits all the heard signals to the remote transmitter.In the circuit with the repeater, the receiver listens to all signals from the victim and sends them over the Internet to the transmitter. Random passers-by who received the signal add their coordinates to it and send it to the server. I am sitting with the victim’s device in the basement, and the transmitter is at the other end of the city. Thus, the victim sees fake coordinates.To build such a scheme, you will need two computers with BLE adapters connected to the same network and frameworkBtleJuice .
The proprietary protocol FindMy has not yet been studied, the format of the BLE packets is unknown. Even the exact intervals between beacon shipments and the conditions under which this function is activated are unknown. An experimentally established interval of 10-20 minutes. According to Apple, the private key changes regularly, but how often is unknown. I invite everyone to participate in the reversal of the protocol. Apple has a description of the cryptography used by FindMy.
UPD: At the time of writing these lines, a study of cryptography used in FindMy was published , the author does not consider the technical implementation of the protocol, and I did not quite understand what the work was about.
To proxy requests to the transmitter, you need a server and will work with a minimal config, like RUVDS for 130 rubles . He has per-second tariffication and payment only for the resources used. For habrayuzers, a 15% discount on the dontpanic promotional code works.
Step 3: stealing data from a laptop
Data on a disk can be much more valuable than the macbook itself. What if there are keys for bitcoin wallets, usernames, passwords, or intimate photos? Therefore, first try to read the data on the disk. We stole the laptop in the on state, but at the time of the theft, the cover was closed, and now it is locked with a user password. Most MacBook owners carry them in sleep mode, that is, they just close the lid. This is the most likely condition in which a thief will receive a computer.The easiest way to read data is to boot from a USB stick in Linux. But if FileVault is turned on in the system, then reading the data will not work, so rebooting is risky for us, because it is not known in advance whether encryption is enabled or not. While the computer is turned on, the file system is decrypted exactly, so you need to try to gain access without rebooting.DMA-, FileVault . , DMA- Thunderbolt - IOMMU. Thunderclap Thunderbolt-, - .
We will not consider the option of brutal password from the user account, because it is not sports. In addition, macOS adds a long delay before entering a new password after failed attempts. For such an attack, you can use any hardware tools that allow you to emulate a HID keyboard, including raspberry pi or arduino. The key point here will be the dictionary for selection. I advise you to use a password with at least one special character and without dictionary words. This is quite enough to defend against such a brutus.Connect a locked laptop to Wi-Fi
While the laptop is turned on and the file system is unlocked, try to knock on it on the network. Perhaps the victim has a network drive or some other services through which you can climb inside. Let's try to persuade the laptop to connect to our WiFi.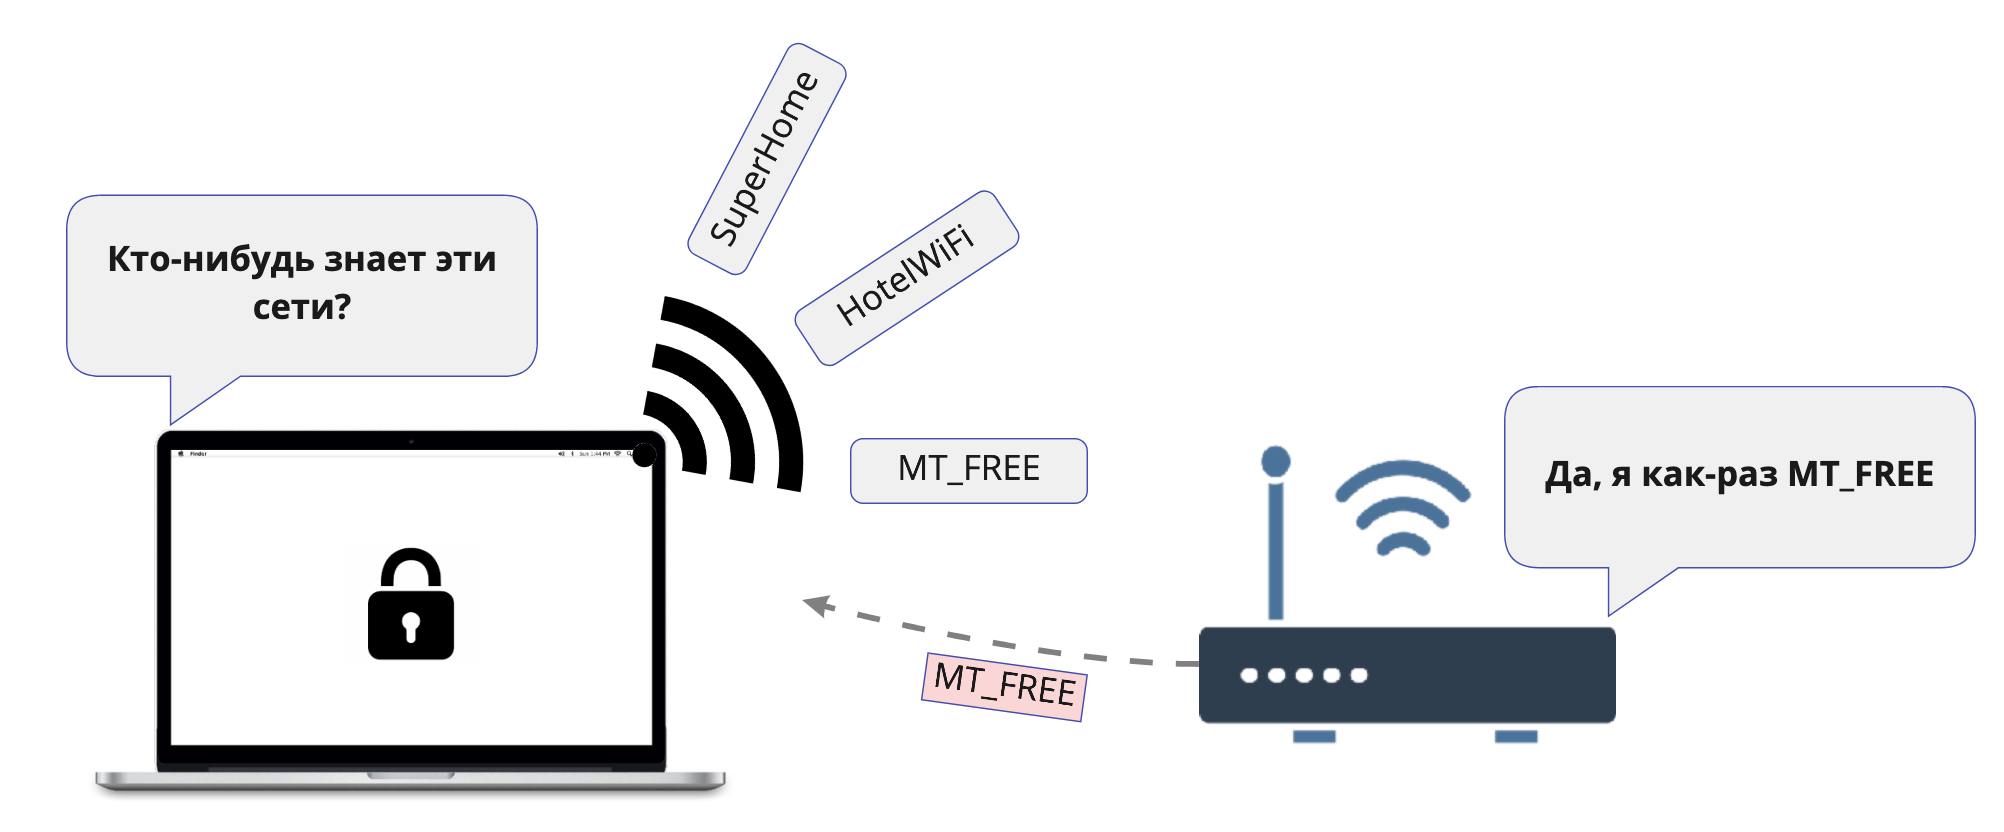 When devices scan WiFi networks, they also send out the names of networks they recently connected to in probe request packets. That is, while you are walking around the city, your phone or laptop sends out the name of your home WiFi network in the hope that it will answer it. As planned, this should speed up the connection to the network when it is nearby.To find out which networks the victim’s laptop is ready to connect to, I put an external WiFi adapter next to him and close the lid of the impromptu Faraday cage. Now the adapter will hear the signals from the laptop well and not hear others.We start monitor mode with a filter for one type of packet, because we want to see only sample requests.
tcpdump -e -l -I -i en0 type mgt subtype probe-req

BSSID:Broadcast DA:Broadcast SA:xx:xx:xx:xx:xx:xx  Probe Request (MGTS_GPON_1856)
BSSID:Broadcast DA:Broadcast SA:xx:xx:xx:xx:xx:xx  Probe Request (MGTS_GPON_1856)
BSSID:Broadcast DA:Broadcast SA:xx:xx:xx:xx:xx:xx  Probe Request (Onlime)
BSSID:Broadcast DA:Broadcast SA:xx:xx:xx:xx:xx:xx  Probe Request (MT_FREE)
It can be seen that the laptop remembers several different networks, among which there are similar to home ones. It is important to keep in mind that if a laptop remembers a network with a password, then it will not automatically connect to it if it suddenly appears without a password, but with the same name. From these names, we can assume that the first two networks most likely had passwords, but the last one is the Moscow public transport network and it was apparently stored in the computer’s memory without a password.This type of attack is quite ancient, but it still sometimes works. There are automatic tools like hostapd-karma that respond immediately to all network names.
Now we need to raise the access point with the name of the selected network, in our case MT_FREE, so that the laptop automatically connects to it. It should be borne in mind that if the laptop can get on the Internet, the owner can immediately block it and clean the disk. But you can’t completely disconnect the Internet, otherwise macOS can immediately disconnect from such a WiFi network, considering it broken. Therefore, it must have a working DHCP, DNS resolver and Internet via HTTP in order for the captive portal tests to work. It is enough to open only TCP port 80 on the Internet, and macOS will assume that the network is absolutely normal, while the iCloud anti-theft functions will not work.If the MacBook successfully connects to WiFi, we will only have to scan it over the network for open services, network ball, etc. I will not tell you how to do this because it is beyond the scope of this article.We must honestly admit that most users use the default settings and do not configure any additional network services, so the chance of success with such an attack is negligible. But it was worth a try anyway, as this is the last available way to interact with a system that has a decrypted drive.
Reboot into the unknown
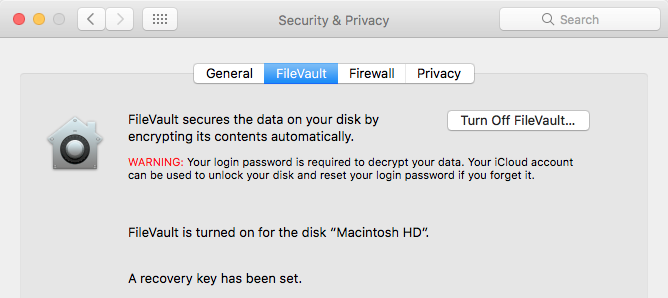 Let me remind you that while the system was loaded, we had no way to find out if FileVault disk encryption was turned on. To check this you need to restart the laptop. This can be done only by holding the power button, as there is no power management menu on the screen of a locked session. Further, there are two possible scenarios:
FileVault not configured
Easy rink! Just boot from the USB flash drive or remove the disk (on models until 2016) and all of our victim’s files are available in clear text. On Linux, you need to get a little confused with the configuration of fuse-apfs .FileVault Enabled
The first time you configure FileVault, it suggests downloading the drive encryption key in iCloud, and in theory a thief could attack the victim’s account, but we don’t consider phishing attacks in this article. There are several tools for the FileVault brute: commercial programs from Elcomsoft and open source programs like apfs2john for use with John The Ripper .Most likely, an ordinary thief will not spend resources on the brutality of your disk, unless this is a targeted attack on data. For simplicity, we assume that a non-dictionary password of 6-8 characters of different registers using special characters is invulnerable.How it should work as planned by Apple
For a long time I couldn’t understand how exactly Apple represents the work of Find My Mac in real life, because if you follow the default recommendations when you first set up the system, the user will receive a computer with FileVault activated and the attacker will never be able to log in to knock on the Internet and activate all the traps . The only possible scenario is a guest account. According to the idea, the thief after a reboot gets to the password entry screen to unlock the disk. Without guessing the password, he selects the guest account and loads into Safari Only Mode. This is a special mode of operation available only to the guest account. It runs only one program - the Safari browser. The fact is that when FileVault is activated, part of the disk remains unencrypted for the recovery partition. It stores a minimal macOS image, from here Safari boots. In this mode, the thief can connect to the Internet, and here the laptop will contact iCloud and will be able to execute remote orders of the owner.
Step 4: Sell MacBook
Working with NVRAM Variables
So, the thief got or did not get access to the data and then he wants to sell the laptop in the secondary market. To do this, he needs to untie the computer from iCloud accounts and reinstall the OS. In addition to the operating system itself on the hard drive, the macbook has NVRAM variables stored on a USB flash drive in the motherboard. This data survives afterreinstalling macOS. They store a token by which the server recognizes the binding of the macbook to the iCloud account.To work with variables from user space, there is the nvram utility :Find My Mac Token Example# Find My Mac
$ nvram fmm-mobileme-token-FMM
fmm-mobileme-token-FMM bplist00%dc%01%02%03%04%05%06%07%08%09%0a%0b%0c%0d%0e%10%0d%11%0d%12%13%14%15%16%1d_%10%0funregisterState_%10%12enabledDataclassesYauthToken^disableContextVuserid]enableContextXusernameXpersonIDWaddTimeTguidXuserInfo_%10%13dataclassProperties%10%00%a1%0f_%10!com.apple.Dataclass.DeviceLocator_%10%ccEAADAAAABLwIAAAAAF6Jva4RDmqzLmljbG91ZC5hdXRovQA_OvlxQ5x0ULxeZIwLf9ZKD2GL8xWXoQiCKVs4tSztt-QZ2ZPlgZqpHekekaGd06Bm20kyU4m1ryRhBPR5DNSSbfzrKM_Ap0elpAitBDkGyHGjTe9c5WajVpfvWe_RGFhcamieaVhGQGzsiFGe11nt1PtCzA~~%11%01%f5_%10%11ivan@ivanov.comZ1253943158#A%d7%a2or%f3kP_%10$7C83E2DA-8A39-414E-B004-4DE79E4D35B3%d3%17%18%19%1a%1b%1c_%10%15InUseOwnerDisplayName_%10%13InUseOwnerFirstName_%10%12InUseOwnerLastName]ivan ivanovUivanWivanov%d1%0f%1e%d5%1f !"#$%25&'(VapsEnvXhostname]idsIdentifierVscheme]authMechanismZProduction_%10%13p09-fmip.icloud.com_%10$0FFD23C3-F469-42C1-97E0-FD8EE1F80502UhttpsUtoken%00%08%00!%003%00H%00R%00a%00h%00v%00%7f%00%88%00%90%00%95%00%9e%00%b4%00%b6%00%b8%00%dc%01%ab%01%ae%01%c2%01%cd%01%d6%01%fd%02%04%02%1c%022%02G%02U%02[%02c%02f%02q%02x%02%81%02%8f%02%96%02%a4%02%af%02%c5%02%ec%02%f2%00%00%00%00%00%00%02%01%00%00%00%00%00%00%00)%00%00%00%00%00%00%00%00%00%00%00%00%00%00%02%f8
Interestingly, the official help for the nvram command hides some features. The manual from leaked CIA documents published on Wikileaks: EFI Basics: NVRAM Variables turned out to be much more useful . It turns out that the utility can work directly with UEFI variables (efi vars). But the values of most variables can only be changed with SIP (system integrity protection) disabled.UPD: My access to EFI variables through the nvram utility on macOS Catalina stopped working for me. The GUID, variable names, or program syntax may have changed. It is necessary to check the relevance of variables through the UEFI shell or Linux.To untie a stolen laptop, just clear the nvram variables and reinstall the OS. To reset nvram you needhold Command (⌘) + Option + P + R when loading a laptop. This is enough to make the iCloud server no longer consider the device to belong to a specific iCloud account. And although after resetting the nvram the serial number of the motherboard remains the same, iCloud will allow you to link the laptop to a new account.Password on UEFI
 In the previous steps, we booted from the USB flash drive (Option key at boot) and reset nvram. But it turns out that all this can be disabled with a UEFI password. By the way, few people even know about this among experienced users of poppies. The installed password for the firmware prohibits such actions:
- Reset NVRAM at boot time
- SMC Reset
- Select another boot method (Option key)
In all cases, a password will be requested. That is, the thief will not be able to boot from the USB flash drive and will not be able to easily untie the computer from iloud, dropping the Find My Mac token from nvram. It also does not work out easily reinstalling the OS. You can set a password for UEFI through Recovery Mode. To do this, hold down CMD + R at the boot stage and select Startup Security Utility from the menu.But not everything is so rosy, the password on the UEFI does not protect. On macbooks until 2019, UEFI firmware and NVRAM variables are stored on a regular SPI flash drive, to which you can connect with the programmer and change any data without authorization.
Reset UEFI Password
On all MacBooks without a T2 chip, the firmware on the motherboard is in no way protected. It can be easily reflashed, including removing the password for UEFI. To do this, just connect the programmer to the debug connector on the motherboard and then you can work with the memory chip as with a regular flash drive.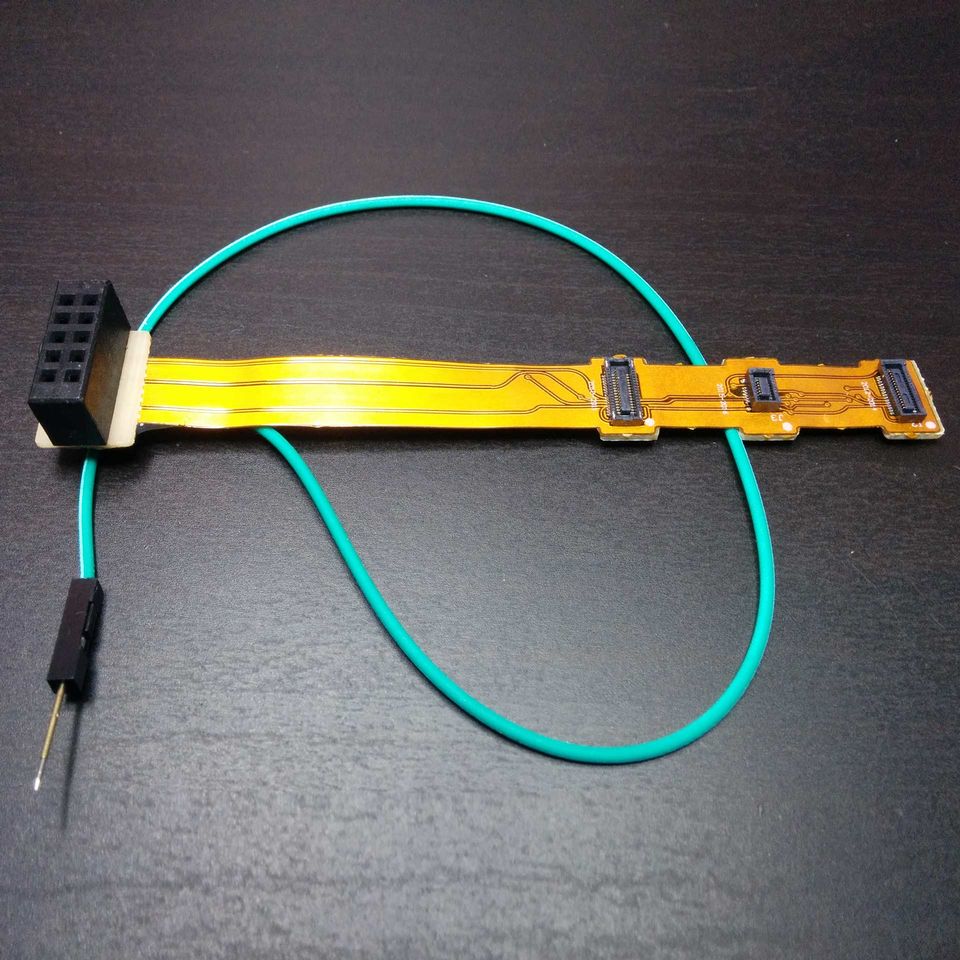 Universal cable for flash drive firmware for all models of macbooksThere is some confusion with these connectors, since they do not have a key, that is, they can be connected by different sides. On different models of macbooks, the connector is in different places, sometimes it is sometimes necessary to solder the power of the 3.3V flash drive separately. Therefore, sometimes you need to carefully study the circuit of a specific motherboard.
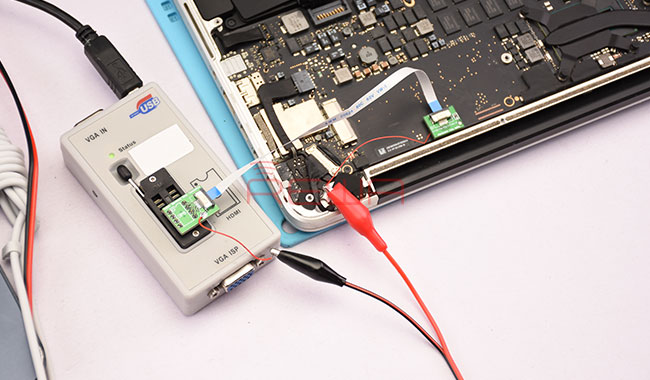 There are also fully autonomous devices that find the desired offset in the firmware and pat it on the fly, disabling the UEFI password. In some service centers, where they offer to get rid of the password on UEFI, they prefer to unsolder the memory chip and flash it in the clip of the programmer.
UEFI implants
There is a separate exotic - external boards with EEPROM, which are inserted immediately into the debug-connector. Usually they are already flashed under the desired motherboard. Immediately after installation, the computer starts to boot from this flash drive, ignoring the native one soldered to the motherboard. In this case, the native flash drive can remain with the firmware password. It is convenient to use such implants for experiments with UEFI patches, you can always roll back to your native firmware by simply pulling out the module.
Phishing anti-theft system
I was so upset by the uselessness of all Apple anti-theft systems that I decided to come up with my own. This was before the announcement of the T2 chip, so it was impossible to rely on hardware protection, and I decided to simply deceive the thief so that he himself did everything that was required.The scheme is as follows:- On the MacBook's disk, a small Linux partition is highlighted. The modern kernel (efistub) can boot immediately without any intermediate bootloaders like refind. I wrote about this in a Linux article in a single file for a Macbook. By default, the laptop boots Linux, which launches the initial setup wizard disguised as macOS. In the video, it is shown from 7:00.
- , macOS , () , nvram: macOS . , , . , . , . . , , .
- The setup wizard offers to perform the initial setup of the system and for this asks to connect to WiFi. Then he draws the fake process of downloading something, and at that moment he taps onto the server and gives full access to the real owner.
- The BSSID owner of WiFi access points finds the location of the laptop, can listen to sound from the microphone and watch the thief through the camera, etc. While the setup wizard interface shows the fake update download process, the owner of the laptop is already traveling to the address.
As a result, I did not finish the server part, but here are the sources of the setup wizard on Electron. It looks, by the way, very believable, I would even be seduced.Demonstration on video:findings
- FindMy . . , , . , . , !
- FileVault! . . , . , , , , . , , .
- [] . UEFI, Safari Only Mode. , .
- UEFI. iCloud. , , .
- T2. , 2. , EEPROM . .