 The text output of commands in the PowerShell interpreter window is just a way to display information in a human-readable form. In fact, the environment is focused on working with objects: cmdlets and functions receive them at the input and return at the output , and the types of variables available in interactive mode and in scripts are based on .NET classes. In the fourth article of the cycle, we will study working with objects in more detail.
Table of contents:
PowerShellForEach-Object, Group-Object Measure-Object.NET COM (New-Object)PSCustomObjectPowerShell
Recall that an object is a collection of data fields (properties, events, etc.) and their processing methods (methods). Its structure is determined by the type, which is usually based on the classes used in the unified .NET Core platform. It is also possible to work with COM, CIM (WMI) and ADSI objects. Properties and methods are needed to perform various actions on the data, in addition to PowerShell, objects can be passed as arguments to functions and cmdlets, assigned their values to variables, and there is also a mechanism for composing commands (pipeline or pipeline). Each command in the pipeline passes its output to the next one in turn - object by object. For processing, you can use compiled cmdlets or create your own advanced functionsto perform various manipulations with objects in the pipeline: filtering, sorting, grouping and even changing their structure. Data transfer in this form has a serious advantage: the receiving team does not need to parse the stream of bytes (text), all the necessary information is easily extracted by referring to the corresponding properties and methods.View object structure
For example, run the Get-Process cmdlet, which allows you to get information about the processes running in the system: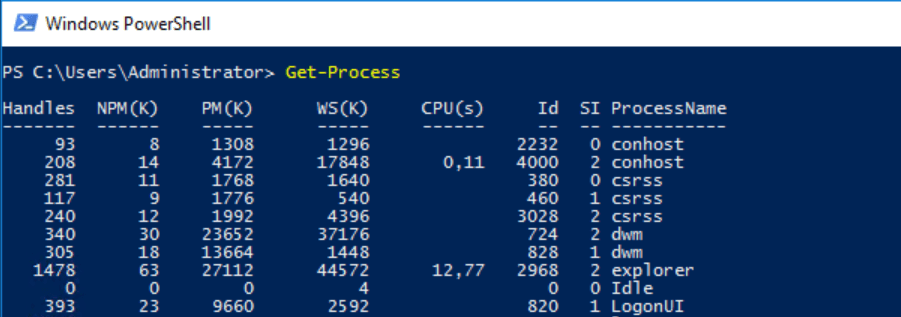 It displays some formatted text data that does not give an idea of the properties of the returned objects and their methods. To fine-tune the output, you need to learn how to examine the structure of objects, and the Get-Member cmdlet will help us with this:
Get-Process | Get-Member
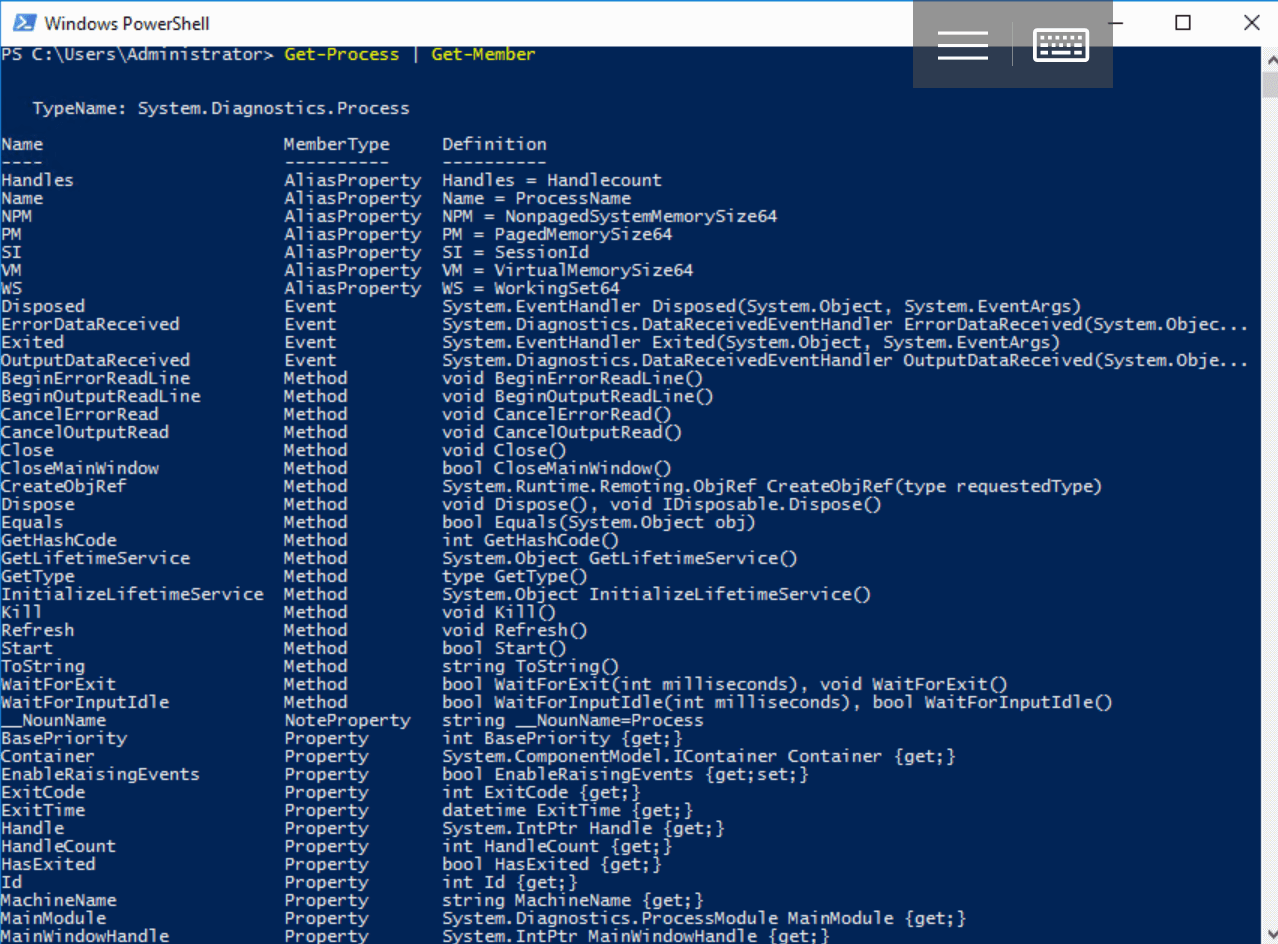 Here we already see the type and structure, and with the help of additional parameters we can, for example, display only the properties of the object that entered the input:
Get-Process | Get-Member -MemberType Property
This knowledge will be needed to solve administrative tasks interactively or to write your own scripts: say, to get information about hung processes by the Responding property.Object Filtering
PowerShell allows you to pipe objects that satisfy a specific condition:Where-Object { }
The result of the execution of the script block in operator brackets should be a logical value. If it is true ($ true), the object that entered the Where-Object cmdlet will be passed down the pipeline, otherwise (the value $ false) it will be deleted. For example, we list the stopped Windows Server services, i.e. those with the Status property set to Stopped:Get-Service | Where-Object {$_.Status -eq "Stopped"}
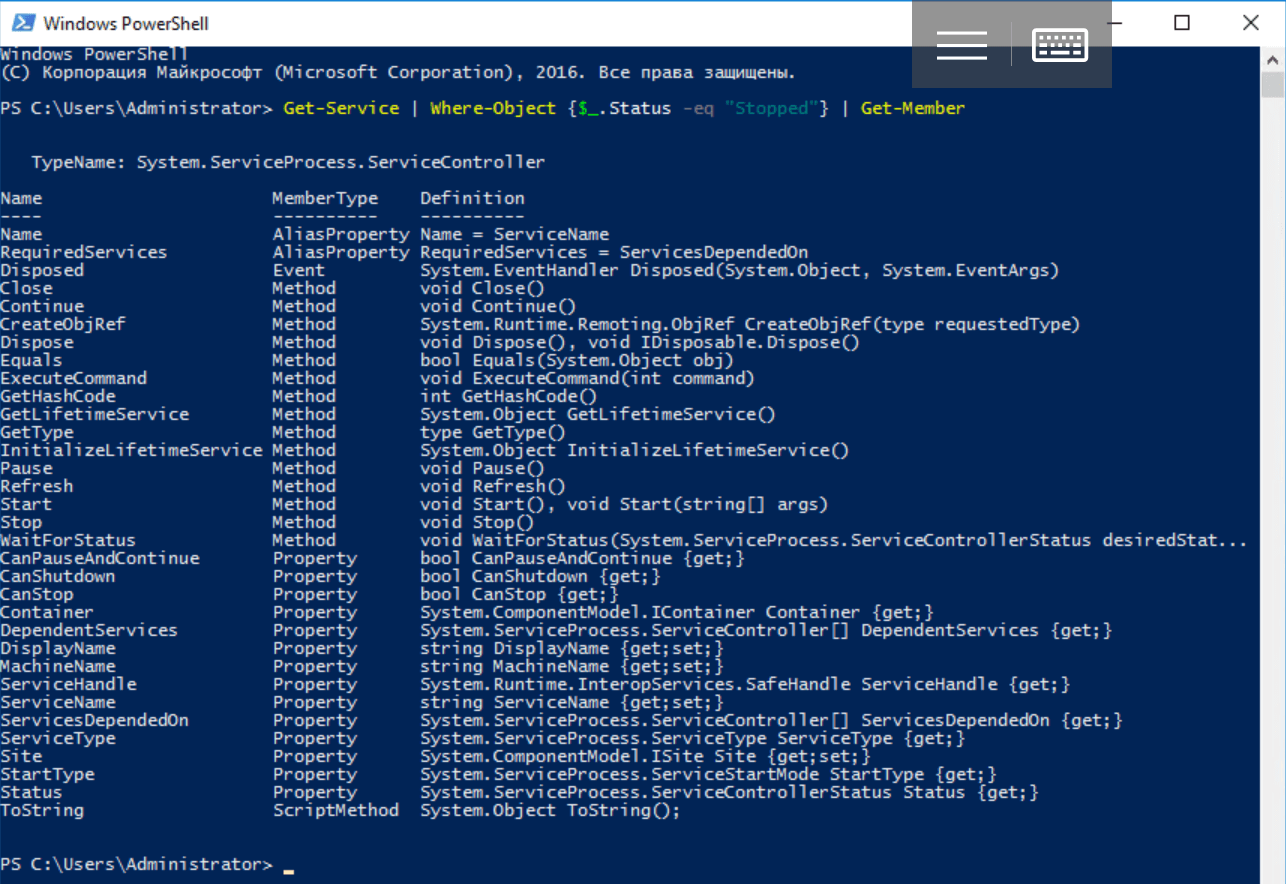
 Here we again see the textual representation, but if you want to understand the type and internal structure of the objects passing through the pipeline, it is easy:
Get-Service | Where-Object {$_.Status -eq "Stopped"} | Get-Member
Sort Objects
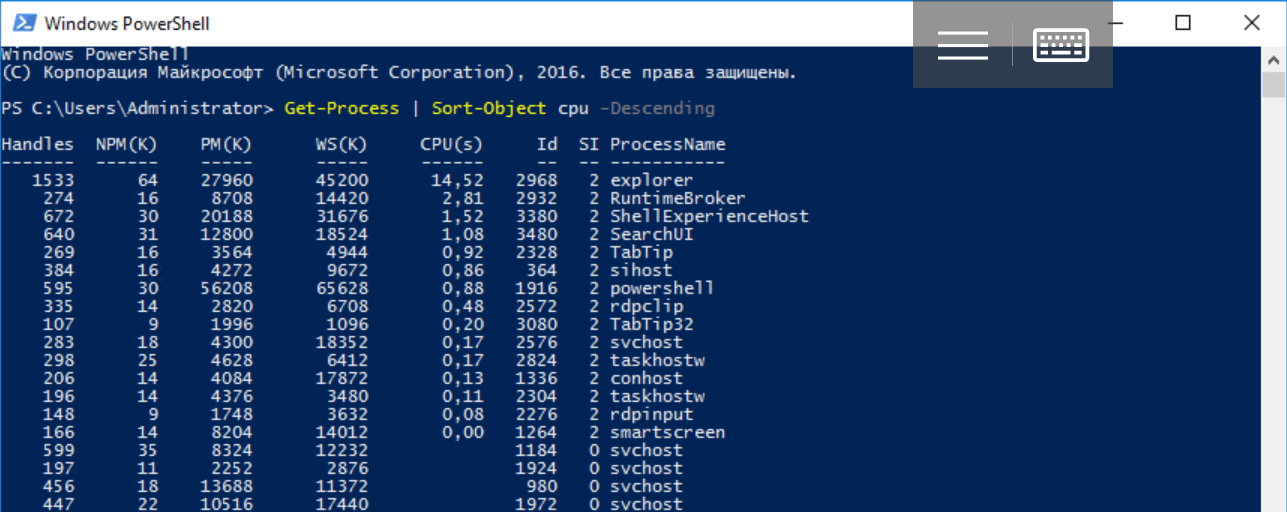
When pipelining objects, it is often necessary to sort them. Property names (sort keys) are passed to the Sort-Object cmdlet, and it returns objects ordered by their values. The output of running processes can be easily sorted by the processor time spent (cpu property):Get-Process | Sort-Object –Property cpu
The -Property parameter can be omitted when calling the Sort-Object cmdlet - it is used by default. For reverse sorting, use the -Descending parameter:Get-Process | Sort-Object cpu -Descending
Selection of objects and their parts
The Select-Object cmdlet allows you to select a specific number of objects at the beginning or at the end of a pipeline using the -First or -Last parameters. With it, you can select single objects or certain properties, as well as create new objects on their basis. Let’s look at the cmdlet’s work using simple examples.The following command displays information about 10 processes consuming the maximum amount of RAM (WS property):Get-Process | Sort-Object WS -Descending | Select-Object -First 10
 You can select only certain properties of objects passing through the pipeline and create new ones on their basis:
Get-Process | Select-Object ProcessName, Id -First 1
As a result of the pipeline, we will get a new object, the structure of which will be different from the structure returned by the Get-Process cmdlet. We will verify this using Get-Member:Get-Process | Select-Object ProcessName, Id -First 1 | Get-Member
 Note that Select-Object returns a single object (-First 1), which has only two fields specified by us: their values were copied from the first object passed to the pipeline with the Get-Process cmdlet. Using Select-Object, one of the ways to create objects in PowerShell scripts is based:
$obj = Get-Process | Select-Object ProcessName, Id -First 1
$obj.GetType()
 Using Select-Object, you can add computed properties to objects that must be represented as a hash table . In this case, the value of its first key corresponds to the name of the property, and the value of the second corresponds to the value of the property for the current element of the pipeline:
Get-Process | Select-Object -Property ProcessName, @{Name="StartTime"; Expression = {$_.StartTime.Minute}}
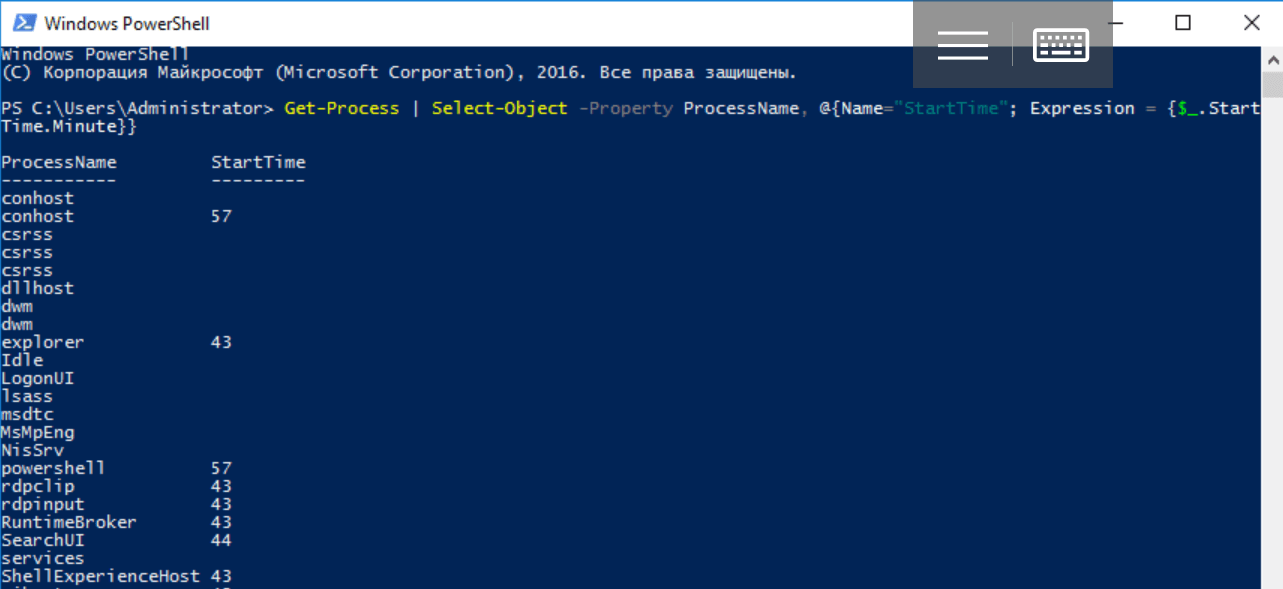 Let's look at the structure of objects passing through the pipeline:
Get-Process | Select-Object -Property ProcessName, @{Name="StartTime"; Expression = {$_.StartTime.Minute}} | Get-Member

ForEach-Object, Group-Object and Measure-Object
There are other cmdlets for working with objects. For example, we’ll talk about the three most useful:ForEach-Object allows you to execute PowerShell code for each object in the pipeline:ForEach-Object { }
Group-Object groups objects by property value:Group-Object PropertyName
If you run it with the -NoElement parameter, you can find out the number of elements in groups.Measure-Object aggregates various summary parameters by the values of the fields of objects in the pipeline (calculates the sum, and also finds the minimum, maximum or average value):Measure-Object -Property PropertyName -Minimum -Maximum -Average -Sum
Typically, the considered cmdlets are used interactively, and scripts often create functions with Begin, Process, and End blocks.Creating .NET and COM Objects (New-Object)
There are many software components with .NET Core and COM interfaces that are useful to system administrators. Using the System.Diagnostics.EventLog class, you can manage system logs directly from Windows PowerShell. Let's look at an example of creating an instance of this class using the New-Object cmdlet with the -TypeName parameter:New-Object -TypeName System.Diagnostics.EventLog
 Since we did not specify a specific event log, the resulting instance of the class contains no data. To change this, during its creation, you must call the special constructor method using the -ArgumentList parameter. If we want to access the application log, pass the string “Application” as an argument to the constructor:
$AppLog = New-Object -TypeName System.Diagnostics.EventLog -ArgumentList Application
$AppLog
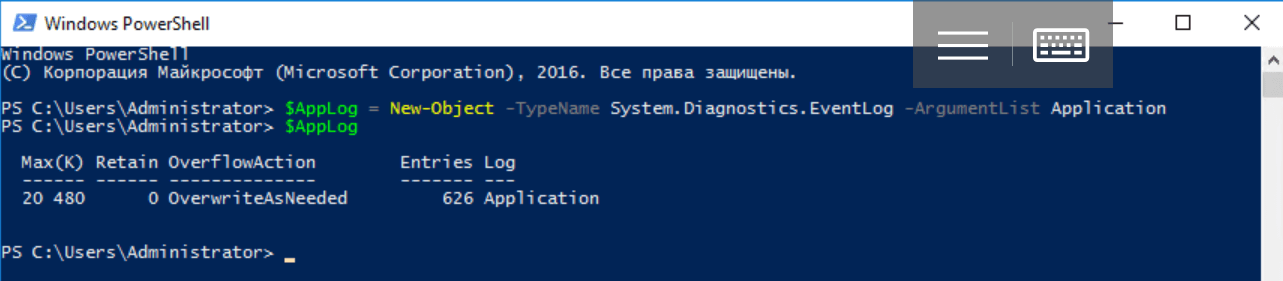 Please note: we saved the output of the command in the $ AppLog variable. Although pipelines are commonly used in interactive mode, scripting often requires maintaining an object reference. In addition, the main .NET Core classes are contained in the System namespace: PowerShell searches by default for the specified types in it, so writing Diagnostics.EventLog instead of System.Diagnostics.EventLog is quite correct.To work with the journal, you can refer to the appropriate methods:
$AppLog | Get-Member -MemberType Method
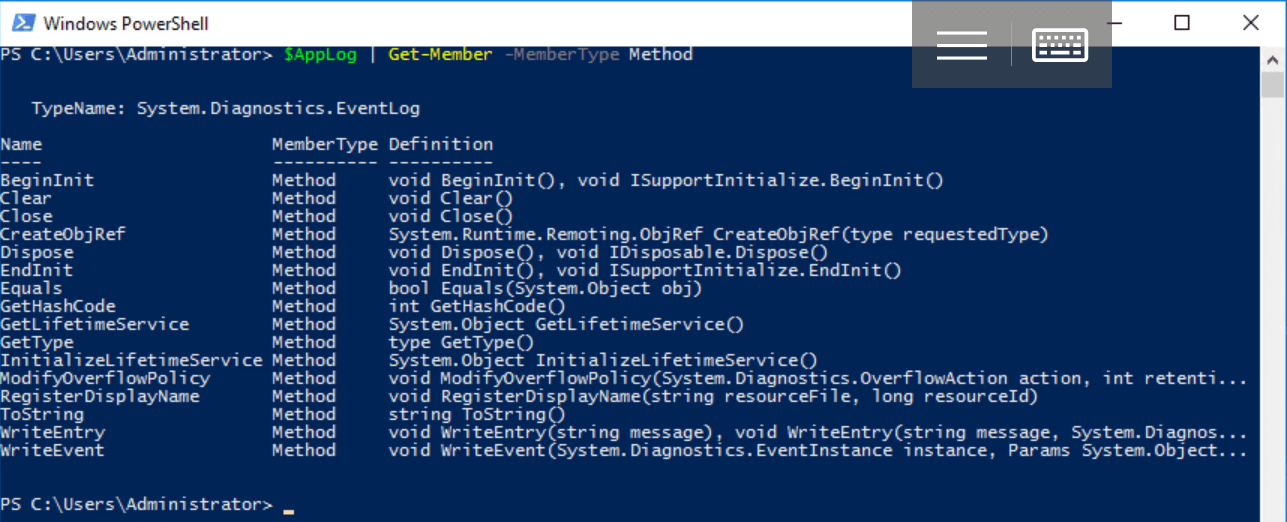 Let's say it is cleared using the Clear () method with access rights:
$AppLog.Clear()
The New-Object cmdlet is also used to work with COM components. There are quite a lot of them - from the libraries supplied with the Windows scripting server to ActiveX applications, such as, for example, Internet Explorer. To create a COM object, you need to specify the -ComObject parameter with the program identifier ProgId of the desired class:New-Object -ComObject WScript.Shell
New-Object -ComObject WScript.Network
New-Object -ComObject Scripting.Dictionary
New-Object -ComObject Scripting.FileSystemObject
To create your own objects with an arbitrary structure, using New-Object looks too archaic and cumbersome; this cmdlet is used to work with software components external to PowerShell. In subsequent articles, this issue will be discussed in more detail. In addition to .NET and COM objects, we will also learn about CIM (WMI) and ADSI objects.Calling Static Methods
It is not possible to create instances of some .NET Core classes: these include System.Environment and System.Math. They are static and contain only static properties and methods. In essence, these are reference libraries that are used without creating objects. You can refer to a static class through a literal, enclosing the type name in square brackets. Moreover, if you look at the structure of the object using Get-Member, we will see the type System.RuntimeType instead of System.Environment:[System.Environment] | Get-Member
 To view only static elements, you need to call Get-Member with the -Static parameter (pay attention to the type of object):
[System.Environment] | Get-Member -Static
 To access static properties and methods, two consecutive colons are used instead of a period after a literal:
[System.Environment]::OSVersion
Or$test=[System.Math]::Sqrt(25)
$test
$test.GetType()

Type PSCustomObject
Among the many data types available in PowerShell, it is worth mentioning PSCustomObject, designed to store objects with an arbitrary structure. Creating such an object using the New-Object cmdlet is considered a classic, but cumbersome and obsolete way:$object = New-Object –TypeName PSCustomObject -Property @{Name = 'Ivan Danko';
City = 'Moscow';
Country = 'Russia'}
Let's look at the structure of the object:$object | Get-Member
 Starting with PowerShell 3.0, another syntax is available:
$object = [PSCustomObject]@{Name = 'Ivan Danko';
                                          City = 'Moscow';
                                          Country = 'Russia'
}
You can access the data in one of the equivalent ways:$object.Name
$object.'Name'
$value = 'Name'
$object.$value
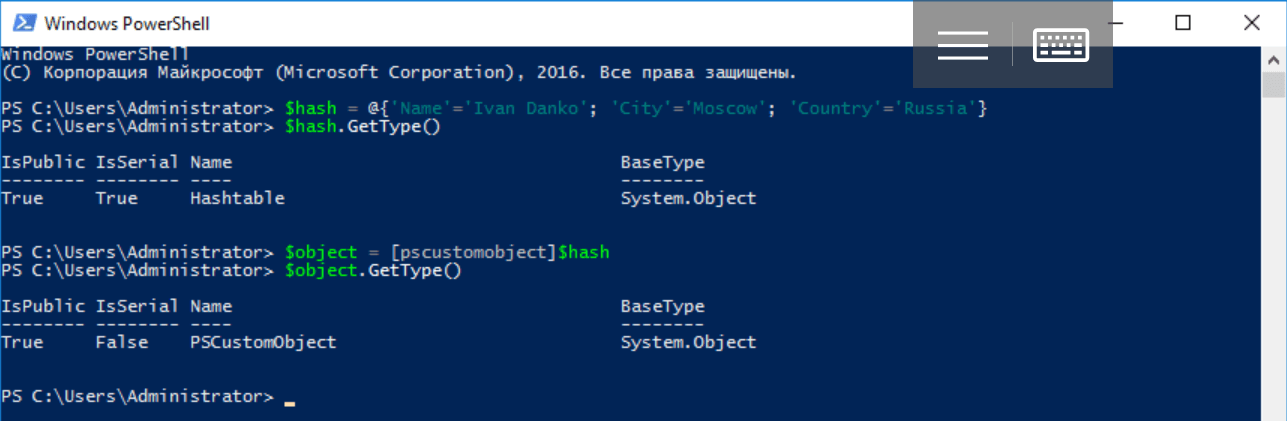
Here is an example of converting an existing hash table into an object:$hash = @{'Name'='Ivan Danko'; 'City'='Moscow'; 'Country'='Russia'}
$hash.GetType()
$object = [pscustomobject]$hash
$object.GetType()
 One of the drawbacks of objects of this type is that the order of their properties can change. To avoid this, you must use the [ordered] attribute:
$object = [PSCustomObject][ordered]@{Name = 'Ivan Danko';
                                          City = 'Moscow';
                                          Country = 'Russia'
}
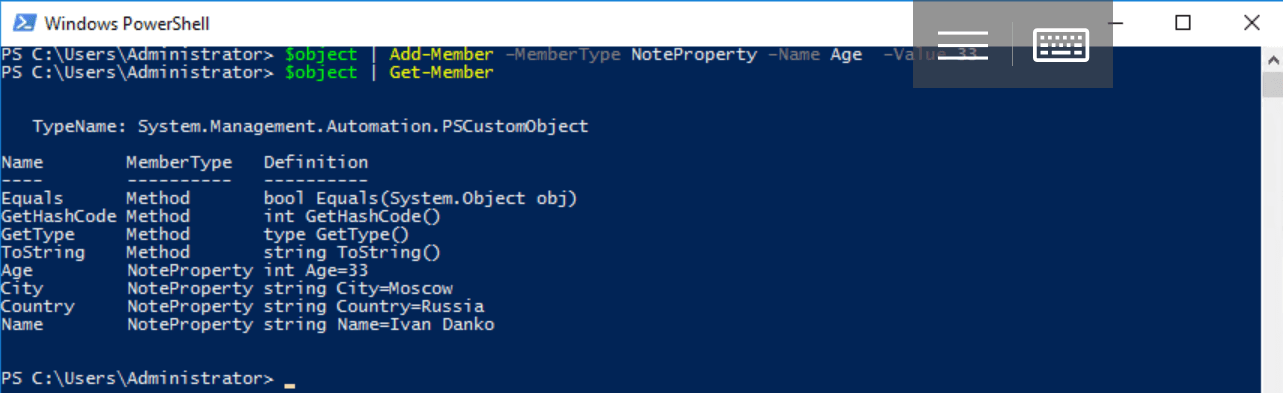
There are other options for creating an object: above we examined the use of the Select-Object cmdlet . It remains to deal with the addition and removal of elements. To do this for the object from the previous example is quite simple:$object | Add-Member –MemberType NoteProperty –Name Age –Value 33
$object | Get-Member
 The Add-Member cmdlet allows you to add not only properties, but also methods to the previously created $ object object using the "-MemberType ScriptMethod" construct:
$ScriptBlock = {
}
$object | Add-Member -Name "MyMethod" -MemberType ScriptMethod -Value $ScriptBlock
$object | Get-Member
Note: to store the code for the new method, we used the $ ScriptBlock variable of type ScriptBlock.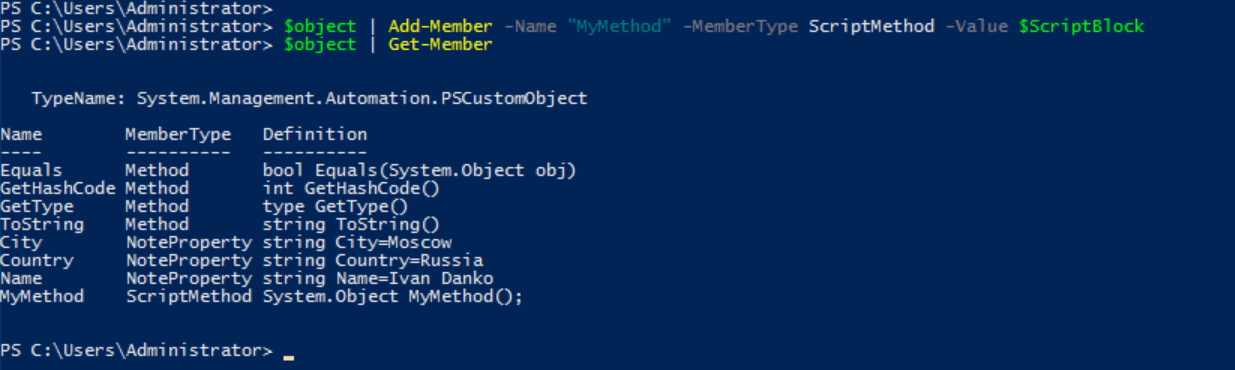 To remove properties, use the appropriate method:
$object.psobject.properties.remove('Name')
Creating Your Own Classes
PowerShell 5.0 introduces the ability to define classes using the characteristic syntax for object-oriented programming languages. The service word Class is intended for this, after which you should specify the class name and describe its body in operator brackets:class MyClass
{
}
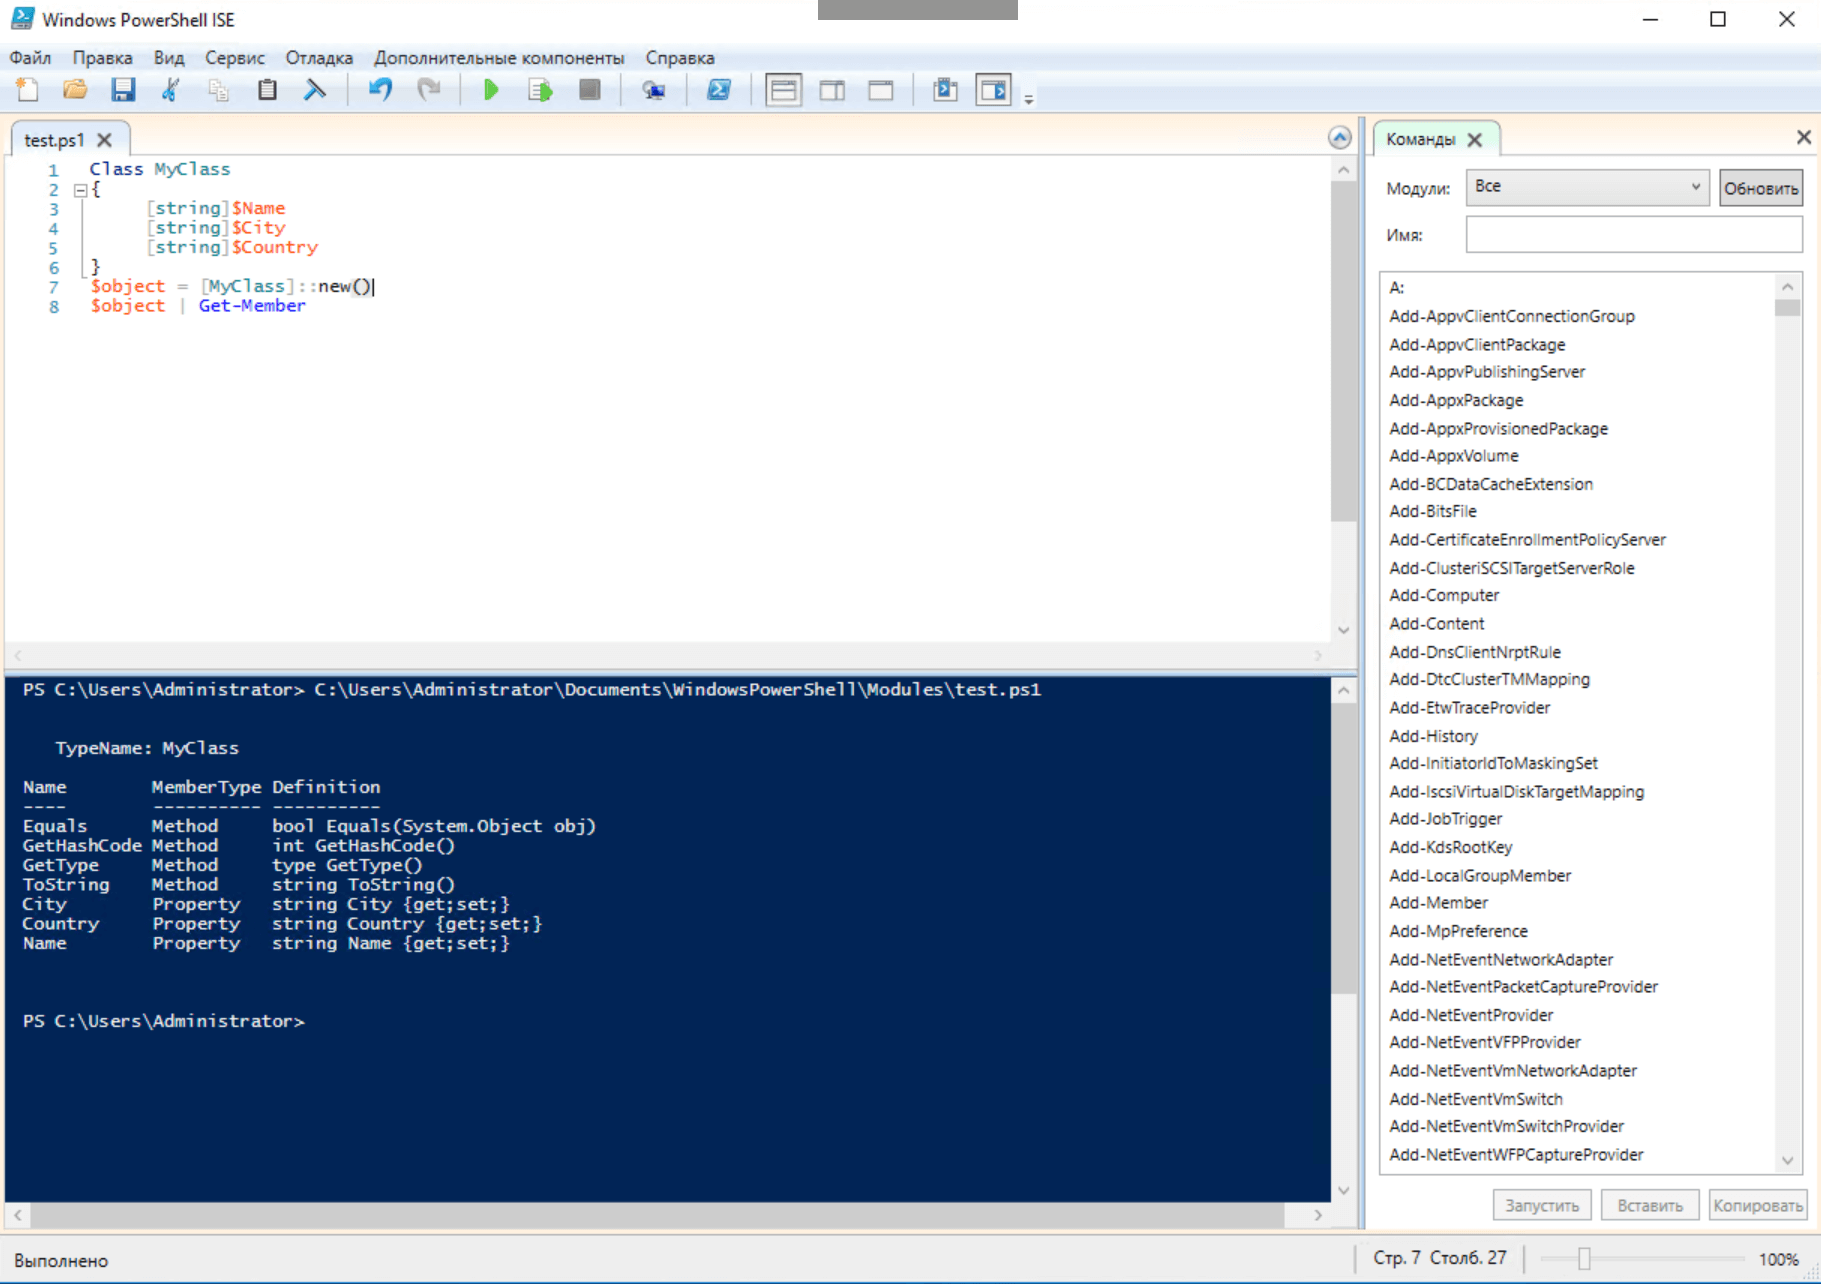
This is a true type of .NET Core, the body of which describes its properties, methods, and other elements. Consider an example of a simple class definition:class MyClass
{
[string]$Name
[string]$City
[string]$Country
}
To create an object (an instance of a class), use the New-Object cmdlet or a literal of the [MyClass] type and the pseudostatic new method (default constructor):$object = New-Object -TypeName MyClass
or$object = [MyClass]::new()
Let us analyze the structure of the object:$object | Get-Member
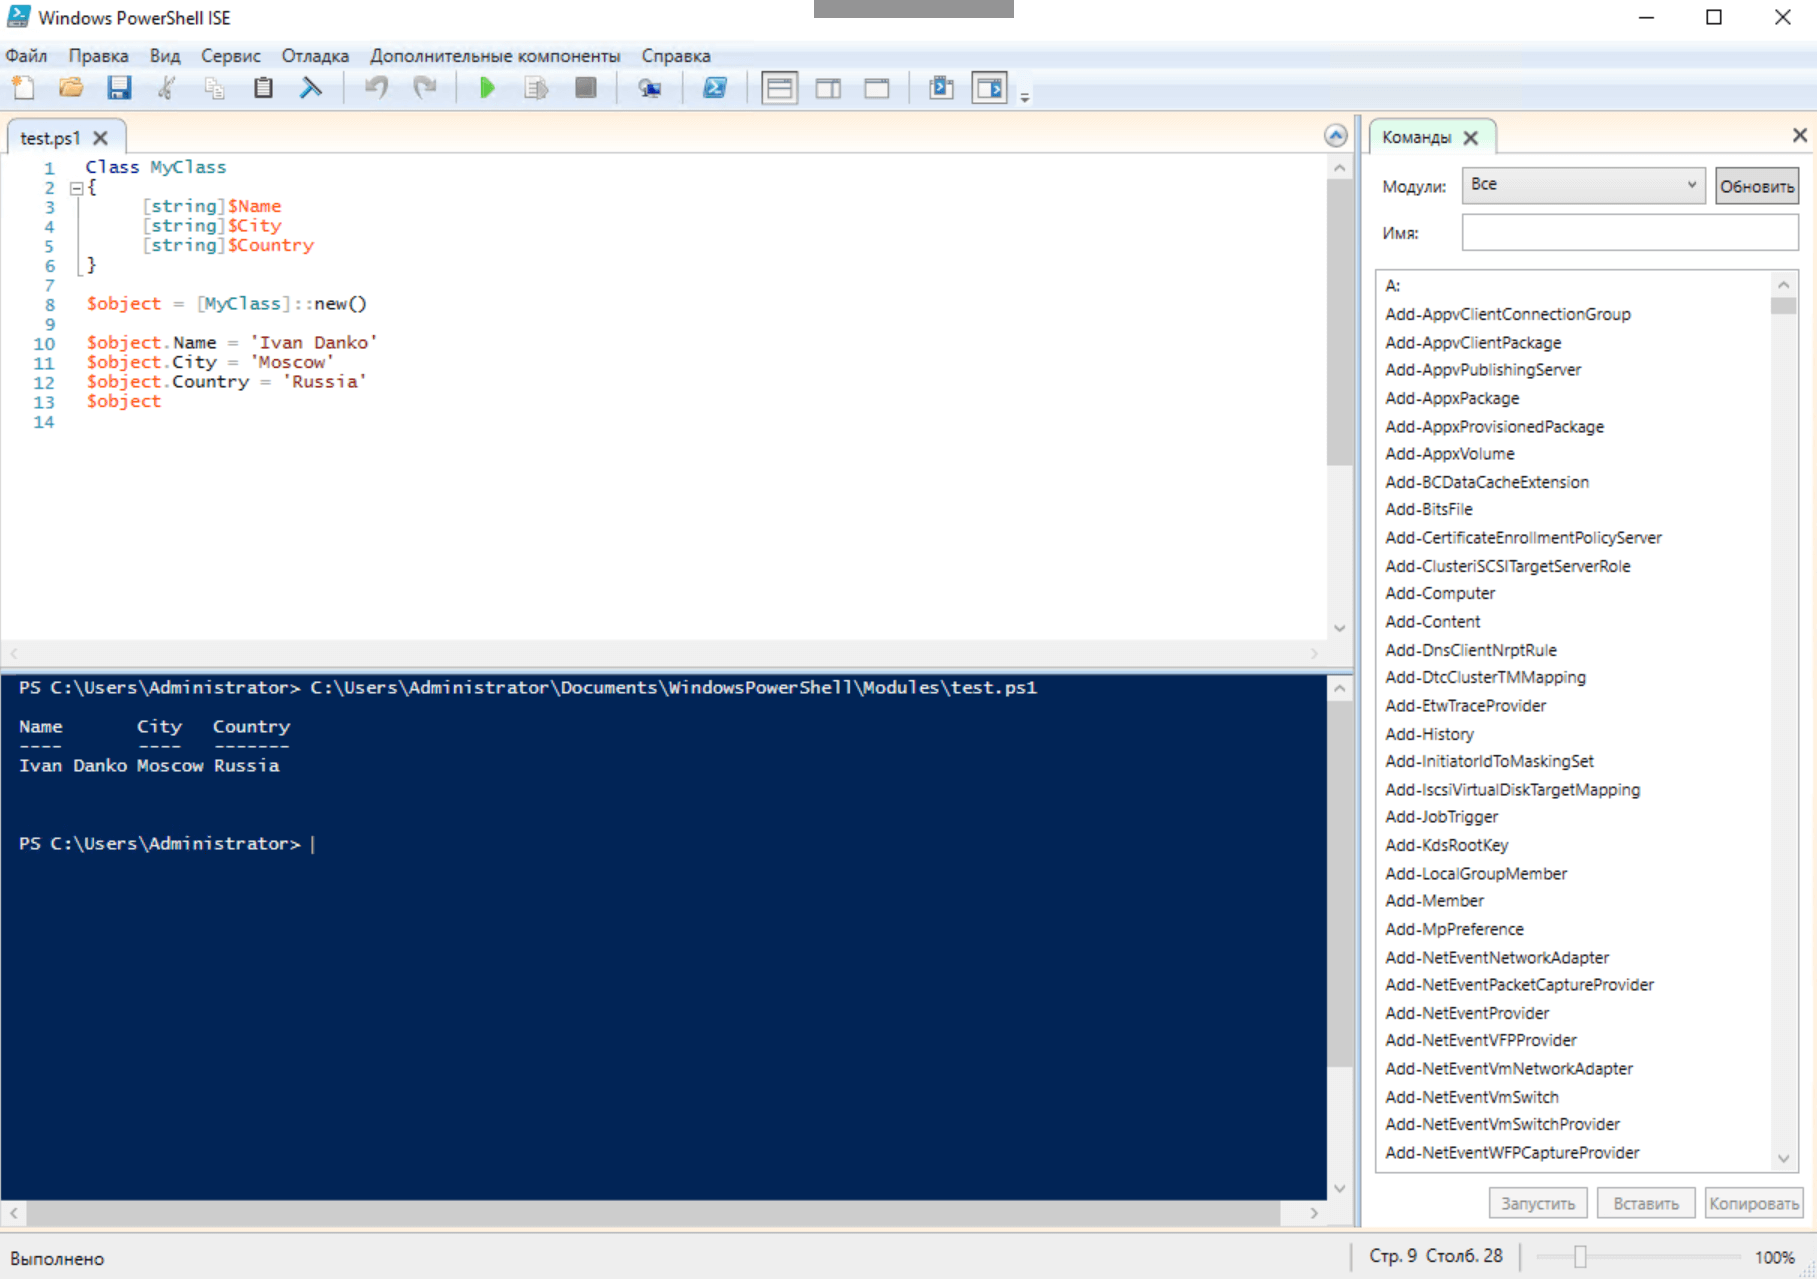
 Do not forget about scope: you cannot refer to the type name as a string or use a type literal outside the script or module in which the class is defined. At the same time, functions can return instances of the class (objects) that will be available outside the module or script.After creating the object, fill in its properties:
$object.Name = 'Ivan Danko'
$object.City = 'Moscow'
$object.Country = 'Russia'
$object
 Note that in the class description not only property types are set, but also their default values:
class Example
{
     [string]$Name = 'John Doe'
}
The description of the class method resembles the description of a function, but without using the function word function. As in the function, the parameters are passed to the methods, if necessary:class MyClass
{
[string]$Name
[string]$City
[string]$Country
Smile([bool]$param1)
{
If($param1) {
Write-Host ':)'
}
}
}
Now the representative of our class knows how to smile:$object = [MyClass]::new()
$object.Smile($true)
Methods can be overloaded, in addition, the class has static properties and methods , as well as constructors whose names coincide with the name of the class itself. A class defined in a script or PowerShell module can serve as a base for another - this is how inheritance is implemented. At the same time, the use of existing .NET classes is allowed as the base ones:class MyClass2 : MyClass
{
}
[MyClass2]::new().Smile($true)
Our description of working with objects in PowerShell is hardly exhaustive. In the following publications, we will try to deepen it with practical examples: the fifth article in the series will be devoted to the issues of integrating PowerShell with third-party software components. Past parts can be found at the links below.
1: Windows PowerShell2: Windows PowerShell3: ,