The translation of the article was prepared especially for advanced students in Android development .
Activity is one of the most striking concepts in Android (the most popular mobile operating system with a well-designed memory management architecture that perfectly implements multitasking).One way or another, with the launch of Activity on the screen, not everything is so simple. The way it was run is also important. There are a lot of nuances in this topic. One of the really important is launchMode , which we will talk about in this article.Each Activity is created to work with different goals. Some of them are designed to work separately with each Intent, for example, activity sent for composing e-mail in the mail client. While others are designed to work as a singleton, such as an activity mailbox.This is why it is important to indicate whether you need to create a new Activity or use an existing one, otherwise it can lead to bad UX or crashes. Thanks to the Android kernel developers, this is easy to do with launchMode , which was specifically designed for this.LaunchMode definition
Essentially, we can define launchMode directly as a tag attribute <activity>AndroidManifest.xml:<activity
android:name=".SingleTaskActivity"
android:label="singleTask launchMode"
android:launchMode="singleTask">
There are 4 types of launchMode available. Let's look at them one at a time.standardThis is the default mode.The behavior of an Activity set to this mode will always create a new Activity to work separately with each sent Intent. In fact, if 10 Intents were sent to compose an email, 10 Activities must be launched in order to serve each Intent separately. As a result, an unlimited number of such Activities can be launched on the device.Behavior on pre-Lollipop AndroidThis kind of Activity will be created and placed on the top of the stack in the same task that sent the Intent. The image below shows what happens when we share the image with the standard Activity. It will be stacked in the same task as described above, although they are from different applications.
 And this is what you will see in the task manager. (It may seem a little strange)
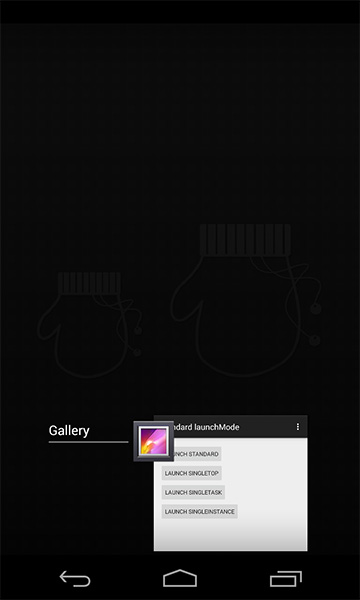 If we switch the application to another task and then switch back to the Gallery, we will still see that the standard launchMode is placed on top of the Gallery task. As a result, if we need to do something in the Gallery, we must first finish our work in this additional Activity.Behavior on Android LollipopIf these Activities relate to the same application, the behavior will be the same as in the pre-Lollipop implementation - placing on the stack on top of the task.
 But in case the Intent is sent from another application, a new task will be created and the newly created Activity will be placed as the root, as shown below.
 This is what you will see in the task manager.
 This is because the task management system has been modified in Lollipop - it has become better and more understandable. In Lollipop, you can simply switch back to the Gallery, as it is in a different task. You can send another Intent, a new task will be created that will serve the Intent in the same way as the previous one.
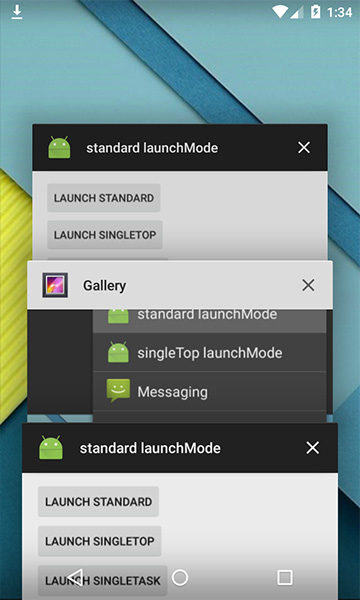 An example of this kind of Activity is Compose Email Activity or Social Network's Status Posting Activity(status update on social networks). If you have an Activity on your mind that processes each Intent separately, then you are thinking of standard Activity .
singleTop
The next mode is singleTop . It behaves in much the same way as standard , which means that you can create as many instances of singleTop Activity as we want. The only difference is that if there is already an Activity instance with the same type at the top of the stack in the calling task, no new Activity will be created, instead, the Intent will be sent to the existing Activity instance through the method onNewIntent(). In singleTop mode, you must consider handling the incoming Intent in
 onCreate()and onNewIntent()so that it works in all cases.An example of using this mode is the search function. Let's think about creating a search box that directs you to SearchActivity to see the search results. For a better UX, we usually always put the search box on the search results page to allow the user to perform the next search without going back.Now imagine that if we always launch a new SearchActivity to serve a new search result, then we will get 10 new Activities for 10 iterations of the search. It would be very strange to go back, since you would have to click back 10 times to go through all the search results in order to return to the root Activity.Instead, if SearchActivity is already at the top of the stack, it is best to send an Intent to an existing Activity instance and let it update the search result. Now there will be only one SearchActivity located at the top of the stack, and you can simply click the back button once to return to the previous Activity. That makes more sense.In any case, singleTop works in the same task as the caller. If you expect the Intent to be sent to an existing Activity, placed on top of any other task, I should disappoint you by saying that there it no longer works. In case the Intent is sent from another application to singleTop Activity, the new Activity will be launched in the same aspect as for standart launchMode (pre-Lollipop: placed on top of the calling task, Lollipop: a new task will be created) .singleTask
This mode is very different from standart and singleTop. Activity with singleTask launchMode is allowed to have only one instance in the system (ala singleton) . If an Activity instance already exists in the system, the entire task holding the instance will be moved up, and the Intent will be provided through the method onNewIntent(). Otherwise, a new Activity will be created and placed in the corresponding task.Working in one applicationIf there was no singleTask Activity instance in the system, a new one will be created and it will simply be placed up the stack in the same task. But if it exists, all Activities located above this singleTask Activity will be automatically brutally destroyed properly (life cycle is completed) in order to display the desired Activity on the top of the stack.At the same time, Intent will be sent to singleTask Activity through a wonderful method
 onNewIntent().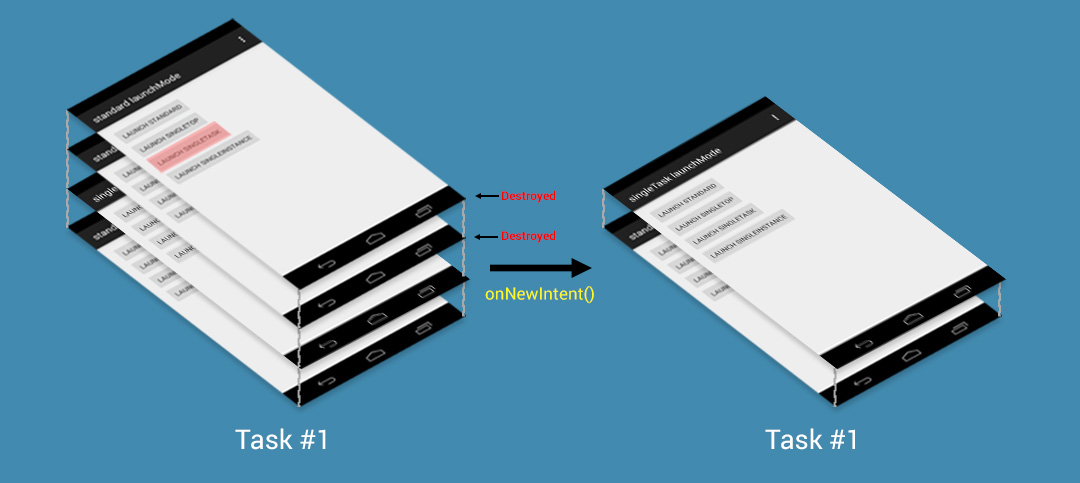 This does not make sense from the point of view of user experience, but it is designed in this way ...You can notice one nuance that is mentioned in the documentation :The system creates a new task and instantiates an activity instance at the root of the new task.But in practice, it seems that this does not work as described . SingleTask Activity is still placed at the top of the Activity stack of the task, as seen from the result of the command
 dumpsys activity.Task id #239
TaskRecord{428efe30 #239 A=com.thecheesefactory.lab.launchmode U=0 sz=2}
Intent { act=android.intent.action.MAIN cat=[android.intent.category.LAUNCHER] flg=0x10000000 cmp=com.thecheesefactory.lab.launchmode/.StandardActivity }
Hist #1: ActivityRecord{429a88d0 u0 com.thecheesefactory.lab.launchmode/.SingleTaskActivity t239}
Intent { cmp=com.thecheesefactory.lab.launchmode/.SingleTaskActivity }
ProcessRecord{42243130 18965:com.thecheesefactory.lab.launchmode/u0a123}
Hist #0: ActivityRecord{425fec98 u0 com.thecheesefactory.lab.launchmode/.StandardActivity t239}
Intent { act=android.intent.action.MAIN cat=[android.intent.category.LAUNCHER] flg=0x10000000 cmp=com.thecheesefactory.lab.launchmode/.StandardActivity }
ProcessRecord{42243130 18965:com.thecheesefactory.lab.launchmode/u0a123}
If you want singleTask Activity to behave as described in the document: create a new task and put Activity as the root Activity. You need to define an attribute taskAffinityfor singleTask Activity as follows.<activity
android:name=".SingleTaskActivity"
android:label="singleTask launchMode"
android:launchMode="singleTask"
android:taskAffinity="">
That will be the result when we try to run SingleTaskActivity.
 Your task is to decide whether to use
 taskAffinityor not depending on the desired behavior of the Activity.Interacting with another applicationAs soon as the Intent is sent from another application and no instance of the Activity has been created in the system, a new task will be created with a new Activity placed as the root Activity.
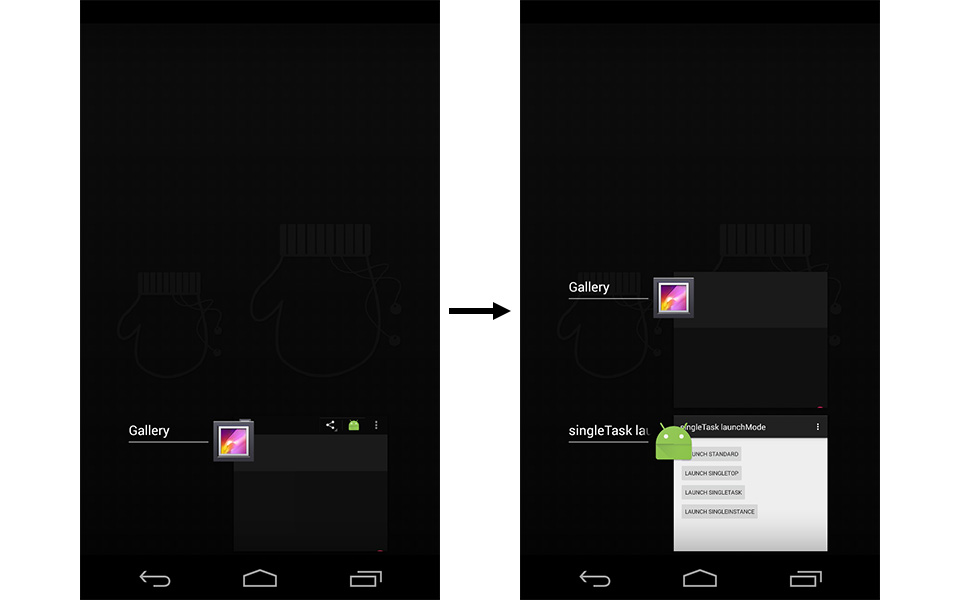 If there is no task that would be the owner of the calling singleTask Activity, a new Activity will be displayed instead.
 If an instance of an Activity exists in a task, the whole task will be moved up, and for each individual Activity located above a singleTask Activity, the life cycle will be completed. If the back button is pressed, the user must go through the Activity on the stack before returning to the calling task.
 An example of using this mode is any Entry Point Activity, for example, the Inbox page of an email client or a social network timeline. These Activities do not assume more than one instance, so singleTask will do its job perfectly. In any case, you should use this mode wisely, since in this mode Activities can be destroyed without user confirmation, as described above.
singleInstance
This mode is very similar to singleTask, where only one instance of an Activity could exist on a system. The difference is that a task that has this Activity can have only one Activity — one that has a singleInstance attribute . If another Activity is called from this kind of Activity, a new task is automatically created to accommodate this new Activity. Similarly, if singleInstance Activity is called, a new task will be created to host this Activity.In any case, the result is rather strange. From the information provideddumpsys, it is clear that there are two tasks in the system, but only one appears in the task manager, depending on which one is on top. As a result, although there is a task that is still running in the background, we cannot switch it back to the foreground. It makes no sense at all.This is what happens when a singleInstance Activity is called while an Activity already exists on the stack. And here is what we see in the task manager.
 Since this task can have only one Activity, we can no longer switch back to task No. 1. The only way to do this is to restart the application from the launcher, but, as a result, the singleInstance task will be hidden in the background.Anyway, there are some workarounds for this problem. As with singleTask Activity, simply assign an attribute
 taskAffinityto singleInstance Activity, allowing multiple tasks to exist in the task manager.<activity
android:name=".SingleInstanceActivity"
android:label="singleInstance launchMode"
android:launchMode="singleInstance"
android:taskAffinity="">
Now the picture makes more sense. This mode is rarely used. Some of the practical use cases are an Activity launcher or an application for which you are 100% sure that there should be only one Activity. In any case, I suggest you not to use this mode, unless there is an emergency.
Intent flags
In addition AndroidManifest.xmlto setting the launch mode directly to , we can also adjust the behavior using a tool called Intent flags , for example:Intent intent = new Intent(StandardActivity.this, StandardActivity.class);
intent.addFlags(Intent.FLAG_ACTIVITY_SINGLE_TOP);
startActivity(intent);
will launch StandardActivitywith the condition singleTop launchMode.There are quite a few flags you can work with. You can find more information about this here .I hope you found this article useful =)Learn more about the course