In this article, I want to demonstrate the use of the DispmanX API of Raspberry Single Board Computers. The DispmanX API provides the ability to create new rendered layers on the Raspberry desktop. Layers hang over layers. They can be dynamically created, deleted, moved, they can be scaled. At the same time, the video controller itself will combine them and display them on the monitor screen. Interestingly, the layers can have an alpha channel, and then, the images of all layers will mix by themselves. Also, in addition to 32 two-bit ARGB layers, you can create, for example, YUV420 layers, or layers of other types. Raspberry already has two layers by default. The lowest one contains a desktop image. All output through the X goes to this layer. And there is a second, topmost layer in which the image of the mouse cursor lives.I will show how to create a new layer, write an image into it and how to move it around the screen. Actually, the demo video above shows the operation of such a program. Four new 32-bit ARGB layers are created here. In each of the layers I write pixels from pre-prepared bitmaps. My bitmaps are images of clouds, the sun and balloons. Layers move around the screen at different speeds, hanging over the lowest X layer.So, the DispmanX API. This is a rather low-level thing specific to Raspberry and its video controllers. And this is a “non-standard” thing. In general, the Linux kernel and the Linux graphics subsystem have a place for programming video layers via DRM, Direct Rendering Manager, but for some reason the creators of Raspberry decided to create their own bike. Although, on the other hand, this is not a complicated bike, which is quite possible to ride. DispmanX runs on Pi-Zero, on Raspberry Pi / Pi2 / Pi3 and Pi4. In general, on all the raspberries. Although, in truth, Pi4 already has normal OpenGLESv3. Here such tambourines may no longer be needed. But on the other hand, DispmanX is much simpler (albeit fewer features) than OpenGLES.To write programs using this DispmanX API, you need to include the header file /opt/vc/include/bcm_host.h. In addition, you will also need to link the program to the libbcm_host.so library, which is located in the / opt / vc / lib folder.All the functions of the API we need start with vc_dispmanx_ * ...The first thing to do to create new layers is to access the display using the following pair of functions:bcm_host_init();
DISPMANX_DISPLAY_HANDLE_T display = vc_dispmanx_display_open( 0 );
Now you can create a “resource” that will contain the image of the layer:VC_IMAGE_TYPE_T type = VC_IMAGE_ARGB8888;
uint32_t UnusedImagePtr;
int SrcImageWidth = 512;
int SrcImageWidth = 196;
DISPMANX_RESOURCE_HANDLE_T resource = vc_dispmanx_resource_create( type, SrcImageWidth, SrcImageHeight, &UnusedImagePtr );
Here, the layer type is 32-bit with the alpha channel. But there may be other types, as I already wrote, even YUV. Using a YUV layer makes sense for dynamic layers, such as when playing a video. Then the amount of data written to the screen is significantly reduced, and you do not need to transcode YUV to RGB, which saves valuable processor clock cycles.After creating a new resource, the display handler obtained earlier can be used to add a new element layer to the display:VC_DISPMANX_ALPHA_T alpha;
alpha.flags =
(DISPMANX_FLAGS_ALPHA_T)(DISPMANX_FLAGS_ALPHA_FROM_SOURCE | DISPMANX_FLAGS_ALPHA_MIX);
alpha.opacity = 255;
alpha.mask = 0;
int OutLayer = 200;
DISPMANX_ELEMENT_HANDLE_T vc_element = vc_dispmanx_element_add(
update,
display,
OutLayer,
&dst_rect, resource, &src_rect, DISPMANX_PROTECTION_NONE, &alpha, NULL, DISPMANX_NO_ROTATE );
There is another very important update parameter. Each time you need to modify the contents of the display, add or remove a layer, or move it, or write a new image to the layer, you need to mark the beginning of the changes and the end of the changes.To start changing the elements on the display you need to do:DISPMANX_UPDATE_HANDLE_T update = vc_dispmanx_update_start( Priority );
Then change everything you need, create a layer or move it, write new pixels to the layer and then close the changes using the function:vc_dispmanx_update_submit_sync( update );
As you can understand from the name of the function, the changes will take effect after the next frame pulse of the video scan.Writing pixels to a layer is performed by the function:vc_dispmanx_resource_write_data(
resource,
type,
pitch,
Pixels,
&rect );
Unfortunately, despite the presence of the rect parameter, it is impossible to update an arbitrary fragment inside the image. Only the “strip” can be updated, that is, the top and bottom of the rectangle can be specified, but left will always be 0 and right will always be the width of the image.Oddly enough, this is perhaps the whole minimum of knowledge needed to manipulate layers.In my program, I wrote a small wrapper over the DispmanX API. This allows me to describe each layer in a separate structure:struct DISPMANX_ELEMENT {
DISPMANX_RESOURCE_HANDLE_T res_;
DISPMANX_ELEMENT_HANDLE_T vc_element_;
VC_IMAGE_TYPE_T type_;
uint32_t src_width_;
uint32_t src_height_;
uint32_t dst_layer_;
uint32_t dst_width_;
uint32_t dst_height_;
int32_t dst_x_;
int32_t dst_y_;
};
Well, many of my wrapper functions take a pointer to such a structure as a parameter:void dispmanx_init();
void dispmanx_element_init(struct DISPMANX_ELEMENT* Element);
struct DISPMANX_ELEMENT dispmanx_element_create( VC_IMAGE_TYPE_T type, int SrcW, int SrcH, int OutX, int OutY, int OutW, int OutH, int OutLayer );
void dispmanx_element_delete(struct DISPMANX_ELEMENT* Element);
void dispmanx_element_write(struct DISPMANX_ELEMENT* Element, char* Pixels);
void dispmanx_element_move( DISPMANX_UPDATE_HANDLE_T update, struct DISPMANX_ELEMENT* Element, int32_t NewX, int32_t NewY );
DISPMANX_UPDATE_HANDLE_T dispmanx_start_update( int Priority );
void dispmanx_sync( DISPMANX_UPDATE_HANDLE_T Update );
This way I can create several layers and easily manipulate them.I also wrote a function for reading a bitmap. Moreover, the function is tricky - if a pure green pixel 0x00FF00 is found in the bitmap, then I consider it as a transparent pixel in my image and accordingly set the Alpha byte of this pixel to zero.In paint, I painted three images.Clouds: Sun:
Sun: Balloons:
 The program creates four layers. The first two layers are created from the same bitmap of the cloud, but I make the layer size different, I use scaling, the second clouds are larger than the first. The third layer is balloons and in the fourth layer I load the sun:
typedef struct OBJ{
	int width_;
	int height_;
	int x_;
	int y_;
	int layer_;
	int speed_;
	char* pixels_;
} OBJ_;

int main(int argc , char *argv[])
{
	cout << "Hello Raspberry DispmanX API!\n";
	dispmanx_init();

	OBJ_ cloud1;
	cloud1.pixels_ = LoadBitmap( (char*)"clouds.bmp", &cloud1.width_, &cloud1.height_ );
	cloud1.layer_ = 100;
	cloud1.x_ = 100;
	cloud1.y_ = 120;
	cloud1.speed_ = 3;

	struct DISPMANX_ELEMENT cloud1_element = dispmanx_element_create(
		VC_IMAGE_ARGB8888, cloud1.width_, cloud1.height_, cloud1.x_, cloud1.y_, cloud1.width_, cloud1.height_, cloud1.layer_ );
	dispmanx_element_write( &cloud1_element, cloud1.pixels_ );

	OBJ_ cloud2;
	cloud2.pixels_ = LoadBitmap( (char*)"clouds.bmp", &cloud2.width_, &cloud2.height_ );
	cloud2.layer_ = 101;
	cloud2.x_ = 10;
	cloud2.y_ = 230;
	cloud2.speed_ = 2;

	struct DISPMANX_ELEMENT cloud2_element = dispmanx_element_create(
		VC_IMAGE_ARGB8888, cloud2.width_, cloud2.height_, cloud2.x_, cloud2.y_, cloud2.width_*1.3, cloud2.height_*1.4, cloud2.layer_ );
	dispmanx_element_write( &cloud2_element, cloud2.pixels_ );

	OBJ_ balls;
	balls.pixels_ = LoadBitmap( (char*)"balls.bmp", &balls.width_, &balls.height_ );
	balls.layer_ = 102;
	balls.x_ = -100;
	balls.y_ = 351;
	balls.speed_ = 5;

	struct DISPMANX_ELEMENT balls_element = dispmanx_element_create(
		VC_IMAGE_ARGB8888, balls.width_, balls.height_, balls.x_, balls.y_, balls.width_, balls.height_, balls.layer_ );
	dispmanx_element_write( &balls_element, balls.pixels_ );

	OBJ_ sun;
	sun.pixels_ = LoadBitmap( (char*)"sun.bmp", &sun.width_, &sun.height_ );
	sun.layer_ = 99;
	sun.x_ = -250;
	sun.y_ = 10;
	sun.speed_ = 1;

	struct DISPMANX_ELEMENT sun_element = dispmanx_element_create(
		VC_IMAGE_ARGB8888, sun.width_, sun.height_, sun.x_, sun.y_, sun.width_, sun.height_, sun.layer_ );
	dispmanx_element_write( &sun_element, sun.pixels_ );
.......................
In the perpetual cycle, I move the layers around the screen at different speeds:
while(1)
	{
		this_thread::sleep_for( chrono::milliseconds(20) );
		cloud1.x_ += cloud1.speed_;
		if( cloud1.x_>= 1920 )
			cloud1.x_ = 10 - cloud1.width_;

		cloud2.x_ += cloud2.speed_;
		if( cloud2.x_>= 1920 )
			cloud2.x_ = 133 - cloud2.width_;

		balls.x_ += balls.speed_;
		if( balls.x_>= 1920 )
			balls.x_ = 200 - balls.width_;

		sun.x_ += sun.speed_;
		if( sun.x_>= 1920 )
			sun.x_ = 250 - sun.width_;

		DISPMANX_UPDATE_HANDLE_T update = dispmanx_start_update(10);
		dispmanx_element_move( update, &cloud1_element, cloud1.x_, cloud1.y_ );
		dispmanx_element_move( update, &cloud2_element, cloud2.x_, cloud2.y_ );
		dispmanx_element_move( update, &balls_element, balls.x_, balls.y_ );
		dispmanx_element_move( update, &sun_element,   sun.x_,   sun.y_ );
		dispmanx_sync( update );
	}
That's all.All the code of my program can be taken on github .Compile the program on raspberry - with the make command. Then run from the command line: ./demo and you get what you see above in the video demonstration.By the way, on Raspberry you can see a list of all video layers with the vcgencmd command with the dispmanx_list parameter. Here is the output of this command on Pi4 before launching my demo: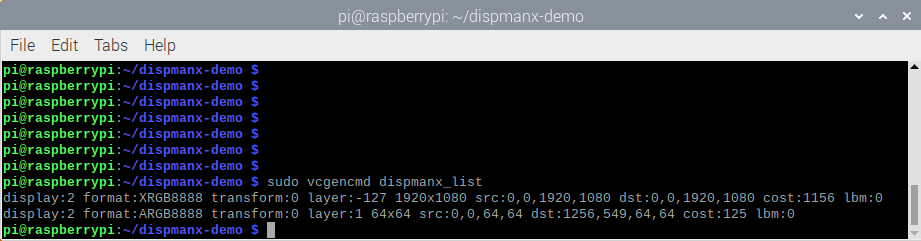 As I wrote, there are already two layers: a layer for Xorg and a layer for a mouse.And here is the list of layers after starting my demo:
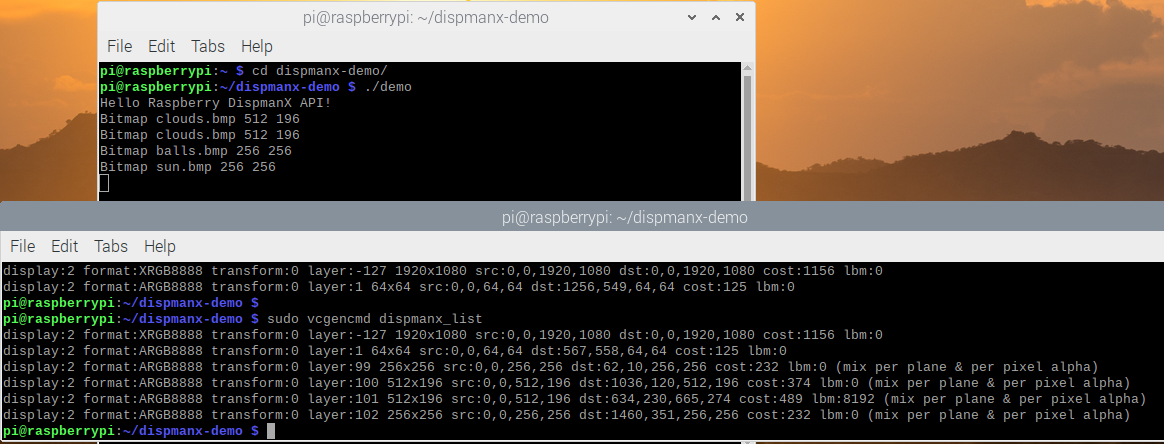 It can be seen that four new layers were added. I took screenshots at the scrot team. It is interesting that it captures only the lower x-layer, therefore, in the screenshot, neither clouds nor balloons that are in other layers are visible.I know that Raspberry microcomputers are sometimes used to create various stalls. And for kiosks, sometimes you need to do OSD, On Screen Display - that is, overlay one image on top of another. It seems to me that the DispmanX API is perfect for these applications. Maybe someone will like this solution.