Hi, I’m Denis and one of my areas of activity is the development of infrastructure solutions in X5. Today I would like to share with you about how you can deploy an automated server preparation system based on publicly available tools. In my opinion, this is an interesting, simple and flexible solution.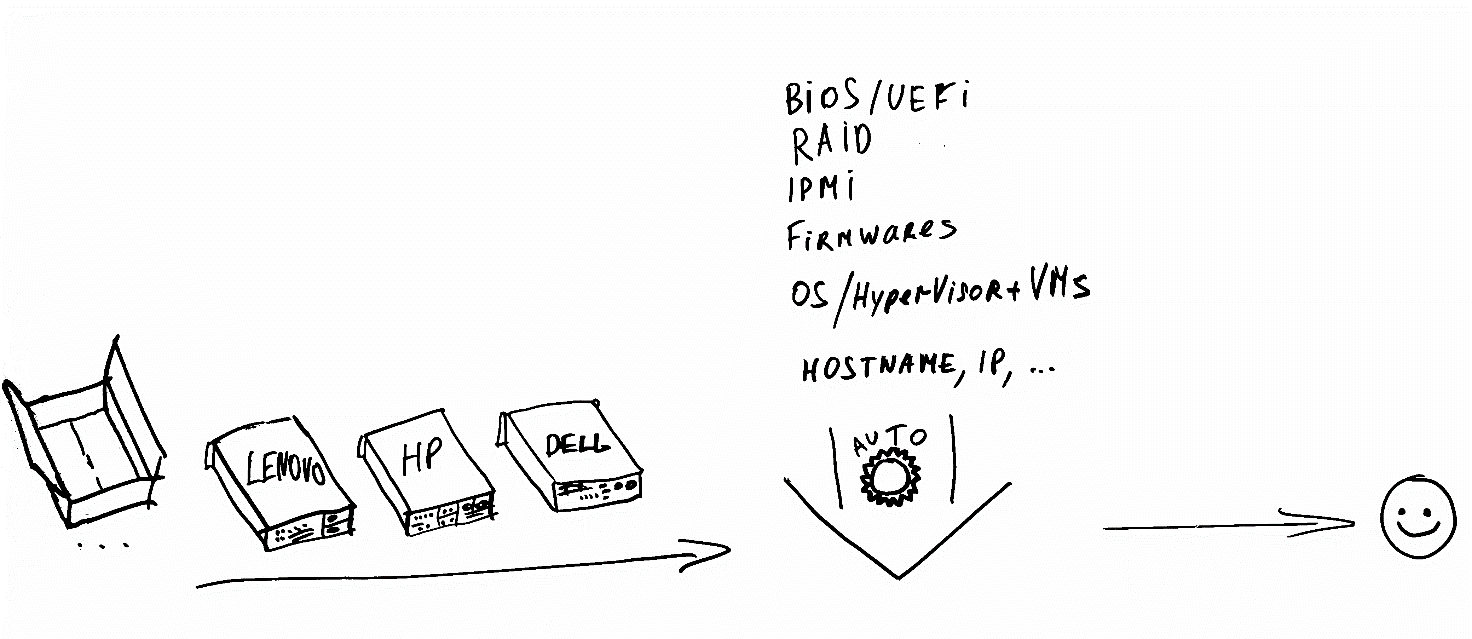 By preparation is meant: to make from a new server out of the box, a fully configured server with OS Linux or with the ESXi hypervisor (Windows server casting is not discussed in this article).Terms :
- servers - servers that need to be configured.
- installation server - the main server that provides the entire preparation process over the network.
Why do you need automation?
Let's say there is a problem: mass prepare the server from scratch, at the peak - 30 per day. Servers of different manufacturers and models, different OSs can be installed on them, a hypervisor may or may not exist.What operations are included in the setup process (without automation):- connect the keyboard, mouse, monitor to the server;
- configure BIOS, RAID, IPMI;
- upgrade component firmware;
- deploy a file system image (or install a hypervisor and copy virtual machines);
Note. Alternatively, deploying the OS is possible through installation with an auto-answer file. But this will not be discussed in the article. Although you will see below that adding this functionality is easy.- configure OS parameters (hostname, IP, etc.).
With this approach, the same settings are performed sequentially on each server. The effectiveness of such work is very low.The essence of automation is to exclude human involvement from the process of preparing the server. As much as possible.Thanks to automation, downtime between operations is reduced and it becomes possible to prepare several servers at the same time. The likelihood of errors due to the human factor is also greatly reduced.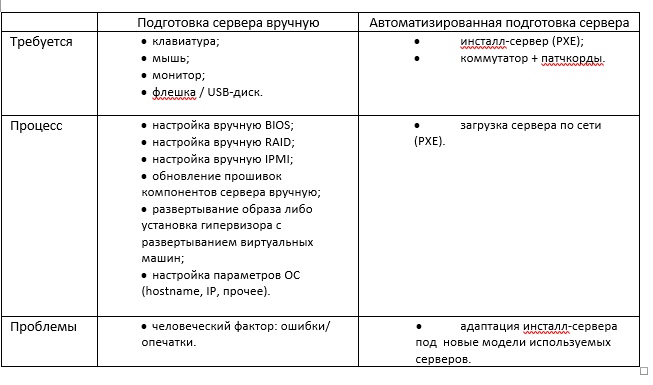
How are the servers configured automatically?
We will analyze all the steps in detail.You have a linux server that you use as the PXE installation server. Services are installed and configured on it: DHCP, TFTP.So, we load the server (which needs to be configured) by PXE. Recall how it works:- The server selected to boot over the network.
- The server loads the PXE-ROM of the network card and contacts the installation server via DHCP to obtain the network address.
- DHCP of the installation server gives the address, as well as instructions for further downloading via PXE.
- The server downloads the network bootloader from the installation server via PXE, further download occurs according to the PXE configuration file.
- The download is performed based on the received parameters (kernel, initramfs, mount points, squashfs image, etc.).
Note. This article describes the PXE boot via BIOS mode. Currently, manufacturers are actively introducing UEFI bootmode. For PXE, the difference will be in the configuration of the DHCP server and the presence of an additional bootloader.Consider a PXE server configuration example (pxelinux menu).File pxelinux.cfg / default:default menu.c32
prompt 0
timeout 100
menu title X5 PXE Boot Menu
LABEL InstallServer Menu
MENU LABEL InstallServer
KERNEL menu.c32
APPEND pxelinux.cfg/installserver
LABEL VMware Menu
MENU LABEL VMware ESXi Install
KERNEL menu.c32
APPEND pxelinux.cfg/vmware
LABEL toolkit //
MENU LABEL Linux Scripting Toolkits
MENU default
KERNEL menu.c32
APPEND pxelinux.cfg/toolkit //
File pxelinux.cfg / toolkit:prompt 0
timeout 100
menu title X5 PXE Boot Menu
label mainmenu
menu label ^Return to Main Menu
kernel menu.c32
append pxelinux.cfg/default
label x5toolkit-auto // —
menu label x5 toolkit autoinstall
menu default
kernel toolkit/tkcustom-kernel
append initrd=toolkit/tk-initramfs.gz quiet net.ifnames=0 biosdevname=0 nfs_toolkit_ip=192.168.200.1 nfs_toolkit_path=tftpboot/toolkit nfs_toolkit_script=scripts/mount.sh script_cmd=master-install.sh CMDIS2=”…”
label x5toolkit-shell // -
menu label x5 toolkit shell
kernel toolkit/tkcustom-kernel
append initrd=toolkit/tkcustom-initramfs.gz quiet net.ifnames=0 biosdevname=0 nfs_toolkit_ip=192.168.200.1 nfs_toolkit_path=tftpboot/toolkit nfs_toolkit_script=scripts/mount.sh script_cmd=/bin/bash CMDIS2=”…”
The kernel and initramfs at this stage are an intermediate linux-image, with the help of which the basic preparation and configuration of the server will take place.As you can see, the bootloader passes many parameters to the kernel. Some of these parameters are used by the kernel itself. And we can use some for our own purposes. This will be described later, but for now you can just remember that all the parameters passed will be available in the intermediate linux image via / proc / cmdline.Where to get them, the kernel and initramfs?As a basis, you can choose any linux distribution. What we pay attention to when choosing:- the boot image must be universal (drivers available, the ability to install additional utilities);
- most likely, initramfs will need to be customized.
How is this done in our solution for X5? CentOS 7 was chosen as the basis. Let's do the following trick: prepare the future image structure, pack it into the archive and create initramfs, inside which will be our file system archive. When loading the image, the archive will be deployed to the created tmpfs section. Thus, we get a minimal, while full-fledged live-linux image with all the necessary utilities, consisting of only two files: vmkernel and initramfs.# :
mkdir -p /tftpboot/toolkit/CustomTK/rootfs /tftpboot/toolkit/CustomTK/initramfs/bin
# :
yum groups -y install "Minimal Install" --installroot=/tftpboot/toolkit/CustomTK/rootfs/
yum -y install nfs-utils mariadb ntpdate mtools syslinux mdadm tbb libgomp efibootmgr dosfstools net-tools pciutils openssl make ipmitool OpenIPMI-modalias rng-tools --installroot=/tftpboot/toolkit/CustomTK/rootfs/
yum -y remove biosdevname --installroot=/tftpboot/toolkit/CustomTK/rootfs/
# initramfs:
wget https://busybox.net/downloads/binaries/1.31.0-defconfig-multiarch-musl/busybox-x86_64 -O /tftpboot/toolkit/CustomTK/initramfs/bin/busybox
chmod a+x /tftpboot/toolkit/CustomTK/initramfs/bin/busybox
cp /tftpboot/toolkit/CustomTK/rootfs/boot/vmlinuz-3.10.0-957.el7.x86_64 /tftpboot/toolkit/tkcustom-kernel
# /tftpboot/toolkit/CustomTK/initramfs/init ( ):
#!/bin/busybox sh
/bin/busybox --install /bin
mkdir -p /dev /proc /sys /var/run /newroot
mount -t proc proc /proc
mount -o mode=0755 -t devtmpfs devtmpfs /dev
mkdir -p /dev/pts /dev/shm /dev/mapper /dev/vc
mount -t devpts -o gid=5,mode=620 devpts /dev/pts
mount -t sysfs sysfs /sys
mount -t tmpfs -o size=4000m tmpfs /newroot
echo -n "Extracting rootfs... "
xz -d -c -f rootfs.tar.xz | tar -x -f - -C /newroot
echo "done"
mkdir -p /newroot/dev /newroot/proc /newroot/sys
mount --move /sys /newroot/sys
mount --move /proc /newroot/proc
mount --move /dev /newroot/dev
exec switch_root /newroot /sbin/init
# rootfs initramfs:
cd /tftpboot/toolkit/CustomTK/rootfs
tar cJf /tftpboot/toolkit/CustomTK/initramfs/rootfs.tar.xz --exclude ./proc --exclude ./sys --exclude ./dev .
cd /tftpboot/toolkit/CustomTK/initramfs
find . -print0 | cpio --null -ov --format=newc | gzip -9 > /tftpboot/toolkit/tkcustom-initramfs-new.gz
So, we have specified a kernel and initramfs which should be loaded. As a result, at this stage, downloading the intermediate linux image via PXE, we get the OS console.Great, but now we need to transfer control to our “automation”.It can be done like this.Suppose, after loading the image, we plan to transfer control to the mount.sh script.We include the mount.sh script in autorun. To do this, you need to modify initramfs:- unpack initramfs (if we use the above version of initramfs, this is not required)
- include in startup code that will analyze the parameters passed through / proc / cmdline and transfer control further;
- pack initramfs.
Note. In the case of the X5 toolkit, the boot control is transferred to the script. /opt/x5/toolkit/bin/hook.sh override.conf getty tty1 (ExecStart=…)So, the image is loaded, in which the mount.sh script starts at startup. Next, the mount.sh script in the process of analysis analyzes the passed parameters (script_cmd =) and launches the necessary program / script.label toolkit- autokernel ...append ... nfs_toolkit_script = scripts / mount.sh script_cmd = master-install.sh
label toolkit- shellkernel ...append ... nfs_toolkit_script = scripts / mount.sh script_cmd = / bin / bash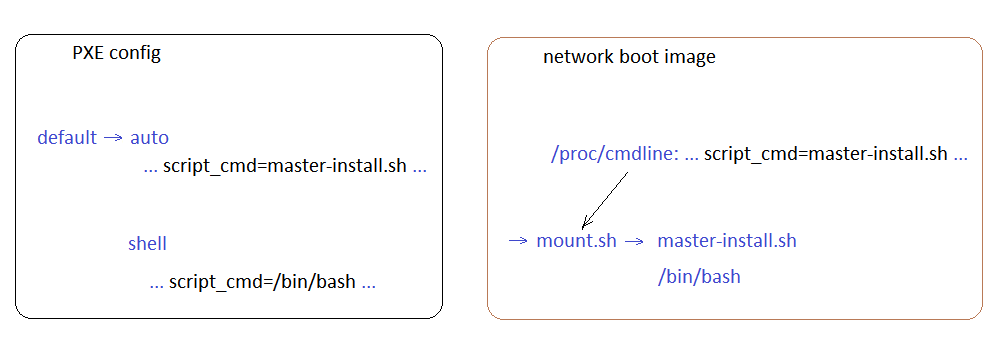 Here on the left side is the PXE menu , on the right is the control transfer scheme.With the transfer of control, we figured it out. Depending on the choice of the PXE menu, either the auto-tuning script or the debugging console is launched.In the case of automatic configuration, the necessary directories from the installation server are mounted, in which there are:
- scripts;
- saved BIOS / UEFI templates of various servers;
- firmware;
- utilities for servers;
- logs.
Next, the mount.sh script transfers control to the master-install.sh script from the scripts directory.The script tree (the order of their launch) looks something like this:- master-install
- sharefunctions (common functions)
- info (information output)
- models (setting installation parameters based on the server model)
- prepare_utils (installing the necessary utilities)
- fwupdate (firmware update)
- diag (elementary diagnosis)
- biosconf (BIOS / UEFI setup)
- clockfix (setting the time on the motherboard)
- srmconf (configuring the remote interface)
- raidconf (configuring logical volumes)
one of:- preinstall (transferring control to the installer of the OS or hypervisor, for example ESXi)
- merged-install (direct start of unpacking the image)
Now we know:
- how to boot the server via PXE;
- how to transfer control to your own script.
Let's continue. The following issues have become relevant:- How to identify the server that we are preparing?
- What utilities and how to configure the server?
- How to get settings for a specific server?
How to identify the server that we are preparing?
It is simple - DMI:dmidecode –s system-product-name
dmidecode –s system-manufacturer
dmidecode –s system-serial-number
It has everything you need: a vendor, a model, a serial number. If you are not sure that this information is presented in all servers, you can identify them by MAC address. Or in both ways at the same time if the server vendors are different and on some models the serial number information is simply not available.Based on the information received, network folders from the installation server are mounted and everything necessary is loaded (utilities, firmware, etc.).What utilities and how to configure the server?
I will give utilities for linux for some manufacturers. All utilities are available on the official websites of the vendors.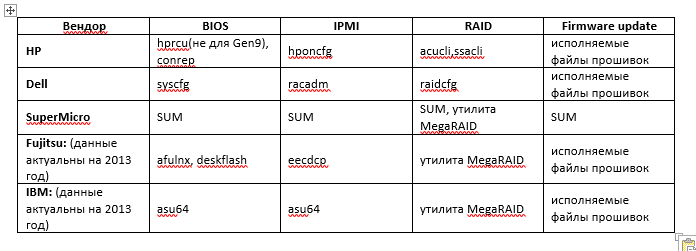 With firmware, I think everything is clear. They usually come in packaged executables. The executable file controls the firmware update process and reports a return code.BIOS and IPMI are usually configured through templates. If necessary, the template can be edited before loading.RAID utilities for some vendors can also configure according to the template. If this is not the case, you will have to write a configuration script.The procedure for configuring RAID is most often as follows:
- We request the current configuration.
- If there are already logical arrays, we erase it.
- We look at what physical disks are present and how many of them.
- Create a new logical array. We interrupt the process in case of an error.
How to get settings for a specific server?
Suppose all server settings are stored on the installation server. In this case, in order to answer our question, you first need to decide: how to transfer the settings to the installation server.At first, it is quite possible to do with text files. (In the future, you can use a text file as a backup way to transfer settings).You can "share" a text file on the installation server. And add it to the mount.sh script.The lines will, for example, look like this:<serial number> <host name> <subnet>These lines will be transferred to the file by the engineer from his working machine. And then, when setting up the server, the parameters for a specific server will be read from the file.But, in the future, it’s better to use the database to store the settings, states and server installation logs.Of course, one database can not do, and you will need to create a client part, with the help of which the settings will be transferred to the database. This is harder to implement than a text file, but it's actually not as hard as it sounds. The minimum version of the client, which will simply transfer data to the database, is quite feasible to write yourself. In the future, it will be possible to improve the client program also in free mode (reports, printing labels, sending notifications, etc., whatever comes to mind).Having made a specific request to the database and indicating the serial number of the server, we obtain the necessary parameters for configuring the server.Plus, we don’t need to invent locks for simultaneous access, as is the case with a text file.We can write the configuration log at all stages in the database and control the installation process through events and flags of the preparation stages.Now we know how:
- load the server via PXE;
- transfer control to our script;
- identify the server to be prepared by serial number;
- configure the server with appropriate utilities;
- transfer settings to the installation server database using the client part.
Found out how:
- the installed server receives the necessary settings from the database;
- all preparation progress is recorded in the database (logs, events, stage flags).
What about the different types of software being installed? How to install a hypervisor, copy a VM and configure all this?
In the case of deploying a file system image (linux) to hardware, everything is quite simple:- After setting up all the server components, deploy the image.
- Install the grub bootloader.
- We make chroot and configure everything that is necessary.
How to transfer control to the OS installer (using ESXi as an example).- We organize the transfer of control from our script to the hypervisor installer using the auto-response file (kickstart):
- Delete the current partitions on the disk.
- Create a 500MB partition.
- We mark it as boot.
- Format in FAT32.
- We copy the ESXi installation files to the root.
- Install syslinux.
- Copy syslinux.cfg to / syslinux /
default esxi
prompt 1
timeout 50
label esxi
kernel mboot.c32
append -c boot.cfg
- Copy mboot.c32 to / syslinux.
- In boot.cfg there should be kernelopt = ks = ftp: // <IP of the installation server> /ks_esxi.cfg
- Reboot the server.
After the server reboots, the ESXi installer will boot from its hard drive. All the necessary installer files will be loaded into memory and the installation of ESXi will begin, according to the specified auto-answer file.Here are a few lines from the ks_esxi.cfg auto answer file:%firstboot --interpreter=busybox
…
#
SYSSN=$(esxcli hardware platform get | grep Serial | awk -F " " '{print $3}')
# IP
IPADDRT=$(esxcli network ip interface ipv4 get | grep vmk0 | awk -F " " '{print $2}')
LAST_OCTET=$(echo $IPADDRT | awk -F'.' '{print $4}')
# NFS -
esxcli storage nfs add -H is -s /srv/nfs_share -v nfsshare1
# ssh, ssh-
mv /etc/ssh /etc/ssh.tmp
cp -R /vmfs/volumes/nfsshare1/ssh /etc/
chmod go-r /etc/ssh/ssh_host_rsa_key
# ovftool, ,
cp -R /vmfs/volumes/nfsshare1/ovftool /vmfs/volumes/datastore1/
#
/vmfs/volumes/datastore1/ovftool/tools/ovftool --acceptAllEulas --noSSLVerify --datastore=datastore1 --name=VM1 /vmfs/volumes/nfsshare1/VM_T/VM1.ova vi://root:esxi_password@127.0.0.1
/vmfs/volumes/datastore1/ovftool/tools/ovftool --acceptAllEulas --noSSLVerify --datastore=datastore1 --name=VM2 /vmfs/volumes/nfsshare1/VM_T/VM2.ova vi://root:esxi_password@127.0.0.1
#
ssh root@is "mysql -h'192.168.0.1' -D'servers' -u'user' -p'secretpassword' -e \"SELECT ... WHERE servers.serial='$SYSSN'\"" | grep -v ^$ | sed 's/NULL//g' > /tmp/servers
...
#
echo '#!/bin/sh' > /vmfs/volumes/datastore1/netconf.sh
echo "esxcli network ip interface ipv4 set -i=vmk0 -t=static --ipv4=$IPADDR --netmask=$S_SUB || exit 1" >> /vmfs/volumes/datastore1/netconf.sh
echo "esxcli network ip route ipv4 add -g=$S_GW -n=default || exit 1" >> /vmfs/volumes/datastore1/netconf.sh
chmod a+x /vmfs/volumes/datastore1/netconf.sh
# guestinfo.esxihost.id,
echo "guestinfo.esxihost.id = \"$SYSSN\"" >> /vmfs/volumes/datastore1/VM1/VM1.vmx
echo "guestinfo.esxihost.id = \"$SYSSN\"" >> /vmfs/volumes/datastore1/VM2/VM2.vmx
...
#
SYSNAME=$(esxcli hardware platform get | grep Product | sed 's/Product Name://' | sed 's/^\ *//')
UUID=$(vim-cmd hostsvc/hostsummary | grep uuid | sed 's/\ //g;s/,$//' | sed 's/^uuid="//;s/"$//')
ssh root@is "mysql -D'servers' -u'user' -p'secretpassword' -e \"UPDATE servers ... SET ... WHERE servers.serial='$SYSSN'\""
ssh root@is "mysql -D'servers' -u'user' -p'secretpassword' -e \"INSERT INTO events ...\""
# SSH
rm -rf /etc/ssh
mv /etc/ssh.tmp /etc/ssh
#
esxcli system hostname set --fqdn=esx-${G_NICK}.x5.ru
/vmfs/volumes/datastore1/netconf.sh
reboot
At this stage, a hypervisor is installed and configured, virtual machines are copied.How to configure virtual machines now?We cheated a little: during the installation we set the guestinfo.esxihost.id = "$ SYSSN" parameter in the VM1.vmx file, indicated the serial number of the physical server in it.Now, after starting, the virtual machine (with the vmware-tools package installed) can access this parameter:ESXI_SN=$(vmtoolsd --cmd "info-get guestinfo.esxihost.id")
That is, the VM will be able to identify itself (it knows the serial number of the physical host), make a request to the installation server database and get the parameters that need to be configured. This is all executed in a script that should be launched automatically when guestos vm starts (but once: RunOnce).Now we know how:
- load the server via PXE;
- transfer control to our script;
- identify the server to be prepared by serial number;
- configure the server with appropriate utilities;
- transfer settings to the installation server database using the client part;
- Configure various types of POs, including deploying the esxi hypervisor and configuring virtual machines (and all automatically).
Found out how:
- the installed server receives the necessary settings from the database;
- all preparation progress is recorded in the database (logs, events, stage flags).
Bottom line:I believe the uniqueness of this solution lies in its flexibility, simplicity, its capabilities and versatility.Please write in the comments what you think.