In anticipation of the start of the course "React.js developer" prepared a translation of useful material.

How does the front-end of your application scale? How to make your code support six months later?In 2015, Redux stormed the front-end development world and established itself as a standard beyond React.The company I work for has recently finished refactoring a large code base on React, where we implemented redux instead of reflux .We had to take this step because moving forward was not possible without a well-structured application and a clear set of rules.The code base has been around for more than two years and reflux has been in it from the very beginning. We had to change the code, strongly tied to React components, which no one had touched for more than a year.Based on the experience from the work done, I created this repository , which will help explain our approach to organizing code on redux.When you learn more about redux, actions, and reducers , you start with simple examples. Many tutorials available today do not go beyond them. However, if you are creating something more complex on Redux than a task list, you will need a reasonable way to scale your code base over time.Someone once said that in computer science there is no more difficult task than giving different things names. I could not disagree. In this case, folder structuring and file organization will be in second place.Let's look at how we used to approach code organization.Function vs Feature
There are two generally accepted approaches to organizing applications: function-first and feature-first.In the screenshot on the left, the folder structure is organized according to the principle of function-first, and on the right - feature-first.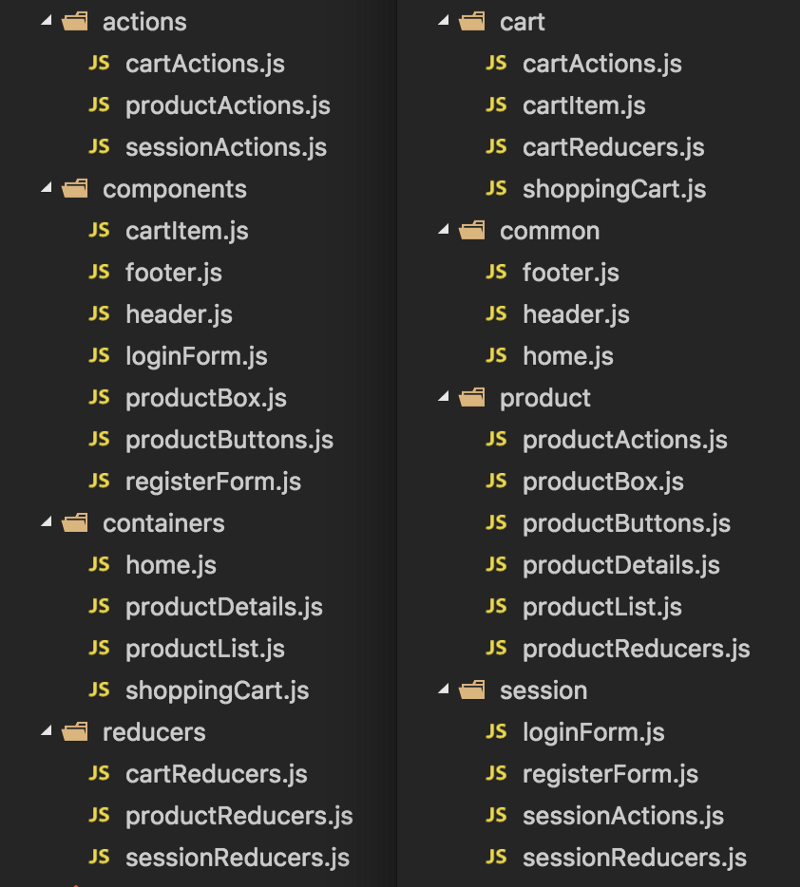 Function-first means that your top-level directories are named according to the files inside. So you have: containers, components, actions, reducers , etc.This does not scale at all. As your application grows and new functionality appears, you will add files to the same folders. As a result, you will need to scroll the contents of one of the folders for a long time to find the desired file.Another problem is combining folders. One of your application threads will probably require access to files from all folders.One of the advantages of this approach is that it can isolate, in our case, React from Redux. Therefore, if you want to change the state management library, you will know which folders you will need. If you need to change the view library, you can leave the folders with redux intact.Feature-first means that top-level directories will be named in accordance with the main functionality of the application: product, cart, session.This approach scales much better, since each new feature lies in a new folder. However, you do not have a separation between the Redux and React components. Changing one of them in the long run is not an easy task.In addition, you will have files that will not belong to any function. As a result, it all comes down to the common or shared folder, because you also want to use your code in different features of your application.
Combining the best of two worlds
Although this is not the topic of the article, I want to say that the state management files from the UI files need to be stored separately.Think about your application in the long run. Imagine what happens to your code if you switch from React to something else. Or think about how your codebase will use ReactNative in parallel with the web version.At the heart of our approach is the principle of isolation React code in a folder called views , and code redux in another folder called redux.This separation at the entry level gives us the flexibility to organize the individual parts of the application in completely different ways.Inside the views folderwe support the organization of function-first files. In the context of React, this looks natural: pages, layouts, components, enhancers , etc.In order not to go crazy about the number of files in a folder, you can use the feature-first approach inside these folders.Meanwhile, in the redux folder ...Introducing re-ducks
Each application function must correspond to separate actions and reducers, so that it makes sense to apply the feature-first approach.The original modular approach ducks makes it easy to work with redux and offers a structured way to add new functionality to your application.However, you wanted to understand what happens when you scale the application. We realized that the way to organize one file per feature clutters the application and makes its support problematic.So re-ducks appeared . The solution was to split the functionality into duck folders.duck/
├── actions.js
├── index.js
├── operations.js
├── reducers.js
├── selectors.js
├── tests.js
├── types.js
├── utils.js
The duck folder should:- Contain all the logic of processing only ONE concept of your application, for example: product, cart, session, etc.
- Contain the index.js file, which is exported according to duck rules.
- Store code in a single file that does similar work, such as reducers, selectors, and actions.
- Contain tests related to duck.
For example, in this example, we did not use abstractions built on top of redux. When creating software, it is important to start with the least amount of abstraction. Thus, you will see that the value of your abstractions does not exceed the benefits of them.If you want to make sure abstraction is bad, watch this Cheng Lou video .Let's look at the contents of each file.Types
The types file contains the names of actions that you execute in your application. As a good practice, you should try to cover the namespace corresponding to the function to which they belong. This approach will help when debugging complex applications.const QUACK = "app/duck/QUACK";
const SWIM = "app/duck/SWIM";
export default {
QUACK,
SWIM
};
Actions
This file contains all the functions of the action creator .import types from "./types";
const quack = ( ) => ( {
type: types.QUACK
} );
const swim = ( distance ) => ( {
type: types.SWIM,
payload: {
distance
}
} );
export default {
swim,
quack
};
Note that all actions are represented by functions, even if they are not parameterized. A consistent approach is the highest priority for a large code base.Operations
To represent the chain of operations ( the Operations ), you will need the redux middleware , to improve the function of the dispatch . Popular examples are redux-thunk , redux-saga, or redux-observable .In our case, redux-thunk is used . We need to separate thunks from action creators, even at the cost of writing extra code. Therefore, we will define the operation as a wrapper over actions .If the operation sends only one action , that is, it does not actually use redux-thunk , we send the action creator function. If the operation uses thunk , it can send a lot of actions and link them using promises .import actions from "./actions";
const simpleQuack = actions.quack;
const complexQuack = ( distance ) => ( dispatch ) => {
dispatch( actions.quack( ) ).then( ( ) => {
dispatch( actions.swim( distance ) );
dispatch( );
} );
}
export default {
simpleQuack,
complexQuack
};
Call them operations, thunks , sagas, epics, as you want. Just identify the principles of naming and stick to them.At the very end, we'll talk about index and see that operations are part of the duck public interface. Actions are encapsulated, operations become accessible from the outside.Reducers
If you have a more multifaceted function, you should definitely use several reducers to handle complex state structures. In addition, do not be afraid to use as many combineReducers as you need. This will allow working with state object structures more freely.import { combineReducers } from "redux";
import types from "./types";
const quackReducer = ( state = false, action ) => {
switch( action.type ) {
case types.QUACK: return true;
default: return state;
}
}
const distanceReducer = ( state = 0, action ) => {
switch( action.type ) {
case types.SWIM: return state + action.payload.distance;
default: return state;
}
}
const reducer = combineReducers( {
quacking: quackReducer,
distance: distanceReducer
} );
export default reducer;
In a large application, the state tree will consist of at least three levels. The reducer functions should be as small as possible and handle only simple data constructs. The combineReducers function is all you need to create a flexible and maintainable state structure.Check out the full-fledged project example and see how to use combineReducers properly , especially in files reducers.jsand store.jswhere we are building the state tree.Selectors
Along with the operations selector ( selector ) are part of the public interface duck. The difference between operations and selectors is similar to the CQRS pattern .Selector functions take a slice of the application state and return some data based on it. They never make changes to the state of the application.function checkIfDuckIsInRange( duck ) {
return duck.distance > 1000;
}
export default {
checkIfDuckIsInRange
};
Index
This file indicates what will be exported from the duck folder.Is he:- Exports the reducer function from duck by default.
- Exports selectors and operations as registered exports.
- Exports types if required in other ducks.
import reducer from "./reducers";

export { default as duckSelectors } from "./selectors";
export { default as duckOperations } from "./operations";
export { default as duckTypes } from "./types";

export default reducer;
Tests
The advantage of using Redux with the ducks framework is that you can write tests right after the code you want to test.Testing your code on Redux is pretty straight forward:import expect from "expect.js";
import reducer from "./reducers";
import actions from "./actions";
describe( "duck reducer", function( ) {
describe( "quack", function( ) {
const quack = actions.quack( );
const initialState = false;
const result = reducer( initialState, quack );
it( "should quack", function( ) {
expect( result ).to.be( true ) ;
} );
} );
} );
Inside this file you can write tests for reducers , operations, selectors, etc.I could write a whole separate article about the benefits of code testing, but they are already enough, so just test your code!That's all
The good news about re-ducks is that you can use the same template for all your redux code.The feature- based partitioning approach for your redux code helps your application stay flexible and scalable as it grows. A function- based separation approach will work well when building small components that are common to different parts of the application.You can take a look at the full react-redux-example code base here . Keep in mind that the repository is actively working.How do you organize your redux applications? I look forward to feedback on the described approach.See you on the course .