Every time I receive a bill for electricity and water, I wonder - is my family really consuming so much? Well, yes, the bathroom has a heated floor and a boiler, but they don’t constantly stoke. We also seem to save water (although we also love splashing in the bathroom). A few years ago, I already connected water and electricity meters to a smart home, but this was stuck on this. Hands got to the analysis of consumption only now, about which, in fact, this article is about.I recently switched to Home Assistant as a smart home system. One of the reasons was just the opportunity to organize the collection of a large amount of data with the possibility of conveniently constructing various kinds of graphs.The information described in this article is not new, all of these things with different sauces have already been described on the Internet. But each article, as a rule, describes only one approach or aspect. I had to compare all these approaches and choose the most suitable one myself. The article still does not provide comprehensive information on data collection, but it is a kind of synopsis of how I did. So constructive criticism and suggestions for improvement are welcome.Formulation of the problem
So, the goal of today's exercise is to get beautiful graphs of water and electricity consumption:- Hourly for 2 days
- Daily for 2 weeks
- (optional) weekly and monthly
This is where some difficulties await us:- , , . .
, , . home assistant, , mini-graph-card, :
- , home assistant SQLite
( , , MySQL Postgres), . , , json
{"entity_id": "sensor.water_cold_hourly", "old_state": {"entity_id": "sensor.water_cold_hourly", "state": "3", "attributes": {"source": "sensor.water_meter_cold", "status": "collecting", "last_period": "29", "last_reset": "2020-02-23T21:00:00.022246+02:00", "meter_period": "hourly", "unit_of_measurement": "l", "friendly_name": "water_cold_hourly", "icon": "mdi:counter"}, "last_changed": "2020-02-23T19:05:06.897604+00:00", "last_updated": "2020-02-23T19:05:06.897604+00:00", "context": {"id": "aafc8ca305ba4e49ad4c97f0eddd8893", "parent_id": null, "user_id": null}}, "new_state": {"entity_id": "sensor.water_cold_hourly", "state": "4", "attributes": {"source": "sensor.water_meter_cold", "status": "collecting", "last_period": "29", "last_reset": "2020-02-23T21:00:00.022246+02:00", "meter_period": "hourly", "unit_of_measurement": "l", "friendly_name": "water_cold_hourly", "icon": "mdi:counter"}, "last_changed": "2020-02-23T19:11:11.251545+00:00", "last_updated": "2020-02-23T19:11:11.251545+00:00", "context": {"id": "0de64b8af6f14bb9a419dcf3b200ef56", "parent_id": null, "user_id": null}}}
( , ), . SDM220 10-15 , 8. , . .. 100-200 . , ( home assistant raspberry PI), . - , .
( ), X - . . , . , , home assistant, , ( home assistant).
1
First, let's see what the home assistant is provided out of the box. Measuring consumption over a period is a highly demanded functionality. Of course, it was realized a long time ago in the form of a specialized component - utility_meter.The essence of the component is that inside it starts the variable current_accumulated_value, and resets it after a specified period (hour / week / month). The component itself monitors the incoming variable (the value of some kind of sensor), subscribes to changes in the value itself - you just get the finished result. This thing is described in just a few lines in the configuration file.utility_meter:
water_cold_hour_um:
source: sensor.water_meter_cold
cycle: hourly
water_cold_day_um:
source: sensor.water_meter_cold
cycle: daily
Here sensor.water_meter_cold is the current value of the counter in liters, which I get directly from the piece of iron by mqtt. The design creates 2 new sensors water_cold_hour_um and water_cold_day_um, which accumulate hourly and daily readings, resetting them after a period. Here's a half-hour battery chart.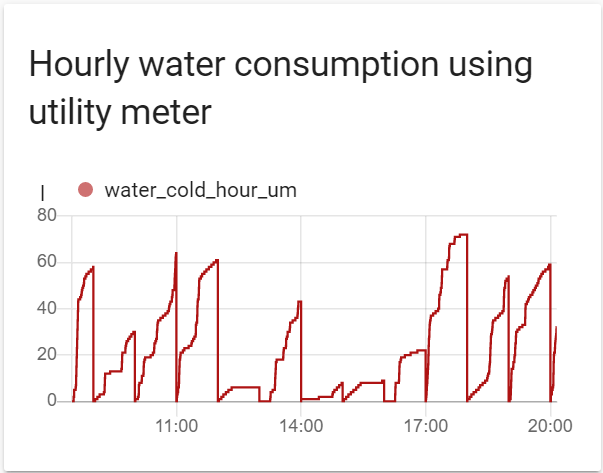 The hourly and daily chart code for lovelace-UI looks like this:
 - type: history-graph
title: 'Hourly water consumption using vars'
hours_to_show: 48
entities:
- sensor.water_hour
- type: history-graph
title: 'Daily water consumption using vars'
hours_to_show: 360
entities:
- sensor.water_day
Actually, the problem of this approach lies in this algorithm. As I mentioned, for each input value (the current meter reading for each next liter), 1kb of record is generated in the database. Each utility meter also generates a new value, which also adds up to the database. If I want to collect hourly / daily / weekly / monthly readings, and for several water risers, and even add a bunch of electric meters - this will be a lot of data. Well, more precisely, there is not much data, but since the home assistant writes to the database a bunch of unnecessary information, the size of the database will grow by leaps and bounds. I'm afraid even to estimate the size of the base for weekly and monthly charts.In addition, the utility meter alone does not solve the task. The graph of values that the utility meter gives is a monotonically increasing function that resets to 0 every hour. We need a user-friendly consumption chart, how many liters were eaten during the period. The standard history-graph component does not know how to do this, but the external mini-graph-card component can help us.This is the card code for lovelace-UI: - aggregate_func: max
entities:
- color: var(--primary-color)
entity: sensor.water_cold_hour_um
group_by: hour
hours_to_show: 48
name: "Hourly water consumption aggregated by utility meter"
points_per_hour: 1
show:
graph: bar
type: 'custom:mini-graph-card'
In addition to standard settings like the name of the sensor, type of graph, color (I did not like the standard orange), it is important to note 3 settings:- group_by: hour - the chart will be generated with the columns aligned at the beginning of the hour
- points_per_hour: 1 - one bar for every hour
- , aggregate_func: max — .
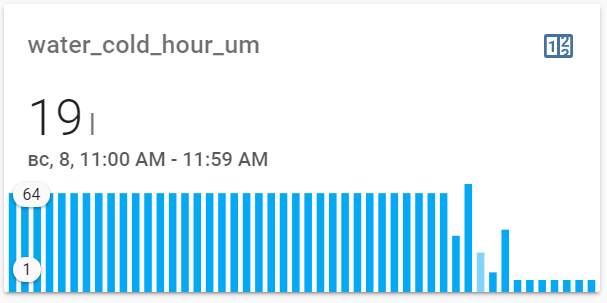 Do not pay attention to a number of columns on the left - this is the standard behavior of a component if there is no data. And there was no data - I only turned on utility meter data collection just a couple of hours ago just for the sake of this article (I will tell you my current approach a bit later).In this picture, I wanted to show that sometimes the data display even works, and the bars really reflect the correct values. But that's not all. The selected column for the interval from 11 to 12 in the morning for some reason displays 19 liters, although on the toothy chart a little higher for the same period we see consumption of 62 liters from the same sensor. Either a bug or hands are crooked. But I don’t understand why the data on the right broke off - the consumption there was normal, which is also visible on the toothy schedule.In general, I did not manage to achieve the credibility of this approach - the graph almost always shows some kind of heresy.The same code for the day sensor.
 - aggregate_func: max
entities:
- color: var(--primary-color)
entity: sensor.water_cold_day_um
group_by: interval
hours_to_show: 360
name: "Daily water consumption aggregated by utility meter"
points_per_hour: 0.0416666666
show:
graph: bar
type: 'custom:mini-graph-card'
Note that the group_by parameter is set to interval, and the points_per_hour parameter rules everything. And this is another problem of this component - points_per_hour works well on graphs in an hour or less, but disgusting at large intervals. So to get one column in one day, I had to enter the value 1/24 = 0.04166666. I'm not talking about weekly and monthly charts.Approach 2
Just figuring out the home assistant, I came across this video here:A friend collects consumption data from several types of Xiaomi outlets. His task is a little easier - just display the value of consumption for today, yesterday and for the month. No schedules are required.Let us leave aside the discussion about the manual integration of instantaneous power values - I already wrote about the “accuracy” of this approach. It is not clear why he did not use the accumulated consumption values, which are already collected by the same outlet. In my opinion, integration inside the piece of iron will work better.From the video we take the idea of manually calculating the consumption for the period. The peasant only counts the values for today and yesterday, but we will go further and try to draw a graph. The essence of the proposed method in my case is as follows.All this can be done through w ... means of the home assistant himself.You will have to write some more code than in the previous approach. To get started, let's get these very “variables." Out of the box, we don’t have the “variable” entity, but you can use the services of the mqtt broker. We will send values with the retain = true flag there - this will save the value inside the broker, and you can pull it out at any time, even when the home assistant reboots. I made hour and day counters right away.- platform: mqtt
state_topic: "test/water/hour"
name: water_hour
unit_of_measurement: l
- platform: mqtt
state_topic: "test/water/hour_begin"
name: water_hour_begin
unit_of_measurement: l
- platform: mqtt
state_topic: "test/water/day"
name: water_day
unit_of_measurement: l
- platform: mqtt
state_topic: "test/water/day_begin"
name: water_day_begin
unit_of_measurement: l
All magic happens in automation, which runs every hour and every night, respectively.- id: water_new_hour
alias: water_new_hour
initial_state: true
trigger:
- platform: time_pattern
minutes: 0
action:
- service: mqtt.publish
data:
topic: "test/water/hour"
payload_template: >
{{ (states.sensor.water_meter_cold.state|int) - (states.sensor.water_hour_begin.state|int) }}
retain: true
- service: mqtt.publish
data:
topic: "test/water/hour_begin"
payload_template: >
{{ states.sensor.water_meter_cold.state }}
retain: true
- id: water_new_day
alias: water_new_day
initial_state: true
trigger:
- platform: time
at: "00:00:00"
action:
- service: mqtt.publish
data:
topic: "test/water/day"
payload_template: >
{{ (states.sensor.water_meter_cold.state|int) - (states.sensor.water_day_begin.state|int) }}
retain: true
- service: mqtt.publish
data:
topic: "test/water/day_begin"
payload_template: >
{{ states.sensor.water_meter_cold.state }}
retain: true
Both automation perform 2 actions:- The value for the interval is calculated as the difference between the start and end value
- Update base value for next interval
The graphing in this case is solved by the usual history-graph: - type: history-graph
title: 'Hourly water consumption using vars'
hours_to_show: 48
entities:
- sensor.water_hour
- type: history-graph
title: 'Daily water consumption using vars'
hours_to_show: 360
entities:
- sensor.water_day
It looks like this: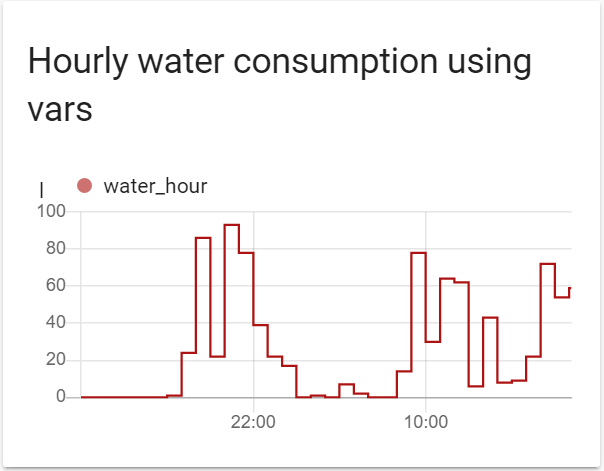 In principle, this is already what you need. The advantage of this method is that the data is generated once per interval. Those. only 24 entries per day for the hourly chart.Unfortunately, this still does not solve the general problem of a growing base. If I want a monthly consumption schedule, I will have to store data for at least a year. And since the home assistant provides only one setting for the duration of storage for the entire database, this means that ALL data in the system will have to be stored for a whole year. For example, for a year I consume 200 cubic meters of water, which means that it is 200,000 records in the database. And if you take into account other sensors, the figure becomes indecent at all.
Approach 3
Fortunately, smart people have already solved this problem by writing the InfluxDB database. This database is specially optimized for storing time-based data and is ideal for storing values of different sensors. The system also provides an SQL-like query language that allows you to pick out values from the database, and then aggregate them in various ways. Finally, different data can be stored at different times. For example, frequently changing readings such as temperature or humidity can be stored for only a couple of weeks, while daily readings of water consumption can be stored for a whole year.In addition to InfluxDB, smart people also invented Grafana, a charting system based on data from InfluxDB. Grafana can draw different types of graphs, customize them in detail, and, most importantly, these graphs can be “stuck” on the lovelace-UI home assistant.Get inspired here and here . The articles describe in detail the process of installing and connecting InfluxDB and Grafana to the home assistant. I will focus on solving my specific problem.So, first of all, let's start adding up the counter value in influxDB. A piece of the home assistant configuration (in this example, I will have fun not only with cold, but also with hot water):influxdb:
host: localhost
max_retries: 3
default_measurement: state
database: homeassistant
include:
entities:
- sensor.water_meter_hot
- sensor.water_meter_cold
Turn off the saving of the same data to the internal database of the home assistant so as not to inflate it once again:recorder:
purge_keep_days: 10
purge_interval: 1
exclude:
entities:
- sensor.water_meter_hot
- sensor.water_meter_cold
We now go to the InfluxDB console and set up our database. In particular, you need to configure how long this or that data will be stored. This is regulated by the so-called retention policy - this is similar to the databases inside the main database, with each internal database having its own settings. By default, all data is stored in a retention policy called autogen, this data will be stored for a week. I would like the hourly data to be stored for a month, the weekly for a year, and the monthly should never be deleted at all. Create appropriate retention policyCREATE RETENTION POLICY "month" ON "homeassistant" DURATION 30d REPLICATION 1
CREATE RETENTION POLICY "year" ON "homeassistant" DURATION 52w REPLICATION 1
CREATE RETENTION POLICY "infinite" ON "homeassistant" DURATION INF REPLICATION 1
Now, in fact, the main trick is data aggregation using continuous query. This is a mechanism that automatically starts a query at specified intervals, aggregates data for this query, and adds the result to a new value. Let's look at an example (I write in a column for readability, but in fact I had to enter this command in one line)CREATE CONTINUOUS QUERY cq_water_hourly ON homeassistant
BEGIN
SELECT max(value) AS value
INTO homeassistant.month.water_meter_hour
FROM homeassistant.autogen.l
GROUP BY time(1h), entity_id fill(previous)
END
This command:- Creates a continuous query named cq_water_cold_hourly in the homeassistant database
- The request will be executed every hour (time (1h))
- The request will retrieve all the data from the measurement'a homeassistant.autogen.l (liters), including the readings of cold and hot water
- Aggregated data will be grouped by entity_id, which will create separate values for cold and hot water.
- , max(value)
- homeassistant.month.water_meter_hour, month retention policy . entity_id value
At night or when nobody is at home there is no water consumption, and accordingly there are no new entries in homeassistant.autogen.l either. To avoid missing values in regular queries, you can use fill (previous). This will force InfluxDB to use the past hour value.Unfortunately, continuous query has a peculiarity: the fill (previous) trick does not work and records are simply not created. Moreover, this is some insurmountable problem that has been discussed for more than a year . We will deal with this problem later, and let fill (previous) in continuous query be - it does not interfere.Let's check what happened (of course, you need to wait a couple of hours):> select * from homeassistant.month.water_meter_hour group by entity_id
...
name: water_meter_hour
tags: entity_id=water_meter_cold
time value
---- -----
...
2020-03-08T01:00:00Z 370511
2020-03-08T02:00:00Z 370513
2020-03-08T05:00:00Z 370527
2020-03-08T06:00:00Z 370605
2020-03-08T07:00:00Z 370635
2020-03-08T08:00:00Z 370699
2020-03-08T09:00:00Z 370761
2020-03-08T10:00:00Z 370767
2020-03-08T11:00:00Z 370810
2020-03-08T12:00:00Z 370818
2020-03-08T13:00:00Z 370827
2020-03-08T14:00:00Z 370849
2020-03-08T15:00:00Z 370921
Please note that the values in the database are stored in UTC, therefore in this list they differ by 3 hours - the values for 7 am in the InfluxDB output correspond to the values for 10 am in the graphs above. Also note that between 2 and 5 in the morning there are simply no records - this is the same feature of continuous query.As you can see, the aggregated value is also a monotonously increasing sequence, only records are less frequent - once per hour. But this is not a problem - we can write another query that will produce the correct data for the chart.SELECT difference(max(value))
FROM homeassistant.month.water_meter_hour
WHERE entity_id='water_meter_cold' and time >= now() -24h
GROUP BY time(1h), entity_id
fill(previous)
I will decrypt:- From the homeassistant.month.water_meter_hour database, we extract the data for entity_id = 'water_meter_cold' for the last day (time> = now () -24h).
- As I mentioned in the sequence homeassistant.month.water_meter_hour some entries may be missing. We will regenerate this data by running a query with GROUP BY time (1h). This time fill (previous) will work as needed, generating the missing data (the function will take the previous value)
- The most important thing in this request is the difference function, which will calculate the difference between hourly marks. By itself, it does not work and requires an aggregate function. Let it be the max () used before.
The result of the execution looks like thisname: water_meter_hour
tags: entity_id=water_meter_cold
time difference
---- ----------
...
2020-03-08T02:00:00Z 2
2020-03-08T03:00:00Z 0
2020-03-08T04:00:00Z 0
2020-03-08T05:00:00Z 14
2020-03-08T06:00:00Z 78
2020-03-08T07:00:00Z 30
2020-03-08T08:00:00Z 64
2020-03-08T09:00:00Z 62
2020-03-08T10:00:00Z 6
2020-03-08T11:00:00Z 43
2020-03-08T12:00:00Z 8
2020-03-08T13:00:00Z 9
2020-03-08T14:00:00Z 22
2020-03-08T15:00:00Z 72
From 2 to 5 in the morning (UTC) there was no consumption. Nevertheless, the query will return the same consumption value due to fill (previous), and the difference function will subtract this value from itself and we will get 0 at the output, which is actually required.The only thing left is to build a schedule. To do this, open Grafana, open some existing (or create a new) dashboard, create a new panel. Chart settings will be like this. I will display data on cold and hot water on one chart. The request is exactly the same as I described above.Display parameters are set as follows. I will have a graph with lines, which goes by stairs. I’ll explain the Stack parameter just below. There are a couple more display options below, but they are not so interesting.
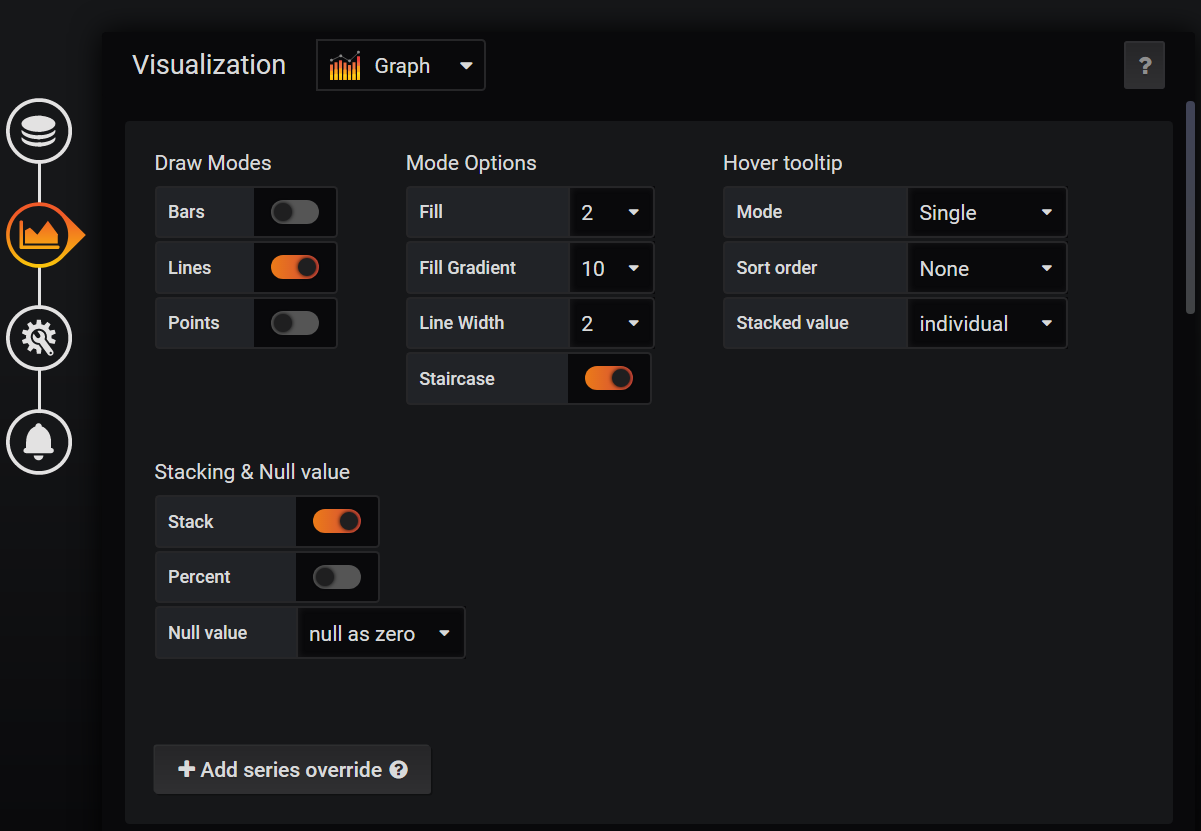 To add the received schedule to the home assistant you need:
- . -
- , share
- embed
- current time range — URL
- . light
- URL lovelace-UI
      - type: iframe
        id: graf_water_hourly
        url: "http://192.168.10.200:3000/d-solo/rZARemQWk/water?orgId=1&panelId=2&from=now-2d&to=now&theme=light"
Please note that the time range (last 2 days) is set here, and not in the dashboard settings.The graph looks like this. I have not used hot water in the last 2 days, so only a graph of cold water is drawn. I didn’t decide for myself which schedule I like best, a step line, or real bars. Therefore, I will simply give an example of a daily consumption chart, only this time in columns. Requests are built in the same way as described above. Display parameters are as follows:
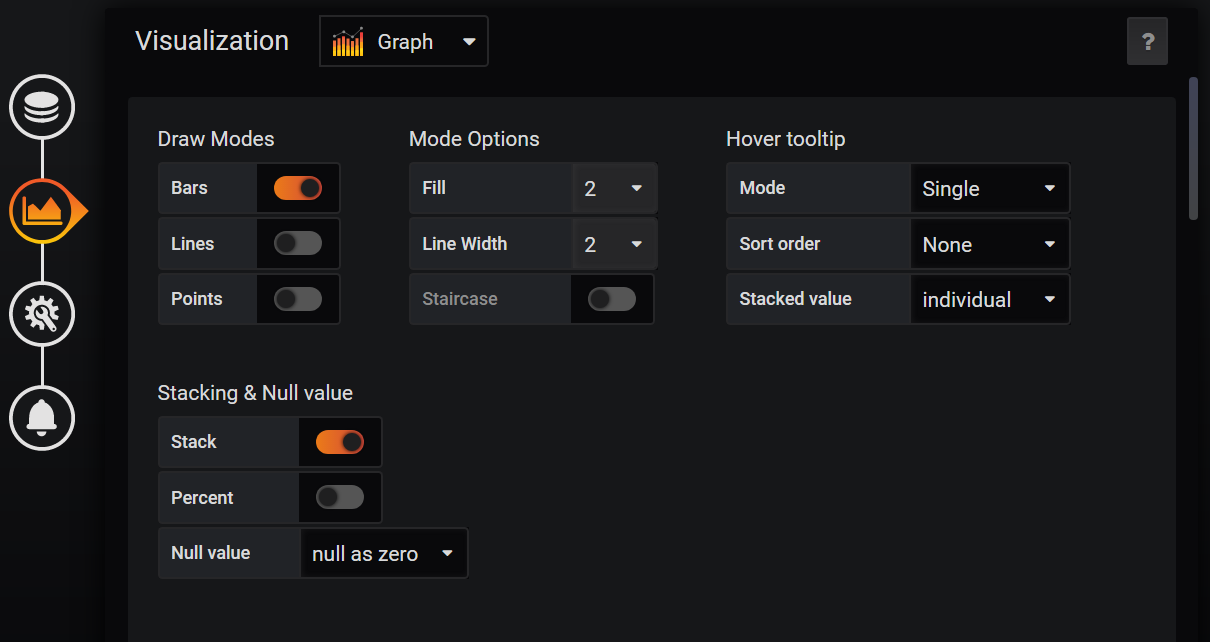 This graph looks like this:
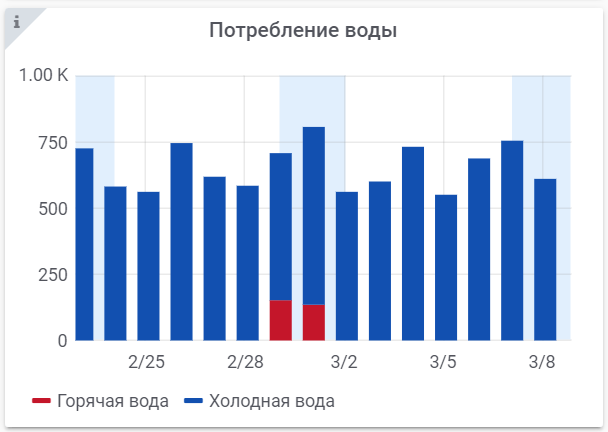 So about the Stack parameter. In this graph, a column of cold water is drawn on top of a column of hot water. The total height corresponds to the total consumption of cold and hot water for the period.All graphs shown are dynamic. You can mouse over a point of interest and see the details and value at a specific point.Unfortunately, a couple of spoons of tar could not do. On the bar graph (in contrast to the graph with step lines), the middle of the bar is not in the middle of the day, but at 00:00. Those. the left half of the column is drawn in place of the previous day. So the charts for Saturday and Sunday are drawn a little to the left than the bluish zone. Until I figured out how to win it.Another problem is the inability to work correctly at monthly intervals. The fact is that the length of the hour / day / week is fixed, but the length of the month is different each time. InfluxDB can only work at regular intervals. So far, my brain was enough to set a fixed interval of 30 days. Yes, the graph will float a little during the year and the columns will not exactly correspond to the months. But since this thing is interesting to me simply as a display device, then I'm ok with that.I see at least two solutions:
- Score on monthly schedules and limit to weekly. 52 weekly bars for the year look pretty good
- №2, . . — .
I don’t know why, but I am plodding on such kind of charts. They show that life is in full swing and everything is changing. Yesterday was a lot, today is not enough, tomorrow will be something else. It remains to work with households on the topic of consumption. But even with current appetites, just a big and incomprehensible figure in the payment is already turning into a fairly clear picture of consumption.Despite the almost 20-year career as a programmer, I practically did not intersect with databases. Therefore, the installation of an external database seemed something so abstruse and incomprehensible. Everything was changed by the aforementioned article - it turned out that screwing up a suitable tool is done in a couple of clicks, and with a specialized tool the task of graphing becomes a little easier.In the headline, I mentioned electricity consumption. Unfortunately, at the moment I can not give a single chart. One SDM120 counter is dead, and the other is buggy when accessing via Modbus. However, this does not affect the topic of this article - the graphics will be built in the same way as for water.In this article, I cited the approaches that I tried myself. Surely there are some other ways of organizing the collection and visualization of data that I do not know about. Tell me about it in the comments, it will be very interesting to me. I will be glad to constructive criticism and new ideas. I hope the material presented will also help someone.